2010 HONDA FIT clock
[x] Cancel search: clockPage 2 of 351

Bulb ReplacementBack-up Lights ........................266
Brake Lights ........................... 266
Fog Lights ............................... 265
Front Parking Lights ...............263
Front Side Marker Lights ........263
Front Turn Signal Lights .........264
Headlights .............................. 262
Rear Bulbs .............................. 266
Specifications .......................... 319
Taillights ................................. 266
Turn Signal Lights ..........263, 266
Bulbs, Halogen .......................... 262
C
Capacities Chart .........................319
Carbon Monoxide Hazard ............53
Cargo ......................................... 208
Cargo Hook ................................ 212
Cargo, How to Carry ..................208
Carrying Cargo .......................... 208
CAUTION, Explanation of ............iii
CD Care ..................................... 186
CD Error Messages ............128, 157 CD Player
........................... 122, 149
Ceiling Light .............................. 107
Certification Label ......................316
Chains, Tires .............................. 278
Changing a Flat Tire ..................285
Changing Oil How to .................................... 254
When to .................................. 245
Charging System Indicator ........................... 60, 303
Check Fuel Cap Indicator .............70
Checklist, Before Driving ...........215
Childproof Door Locks .................82
Child Safety .................................. 34
Booster Seats ........................... 50
Child Seats .................... 39, 40, 41
Important Safety Reminders .....38
Infants ...................................... 39
Larger Children .......................49
LATCH ..................................... 43
Risks with Airbags ...................35
Small Children ......................... 40
Tethers .................................... 47
Warning Labels ........................36
Where Should a Child Sit? ........35Child Seats
............................. 34, 41
LATCH Anchorage Points ........43
Tether Anchorage Points .........47
Cleaning the Seat Belts ..............267
Clock .......................................... 192
Clutch Fluid ............................... 261
Code, Audio System ...................191
CO in the Exhaust ................53, 326
Cold Weather, Starting in ...........216
Compact Spare Tire ....................284
Controls, Instruments and ............57
Coolant
Adding .................................... 256
Checking ................................ 202
Proper Solution .......................256
Temperature Indicator .............63
Crankcase Emissions Control System ................................... 326
Cruise Control Indicator ...............65
Cruise Control Operation ...........194
Cruise Main Indicator ..................65
Cup Holders ............................... 106
Customer Service .......................332
Index
II
Page 9 of 351

Service Intervals.........................245
Service Manual (U.S. only) ........335
Service Station Procedures ........199
Setting the Clock ........................192
Shifting the Automatic Transmission .......................... 219
Shift Lever Position Indicators ...219
Shift Lock Release ......................223
Side Airbags ................................. 28
How the Side Airbag Off
Indicator Works ...................31
How Your Side Airbags Work ..28
Side Curtain Airbags ....................30
How Your Side Curtain Airbags Work .................................... 30
Side Marker Lights, Bulb Replacement in .......................263
Signaling Turns ............................ 63
Snow Tires ................................. 278
Spare Tire .................................. 284
Inflating ........................... 273, 284
Specifications .......................... 320
Spark Plugs ................................ 318
Specifications ............................. 318
Speed Control ............................ 194
Speed Limiter ......................218, 222Speedometer
................................ 68
SRS, Additional Information .........22
Additional Safety Precautions ...33
Airbag Service .......................... 32
Airbag System Components .....22
How the Side Airbag Off Indicator Works ...................31
How the SRS Indicator Works ..30
How Your Front Airbags Work .................................... 25
How Your Side Airbags Work ..28
How Your Side Curtain Airbags
Work .................................... 30
SRS Indicator ......................... 30, 61
START (Ignition Key Position) .....80
Starting the Engine ....................216
In Cold Weather at High Altitude ................................ 216
With a Dead Battery ................299
State Emissions Testing .............329
Steam Coming from Engine .......301
Steering Wheel
Adjustments ............................. 77
Anti-theft Column Lock ............80
Buttons ........................... 189, 194
Storing Your Vehicle ..................281Sun Visor
................................... 106
Supplemental Restraint
System .............................. 9, 22
Servicing .................................. 32
SRS Indicator ...................... 30, 61
System Components ................22
Synthetic Oil .............................. 254
T
Tachometer .................................. 68
Tailgate ........................................ 88
Open Indicator ......................... 62
Opening the ............................. 88
Taillights, Changing Bulbs in .....266
Taking Care of the
Unexpected ............................ 283
CONTINUED
Index
IX
INDEX
Page 89 of 351

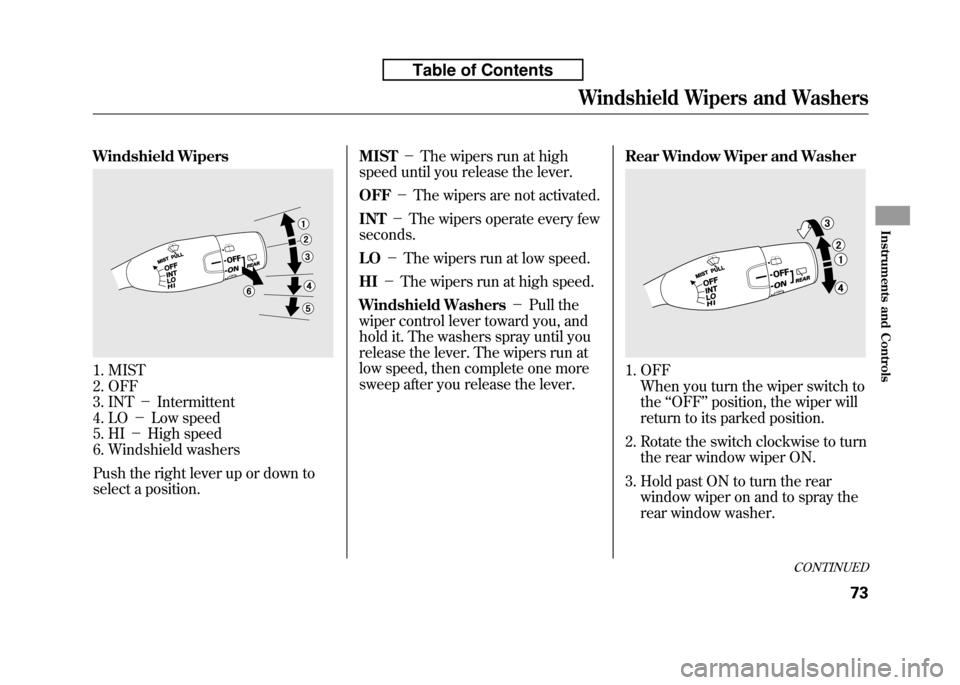
Windshield Wipers
1. MIST
2. OFF
3. INT-Intermittent
4. LO -Low speed
5. HI -High speed
6. Windshield washers
Push the right lever up or down to
select a position. MIST
-The wipers run at high
speed until you release the lever. OFF -The wipers are not activated.
INT -The wipers operate every few
seconds. LO -The wipers run at low speed.
HI -The wipers run at high speed.
Windshield Washers -Pull the
wiper control lever toward you, and
hold it. The washers spray until you
release the lever. The wipers run at
low speed, then complete one more
sweep after you release the lever. Rear Window Wiper and Washer1. OFF
When you turn the wiper switch to the ‘‘OFF ’’position, the wiper will
return to its parked position.
2. Rotate the switch clockwise to turn the rear window wiper ON.
3. Hold past ON to turn the rear window wiper on and to spray the
rear window washer.
CONTINUED
Windshield Wipers and Washers
73
Instruments and Controls
Table of Contents
Page 124 of 351

The heating and air conditioning
system in your vehicle provides a
comfortable driving environment in
all weather conditions.
The standard audio system has many
features. This section describes
those features and how to use them.
Your vehicle has an anti-theft audio
system that requires a code number
to enable it.
The security system helps to
discourage vandalism and theft of
your vehicle.Vents, Heating, and A/C.............
110
Playing the FM/AM Radio (Models without navigationsystem) ...............................
115
Playing a Disc (Models without navigation system) ..................
122
Disc Player Error Messages (Models without navigationsystem) ...............................
128
Playing an iPod
®(Models without
navigation system) ..................
129
iPod
®Error Messages (Models
without navigation system) .....
135
Playing a USB Flash Memory Device (Models without
navigation system) ..............
136
USB Flash Memory Device Error
Messages (Models withoutnavigation system) ..............
142
Playing the AM/FM Radio
(Models with navigation
system) ...............................
143
Playing a Disc (Models with
navigation system) ..................
149Disc Player Error Messages
(Models with navigation
system) ...............................
157
Playing a PC card (Models with
navigation system) ..................
158
Playing an iPod
®(Models with
navigation system) ..................
170
iPod
®Error Messages (Models
with navigation system) ..........
176
Playing a USB Flash Memory
Device (Models withnavigation system) ..............
177
USB Flash Memory Device Error Messages (Models withnavigation system) ..............
183
FM/AM Radio Reception ............
184
Protecting Your Discs .................
186
Remote Audio Controls ...............
189
Auxiliary Input Jack ....................
190
Radio Theft Protection ................
191
Setting the Clock .........................
192
Security System ..........................
193
Cruise Control ............................
194
Features
109
Features
Page 126 of 351

Airflow Controls
Fan Control Dial
Turn this dial to increase or decrease
the fan speed and airflow.
Temperature Control Dial
Turning this dial clockwise increases
the temperature of the airflow.
Air Conditioning (A/C) Button
If equipped
This button turns the air
conditioning on and off. The
indicator in the button is on when the
A/C is on.
Fresh Air/Recirculation Lever
This lever controls the source of the
air going into the system. When you
slide the lever to the
side, air is
brought in from outside the vehicle
(fresh air mode). When you selectthe
side, air from the vehicle's
interior is sent through the system
again (recirculation mode). The outside air intakes for the
heating and cooling system are at the
base of the windshield. Keep this
area clear of leaves and other debris.
The system should be left in fresh air
mode under almost all conditions.
Keeping the system in recirculation
mode, particularly with the A/C off,
can cause the windows to fog up.
Switch to recirculation mode when
driving through dusty or smoky
conditions, then return to fresh airmode.
Rear Window Defogger Button
/
This button turns the rear window
defogger on and off (see page 76).
On some models, this button also
operates the heated outside mirrors
(see page 102).
Mode Control Dial
Use the mode control dial to select
the vents the air flows from. Some air
will flow from the dashboard corner
vents in all modes.
Air flows from the center and
corner vents in the dashboard.
Airflow is divided between the
vents in the dashboard and the floor vents.
Air flows from the floor vents.
Airflow is divided between the
floor vents and defroster vents at the
base of the windshield.
Air flows from the defroster
vents at the base of the windshield.
CONTINUED
Vents, Heating, and A/C
111
Features
Table of Contents
Page 207 of 351

On vehicles without navigation system
Press and hold the FM/AM
(CLOCK) button until the displayed
time begins to blink, then release the
button. Change the hours by
pressing the 1 (H) button until the
numbers advance to the desired
time. Change the minutes by
pressing the 2 (M) button until the
numbers advance to the desiredtime.
Press the FM/AM (CLOCK) button
again to enter the set time.
You can quickly set the time to the
nearest hour. If the displayed time is
before the half hour, press the FM/
AM (CLOCK) button until you hear a
beep, then press the 3 (R) button to
set the clock back to the previous
hour. If the displayed time is after the
half hour, the clock sets forward to
the beginning of the next hour.
For example:
1:06 will reset to 1:00
1:53 will reset to 2:00On vehicles with navigation system
The navigation system receives
signals from the global positioning
system (GPS), and the displayed
time is updated automatically by the
GPS. Refer to the navigation system
manual for how to adjust the time.
1 (H) BUTTON
FM/AM (CLOCK) BUTTON 3 (R) BUTTON
CLOCK
2 (M) BUTTON
Setting the Clock
192
Table of Contents
Page 272 of 351

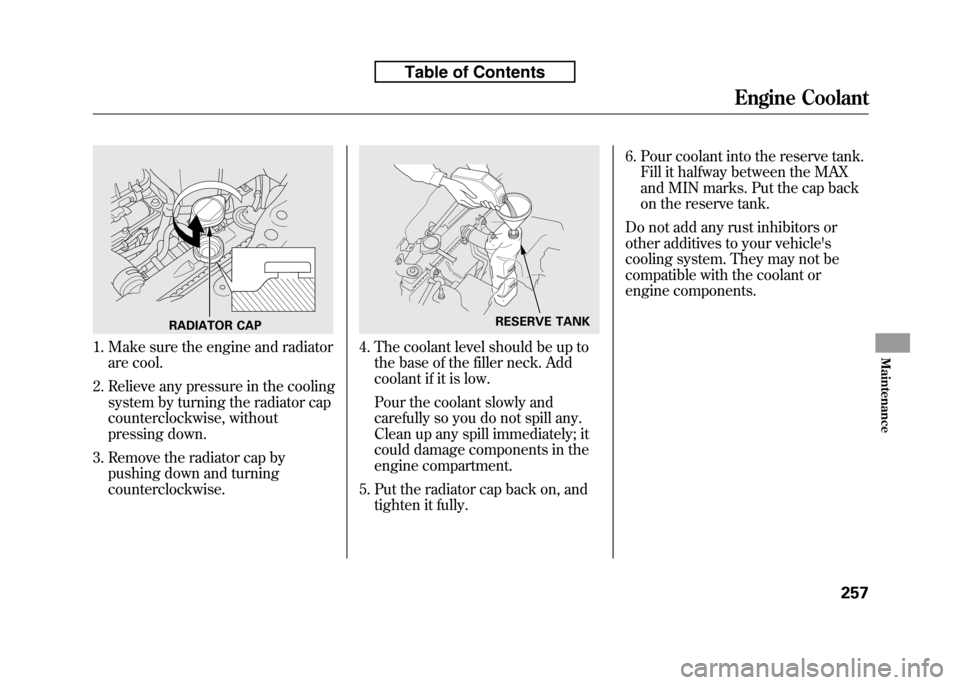
1. Make sure the engine and radiatorare cool.
2. Relieve any pressure in the cooling system by turning the radiator cap
counterclockwise, without
pressing down.
3. Remove the radiator cap by pushing down and turningcounterclockwise.4. The coolant level should be up tothe base of the filler neck. Add
coolant if it is low.
Pour the coolant slowly and
carefully so you do not spill any.
Clean up any spill immediately; it
could damage components in the
engine compartment.
5. Put the radiator cap back on, and tighten it fully. 6. Pour coolant into the reserve tank.
Fill it halfway between the MAX
and MIN marks. Put the cap back
on the reserve tank.
Do not add any rust inhibitors or
other additives to your vehicle's
cooling system. They may not be
compatible with the coolant or
engine components.
RADIATOR CAPRESERVE TANK
Engine Coolant
257
Maintenance
Table of Contents
Page 278 of 351

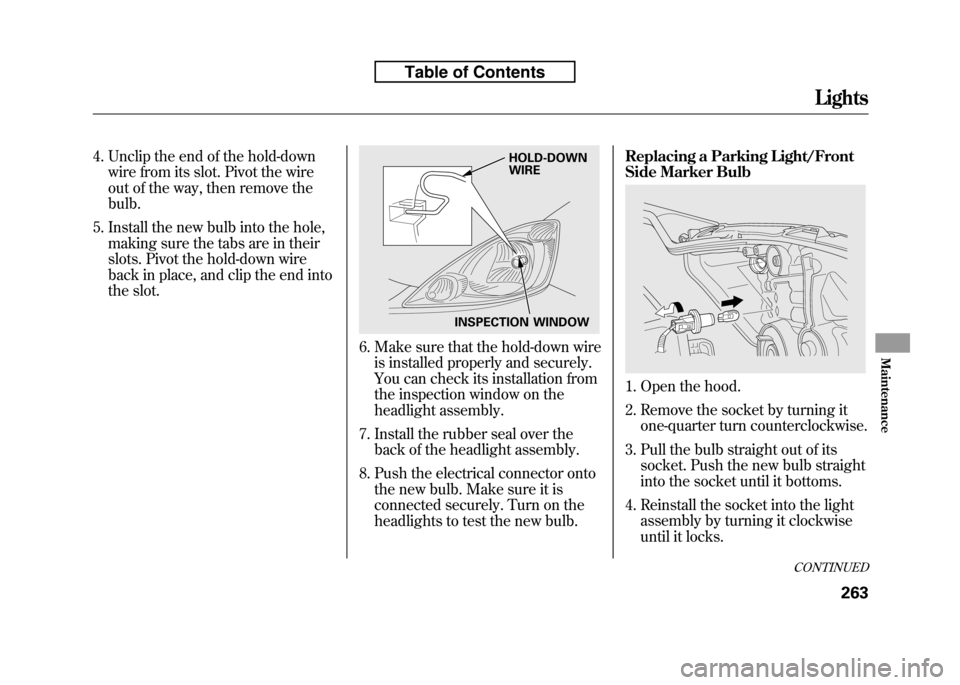
4. Unclip the end of the hold-downwire from its slot. Pivot the wire
out of the way, then remove thebulb.
5. Install the new bulb into the hole, making sure the tabs are in their
slots. Pivot the hold-down wire
back in place, and clip the end into
the slot.
6. Make sure that the hold-down wireis installed properly and securely.
You can check its installation from
the inspection window on the
headlight assembly.
7. Install the rubber seal over the back of the headlight assembly.
8. Push the electrical connector onto the new bulb. Make sure it is
connected securely. Turn on the
headlights to test the new bulb. Replacing a Parking Light/Front
Side Marker Bulb
1. Open the hood.
2. Remove the socket by turning it
one-quarter turn counterclockwise.
3. Pull the bulb straight out of its socket. Push the new bulb straight
into the socket until it bottoms.
4. Reinstall the socket into the light assembly by turning it clockwise
until it locks.
INSPECTION WINDOW HOLD-DOWN WIRE
CONTINUED
Lights
263
Maintenance
Table of Contents