2010 HONDA FIT ECO mode
[x] Cancel search: ECO modePage 266 of 351

Symbol Maintenance Main ItemsA ●
Replace engine oilꭧ1
B ●
Replace engine oil and oil filter
● Inspect front and rear brakes
● Check parking brake adjustment
● Inspect these items:
● Tie rod ends, steering gear box, and boots
● Suspension components
● Driveshaft boots
● Brake hoses and lines (including ABS/VSA)
● All fluid levels and condition of fluids
● Exhaust system
#
●Fuel lines and connections#
●Check expiration date for TRK bottleꭧ2
ꭧ 1: If the message ‘‘SERVICE ’’does not appear more than 12 months after the
display is reset, change the engine oil every year.
ꭧ 2: Canadian A/T models only
# : See information on maintenance and emissions warranty on page 249.
NOTE: ●
Independent of maintenance messages in the information display,
replace the brake fluid every 3 years.
● Inspect idle speed every 160,000 miles (256,000 km).
● Adjust the valves during services A, B, 1, 2, or 3 only if they are noisy. Symbol Maintenance Sub Items
1 ●
Rotate tires
2 ●
Replace air cleaner element
If you drive in dusty conditions, replace every 15,000
miles (24,000 km).
● Replace dust and pollen filter
If you drive primarily in urban areas that have high
concentrations of soot in the air from industry and from
diesel-powered vehicles, replace every 15,000 miles
(24,000 km).
● Inspect drive belt
3 ●
Replace transmission fluid
Driving in mountainous areas at very low vehicle
speeds results in higher transmission temperatures.
This requires transmission fluid changes more
frequently than recommended by the maintenance
minder. If you regularly drive your vehicle under these
conditions, have the transmission fluid changed at
60,000 miles (100,000 km), then every 30,000 miles
(48,000 km). (For A/T only)
If you tow a Fit behind a motorhome, the transmission
fluid must be changed every 2 years or 30,000 miles
(48,000 km), whichever comes first. (For A/T only)
4 ●
Replace spark plugs
● Inspect valve clearance
5 ●
Replace engine coolant
Maintenance Minder
Maintenance Minder
251
Table of Contents
Page 276 of 351

Check the brake fluid level in the
reservoirs monthly.
There are up to two reservoirs,
depending on the model. They are:● Brake fluid reservoir (all models)
● Clutch fluid reservoir
(manual transmission modelsonly)
Replace the brake fluid according to
the time recommendation in the
maintenance minder schedule.
Always use Honda Heavy Duty
Brake Fluid DOT 3. If it is not
available, you should use only DOT 3
or DOT 4 fluid, from a sealed
container, as a temporaryreplacement.
Using any non-Honda brake fluid can
cause corrosion and decrease the life
of the system. Have the brake
system flushed and refilled with
Honda Heavy Duty Brake Fluid
DOT 3 as soon as possible. Brake fluid marked DOT 5 is not
compatible with your vehicle's
braking system and can cause
extensive damage.
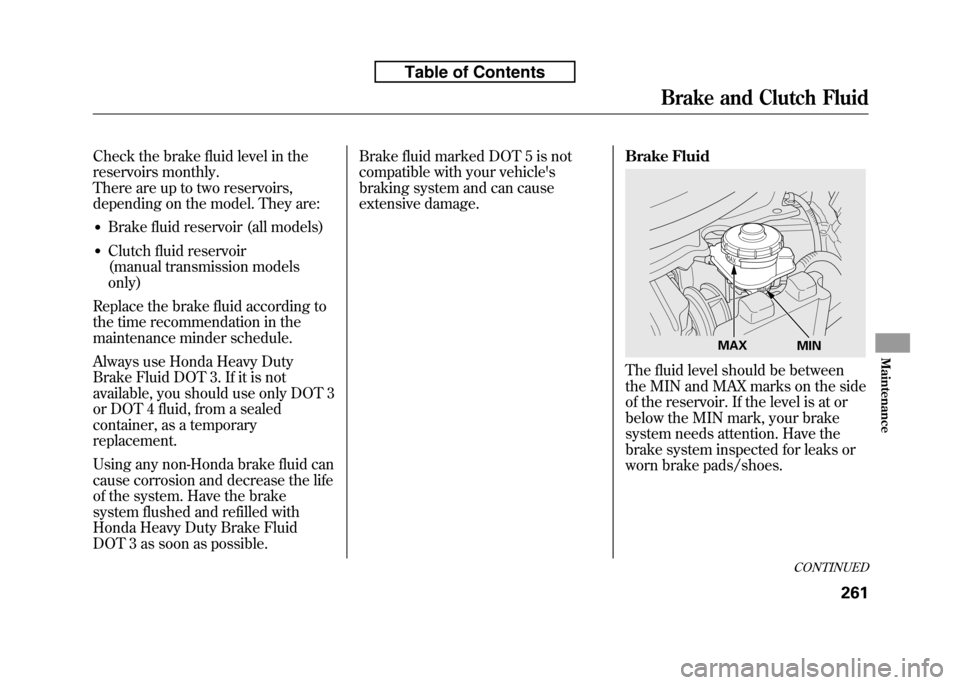
Brake Fluid
The fluid level should be between
the MIN and MAX marks on the side
of the reservoir. If the level is at or
below the MIN mark, your brake
system needs attention. Have the
brake system inspected for leaks or
worn brake pads/shoes.
MAX
MIN
CONTINUED
Brake and Clutch Fluid
261
Maintenance
Table of Contents
Page 283 of 351

If you remove the driver's floor mat,
make sure to re-anchor it when you
put it back in your vehicle.
If you use a non-Honda floor mats,
make sure they fit properly and that
they can be anchored securely. Do
not put additional floor mats on top of
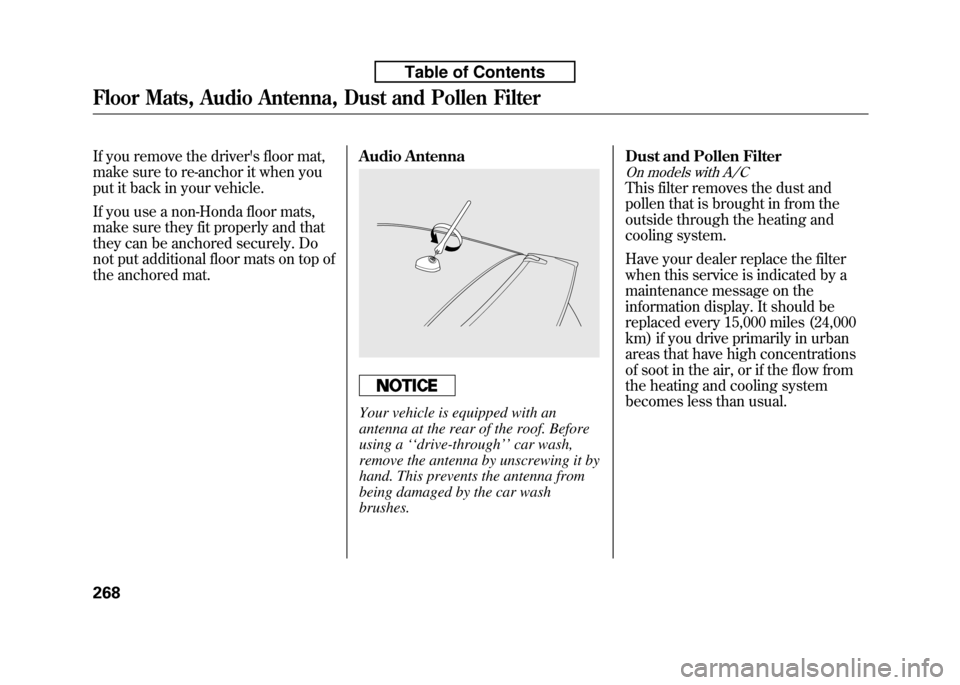
the anchored mat.Audio Antenna
Your vehicle is equipped with an
antenna at the rear of the roof. Before
using a
‘‘drive-through ’’car wash,
remove the antenna by unscrewing it by
hand. This prevents the antenna from
being damaged by the car wash brushes. Dust and Pollen Filter
On models with A/C
This filter removes the dust and
pollen that is brought in from the
outside through the heating and
cooling system.
Have your dealer replace the filter
when this service is indicated by a
maintenance message on the
information display. It should be
replaced every 15,000 miles (24,000
km) if you drive primarily in urban
areas that have high concentrations
of soot in the air, or if the flow from
the heating and cooling system
becomes less than usual.
Floor Mats, Audio Antenna, Dust and Pollen Filter
268
Table of Contents
Page 289 of 351
![HONDA FIT 2010 2.G Owners Manual If you check air pressures when the
tires are hot [driven for several miles
(kilometers)], you will see readings 4
to 6 psi (30 to 40 kPa, 0.3 to 0.4kgf/cm
2) higher than the cold
readings. This is n HONDA FIT 2010 2.G Owners Manual If you check air pressures when the
tires are hot [driven for several miles
(kilometers)], you will see readings 4
to 6 psi (30 to 40 kPa, 0.3 to 0.4kgf/cm
2) higher than the cold
readings. This is n](/manual-img/13/5921/w960_5921-288.png)
If you check air pressures when the
tires are hot [driven for several miles
(kilometers)], you will see readings 4
to 6 psi (30 to 40 kPa, 0.3 to 0.4kgf/cm
2) higher than the cold
readings. This is normal. Do not let
air out to match the recommended
cold air pressure. The tire will beunderinflated.
You should get your own tire
pressure gauge and use it whenever
you check your tire pressures. This
will make it easier for you to tell if a
pressure loss is due to a tire problem
and not due to a variation betweengauges.
While tubeless tires have some
ability to self-seal if they are
punctured, you should look closely
for punctures if a tire starts losingpressure. Recommended Tire Pressures
The following charts show the
recommended cold tire pressures for
most normal and high-speed drivingconditions.
All models except Sport
Tire Size Cold Tire Pressure
for Normal Driving
175/65R15 84S Front/Rear: 32 psi (220 kPa,
2.2 kgf/cm
2)
Sport model
Tire Size Cold Tire Pressurefor Normal Driving
185/55R16 83H Front/Rear: 33 psi (230 kPa,
2.3 kgf/cm
2)
If equipped
The compact spare tire pressure is:
60 psi (420 kPa, 4.2 kgf/cm2)
For convenience, the recommended
tire sizes and cold tire pressures are
on a label on the driver's doorjamb.
For additional information about your
tires, see page 323.
Tires
274
Table of Contents
Page 292 of 351

It is best to replace all four tires at
the same time. If that is not possible
or necessary, replace the two front
tires or two rear tires as a pair.
Replacing just one tire can seriously
affect your vehicle's handling.
If you ever replace a wheel, make
sure that the wheel's specifications
match those of the original wheels.
Also be sure you use only TPMS
specific wheels (if equipped). If you
do not, the tire pressure monitoring
system will not work.
Replacement wheels are available at
your dealer.
Installing improper tires on your
vehicle can affect handling and
stability. This can cause a crash
in which you can be seriously
hurt or killed.
Always use the size and type of
tires recommended in this
owner's manual.Wheel and Tire SpecificationsWheels:All models except Sport
15 x 5 1/2J
Sport model
16 x 6J
Tires:
All models except Sport
175/65R15 84S
Sport model
185/55R16 83H
See page 321 for DOT tire quality
grading information, and page 323
for tire size and labeling information.
CONTINUED
Tires
277
Maintenance
Table of Contents
Page 293 of 351

Winter Driving
Tires marked‘‘M + S’’ or ‘‘All
Season ’’on the sidewall have an all-
weather tread design suitable for
most winter driving conditions.
For the best performance in snowy
or icy conditions, you should install
snow tires or tire chains. They may
be required by local laws under
certain conditions.
Snow Tires
If you mount snow tires on your
vehicle, make sure they are radial
tires of the same size and load range
as the original tires. Mount snow
tires on all four wheels. The traction
provided by snow tires on dry roads
may be lower than your original tires.
Check with the tire dealer for
maximum speed recommendations.
Tire Chains
Mount tire chains on your tires when
required by driving conditions or
local laws. Install them only on the
front tires.
Because your vehicle has limited tire
clearance, Honda strongly
recommends using the chains listed
below, made by Security Chain
Company (SCC).
All models except Sport
SC1026
Sport model
SC1030
When installing cables, follow the
manufacturer's instructions, and
mount them as tight as you can.
Make sure they are not contacting
the brake lines or suspension. Drive
slowly with them installed. If you
hear them coming into contact with
the body or chassis, stop and
investigate. Remove them as soon as
you begin driving on cleared roads.
Traction devices that are the wrong size
or improperly installed can damage
your vehicle's brake lines, suspension,
body, and wheels. Stop driving if they
are hitting any part of the vehicle.
Using the wrong chains, or not
properly installing chains, can
damage the brake lines and
cause a crash in which you can
be seriously injured or killed.
Follow all instructions in this
owner's manual regarding the
selection and use of tire chains.
Tires
278
Table of Contents
Page 339 of 351

Glossary of Tire Terminology
Cold Tire Pressure - The tire air
pressure when the vehicle has been
parked for at least three hours or
driven less than 1 mile (1.6km).
Load Rating - Means the maximum
load that a tire is rated to carry for a
given inflation presure.
Maximum Inflation Pressure - the
maximum tire air pressure that the
tire can hold.
Maximum Load Rating - Means the
load rating for a tire at the maximum
permissible inflation pressure for thattire.
Recommended Inflation Pressure -
The cold tire inflation pressure
recommended by the manufacturer.
Treadwear Indicators (TWI) - Means
the projections within the principal
grooves designed to give a visual
indication of the degrees of wear of
the tread.Tire Pressure Monitoring System(TPMS)
-Required Federal
Explanation
U.S. models only
Each tire, including the spare (if
provided), should be checked
monthly when cold and inflated to
the inflation pressure recommended
by the vehicle manufacturer on the
vehicle placard or tire inflation
pressure label.
(If your vehicle has tires of a different
size than the size indicated on the
vehicle placard or tire inflation
pressure label, you should determine
the proper tire inflation pressure for
those tires.) As an added safety feature, your
vehicle has been equipped with a tire
pressure monitoring system (TPMS)
that illuminates a low tire pressuretelltale
when one or more of your tires is
significantly under-inflated.
Accordingly, when the low tire
pressure telltale illuminates, you
should stop and check your tires as
soon as possible, and inflate them to
the proper pressure.
Tire Labeling, Tire Pressure Monitoring System (TPMS)
-Required Federal Explanation
324
Table of Contents
Page 350 of 351

Purchasing Factory Authorized Manuals (U.S. only)
The publications shown below can be purchased from Helm
Incorporated. You can order by phone or online:● Call Helm Inc. at 1-800-782-4356 (credit card orders only)
● Go online at www. helminc. com
If you are interested in other years or models, contact Helm Inc.
at 1-800-782-4356.
Publication
Form Number Form Description
61TK610 2010 Honda Fit Service Manual
61TK601EL 2010 Honda Fit Electrical Troubleshooting Manual
61TK630 2009 Honda Fit Body Repair Manual
31TK6610 2010 Honda Fit Owner's Manual
31TK6810 2010 Honda Fit Navigation System Owner's Manual
31TK6M10 2010 Honda Fit Honda Service History 31TK6Q10 2010 Honda Fit Technology Reference Guide HON-R Order Form for Previous Years- Indicate Year and Model Desired Service Manual:
Covers maintenance and recommended procedures for
repair to engine and chassis components. It is written
for the journeyman mechanic, but it is simple enough
for most mechanically inclined owners to understand.
Electrical Troubleshooting Manual:
Complements the Service Manual by providing in-depth
troubleshooting information for each electrical circuit in
your vehicle.
Body Repair Manual:
Describes the procedures involved in the replacement
of damaged body parts.
Authorized Manuals
335
Warranty and Customer Relations
Table of Contents