Page 263 of 351

To change the information display
from the engine oil life display to the
odometer, the trip meter or average
fuel mileage, press and release the
select/reset knob.
When the engine oil life is 0 percent
or negative mileage, the maintenance
minder indicator (
) remains on
even if you change the information display.
Immediately have the service
performed, and make sure to reset
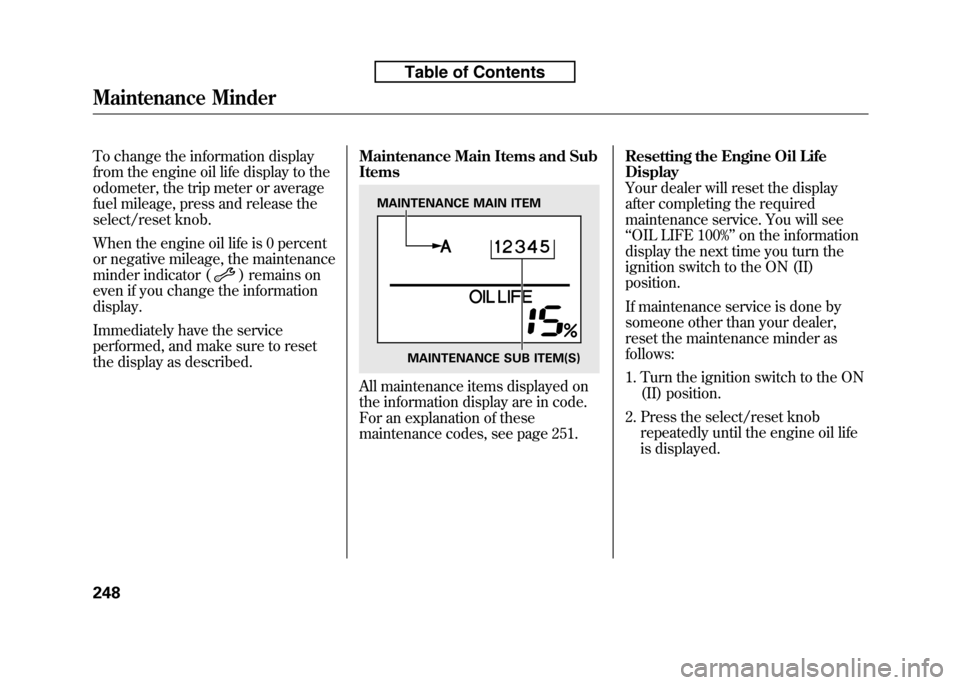
the display as described. Maintenance Main Items and SubItems
All maintenance items displayed on
the information display are in code.
For an explanation of these
maintenance codes, see page 251.Resetting the Engine Oil LifeDisplay
Your dealer will reset the display
after completing the required
maintenance service. You will see‘‘
OIL LIFE 100% ’’on the information
display the next time you turn the
ignition switch to the ON (II)position.
If maintenance service is done by
someone other than your dealer,
reset the maintenance minder asfollows:
1. Turn the ignition switch to the ON (II) position.
2. Press the select/reset knob repeatedly until the engine oil life
is displayed.
MAINTENANCE MAIN ITEM
MAINTENANCE SUB ITEM(S)
Maintenance Minder
248
Table of Contents
Page 264 of 351
3. Press the select/reset knob forabout 10 seconds. The engine oil
life and the maintenance item
code(s) will blink.4. Press the select/reset knob foranother 5 seconds. The
maintenance item code(s) will
disappear, and the engine oil life
will reset to ‘‘100. ’’ Important MaintenancePrecautions
If you have the required service done
but do not reset the display, or reset
the display without doing the service,
the system will not show the proper
maintenance intervals. This can lead
to serious mechanical problems
because you will no longer have an
accurate record of when
maintenance is needed.
Your authorized Honda dealer knows
your vehicle best and can provide
competent, efficient service.
CONTINUED
Maintenance Minder
249
Maintenance
Table of Contents
Page 265 of 351

However, service at a dealer is not
mandatory to keep your warranties in
effect. Maintenance may be done by
any qualified service facility or
person who is skilled in this type of
automotive service. Make sure to
have the service facility or person
reset the display as previously
described. Keep all receipts as proof
of completion, and have the person
who does the work fill out your
Honda Service History or Canadian
Maintenance Log. Check your
warranty booklet for moreinformation.
We recommend using Honda parts
and fluids whenever you have
maintenance done. These are
manufactured to the same high
quality standards as the original
components, so you can be confident
of their performance and durability.U.S. Vehicles:
Maintenance,
replacement, or repair of
emissions control devices and
systems may be done by any
automotive repair establishment
or individual using parts that are‘‘ certified ’’to EPA standards.
According to state and federal
regulations, failure to perform
maintenance on the items markedwith #will not void your emissions
warranties. However, all
maintenance services should be
performed in accordance with the
intervals indicated by the informationdisplay.
Owner's Maintenance Checks
You should check the following
items at the specified intervals. If you
are unsure of how to perform any
check, turn to the appropriate pagelisted. ●
Engine oil level -Check every
time you fill the fuel tank. See page201.
● Engine coolant level -Check the
radiator reserve tank every time
you fill the fuel tank. See page 202.
● Automatic transmission -Check
the fluid level monthly. See page259.
● Brakes -Check the fluid level
monthly. See page 261.
● Tires -Check the tire pressure
monthly. Examine the tread for
wear and foreign objects. See page274.
● Lights -Check the operation of
the headlights, parking lights,
taillights, high-mount brake light,
and license plate lights monthly.
See page 262.
Maintenance Minder
250
Table of Contents
Page 266 of 351

Symbol Maintenance Main ItemsA ●
Replace engine oilꭧ1
B ●
Replace engine oil and oil filter
● Inspect front and rear brakes
● Check parking brake adjustment
● Inspect these items:
● Tie rod ends, steering gear box, and boots
● Suspension components
● Driveshaft boots
● Brake hoses and lines (including ABS/VSA)
● All fluid levels and condition of fluids
● Exhaust system
#
●Fuel lines and connections#
●Check expiration date for TRK bottleꭧ2
ꭧ 1: If the message ‘‘SERVICE ’’does not appear more than 12 months after the
display is reset, change the engine oil every year.
ꭧ 2: Canadian A/T models only
# : See information on maintenance and emissions warranty on page 249.
NOTE: ●
Independent of maintenance messages in the information display,
replace the brake fluid every 3 years.
● Inspect idle speed every 160,000 miles (256,000 km).
● Adjust the valves during services A, B, 1, 2, or 3 only if they are noisy. Symbol Maintenance Sub Items
1 ●
Rotate tires
2 ●
Replace air cleaner element
If you drive in dusty conditions, replace every 15,000
miles (24,000 km).
● Replace dust and pollen filter
If you drive primarily in urban areas that have high
concentrations of soot in the air from industry and from
diesel-powered vehicles, replace every 15,000 miles
(24,000 km).
● Inspect drive belt
3 ●
Replace transmission fluid
Driving in mountainous areas at very low vehicle
speeds results in higher transmission temperatures.
This requires transmission fluid changes more
frequently than recommended by the maintenance
minder. If you regularly drive your vehicle under these
conditions, have the transmission fluid changed at
60,000 miles (100,000 km), then every 30,000 miles
(48,000 km). (For A/T only)
If you tow a Fit behind a motorhome, the transmission
fluid must be changed every 2 years or 30,000 miles
(48,000 km), whichever comes first. (For A/T only)
4 ●
Replace spark plugs
● Inspect valve clearance
5 ●
Replace engine coolant
Maintenance Minder
Maintenance Minder
251
Table of Contents
Page 295 of 351

WARNING:Battery posts,
terminals, and related accessories
contain lead and lead compounds.
Wash your hands after handling.
If you need to connect the battery to
a charger, disconnect both cables to
prevent damaging your vehicle's
electrical system. Always disconnect
the negative ( -) cable first, and
reconnect it last.
On vehicles without navigation system
If your vehicle's battery is
disconnected, or goes dead, the time
setting is lost. To reset the time, see
page 192.
If your vehicle's battery is
disconnected, or goes dead, the
audio system may disable itself. The
next time you turn on the radio, you
will see ‘‘ENTER CODE ’’in the
frequency display. Use the preset
buttons to enter the code (see page191).
The battery gives off explosive
hydrogen gas during normaloperation.
A spark or flame can cause the
battery to explode with enough
force to kill or seriously hurtyou.
Wear protective clothing and a
face shield, or have a skilled
technician do the batterymaintenance.
On vehicles with navigation system
The navigation system will also
disable itself. The next time you turn
on the ignition switch, the system
will require you to enter ‘‘ENTER
CODE ’’before it can be used. Refer
to the navigation system manual.
Checking the Battery
280
Table of Contents
Page 323 of 351

5. Look for a blown wire inside thefuse. If it is blown, replace it with
one of the spare fuses of the same
rating or lower.
If you cannot drive the vehicle
without fixing the problem, and you
do not have a spare fuse, take a fuse
of the same rating or a lower rating
from one of the other circuits. Make
sure you can do without that circuit
temporarily (such as the accessory
power socket or radio). If you replace the blown fuse with a
spare fuse that has a lower rating, it
might blow out again. This does not
indicate anything wrong. Replace the
fuse with one of the correct rating as
soon as you can.
Replacing a fuse with one that has a
higher rating greatly increases the
chances of damaging the electrical
system. If you do not have a
replacement fuse with the proper rating
for the circuit, install one with a lowerrating.
6. If the replacement fuse of the same
rating blows in a short time, there
is probably a serious electrical
problem in your vehicle. Leave the
blown fuse in that circuit and have
your vehicle checked by a
qualified technician.
On vehicles without navigation system
If the radio fuse is removed, the
audio system will disable itself. The
next time you turn on the radio you
will see ‘‘ENTER CODE ’’in the
frequency display. Use the preset
buttons to enter the code (see page191).
When the audio system is disabled,
the clock setting in the audio system
will be canceled. You will need to
reset the clock (see page 192).
On vehicles with navigation system
The navigation system will also
disable itself. The next time you turn
on the ignition switch, the system
will require you to enter ‘‘ENTER
CODE ’’before it can be used. Refer
to the navigation system manual.
BLOWN
Fuses
308
Table of Contents