Page 210 of 351

Changing the Set Speed
You can increase the set cruising
speed in any of these ways:● Press and hold the RES/ACCEL
button. When you reach the
desired cruising speed, release thebutton.
● To increase your speed in very
small amounts, tap the RES/
ACCEL button. Each time you do
this, the vehicle will speed up
about 1 mph (1.6 km/h).
● Push on the accelerator pedal.
Accelerate to the desired cruising
speed, then press the SET/
DECEL button. You can decrease the set cruising
speed in any of these ways:
● Press and hold the SET/DECEL
button. Release the button when
you reach the desired speed.
● To slow down in very small
amounts, tap the SET/DECEL
button. Each time you do this,
your vehicle will slow down about
1 mph (1.6 km/h).
● Tap the brake or clutch pedal
lightly with your foot. The CRUISE
CONTROL indicator on the
instrument panel goes out. When
the vehicle slows to the desired
speed, press the SET/DECELbutton. Even with the cruise control turned
on, you can still use the accelerator
pedal to speed up for passing. After
completing the pass, take your foot
off the accelerator pedal. The vehicle
will return to the set cruising speed.
Resting your foot on the brake or
clutch pedal causes the cruise
control to cancel.
CONTINUED
Cruise Control
195
Features
Table of Contents
Page 213 of 351

Break-in Period
Help assure your vehicle's future
reliability and performance by paying
extra attention to how you drive
during the first 600 miles (1,000 km).
During this period:● Avoid full-throttle starts and rapidacceleration.
● Avoid hard braking for the first 200
miles (300 km).
● Do not change the oil until the
scheduled maintenance time.
You should also follow these
recommendations with an
overhauled or exchanged engine, or
when the brakes are replaced. Fuel Recommendation
Your vehicle is designed to operate
on unleaded gasoline with a pump
octane number of 87 or higher. Use of
a lower octane gasoline can cause a
persistent, heavy metallic rapping
noise that can lead to engine damage.
We recommend using quality
gasolines containing detergent
additives that help prevent fuel
system and engine deposits.
In addition, in order to maintain good
performance, fuel economy, and
emissions control, we strongly
recommend, in areas where it is
available, the use of gasoline that
does NOT contain manganese-based
fuel additives such as MMT.
Use of gasoline with these additives
may adversely affect performance,
and cause the malfunction indicator
lamp on your instrument panel to
come on. If this happens, contact your
authorized dealer for service. Some gasoline today is blended with
oxygenates such as ethanol or
MTBE. Your vehicle is designed to
operate on oxygenated gasoline
containing up to 10% ethanol by
volume and up to 15% MTBE by
volume. Do not use gasoline
containing methanol.
If you notice any undesirable
operating symptoms, try another
service station or switch to another
brand of gasoline.
For further important fuel-related
information for your vehicle, or
information on gasoline that does not
contain MMT, visit Owner Link at
owners.honda.com. In Canada, visit
www.honda. cafor additoin
information on gasoine.
Break-in Period, Fuel Recommendation
198
Table of Contents
Page 230 of 351
You should do the following checks
and adjustments before you drive
your vehicle.
1. Make sure all windows, mirrors,and outside lights are clean and
unobstructed. Remove frost, snow,
or ice.
2. Check that the hood is fully closed.
3. Visually check the tires. If a tire looks low, use a gauge to check its
pressure (see page 273).
4. Check that any items you may be carrying are stored properly or
fastened down securely. 5. Check the seat adjustment (see
page 93).
6. Check the adjustment of the inside and outside mirrors (see page101).
7. Check the steering wheel adjustment (see page 77).
8. Make sure the doors and the tailgate are securely closed andlocked.
9. Fasten your seat belt. Check that your passengers have fastened
their seat belts (see page 14).
10. When you start the engine, check the gauges and indicators in the
instrument panel (see page 59).
Preparing to Drive
215
Driving
Table of Contents
Page 234 of 351

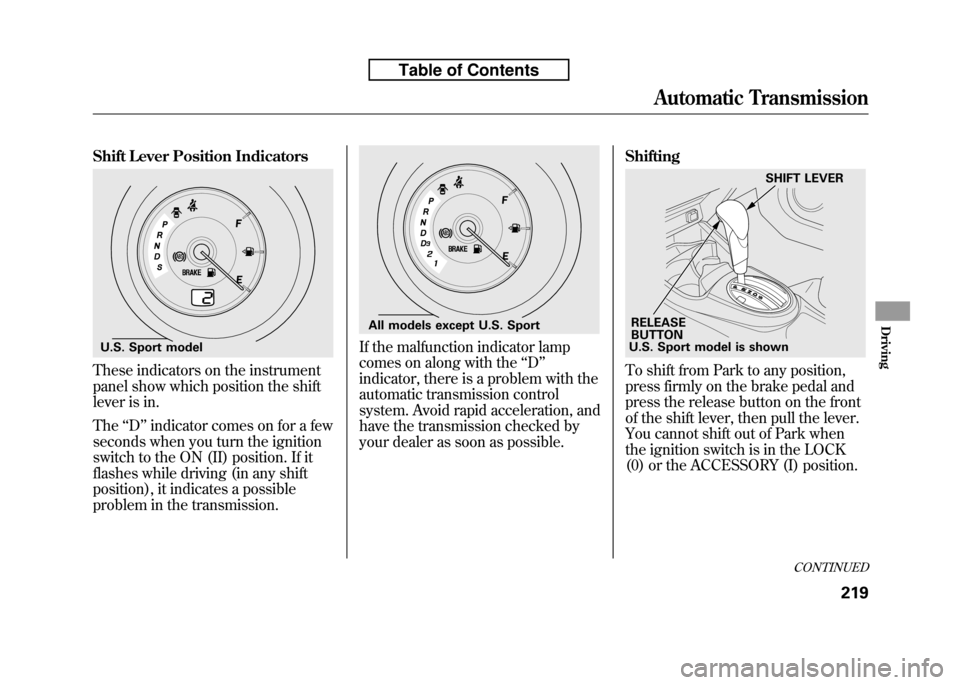
Shift Lever Position Indicators
These indicators on the instrument
panel show which position the shift
lever is in. The‘‘D ’’indicator comes on for a few
seconds when you turn the ignition
switch to the ON (II) position. If it
flashes while driving (in any shift
position), it indicates a possible
problem in the transmission.
If the malfunction indicator lamp
comes on along with the ‘‘D ’’
indicator, there is a problem with the
automatic transmission control
system. Avoid rapid acceleration, and
have the transmission checked by
your dealer as soon as possible. Shifting
To shift from Park to any position,
press firmly on the brake pedal and
press the release button on the front
of the shift lever, then pull the lever.
You cannot shift out of Park when
the ignition switch is in the LOCK
(0) or the ACCESSORY (I) position.
U.S. Sport model
All models except U.S. Sport
U.S. Sport model is shown
RELEASE
BUTTON SHIFT LEVER
CONTINUED
Automatic Transmission
219
Driving
Table of Contents
Page 239 of 351
Using the Paddle Shifters in D
position (D-Paddle Shift Mode)
U.S. models only
When you are driving in D position,
you can shift the transmission up or
down manually with the paddleshifters.
To shift up or down, use the+
(right) or -(left) paddle shifter on
each side of the steering wheel.Each time you pull the +(right)
paddle, the transmission shifts to a
higher gear. Pull the -(left) paddle
to downshift. You will see the
selected gear number on the
instrument panel.
When you pull either paddle shifter,
the gear position indicator shows you
the selected gear number.
When the transmission returns to
drive mode (D), the displayed gear
number disappears.
GEAR POSITION INDICATOR
Driving with the Paddle Shifters (Sport only)
224
Table of Contents
Page 244 of 351

Always use the parking brake when
you park your vehicle. Make sure the
parking brake is set firmly, or your
vehicle may roll if it is parked on anincline.
If your vehicle has an automatic
transmission, set the parking brake
before you put the transmission in
Park. This keeps the vehicle from
moving and putting pressure on the
parking mechanism in thetransmission.Parking Tips
● Make sure the windows areclosed.
● Turn off the lights.
● Place any packages, valuables, etc.
in the cargo area or take them withyou.
● Lock the doors and the tailgate.
On Sport model
Check the indicator on the
instrument panel to verify that the
security system is set.
● Never park over dry leaves, tall
grass, or other flammable
materials. The hot three way
catalytic converter could cause
these materials to catch on fire. ●
If the vehicle is facing uphill, turn
the front wheels away from the
curb. If your vehicle has a manual
transmission, put it in first gear
and set the parking brake.
● If the vehicle is facing downhill,
turn the front wheels toward the
curb. If your vehicle has a manual
transmission, put it in reverse gear
and set the parking brake.
● Make sure the parking brake is
fully released before driving away.
Driving with the parking brake
partially set can overheat or
damage the rear brakes.
Parking
229
Driving
Table of Contents
Page 262 of 351

The maintenance item code or codes
indicate the main and sub items
required at the time of the oil change
(see page 248).
You can switch the information
display from the engine oil life
display to the odometer or the trip
meter. Press and release the select/
reset knob on the instrument panel.
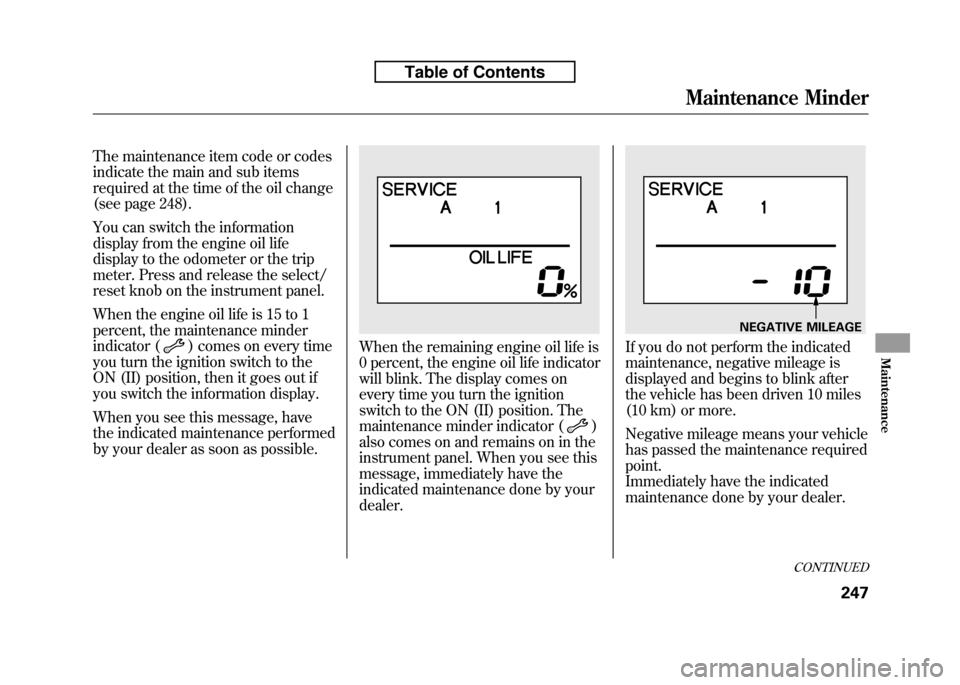
When the engine oil life is 15 to 1
percent, the maintenance minder
indicator (
) comes on every time
you turn the ignition switch to the
ON (II) position, then it goes out if
you switch the information display.
When you see this message, have
the indicated maintenance performed
by your dealer as soon as possible.When the remaining engine oil life is
0 percent, the engine oil life indicator
will blink. The display comes on
every time you turn the ignition
switch to the ON (II) position. The
maintenance minder indicator (
)
also comes on and remains on in the
instrument panel. When you see this
message, immediately have the
indicated maintenance done by yourdealer.
If you do not perform the indicated
maintenance, negative mileage is
displayed and begins to blink after
the vehicle has been driven 10 miles
(10 km) or more.
Negative mileage means your vehicle
has passed the maintenance requiredpoint.
Immediately have the indicated
maintenance done by your dealer.
NEGATIVE MILEAGE
CONTINUED
Maintenance Minder
247
Maintenance
Table of Contents
Page 307 of 351
2. Open the tailgate.
3. Raise the cargo area floor lid bylifting it up with the back of the
strap. Remove the tire repair kit.Your tire repair kit contains:
● An air pump with a power cord and
an air hose attached.
● A bottle of sealant with a filler hoseattached.
● Two labels, one for the tire wheel
and one for the instrument panel.
● An instruction sheet. ●
An empty recovery bottle. A tire
repair professional will use this to
collect the injected sealant from the
tire during the permanent repair.
4. Remove the sealant bottle and
check the expiration date on the
label. If the date has expired, do not
continue. Have your vehicle towed
to the nearest Honda service
center. In Canada or the
continental U.S.A. simply call 1-800-
465-PLUS (7587) for Honda Plus
Roadside Assistance.
FLOOR LID
TIRE REPAIR KIT STRAP
EXPIRATION DATE
Temporarily Repairing a Flat Tire
292
Table of Contents