Page 276 of 351

Check the brake fluid level in the
reservoirs monthly.
There are up to two reservoirs,
depending on the model. They are:● Brake fluid reservoir (all models)
● Clutch fluid reservoir
(manual transmission modelsonly)
Replace the brake fluid according to
the time recommendation in the
maintenance minder schedule.
Always use Honda Heavy Duty
Brake Fluid DOT 3. If it is not
available, you should use only DOT 3
or DOT 4 fluid, from a sealed
container, as a temporaryreplacement.
Using any non-Honda brake fluid can
cause corrosion and decrease the life
of the system. Have the brake
system flushed and refilled with
Honda Heavy Duty Brake Fluid
DOT 3 as soon as possible. Brake fluid marked DOT 5 is not
compatible with your vehicle's
braking system and can cause
extensive damage.
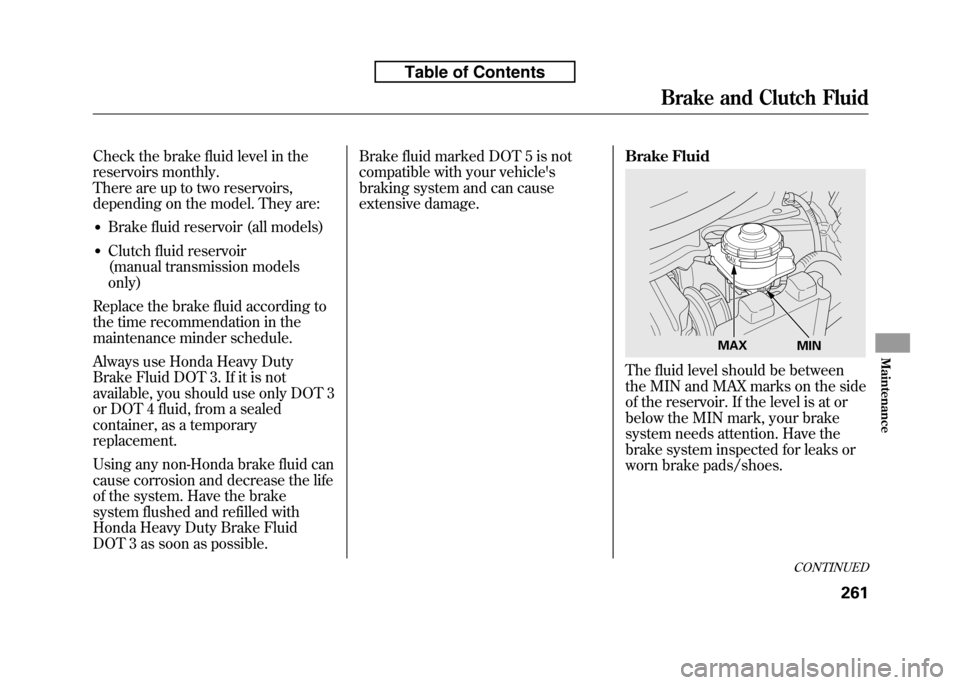
Brake Fluid
The fluid level should be between
the MIN and MAX marks on the side
of the reservoir. If the level is at or
below the MIN mark, your brake
system needs attention. Have the
brake system inspected for leaks or
worn brake pads/shoes.
MAX
MIN
CONTINUED
Brake and Clutch Fluid
261
Maintenance
Table of Contents
Page 277 of 351

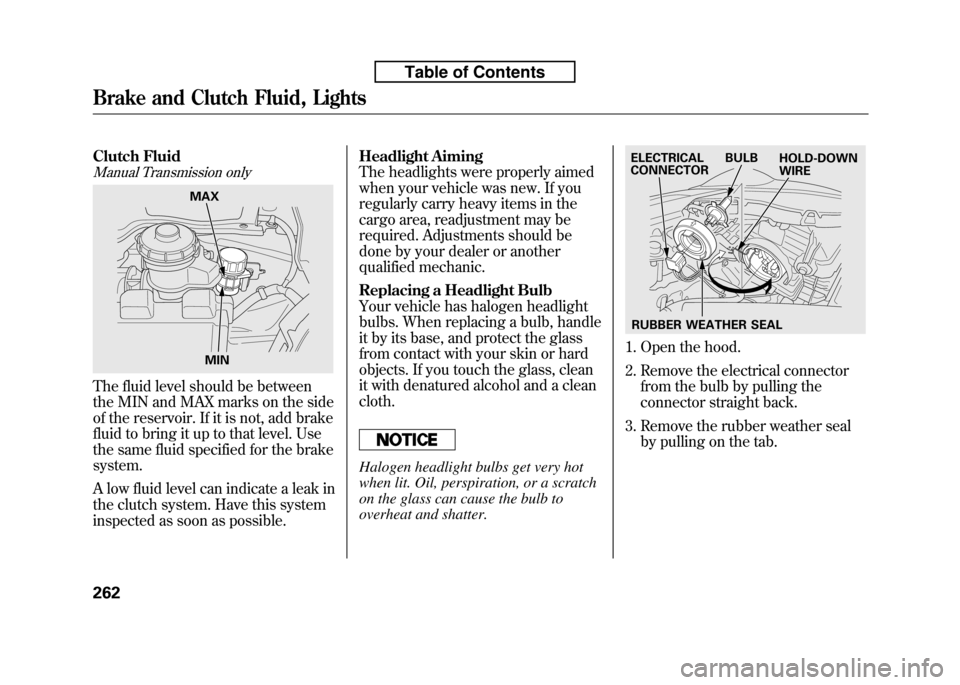
Clutch Fluid
Manual Transmission only
The fluid level should be between
the MIN and MAX marks on the side
of the reservoir. If it is not, add brake
fluid to bring it up to that level. Use
the same fluid specified for the brakesystem.
A low fluid level can indicate a leak in
the clutch system. Have this system
inspected as soon as possible.Headlight Aiming
The headlights were properly aimed
when your vehicle was new. If you
regularly carry heavy items in the
cargo area, readjustment may be
required. Adjustments should be
done by your dealer or another
qualified mechanic.
Replacing a Headlight Bulb
Your vehicle has halogen headlight
bulbs. When replacing a bulb, handle
it by its base, and protect the glass
from contact with your skin or hard
objects. If you touch the glass, clean
it with denatured alcohol and a cleancloth.
Halogen headlight bulbs get very hot
when lit. Oil, perspiration, or a scratch
on the glass can cause the bulb to
overheat and shatter.
1. Open the hood.
2. Remove the electrical connector
from the bulb by pulling the
connector straight back.
3. Remove the rubber weather seal by pulling on the tab.
MAX
MIN
BULB
ELECTRICAL
CONNECTOR
RUBBER WEATHER SEAL HOLD-DOWN WIRE
Brake and Clutch Fluid, Lights
262
Table of Contents
Page 296 of 351

If you need to park your vehicle for
an extended period (more than 1
month), there are several things you
should do to prepare it for storage.
Proper preparation helps prevent
deterioration and makes it easier to
get your vehicle back on the road. If
possible, store your vehicle indoors.● Fill the fuel tank.
● Wash and dry the exteriorcompletely.
● Clean the interior. Make sure the
carpeting, floor mats, etc., are
completely dry.
● Leave the parking brake off. Put
the transmission in reverse
(manual) or Park (automatic).
● Block the rear wheels. ●
If the vehicle is to be stored for a
longer period, it should be
supported on jackstands so the
tires are off the ground.
● Leave one window open slightly (if
the vehicle is being storedindoors).
● Disconnect the battery.
● Support the front and rear wiper
blade arms with a folded towel or
rag so they do not touch thewindshield.
● To minimize sticking, apply a
silicone spray lubricant to all door
and tailgate seals. Also, apply a
vehicle body wax to the painted
surfaces that mate with the door
and tailgate seals. ●
Cover the vehicle with a‘‘breathable ’’cover, one made from
a porous material such as cotton.
Non-porous materials, such as
plastic sheeting, trap moisture,
which can damage the paint.
● If possible, periodically run the
engine until it reaches full
operating temperature (the cooling
fans cycle on and off twice).
Preferably, do this once a month.
Vehicle Storage
281
Maintenance
Table of Contents
Page 300 of 351

Except all Canadian models withautomatic transmission
If you have a flat tire while driving,
stop in a safe place to change it.
Drive slowly along the shoulder until
you get to an exit or an area to stop
that is far away from the traffic lanes.The vehicle can easily roll off
the jack, seriously injuring
anyone underneath.
Follow the directions for
changing a tire exactly, and
never get under the vehicle
when it is supported only by thejack.
1. Park the vehicle on firm, level, and non-slippery ground. Put the
transmission in Park (automatic)
or reverse (manual). Apply the
parking brake.
2. Turn on the hazard warning lights, and turn the ignition switch to the
LOCK (0) position. Have all
passengers get out of the vehicle
while you change the tire.
3. Lift the rear center head restraint.
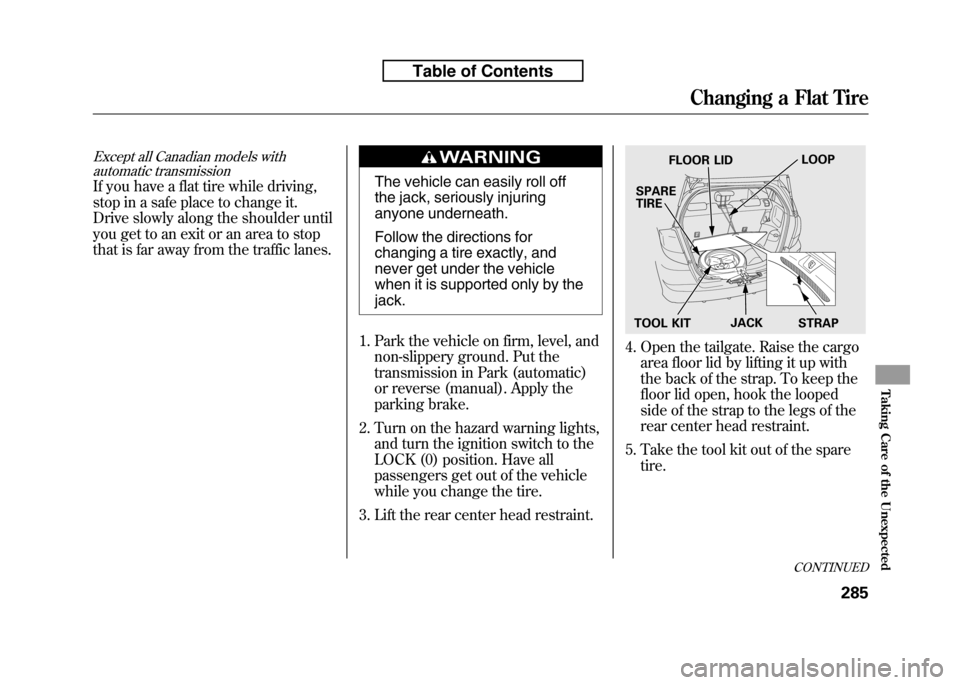
4. Open the tailgate. Raise the cargo area floor lid by lifting it up with
the back of the strap. To keep the
floor lid open, hook the looped
side of the strap to the legs of the
rear center head restraint.
5. Take the tool kit out of the spare tire.
FLOOR LID LOOP
SPARE TIRE
TOOL KIT JACK
STRAP
CONTINUED
Changing a Flat Tire
285
Taking Care of the Unexpected
Table of Contents
Page 301 of 351
6. Take the jack out of the cargo area.Turn the jack's end bracket
counterclockwise to loosen it, then
remove the jack by lifting it
straight up.
7. Unscrew the wing bolt and take the spare tire out of its well.8. On all models except Sport andCanadian LX model with manual
transmission, remove the wheel
cover by carefully prying under its
edge with the flat tip of theextension.9. Loosen each wheel nut 1/2 turnwith the wheel nut wrench.
EXTENSION WHEEL NUT
WHEEL COVER
WHEEL NUT WRENCH
Changing a Flat Tire
286
Table of Contents
Page 303 of 351
14. Put on the spare tire. Put thewheel nuts back on finger-tight,
then tighten them in a crisscross
pattern with the wheel nut wrench
until the wheel is firmly against the
hub. Do not try to tighten the
wheel nuts fully.
15. Lower the vehicle to the ground, and remove the jack.
16. Tighten the wheel nuts securely in the same crisscross pattern. Have
the wheel nut torque checked at
the nearest automotive servicefacility.
Tighten the wheel nuts to:
80 lbf·ft (108 N·m, 11 kgf·m)
17.
On Sport model and Canadian LX model with manual transmission:
Remove the center cap before
storing the flat tire.
18. Remove the strap loop from the
legs of the head restraint and
lower the cargo area floor lid.
19. Pull the floor lid toward you and remove the tabs.
20. Pull the floor lid out.
TAB
FLOOR LID
Changing a Flat Tire
288
Table of Contents
Page 305 of 351
Installing a wheel cover
All models except Sport and CanadianLX model with manual transmission
1. Make sure the wire support ring is
hooked into the clips around the
edge of the wheel cover.
2. Align the valve mark on the wheelcover to the tire valve on the
wheel, then install the wheelcover.3. Make sure the wire support ring ison the outer side of the tire valve
as shown.CLIPS CLIPS
WIRE SUPPORT RING
Changing a Flat Tire
290
Table of Contents
Page 306 of 351

How to Use the Tire Repair Kit
All Canadian models with automatictransmission
To reduce weight, your vehicle is
equipped with a tire repair kit instead
of a spare tire. This kit will allow you
to temporarily repair a flat tire under
the following conditions:
● Only one tire is flat.
● The puncture is smaller than
3/16ths of an inch (4 mm).
● The puncture is located within the tread.
● The wheel rim is not damaged.
● The tire bead is seated.
When making a temporary repair,
carefully follow all instructions in this
owner's manual and in the
instructions that came with the kit. If you have a flat tire while driving,
park the vehicle on a level surface in
a safe place, put the transmission in
Park (P), set the parking brake, and
turn the hazard lights on.
Thoroughly examine the tire for a
puncture or other damage.
If a puncture is wider than 3/16ths of
an inch (4 mm), or is located in the
tire sidewall, do not attempt to repair
the tire. Have your vehicle towed to a
Honda service center. In Canada or
the continental U.S.A. simply call 1-
800-465-PLUS (7587) for Honda Plus
Roadside Assistance.
If the damage is smaller than 3/16ths
of an inch (4 mm) and within the tire
tread, proceed with the followinginstructions.
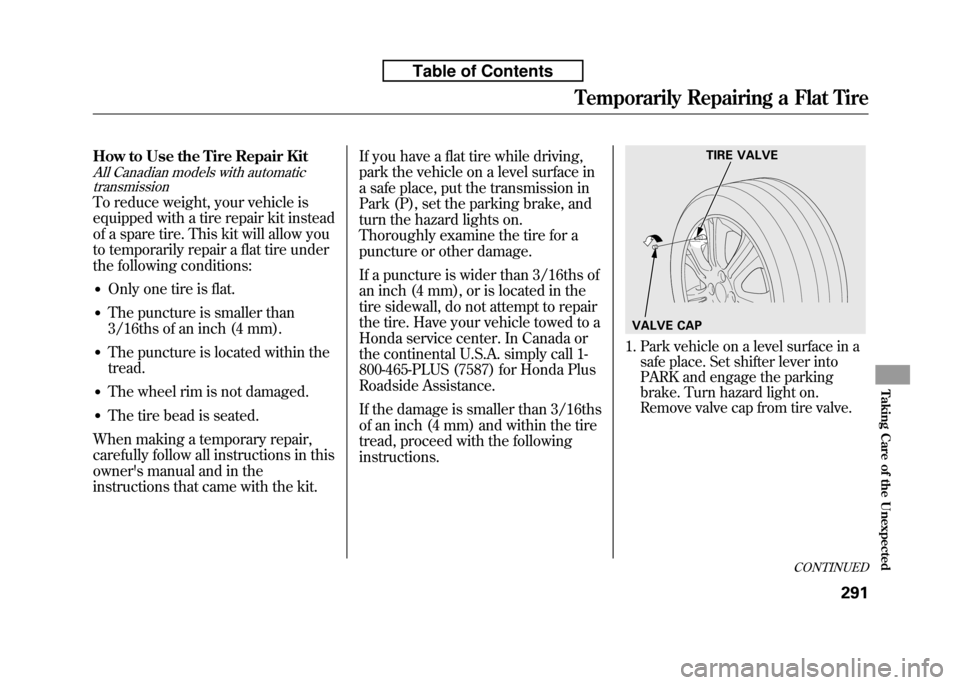
1. Park vehicle on a level surface in a
safe place. Set shifter lever into
PARK and engage the parking
brake. Turn hazard light on.
Remove valve cap from tire valve.
TIRE VALVE
VALVE CAP
CONTINUED
Temporarily Repairing a Flat Tire
291
Taking Care of the Unexpected
Table of Contents