Page 122 of 351

Beverage Holders
Be careful when you are using the
beverage holders. A spilled liquid
that is very hot can scald you or your
passengers. Liquid can also spill
from the door pocket beverage
holders when you open or close the
doors. Use only resealable containers
in the door pockets.
Spilled liquids can damage the
upholstery, carpeting, and electrical
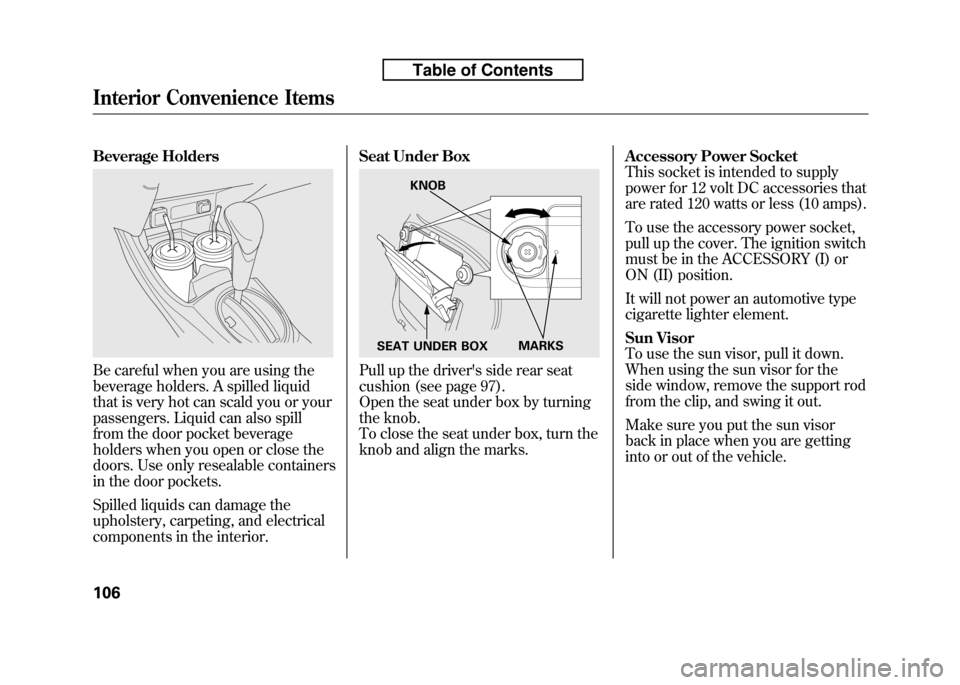
components in the interior.Seat Under BoxPull up the driver's side rear seat
cushion (see page 97).
Open the seat under box by turning
the knob.
To close the seat under box, turn the
knob and align the marks.
Accessory Power Socket
This socket is intended to supply
power for 12 volt DC accessories that
are rated 120 watts or less (10 amps).
To use the accessory power socket,
pull up the cover. The ignition switch
must be in the ACCESSORY (I) or
ON (II) position.
It will not power an automotive type
cigarette lighter element.
Sun Visor
To use the sun visor, pull it down.
When using the sun visor for the
side window, remove the support rod
from the clip, and swing it out.
Make sure you put the sun visor
back in place when you are getting
into or out of the vehicle.
KNOB
MARKS
SEAT UNDER BOX
Interior Convenience Items
106
Table of Contents
Page 123 of 351
Ceiling Light
The ceiling light has a three-position
switch: ON, Door Activated, and
OFF. In the Door Activated (center)
position, the light comes on whenyou:● Open any door.
● Unlock the doors and the tailgate
with the key or the remote
transmitter (if equipped). After all doors are closed tightly, the
light fades out in about 30 seconds.
The ceiling light (with the switch in
the door activated position) comes on
when you remove the key from the
ignition switch. If you do not open a
door, the light fades out in about 30seconds.
If you leave any door open without
the key in the ignition switch, the
ceiling light will go off after 15minutes.
DOOR ACTIVATED
ON
OFF
Interior Lights
107
Instruments and Controls
Table of Contents
Page 136 of 351

Adjusting the Sound
Press the SOUND (
) button to
select an appropriate setting: bass,
treble, fader, balance, and SVC
(speed-sensitive volume
compensation). Turn the VOL/
SELECT knob to adjust the setting. BASS -Adjusts the bass.
TREBLE -Adjusts the treble.
FADER -Adjusts the front-to-back
strength of the sound.BALANCE -Adjusts the side-to-
side strength of the sound.
Each mode is shown in the display as
it changes. Turn the VOL/SELECT
knob to adjust the setting to your
liking. When the level reaches the
center, you will see ‘‘C ’’in the
display. SVC
-Adjusts the volume level
based on the vehicle speed.
The system will return to the audio
display about 10 seconds after you
stop adjusting a mode.
Speed-sensitive Volume Compensation (SVC)
The SVC mode controls the volume
based on vehicle speed. The faster
you go, the louder the audio volume
becomes. As you slow down, the
audio volume decreases.
The SVC has four modes; SVC OFF,
SVC LOW, SVC MID, and SVC
HIGH. Turn the VOL/SELECT knob
to adjust the setting to your liking. If
you feel the sound is too loud,
choose low. If you feel the sound is
too quiet, choose high.
This function is set to MID as the
default setting when the vehicle
leaves the factory. Audio System Lighting
You can use the instrument panel
brightness control knob to adjust the
illumination of the audio system (see
page 76). The audio system
illuminates when the parking lights
are on, even if the system is turnedoff.
Playing the FM/AM Radio (Models without navigation system)
121
Features
Table of Contents
Page 145 of 351

To Play an iPodꭂ
This audio system can operate the
audio files on the iPodꭂwith the
same controls used for the in-dash
disc player. To play an iPod, connect
it to the USB adapter cable in the
upper glove box by using your dock
connector, then press the AUX
button. The ignition switch must be
in the ACCESSORY (I) or ON (II)
position. The iPod will also be
recharged with the ignition switch in
these positions.
The audio system reads and plays
sound files to be playable on the
iPod. The system cannot operate an
iPod as a mass storage device. The
system will only play songs stored on
the iPod with iTunes.
iPod and iTunes are registered
trademarks owned by Apple Inc.
iPods compatible with your audio
system using the USB adapter cable are: Model Software
iPod classic Ver. 1.0 or more
iPod with video
(iPod 5th generation) Ver. 1.2 or more
iPod nano Ver. 1.2 or more
iPod nano 2nd generation Ver. 1.1.2 or more
iPod nano 3rdgeneration Ver. 1.0 or more
iPod touch Ver. 1.1.1 or more
Use only compatible iPods with the
latest software. iPods that are not
compatible will not work in this audiounit. NOTE: ● Do not connect your iPod using a HUB.
● Do not keep the iPod in the
vehicle. Direct sunlight and high
heat will damage it. ●
Do not use an extension cable
between the USB adapter cable
equipped with your vehicle and
your dock connector.
● We recommend backing up your
data before playing it.
In AAC format, DRM (digital rights
management) files cannot be played.
If the system finds a DRM file, the
audio unit displays UNPLAYABLE,
and then skips to the next file.
Playing an iPod®(Models without navigation system)
130
Table of Contents
Page 152 of 351

To Play a USB Flash Memory Device
This audio system can operate the
audio files on a USB flash memory
device with the same controls used
for the in-dash disc player. To play a
USB flash memory device, connect it
to the USB adapter cable in the
upper glove box, then press the AUX
button. The ignition switch must be
in the ACCESSORY (I) or ON (II)position.
The audio system reads and plays
the audio files on the USB flash
memory device in MP3, WMA orAAC
ꭧformats. Depending on the
format, the display shows MP3,
WMA or AAC when a USB flash
memory device is playing. The USB
flash memory device limit is up to
700 folders or up to 65535 files. ꭧ : Only AAC format files recorded
with iTunes are playable on this
audio unit. The recommended USB flash
memory devices are 256 Mbyte or
higher, and formatted with the FAT
file system. Some digital audio
players may be compatible as well.
Some USB flash memory device
(such as devices with security
lockout features, etc.) will not work
in this audio unit. NOTE:
● Do not use a device such as a card
reader or hard drive as the device
or your files may be damaged.
● Do not connect your USB flash
memory device using a HUB.
● Do not use an extension cable to
the USB adapter cable equipped
with your vehicle.
● Do not keep the USB flash
memory device in the vehicle.
Direct sunlight and high heat will
damage it. ●
We recommend backing up your
data before playing a USB flash
memory device.
● Depending on the type and
number of files, it may take some
time before they begin to play.
● Depending on the software the
files were made with, it may not be
possible to play some files, or
display some text data.
The specifications for compatible
MP3 files are: – Sampling frequency:
32/44.1/48 kHz (MPEG1)
16/22.05/24 kHz (MPEG2)
– Bit rate:
32/40/48/56/64/80/96/112/128/
160/192/224/256/320/VBR kbps(MPEG1)
8/16/24/32/40/48/56/64/80/96/
112/128/144/160/VBR kbps(MPEG2)
CONTINUED
Playing a USB Flash Memory Device (Models without navigation system)
137
Features
Table of Contents
Page 162 of 351

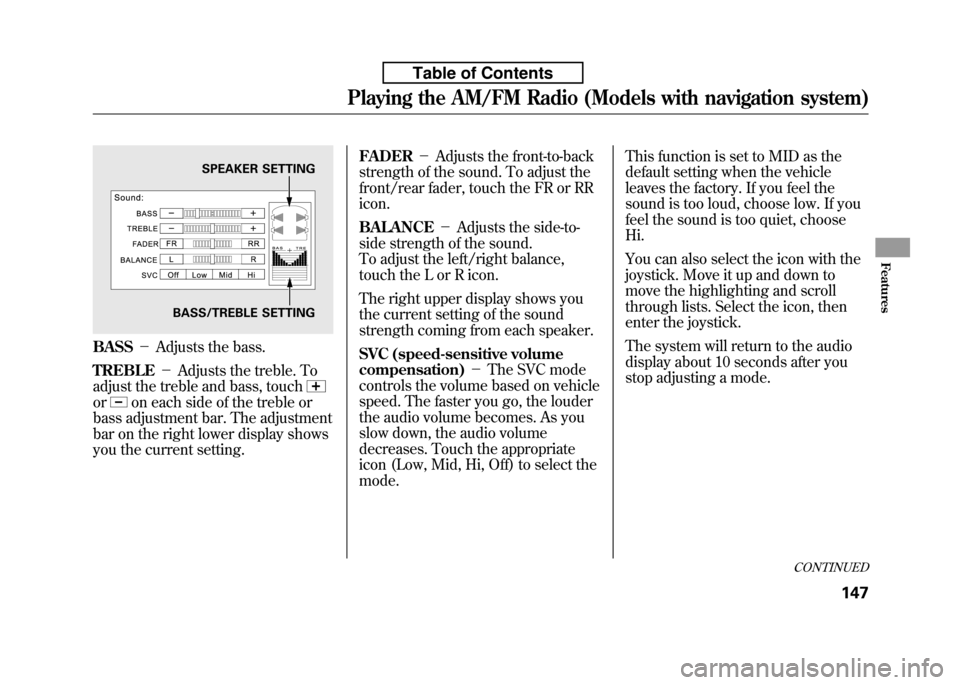
BASS-Adjusts the bass.
TREBLE -Adjusts the treble. To
adjust the treble and bass, touch
oron each side of the treble or
bass adjustment bar. The adjustment
bar on the right lower display shows
you the current setting. FADER
-Adjusts the front-to-back
strength of the sound. To adjust the
front/rear fader, touch the FR or RRicon. BALANCE -Adjusts the side-to-
side strength of the sound.
To adjust the left/right balance,
touch the L or R icon.
The right upper display shows you
the current setting of the sound
strength coming from each speaker.
SVC (speed-sensitive volume
compensation) -The SVC mode
controls the volume based on vehicle
speed. The faster you go, the louder
the audio volume becomes. As you
slow down, the audio volume
decreases. Touch the appropriate
icon (Low, Mid, Hi, Off) to select themode. This function is set to MID as the
default setting when the vehicle
leaves the factory. If you feel the
sound is too loud, choose low. If you
feel the sound is too quiet, chooseHi.
You can also select the icon with the
joystick. Move it up and down to
move the highlighting and scroll
through lists. Select the icon, then
enter the joystick.
The system will return to the audio
display about 10 seconds after you
stop adjusting a mode.
SPEAKER SETTING
BASS/TREBLE SETTING
CONTINUED
Playing the AM/FM Radio (Models with navigation system)
147
Features
Table of Contents
Page 163 of 351
Screen Mode
You can select the background
screen to display the sound level.
There are three screen modes: level
(the sound level is shown with the
vertical bars), spectrum analysis (the
sound level appears as ripples of
water), and off. Each time you touch
the background icon, the displaychanges.Audio System Lighting
You can use the instrument panel
brightness control knob to adjust the
illumination of the control panel (see
page 76). The audio system
illuminates when the parking lights
are on, even if the radio is turned off.
Playing the AM/FM Radio (Models with navigation system)
148
Table of Contents
Page 167 of 351

Press the AUDIO button beside the
screen to show the audio display and
operate the in-dash disc player.
You can also operate the audio
system without using the control
icons on the audio screen. Press the
CD/AUX button. The status bar
appears on the bottom of the screen.
On the navigation screen, you can
see the audio information whenever
you touch the AUDIO INFO or
TRACK LIST icons on the lower of
the screen.
When playing a CD recorded with
text data, the track, album, and artist
name are shown on the audio
display. When playing a disc in MP3
or WMA, the folder number and
name, the file number and name, the
artist name, and the elapsed time are
shown. The system will continuously
play a disc until you change modes.
If the disc was not recorded with text
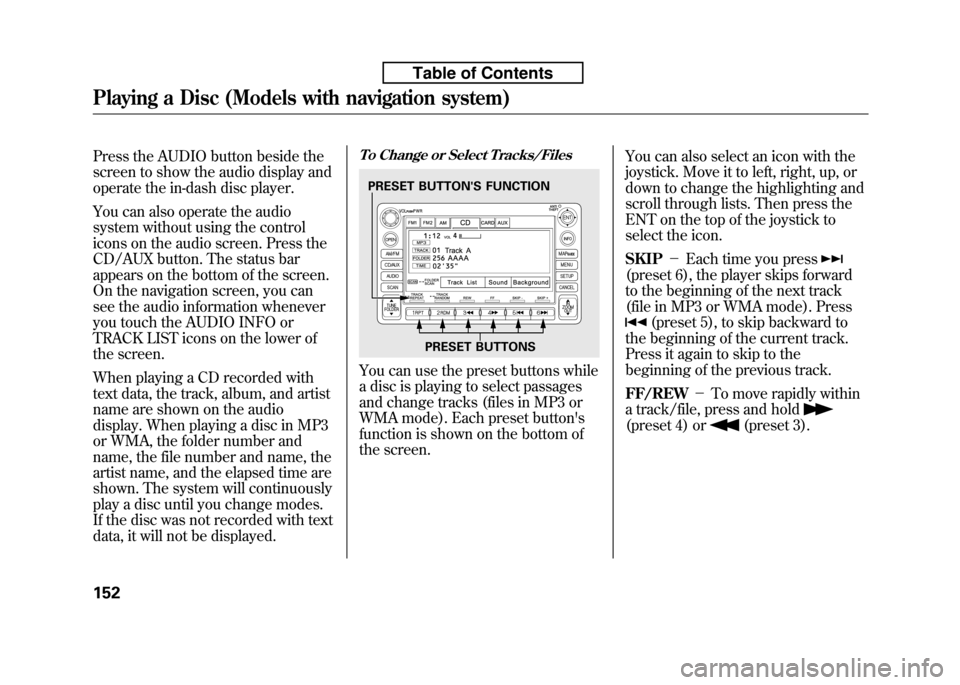
data, it will not be displayed.To Change or Select Tracks/Files
You can use the preset buttons while
a disc is playing to select passages
and change tracks (files in MP3 or
WMA mode). Each preset button's
function is shown on the bottom of
the screen.You can also select an icon with the
joystick. Move it to left, right, up, or
down to change the highlighting and
scroll through lists. Then press the
ENT on the top of the joystick to
select the icon. SKIP
-Each time you press
(preset 6), the player skips forward
to the beginning of the next track
(file in MP3 or WMA mode). Press
(preset 5), to skip backward to
the beginning of the current track.
Press it again to skip to the
beginning of the previous track. FF/REW -To move rapidly within
a track/file, press and hold
(preset 4) or(preset 3).
PRESET BUTTON'S FUNCTION
PRESET BUTTONS
Playing a Disc (Models with navigation system)
152
Table of Contents