Page 216 of 351
3. Holding the grip, pull the supportrod out of its clip. Insert the end
into the designated hole in thehood.
To close the hood, lift it up slightly to
remove the support rod from the
hole. Put the support rod back into
its holding clip. Lower the hood to
about a foot (30 cm) above the
fender, then let it drop. Make sure it
is securely latched. Oil Check
Wait a few minutes after turning the
engine off before you check the oil.
1. Remove the dipstick (orange loop).
2. Wipe off the dipstick with a clean
cloth or paper towel.
3. Insert the dipstick all the way back into its hole.
4. Remove the dipstick again, andcheck the level. It should be
between the upper and lowermarks.
If it is near or below the lower mark,see Adding Engine Oil on page 253.
SUPPORT ROD
GRIP CLIP
DIPSTICK
UPPER MARK
LOWER MARK
Service Station Procedures
201
Before Driving
Table of Contents
Page 217 of 351
Engine Coolant Check
Look at the coolant level in the
radiator reserve tank. Make sure it is
between the MAX and MIN lines. If
it is below the MIN line, seeAdding
Engine Coolant on page 256 for
information on adding the propercoolant. Refer to
Owner's Maintenance
Checks on page 250 for information
about checking other items on yourvehicle.
RESERVE TANK
MAX
MIN
Service Station Procedures
202
Table of Contents
Page 219 of 351

Fuel Economy Factors
The following factors can lower your
vehicle's fuel economy:● Aggressive driving (hard
acceleration and braking)
● Excessive idling, accelerating and
braking in stop-and-go traffic
● Cold engine operation (engines
are more efficient when warmedup)
● Driving with a heavy load or the air
conditioner running
● Improperly inflated tires Improving Fuel Economy
Vehicle Maintenance
A properly maintained vehicle
maximizes fuel economy. Poor
maintenance can significantly reduce
fuel economy. Always maintain your
vehicle according to the maintenance
messages displayed on the
information display (see
Owner's
Maintenance Checks on page 250).
For example:
● Use the recommended viscosity
motor oil, displaying the API
Certification Seal (see page253).
● Maintain proper tire inflation -
An under-inflated tire increases‘‘ rolling resistance, ’’which reduces
fuel economy.
● Avoid carrying excess weight in
your vehicle -It puts a heavier
load on the engine, increasing fuel consumption. ●
Keep your vehicle clean -In
particular, a build-up of snow or
mud on your vehicle's underside
adds weight and rolling resistance.
Frequent cleaning helps your fueleconomy.
Drive Efficiently● Drive moderately -Rapid
acceleration, abrupt cornering, and
hard braking increase fuelconsumption.
● Observe the speed limit -
Aerodynamic drag has a big effect
on fuel mileage at speeds above 45
mph (75 km/h). Reduce your
speed and you reduce the drag.
Trailers, car top carriers, roof
racks and bike racks are also big
contributors to increased drag.
● Always drive in the highest gearpossible -If your vehicle has a
manual transmission, you can
boost your fuel economy by up
shifting as early as possible.
Fuel Economy
204
Table of Contents
Page 220 of 351

●Avoid excessive idling -Idling
results in 0 miles per gallon.
● Minimize the use of the air
conditioning system -The A/C
puts an extra load on the engine
which makes it use more fuel. Use
the fresh-air ventilation whenpossible.
● Plan and combine trips -
Combine several short trips into
one. A warmed-up engine is more
fuel efficient than a cold one.
Calculating Fuel Economy
Measuring Techniques
Direct calculation is the
recommended source of information
about your actual fuel economy.
Using frequency of fill-ups or taking
fuel gauge readings are NOT
accurate measures of fuel economy.
Fuel economy may improve over the
first several thousand miles.
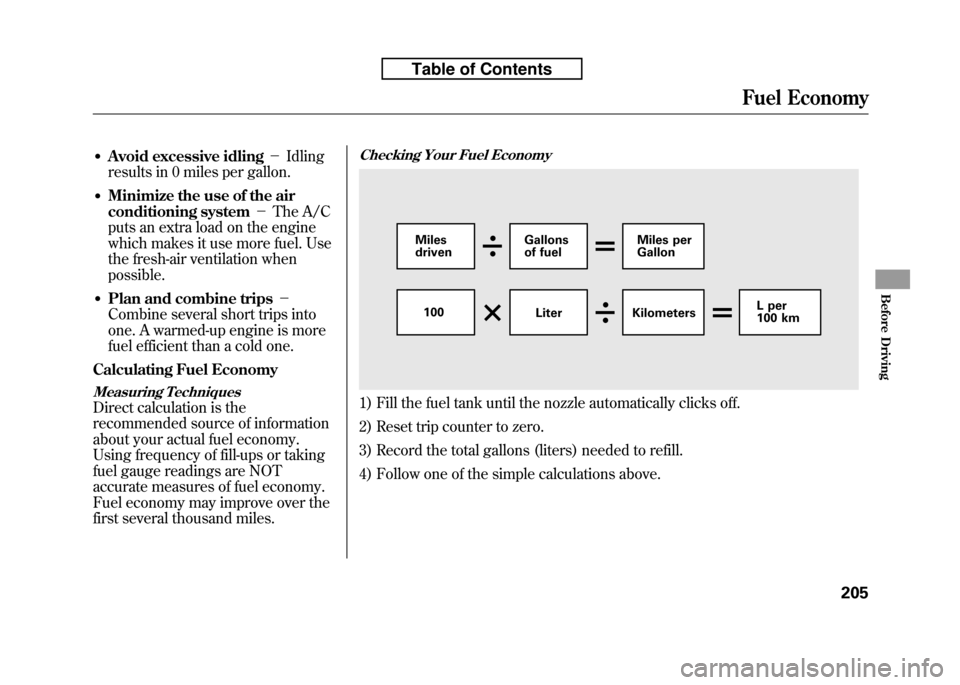
Checking Your Fuel Economy
1) Fill the fuel tank until the nozzle automatically clicks off.
2) Reset trip counter to zero.
3) Record the total gallons (liters) needed to refill.
4) Follow one of the simple calculations above.
Miles driven Gallons
of fuel Miles perGallon
100 Liter Kilometers L per
100 km
Fuel Economy
205
Before Driving
Table of Contents
Page 230 of 351
You should do the following checks
and adjustments before you drive
your vehicle.
1. Make sure all windows, mirrors,and outside lights are clean and
unobstructed. Remove frost, snow,
or ice.
2. Check that the hood is fully closed.
3. Visually check the tires. If a tire looks low, use a gauge to check its
pressure (see page 273).
4. Check that any items you may be carrying are stored properly or
fastened down securely. 5. Check the seat adjustment (see
page 93).
6. Check the adjustment of the inside and outside mirrors (see page101).
7. Check the steering wheel adjustment (see page 77).
8. Make sure the doors and the tailgate are securely closed andlocked.
9. Fasten your seat belt. Check that your passengers have fastened
their seat belts (see page 14).
10. When you start the engine, check the gauges and indicators in the
instrument panel (see page 59).
Preparing to Drive
215
Driving
Table of Contents
Page 238 of 351

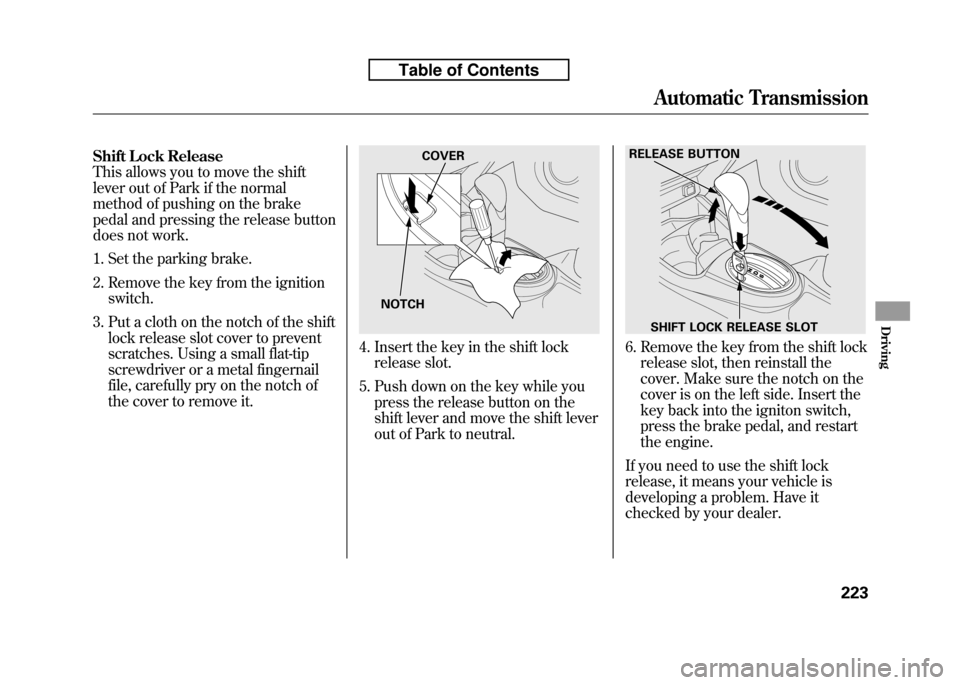
Shift Lock Release
This allows you to move the shift
lever out of Park if the normal
method of pushing on the brake
pedal and pressing the release button
does not work.
1. Set the parking brake.
2. Remove the key from the ignitionswitch.
3. Put a cloth on the notch of the shift lock release slot cover to prevent
scratches. Using a small flat-tip
screwdriver or a metal fingernail
file, carefully pry on the notch of
the cover to remove it.
4. Insert the key in the shift lockrelease slot.
5. Push down on the key while you press the release button on the
shift lever and move the shift lever
out of Park to neutral.6. Remove the key from the shift lockrelease slot, then reinstall the
cover. Make sure the notch on the
cover is on the left side. Insert the
key back into the igniton switch,
press the brake pedal, and restart
the engine.
If you need to use the shift lock
release, it means your vehicle is
developing a problem. Have it
checked by your dealer.
NOTCH COVER
RELEASE BUTTON
SHIFT LOCK RELEASE SLOT
Automatic Transmission
223
Driving
Table of Contents
Page 245 of 351

Your vehicle is equipped with front
disc brakes. The brakes on the rear
wheels are drum. A power assist
helps reduce the effort needed on the
brake pedal. The anti-lock brake
system (ABS) helps you retain
steering control when braking veryhard.
Resting your foot on the pedal keeps
the brakes applied lightly, builds up
heat, and reduces their effectiveness
and reduces brake pad life. In
addition, fuel economy can be
reduced. It also keeps your brake
lights on all the time, confusing
drivers behind you.
Constant application of the brakes
when going down a long hill builds
up heat and reduces their
effectiveness. Use the engine to
assist the brakes by taking your foot
off the accelerator and downshifting
to a lower gear.Check your brakes after driving
through deep water. Apply the
brakes moderately to see if they feel
normal. If not, apply them gently and
frequently until they do. Be extra
cautious and alert in your driving.
Braking System Design
The hydraulic system that operates
the brakes has two separate circuits.
Each circuit works diagonally across
the vehicle (the left-front brake is
connected with the right-rear brake,
etc.). If one circuit should develop a
problem, you will still have braking
at two wheels.
Brake Pad Wear Indicators
If the front brake pads need
replacing, you will hear a distinctive,
metallic screeching sound when you
apply the brake pedal. If you do not
have the brake pads replaced, they
will screech all the time. It is normal
for the brakes to occasionally squeal
or squeak when you apply them.
Braking System
230
Table of Contents
Page 250 of 351

U.S. models only
Your vehicle is equipped with a tire
pressure monitoring system (TPMS)
that turns on every time you start the
engine and monitors the pressure in
your tires while driving.
Each tire has its own pressure sensor
(not including the spare tire). If the
air pressure of a tire becomes
significantly low, the sensor in that
tire immediately sends a signal that
causes the low tire pressure indicator
to come on.
Low Tire Pressure Indicator
When the low tire pressure indicator
is on, one or more of your tires is
significantly underinflated. You
should stop and check your tires as
soon as possible, and inflate them to
the proper pressure as indicated on
the vehicle's tire information placard.
If you think you can safely drive a
short distance to a service station,
proceed slowly, and inflate the tire to
the recommended pressure shown
on the driver's doorjamb.
If the tire is flat, or if the tire pressure
is too low to continue driving, replace
the tire with the compact spare tire
(see page 284). If you cannot make the low tire
pressure indicator go out after
inflating the tires to the specified
values, have your dealer check the
system as soon as possible.
Driving on a significantly under-
inflated tire causes the tire to
overheat and can lead to tire failure.
Under-inflation also reduces fuel
efficiency and tire tread life, and may
affect the vehicle's handling and
stopping ability.
Because tire pressure varies by
temperature and other conditions,
the low tire pressure indicator may
come on unexpectedly.
CONTINUED
Tire Pressure Monitoring System (TPMS)
235
Driving
Table of Contents