2010 HONDA FIT steering wheel
[x] Cancel search: steering wheelPage 39 of 351
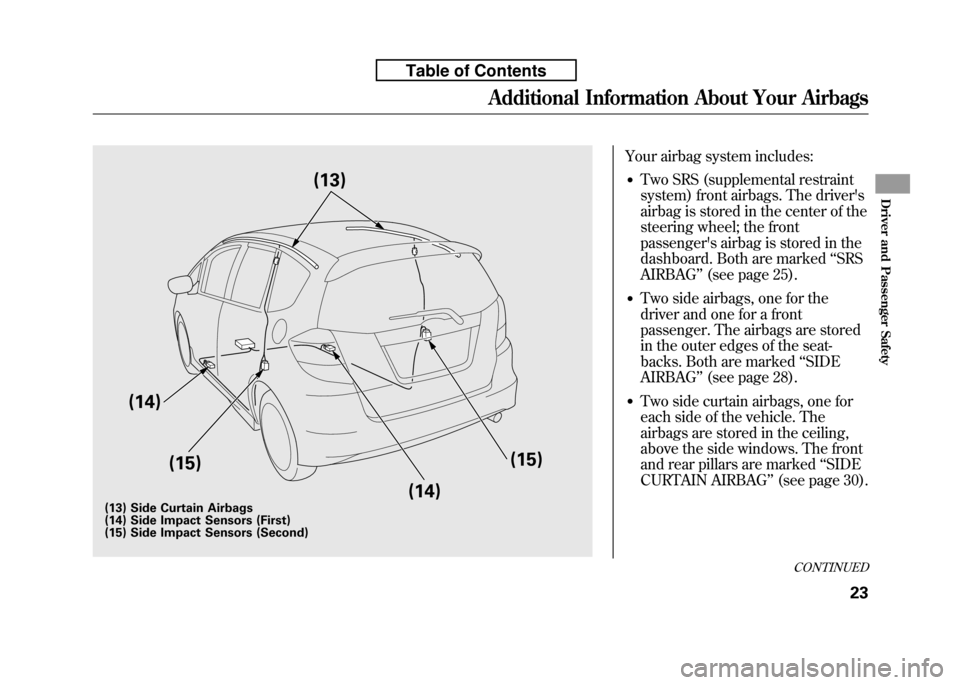
Your airbag system includes:● Two SRS (supplemental restraint
system) front airbags. The driver's
airbag is stored in the center of the
steering wheel; the front
passenger's airbag is stored in the
dashboard. Both are marked ‘‘SRS
AIRBAG ’’(see page 25).
● Two side airbags, one for the
driver and one for a front
passenger. The airbags are stored
in the outer edges of the seat-
backs. Both are marked ‘‘SIDE
AIRBAG ’’(see page 28).
● Two side curtain airbags, one for
each side of the vehicle. The
airbags are stored in the ceiling,
above the side windows. The front
and rear pillars are marked ‘‘SIDE
CURTAIN AIRBAG ’’(see page 30).
(14)
(15) (14)(15)
(13)
(13) Side Curtain Airbags
(14) Side Impact Sensors (First)
(15) Side Impact Sensors (Second)
CONTINUED
Additional Information About Your Airbags
23
Driver and Passenger Safety
Table of Contents
Page 73 of 351

This section gives information about
the controls and displays that
contribute to the daily operation of
your vehicle. All the essential
controls are within easy reach.Control Locations..........................
58
Instrument Panel ..........................
59
Instrument Panel Indicators ..........
60
Gauges ..........................................
68
Trip Meter ................................
69
Instant Fuel Economy ...............
70
Average Fuel Economy .............
70
Odometer ..................................
70
Fuel Gauge ...............................
70
Check Fuel Cap Indicator .........
70
Maintenance Minder ................
71
Controls Near the Steering
Wheel .......................................
72
Windshield Wipers and Washers ................................
73
Windshield Wipers ...................
73
Rear Window Wiper and
Washer .................................
73
Turn Signal and Headlights ..........
74
Headlights ....................................
75
Instrument Panel Brightness ........
76
Hazard Warning Button ................
76
Rear Window Defogger .................
76
Steering Wheel Adjustments .........
77Keys and Locks
............................. 78
Immobilizer System ......................
79
Ignition Switch ..............................
80
Door Locks ...................................
81
Power Door Locks ....................
81
Childproof Door Locks ..............
82
Auto Door Locking/ Unlocking .............................
83
Auto Door Locking ...................
83
Auto Door Unlocking ................
85
Tailgate .........................................
88
Remote Transmitter ......................
90
Seats .............................................
93
Power Windows ..........................
100
Mirrors .......................................
101
Parking Brake .............................
102
Interior Convenience Items .........
104
Lower Glove Box ....................
105
Upper Glove Box .....................
105
Beverage Holders ...................
106
Seat Under Box .......................
106
Accessory Power Socket .........
106
Sun Visor ................................
106
Interior Lights .............................
107
Instruments and Controls
57
Instruments and Controls
Page 78 of 351

Anti-lock Brake System
(ABS) Indicator
This indicator normally comes on for
a few seconds when you turn the
ignition switch to the ON (II)
position, and when the ignition
switch is turned to the START (III)
position. If it comes on at any other
time, there is a problem with the
ABS. If this happens, have your
vehicle checked at a dealer. With this
indicator on, your vehicle still has
normal braking ability but no anti-
lock function. For more information,
see page 231.Electric Power Steering
(EPS) Indicator
This indicator normally comes on when
you turn the ignition switch to the ON
(II) position and goes off after the
engine starts. If it comes on at any
other time, there is a problem in the
electric power steering system. If this
happens, stop the vehicle in a safe
place and turn off the engine. Reset the
system by restarting the engine. The
indicator will not turn off immediately.
If it does not go off after driving a short
distance, or comes back on again while
driving, take the vehicle to your dealer
to have it checked. With the indicator
on, the EPS may be turned off, making
the vehicle harder to steer.
If you turn the steering wheel to the
full left or right position repeatedly
while stopping or driving at very low
speed, you may feel slightly harder
steering in order to prevent damage to
the steering box caused by overheating.Low Fuel Indicator
This indicator comes on as a
reminder that you must refuel soon.
When the indicator comes on, there
is about 1.64 US gal (6.2 L) of fuel
remaining in the tank before the
needle reaches E. There is a small
reserve of fuel remaining in the tank
when the needle does reach E.
Door and Tailgate Open Indicator
This indicator comes on if any door
or the tailgate is not closed tightly.
Instrument Panel Indicators
62
Table of Contents
Page 88 of 351

ꭧ1: To use the horn, press the center pad of the steering wheel.
ꭧ 2: If equipped.
ꭧ 3: Only on vehicles equipped with navigation system. Refer to the navigation system manual.
PADDLE SHIFTER (DOWNSHIFT)ꭧ2
(P. 224)
HEADLIGHTS/
TURN SIGNAL/
FOG LIGHTS
ꭧ2
(P. 74)
NAVIGATION SYSTEM
VOICE CONTROL BUTTONS
ꭧ3
STEERING WHEEL
ADJUSTMENTS
(P. 77) CRUISE CONTROLBUTTONSꭧ
2
(P. 194) AUXILIARY INPUT JACK
(P. 190)
ACCESSORY POWER SOCKET
(P. 106) PASSENGER AIRBAG OFFINDICATOR
(P. 31)
REAR WINDOW
DEFOGGER/HEATED
MIRROR BUTTON
ꭧ
2
(P. 76/102)
WINDSHIELD
WIPERS/WASHERS
(P. 73)
HAZARD WARNING BUTTON
(P. 76)
PADDLE SHIFTER (UPSHIFT)
ꭧ
2
(P. 224)
INSTRUMENT PANEL
BRIGHTNESS
(P. 76)
REMOTE AUDIO
CONTROL BUTTONS
ꭧ 2
(P. 189)
VEHICLE STABILITY
ASSIST (VSA) SYSTEM
OFF SWITCH
ꭧ 2
(P. 234)
Vehicle with navigation system is shown. HORN
ꭧ
1
Controls Near the Steering Wheel
72
Table of Contents
Page 93 of 351
Make sure the rear window is clear
and you have good visibility before
starting to drive.
The defogger wires on the inside of
the rear window can be accidentally
damaged. When cleaning the glass,
always wipe side-to-side.
If equipped
Pushing this button also turns the
mirror heaters on or off. For more
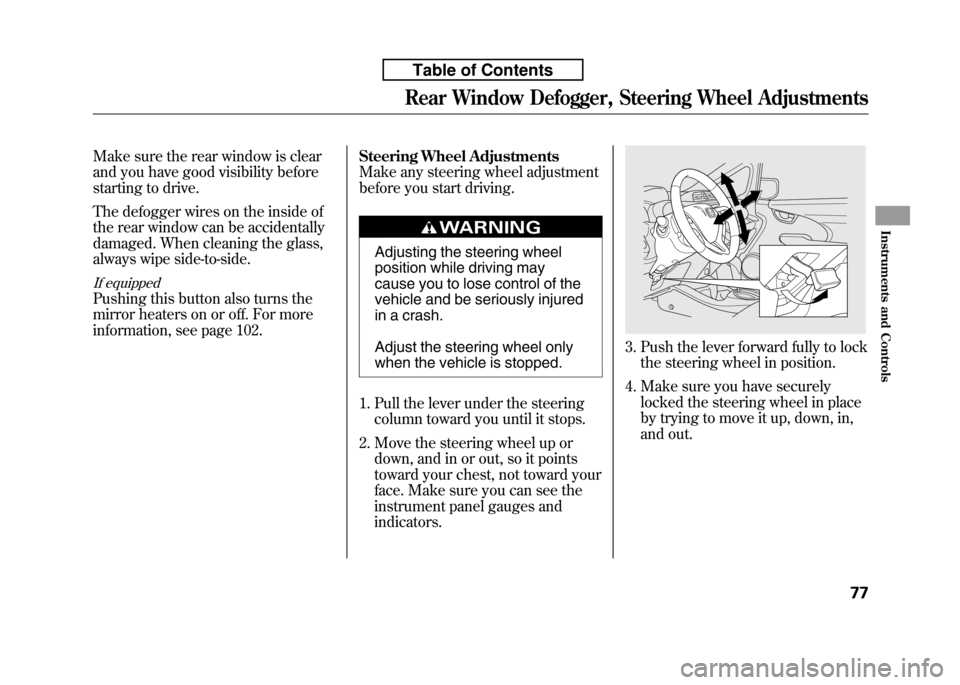
information, see page 102.Steering Wheel Adjustments
Make any steering wheel adjustment
before you start driving.
Adjusting the steering wheel
position while driving may
cause you to lose control of the
vehicle and be seriously injured
in a crash.
Adjust the steering wheel only
when the vehicle is stopped.
1. Pull the lever under the steering column toward you until it stops.
2. Move the steering wheel up or down, and in or out, so it points
toward your chest, not toward your
face. Make sure you can see the
instrument panel gauges andindicators.
3. Push the lever forward fully to lockthe steering wheel in position.
4. Make sure you have securely locked the steering wheel in place
by trying to move it up, down, in,
and out.
Rear Window Defogger, Steering Wheel Adjustments
77
Instruments and Controls
Table of Contents
Page 96 of 351
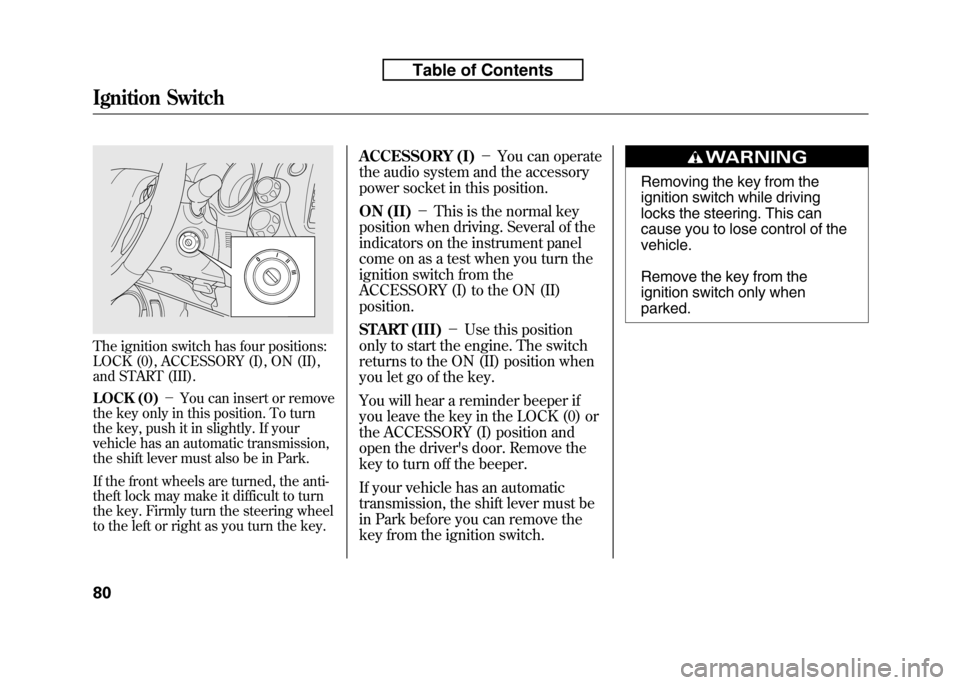
The ignition switch has four positions:
LOCK (0), ACCESSORY (I), ON (II),
and START (III).
LOCK (0)-You can insert or remove
the key only in this position. To turn
the key, push it in slightly. If your
vehicle has an automatic transmission,
the shift lever must also be in Park.
If the front wheels are turned, the anti-
theft lock may make it difficult to turn
the key. Firmly turn the steering wheel
to the left or right as you turn the key. ACCESSORY (I)
-You can operate
the audio system and the accessory
power socket in this position.
ON (II) -This is the normal key
position when driving. Several of the
indicators on the instrument panel
come on as a test when you turn the
ignition switch from the
ACCESSORY (I) to the ON (II)position.
START (III) -Use this position
only to start the engine. The switch
returns to the ON (II) position when
you let go of the key.
You will hear a reminder beeper if
you leave the key in the LOCK (0) or
the ACCESSORY (I) position and
open the driver's door. Remove the
key to turn off the beeper.
If your vehicle has an automatic
transmission, the shift lever must be
in Park before you can remove the
key from the ignition switch.
Removing the key from the
ignition switch while driving
locks the steering. This can
cause you to lose control of thevehicle.
Remove the key from the
ignition switch only whenparked.
Ignition Switch
80
Table of Contents
Page 204 of 351
On vehicles with navigation system
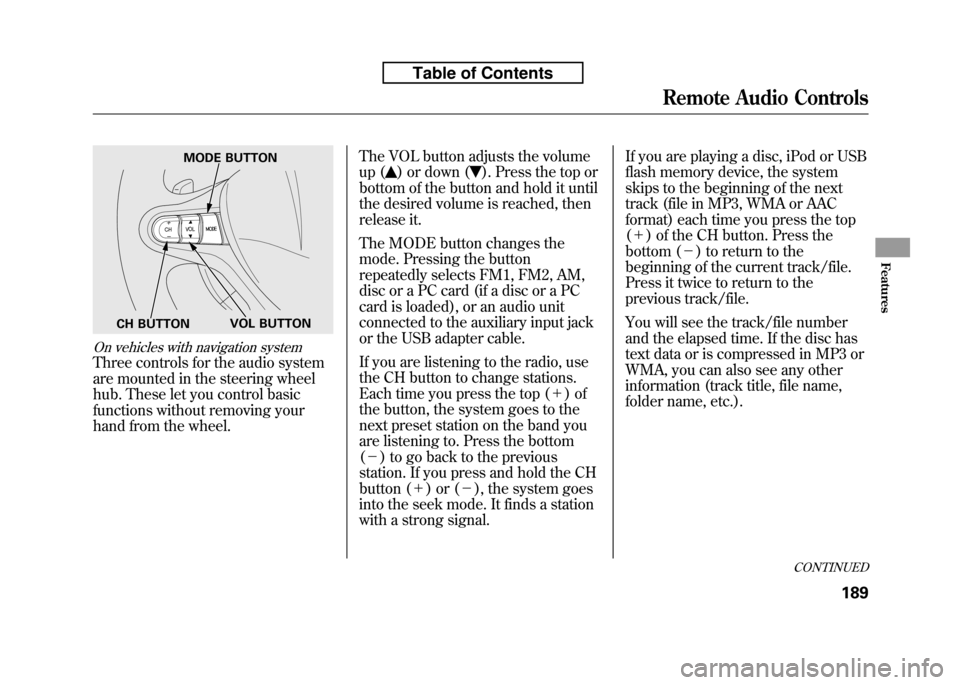
Three controls for the audio system
are mounted in the steering wheel
hub. These let you control basic
functions without removing your
hand from the wheel.The VOL button adjusts the volume
up (
) or down (). Press the top or
bottom of the button and hold it until
the desired volume is reached, then
release it.
The MODE button changes the
mode. Pressing the button
repeatedly selects FM1, FM2, AM,
disc or a PC card (if a disc or a PC
card is loaded), or an audio unit
connected to the auxiliary input jack
or the USB adapter cable.
If you are listening to the radio, use
the CH button to change stations.
Each time you press the top ( +)of
the button, the system goes to the
next preset station on the band you
are listening to. Press the bottom( - ) to go back to the previous
station. If you press and hold the CH
button ( +)or( -), the system goes
into the seek mode. It finds a station
with a strong signal. If you are playing a disc, iPod or USB
flash memory device, the system
skips to the beginning of the next
track (file in MP3, WMA or AAC
format) each time you press the top(
+ ) of the CH button. Press the
bottom ( -) to return to the
beginning of the current track/file.
Press it twice to return to the
previous track/file.
You will see the track/file number
and the elapsed time. If the disc has
text data or is compressed in MP3 or
WMA, you can also see any other
information (track title, file name,
folder name, etc.).
MODE BUTTON
VOL BUTTON
CH BUTTON
CONTINUED
Remote Audio Controls
189
Features
Table of Contents
Page 209 of 351
On Sport model and Canadian LX model
Cruise control allows you to maintain
a set speed above 25 mph (40 km/h)
without keeping your foot on the
accelerator pedal. It should be used
for cruising on straight, open
highways. It is not recommended for
city driving, winding roads, slippery
roads, heavy rain, or bad weather.
Improper use of the cruise
control can lead to a crash.
Use the cruise control only
when traveling on open
highways in good weather.Using the Cruise Control
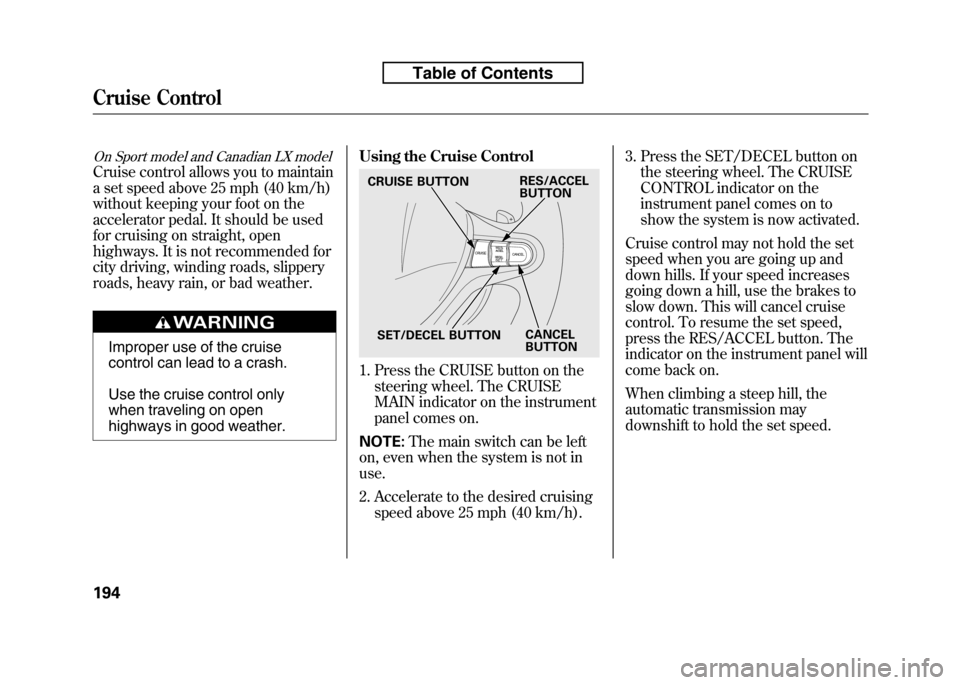
1. Press the CRUISE button on the
steering wheel. The CRUISE
MAIN indicator on the instrument
panel comes on.
NOTE: The main switch can be left
on, even when the system is not inuse.
2. Accelerate to the desired cruising speed above 25 mph (40 km/h). 3. Press the SET/DECEL button on
the steering wheel. The CRUISE
CONTROL indicator on the
instrument panel comes on to
show the system is now activated.
Cruise control may not hold the set
speed when you are going up and
down hills. If your speed increases
going down a hill, use the brakes to
slow down. This will cancel cruise
control. To resume the set speed,
press the RES/ACCEL button. The
indicator on the instrument panel will
come back on.
When climbing a steep hill, the
automatic transmission may
downshift to hold the set speed.
CRUISE BUTTON
SET/DECEL BUTTON CANCEL
BUTTON
RES/ACCEL
BUTTON
Cruise Control
194
Table of Contents