Page 88 of 351
ꭧ1: To use the horn, press the center pad of the steering wheel.
ꭧ 2: If equipped.
ꭧ 3: Only on vehicles equipped with navigation system. Refer to the navigation system manual.
PADDLE SHIFTER (DOWNSHIFT)ꭧ2
(P. 224)
HEADLIGHTS/
TURN SIGNAL/
FOG LIGHTS
ꭧ2
(P. 74)
NAVIGATION SYSTEM
VOICE CONTROL BUTTONS
ꭧ3
STEERING WHEEL
ADJUSTMENTS
(P. 77) CRUISE CONTROLBUTTONSꭧ
2
(P. 194) AUXILIARY INPUT JACK
(P. 190)
ACCESSORY POWER SOCKET
(P. 106) PASSENGER AIRBAG OFFINDICATOR
(P. 31)
REAR WINDOW
DEFOGGER/HEATED
MIRROR BUTTON
ꭧ
2
(P. 76/102)
WINDSHIELD
WIPERS/WASHERS
(P. 73)
HAZARD WARNING BUTTON
(P. 76)
PADDLE SHIFTER (UPSHIFT)
ꭧ
2
(P. 224)
INSTRUMENT PANEL
BRIGHTNESS
(P. 76)
REMOTE AUDIO
CONTROL BUTTONS
ꭧ 2
(P. 189)
VEHICLE STABILITY
ASSIST (VSA) SYSTEM
OFF SWITCH
ꭧ 2
(P. 234)
Vehicle with navigation system is shown. HORN
ꭧ
1
Controls Near the Steering Wheel
72
Table of Contents
Page 90 of 351
4. Hold past OFF to turn the rearwindow wiper on and to spray the
rear window washer. The rear
window wiper makes one more
sweep after you release the switch.
When you shift the transmission to
the reverse position with the front
windshield wiper activated, the rear
wiper operates automatically even if
the rear wiper switch is off.
The rear window washer uses the
same fluid reservoir as the
windshield washer. Turn Signal and Headlights
1. Turn signal
2. Off
3. Parking and interior lights
4. Headlights
5. High beams
6. Flash high beams
On Sport model
7. Fog lights off
8. Fog lights onTurn Signal
-Push down on the
left lever to signal a left turn and up
to signal a right turn. To signal a lane
change, push lightly on the lever and
hold it. The lever will return to the
center when you release it or
complete a turn.
Windshield Wipers and Washers, Turn Signal and Headlights
74
Table of Contents
Page 91 of 351

Headlights-Turning the switch to
the ‘‘
’’position turns on the
parking lights, taillights, instrument
panel lights, side-marker lights, and
rear license plate lights.
Turning the switch to the ‘‘
’’
position turns on the headlights.
When the light switch is in the ‘‘
’’ or ‘‘’’position, the lights
on indicator comes on as a reminder.
This indicator stays on if you leave
the light switch on and turn the
ignition switch to the ACCESSORY
(I) or the LOCK (0) position.
If you leave the lights on with the key
removed from the ignition switch,
you will hear a reminder chime when
you open the driver's door. High Beams
-Push the lever
forward and the high beam indicator
will come on (see page 65). Pull it
back to return to low beams.
To flash the high beams, pull the
lever back lightly, then release it.
The high beams will stay on as long
as you hold the lever back.
Fog Lights
On Sport model
Turn the fog lights on and off by
turning the switch next to the
headlight switch.
You can use the fog lights only when
the headlights are on low beam.
They will go off when the headlights
are turned off. Daytime Running Lights
With the headlight switch off or inthe
position, the high beam
headlights and the high beam
indicator come on with reduced
brightness when you turn the
ignition switch to the ON (II)
position and release the parking
brake. They remain on until you turn
the ignition switch off, even if you set
the parking brake.
The headlights revert to normal
operation when you turn them on
with the switch.
Headlights
75
Instruments and Controls
Table of Contents
Page 92 of 351

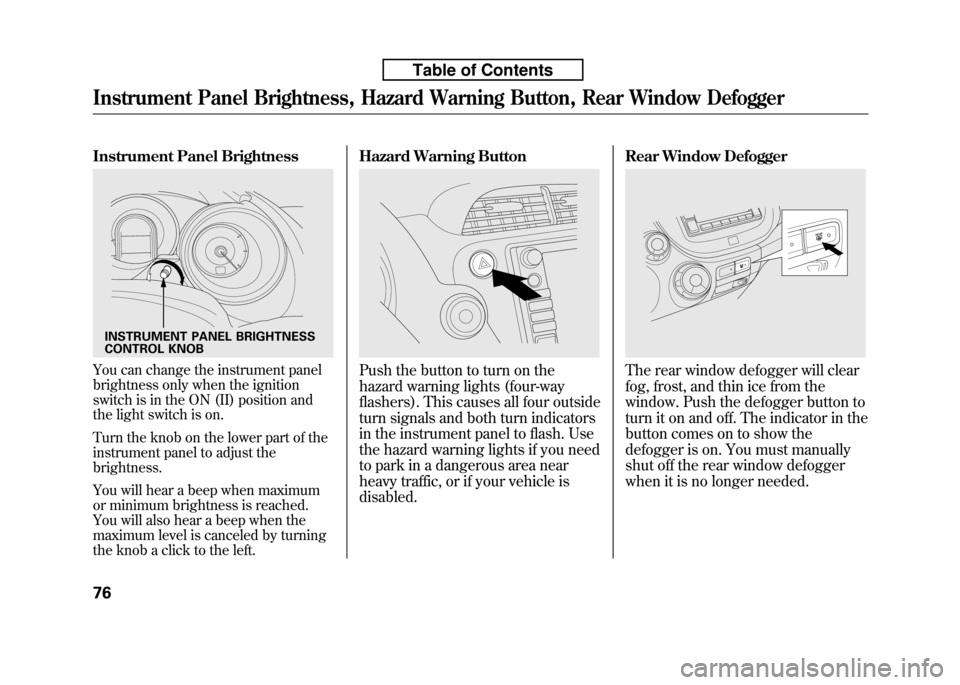
Instrument Panel Brightness
You can change the instrument panel
brightness only when the ignition
switch is in the ON (II) position and
the light switch is on.
Turn the knob on the lower part of the
instrument panel to adjust thebrightness.
You will hear a beep when maximum
or minimum brightness is reached.
You will also hear a beep when the
maximum level is canceled by turning
the knob a click to the left.Hazard Warning ButtonPush the button to turn on the
hazard warning lights (four-way
flashers). This causes all four outside
turn signals and both turn indicators
in the instrument panel to flash. Use
the hazard warning lights if you need
to park in a dangerous area near
heavy traffic, or if your vehicle isdisabled.
Rear Window DefoggerThe rear window defogger will clear
fog, frost, and thin ice from the
window. Push the defogger button to
turn it on and off. The indicator in the
button comes on to show the
defogger is on. You must manually
shut off the rear window defogger
when it is no longer needed.
INSTRUMENT PANEL BRIGHTNESS
CONTROL KNOB
Instrument Panel Brightness, Hazard Warning Button, Rear Window Defogger
76
Table of Contents
Page 118 of 351
3. Push the appropriate edge of theadjustment switch to move the
mirror right, left, up, or down.
4. When you finish, move the selector switch to the center (off)
position. This turns the adjustment
switch off to keep your settings.Heated Mirrors
On Canadian Sport and LX models
The outside mirrors are heated to
remove fog and frost. With the
ignition switch in the ON (II)
position, turn on the heaters by
pressing the button. The indicator in
the button comes on as a reminder.
Press the button again to turn the
heaters off. Pressing this button also
turns the rear window defogger on
and off. Parking Brake
To apply the parking brake, pull the
lever up fully. To release it, pull up
slightly, push the button, and lower
the lever. The parking brake
indicator on the instrument panel
should go out when the parking
brake is fully released (see page 60).
HEATED MIRROR BUTTONPARKING BRAKE LEVER
Mirrors, Parking Brake
102
Table of Contents
Page 280 of 351
Replacing a Fog Light Bulb
On Sport model
The fog lights use halogen bulbs.
When replacing a bulb, handle it
carefully. See page 262 for moreinformation.
1. Use a Phillips-head screwdriver toremove the screw.
2. To remove the fog light assembly, pull it out of the bumper.
3. Remove the electrical connectorfrom the bulb by squeezing the
connector to unlock the tab, then
slide the connector off the bulb.
4. Remove the bulb by turning it about one-quarter turncounterclockwise. 5. Insert the new bulb into the hole,
and turn it one-quarter turn
clockwise to lock it in place.
6. Push the electrical connector back onto the bulb. Make sure it is on
all the way.
7. Turn on the fog lights to test the new bulb.
8. Reinstall the fog light assembly, then tighten the screw.
SCREW
ELECTRICAL CONNECTOR
CONTINUED
Lights
265
Maintenance
Table of Contents
Page 324 of 351

INTERIOR FUSE BOXNo. Amps. Circuits Protected1 10 A Back Up
2 (7.5 A) TPMS
ꭧ
3 20 A Driver's Power Window 4 - Not Used
5 10 A Back Up Light
6 10 A SRS
7 (10 A) Transmission SOL
ꭧ
8 7.5 A SRS
9 (20 A) Fog Lightꭧ
10 7.5 A A/Cꭧ
11 7.5 A ABS/VSAꭧ
12 10 A ACG
13 20 A ACC Socket
14 7.5 A Key Lock/Radio
15 7.5 A Daytime Running Light
16 10 A Rear Wiper
17 20 A Front Passenger's Power Window
18 20 A Rear Passenger's Side Power Window
19 20 A Rear Driver's Side Power Window
20 15 A Fuel Pump
21 15 A Washer
22 7.5 A Meter
23 10 A Hazard
24 10 A Stop/Horn25 - Not Used No. Amps. Circuits Protected
26 10 A LAF
27 (30 A) Door Lock Main
ꭧ
28 20 A Headlight Main
29 10 A Small Light
30 30 A Main Fan Motor31 - Not Used
32 10 A Right Headlight Low Beam
33 15 A IG Coil
34 10 A Left Headlight Low Beam
35 (15 A) Door Lock
ꭧ
36 (15 A) Door Lockꭧ
37 30 A ABS/VSAꭧFSR
38 (15 A) Door Lockꭧ
39 15 A IGP40 - Not Used
41 - Not Used
42 - Not Used
43 (7.5 A) MG Clutch
44 7.5 A STS45 - Not Used
46 - Not Used
47 (30 A) Sub Fan Motor
48 10 A Left Headlight High Beam
49 (15 A) Door Lock
ꭧ
50 (15 A) Door Lockꭧ
ꭧ : If equipped
CONTINUED
Fuse Locations
309
Taking Care of the Unexpected
Table of Contents
Page 325 of 351
No. Amps. Circuits Protected51 10 A Right Headlight High Beam
52 15 A DBW53 - Not Used
54 20 A Rear Defogger
ꭧ
55 10 A Heated Mirrorꭧ
56 30 A Front Wiper
57 30 A Blower Motor
58 30 A ABS/VSA
ꭧMotor
59 20 A Rear Defogger
30 A
60 50 A/ 40 A IG Main/Option Main
61 30 A Radio62 - Not Used
ꭧ : If equipped UNDER-HOOD FUSE BOX
Under-hood Fuse Box (On the battery)
Amps. Circuits Protected100 A Battery 70 A EPS
20 A Horn/Hazard
Fuse Locations
310
Table of Contents