2010 HONDA FIT check engine light
[x] Cancel search: check engine lightPage 258 of 351

This section explains why it is
important to keep your vehicle well
maintained and how to follow basic
maintenance safety precautions.
This section also includes
instructions on how to read the
maintenance minder messages on
the information display, and
instructions for simple maintenance
tasks you may want to take care ofyourself.
If you have the skills and tools to
perform more complex maintenance
tasks on your vehicle, you may want
to purchase the service manual. See
page 335 for information on how to
obtain a copy, or see your dealer.Maintenance Safety.....................
244
Maintenance Minder ..................
245
Fluid Locations ...........................
252
Adding Engine Oil ......................
253
Changing the Engine Oil and Filter .......................................
254
Engine Coolant ...........................
256
Windshield Washers ...................
258
Transmission Fluid .....................
259
Automatic Transmission
Fluid ...................................
259
Manual Transmission Fluid ....
260
Brake and Clutch Fluid ...............
261
Lights ..........................................
262
Cleaning the Seat Belts ...............
267
Floor Mats ..................................
267
Audio Antenna ............................
268
Dust and Pollen Filter .................
268
Wiper Blades ..............................
269
Tires ...........................................
273
Checking the Battery ..................
279
Vehicle Storage ...........................
281
Maintenance
243
Maintenance
Page 265 of 351

However, service at a dealer is not
mandatory to keep your warranties in
effect. Maintenance may be done by
any qualified service facility or
person who is skilled in this type of
automotive service. Make sure to
have the service facility or person
reset the display as previously
described. Keep all receipts as proof
of completion, and have the person
who does the work fill out your
Honda Service History or Canadian
Maintenance Log. Check your
warranty booklet for moreinformation.
We recommend using Honda parts
and fluids whenever you have
maintenance done. These are
manufactured to the same high
quality standards as the original
components, so you can be confident
of their performance and durability.U.S. Vehicles:
Maintenance,
replacement, or repair of
emissions control devices and
systems may be done by any
automotive repair establishment
or individual using parts that are‘‘ certified ’’to EPA standards.
According to state and federal
regulations, failure to perform
maintenance on the items markedwith #will not void your emissions
warranties. However, all
maintenance services should be
performed in accordance with the
intervals indicated by the informationdisplay.
Owner's Maintenance Checks
You should check the following
items at the specified intervals. If you
are unsure of how to perform any
check, turn to the appropriate pagelisted. ●
Engine oil level -Check every
time you fill the fuel tank. See page201.
● Engine coolant level -Check the
radiator reserve tank every time
you fill the fuel tank. See page 202.
● Automatic transmission -Check
the fluid level monthly. See page259.
● Brakes -Check the fluid level
monthly. See page 261.
● Tires -Check the tire pressure
monthly. Examine the tread for
wear and foreign objects. See page274.
● Lights -Check the operation of
the headlights, parking lights,
taillights, high-mount brake light,
and license plate lights monthly.
See page 262.
Maintenance Minder
250
Table of Contents
Page 273 of 351

Check the fluid level in the
windshield washer reservoir at least
monthly during normal use. This
reservoir supplies the windshield and
rear window washers.
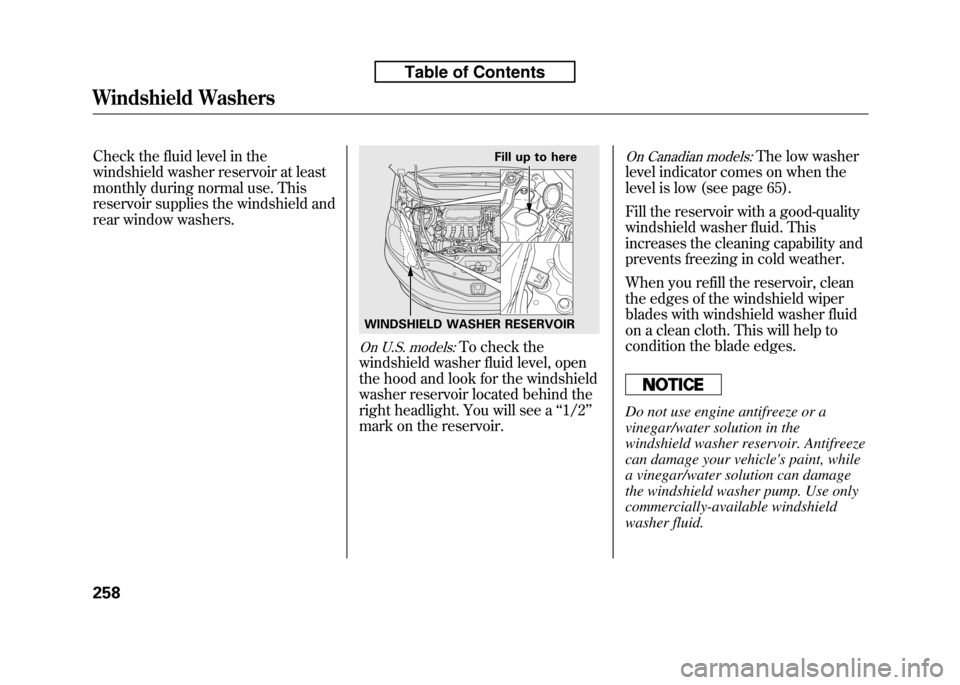
On U.S. models:To check the
windshield washer fluid level, open
the hood and look for the windshield
washer reservoir located behind the
right headlight. You will see a ‘‘1/2 ’’
mark on the reservoir.
On Canadian models:The low washer
level indicator comes on when the
level is low (see page 65).
Fill the reservoir with a good-quality
windshield washer fluid. This
increases the cleaning capability and
prevents freezing in cold weather.
When you refill the reservoir, clean
the edges of the windshield wiper
blades with windshield washer fluid
on a clean cloth. This will help to
condition the blade edges.
Do not use engine antifreeze or a
vinegar/water solution in the
windshield washer reservoir. Antifreeze
can damage your vehicle's paint, while
a vinegar/water solution can damage
the windshield washer pump. Use only
commercially-available windshield
washer fluid.
WINDSHIELD WASHER RESERVOIR Fill up to here
Windshield Washers
258
Table of Contents
Page 312 of 351

If the pressure is lower than 32 psi
(220 kPa) and higher than 19 psi
(130 kPa), use the air pump to
bring air to the desired level as
described in step 11. Then drive to
the nearest service station at no
more than 50 mph (80 km/h).
If the pressure is below 19 psi, do
not continue. Have the vehicle
towed (see page 311).
In any case, be sure to have the
damaged tire permanently repaired
as soon as possible.
Remember to return the tire sealant
bottle to your Honda service center
for proper disposal. If the Engine Won't Start
Diagnosing why the engine won't
start falls into two areas, depending
on what you hear when you turn the
ignition switch to the START (III)position:
● You hear nothing, or almost
nothing. The engine's starter
motor does not operate at all, or
operates very slowly.
● You can hear the starter motor
operating normally, or the starter
motor sounds like it is spinning
faster than normal, but the engine
does not start up and run. Nothing Happens or the Starter
Motor Operates Very Slowly
When you turn the ignition switch to
the START (III) position, you do not
hear the normal noise of the engine
trying to start. You may hear a
clicking sound, a series of clicks, or
nothing at all.
Check these things:
● Check the transmission interlock.
If you have a manual transmission,
the clutch pedal must be pushed
all the way to the floor or the
starter will not operate. With an
automatic transmission, it must be
in Park or neutral.
● Turn the ignition switch to the ON
(II) position. Turn on the
headlights, and check their
brightness. If the headlights are
very dim or do not come on at all,
the battery is discharged. See
Jump Starting on page 299.
CONTINUED
Temporarily Repairing a Flat Tire, If the Engine Won't Start
297
Taking Care of the Unexpected
Table of Contents
Page 313 of 351

●Turn the ignition switch to the
START (III) position. If the
headlights do not dim, check the
condition of the fuses. If the fuses
are OK, there is probably
something wrong with the
electrical circuit for the ignition
switch or starter motor. You will
need a qualified technician to
determine the problem. See
Emergency Towing on page 311.
If the headlights dim noticeably or go
out when you try to start the engine,
either the battery is discharged or
the connections are corroded. Check
the condition of the battery and
terminal connections (see page 279).
You can then try jump starting the
vehicle from a booster battery (see
page 299). The Starter Operates Normally
In this case, the starter motor's speed
sounds normal, or even faster than
normal, when you turn the ignition
switch to the START (III) position,
but the engine does not run.
● Are you using a properly coded
key? An improperly coded key will
cause the immobilizer system
indicator in the instrument panel
to blink rapidly (see page 79).
● Are you using the proper starting
procedure? Refer to Starting the
Engine on page 216. ●
Do you have fuel? Check the fuel
gauge; the low fuel indicator may
not be working.
● There may be an electrical
problem, such as no power to the
fuel pump. Check all the fuses (see
page 306).
If you find nothing wrong, you will
need a qualified technician to find the
problem. See Emergency Towing on
page 311.
If the Engine Won't Start
298
Table of Contents
Page 316 of 351

The high temperature indicator
should be off under most conditions.
If the engine coolant temperature
gets higher than normal, the
indicator will blink. If it stays on, you
should determine the reason (hot
day, driving up a steep hill, etc.).
If the vehicle overheats, you should
take immediate action. The only
indication may be the high
temperature indicator blinking or
remaining on. Or you may see steam
or spray coming from under thehood.
Driving with the high temperature
indicator on can cause serious damage
to your engine.
Steam and spray from an
overheated engine can
seriously scald you.
Do not open the hood if steam
is coming out.
1. Safely pull to the side of the road. Put the transmission in neutral
(manual) or Park (automatic), and
set the parking brake. Turn off all
accessories, and turn on the
hazard warning lights.
2. If you see steam and/or spray coming from under the hood, turn
off the engine. Wait until you see
no more signs of steam or spray,
then open the hood. 3. If you do not see steam or spray,
leave the engine running, and
check the high temperature
indicator. If the high heat is due to
overloading, the engine should
start to cool down almost
immediately. If it does, wait until
the high temperature indicator
goes off, then continue driving.
4. If the high temperature indicator stays on, turn off the engine.
CONTINUED
If the Engine Overheats
301
Taking Care of the Unexpected
Table of Contents
Page 318 of 351

Low Oil Pressure Indicator
This indicator should never
come on when the engine is
running. If it starts flashing or stays
on, the oil pressure has dropped very
low or lost pressure. Serious engine
damage is possible, and you should
take immediate action.
Running the engine with low oil
pressure can cause serious mechanical
damage almost immediately. Turn off
the engine as soon as you can safely get
the vehicle stopped. 1. Safely pull off the road, and shut
off the engine. Turn on the hazard
warning lights.
2. Let the vehicle sit for a minute. Open the hood, and check the oil
level (see page 201). An engine
very low on oil can lose pressure
during cornering and other drivingmaneuvers.
3. If necessary, add oil to bring the level back to the full mark on the
dipstick (see page 253).
4. Start the engine, and watch the oil pressure indicator. If it does not go
out within 10 seconds, turn off the
engine. There is a mechanical
problem that needs to be repaired
before you can continue driving(see Emergency Towing on page
311). Charging System Indicator
If the charging system
indicator comes on brightly
when the engine is running, the
battery is not being charged.
Immediately turn off all electrical
accessories. Try not to use other
electrically operated controls such as
the power windows. Keep the engine
running; starting the engine will
discharge the battery rapidly.
Go to a service station or garage
where you can get technicalassistance.
Low Oil Pressure Indicator, Charging System Indicator
303
Taking Care of the Unexpected
Table of Contents