2010 HONDA FIT stop start
[x] Cancel search: stop startPage 78 of 351

Anti-lock Brake System
(ABS) Indicator
This indicator normally comes on for
a few seconds when you turn the
ignition switch to the ON (II)
position, and when the ignition
switch is turned to the START (III)
position. If it comes on at any other
time, there is a problem with the
ABS. If this happens, have your
vehicle checked at a dealer. With this
indicator on, your vehicle still has
normal braking ability but no anti-
lock function. For more information,
see page 231.Electric Power Steering
(EPS) Indicator
This indicator normally comes on when
you turn the ignition switch to the ON
(II) position and goes off after the
engine starts. If it comes on at any
other time, there is a problem in the
electric power steering system. If this
happens, stop the vehicle in a safe
place and turn off the engine. Reset the
system by restarting the engine. The
indicator will not turn off immediately.
If it does not go off after driving a short
distance, or comes back on again while
driving, take the vehicle to your dealer
to have it checked. With the indicator
on, the EPS may be turned off, making
the vehicle harder to steer.
If you turn the steering wheel to the
full left or right position repeatedly
while stopping or driving at very low
speed, you may feel slightly harder
steering in order to prevent damage to
the steering box caused by overheating.Low Fuel Indicator
This indicator comes on as a
reminder that you must refuel soon.
When the indicator comes on, there
is about 1.64 US gal (6.2 L) of fuel
remaining in the tank before the
needle reaches E. There is a small
reserve of fuel remaining in the tank
when the needle does reach E.
Door and Tailgate Open Indicator
This indicator comes on if any door
or the tailgate is not closed tightly.
Instrument Panel Indicators
62
Table of Contents
Page 93 of 351

Make sure the rear window is clear
and you have good visibility before
starting to drive.
The defogger wires on the inside of
the rear window can be accidentally
damaged. When cleaning the glass,
always wipe side-to-side.
If equipped
Pushing this button also turns the
mirror heaters on or off. For more
information, see page 102.Steering Wheel Adjustments
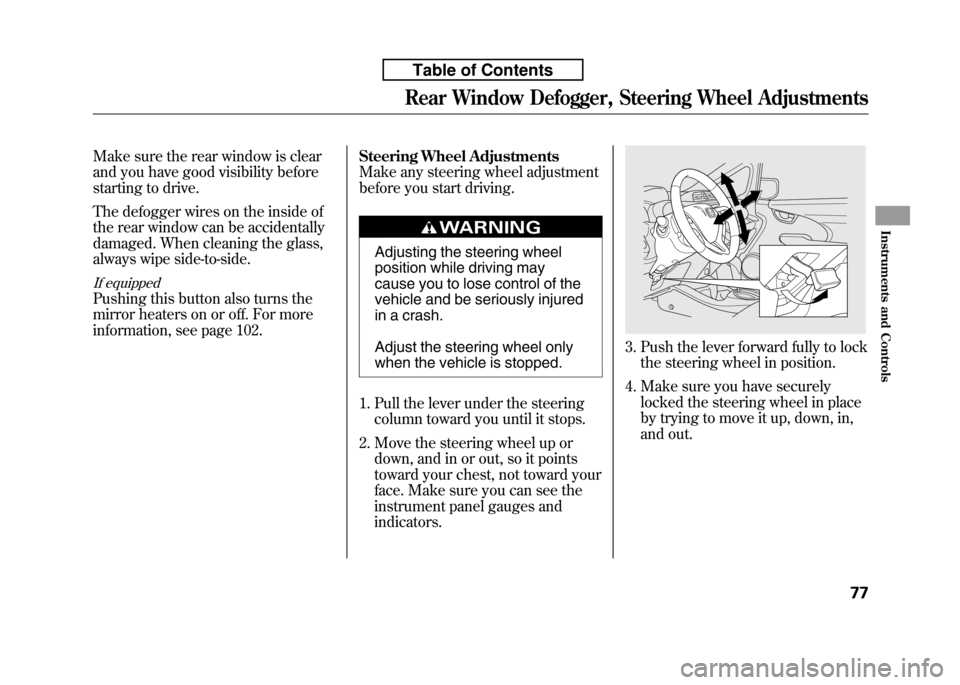
Make any steering wheel adjustment
before you start driving.
Adjusting the steering wheel
position while driving may
cause you to lose control of the
vehicle and be seriously injured
in a crash.
Adjust the steering wheel only
when the vehicle is stopped.
1. Pull the lever under the steering column toward you until it stops.
2. Move the steering wheel up or down, and in or out, so it points
toward your chest, not toward your
face. Make sure you can see the
instrument panel gauges andindicators.
3. Push the lever forward fully to lockthe steering wheel in position.
4. Make sure you have securely locked the steering wheel in place
by trying to move it up, down, in,
and out.
Rear Window Defogger, Steering Wheel Adjustments
77
Instruments and Controls
Table of Contents
Page 117 of 351

AUTO-To open or close the
driver's window, push or pull the
window switch firmly down or up to
the second detent, and release it.
The window will automatically go
down or up all the way. To stop the
window, pull or push the window
switch briefly.
AUTO REVERSE -If the driver's
window senses any obstacle while it
is closing automatically, it will
reverse direction, and then stop. To
close the window, remove the
obstacle, then use the window switchagain.
Auto reverse stops sensing when the
window is almost closed. You should
always check that all passengers and
objects are away from the window
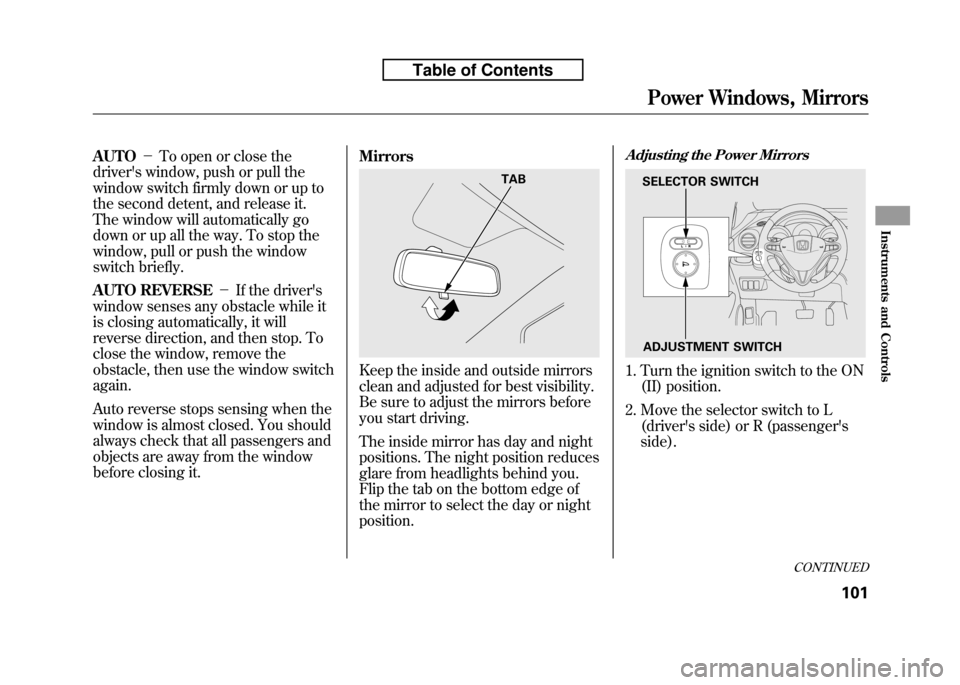
before closing it. Mirrors
Keep the inside and outside mirrors
clean and adjusted for best visibility.
Be sure to adjust the mirrors before
you start driving.
The inside mirror has day and night
positions. The night position reduces
glare from headlights behind you.
Flip the tab on the bottom edge of
the mirror to select the day or nightposition.
Adjusting the Power Mirrors
1. Turn the ignition switch to the ON
(II) position.
2. Move the selector switch to L (driver's side) or R (passenger's side).
TABSELECTOR SWITCH
ADJUSTMENT SWITCH
CONTINUED
Power Windows, Mirrors
101
Instruments and Controls
Table of Contents
Page 235 of 351

All models except U.S. Sport
To shift from: Do this:PtoR Press the brake pedal, and
press the shift lever releasebutton.
RtoP
NtoR
D 3to 2
2to1 Press the shift lever releasebutton.
1to2
2toD 3
D 3to D
DtoN
DtoD 3
NtoD
RtoN Move the shift lever.
U.S. Sport model
To shift from: Do this:
PtoR Press the brake pedal, and
press the shift lever releasebutton.
RtoP
NtoR
DtoS Press the shift lever releasebutton.
StoD
DtoN
NtoD RtoN Move the shift lever. Park (P)
-This position
mechanically locks the transmission.
Use Park whenever you are turning
off or starting the engine. To shift out
of Park, you must press on the brake
pedal and have your foot off the
accelerator pedal. Press the release
button on the front of the shift lever
to move it.
If you have done all of the above and
still cannot move the lever out of
Park, see Shift Lock Release on
page 223.
To avoid transmission damage, come
to a complete stop before shifting
into Park. You must also press the
release button to shift into Park. The
shift lever must be in Park before
you can remove the key from the
ignition switch.
Automatic Transmission
220
Table of Contents
Page 236 of 351

Reverse (R)-Press the brake
pedal and press the release button on
the front of the shift lever to shift
from Park to reverse. To shift from
reverse to neutral, come to a
complete stop, and then shift. Press
the release button before shifting
into reverse from neutral.
Neutral (N) -Use neutral if you
need to restart a stalled engine, or if
it is necessary to stop briefly with the
engine idling. Shift to the Park
position if you need to leave your
vehicle for any reason. Press on the
brake pedal when you are moving
the shift lever from neutral to
another gear. Drive (D)
-Use this position for
your normal driving. The
transmission automatically selects a
suitable gear (1 through 5) for your
speed and acceleration. You may
notice the transmission shifting up at
higher engine speeds when the
engine is cold. This helps the engine
warm up faster.
All models except U.S. Sport
Drive (D 3) - This position is similar
to D, except only the first three gears
are selected. Use D 3to provide
engine braking when going down a
steep hill. D 3can also keep the
transmission from cycling between
third and fourth gears in stop-and-godriving.
All models except U.S. Sport
Second (2) -To shift to second,
press the release button on the front
of the shift lever. This position locks
the transmission in second gear. It
does not downshift to first gear when
you come to a stop.
Use second gear:
● For more power when climbing.
● To increase engine braking when
going down steep hills.
● For starting out on a slippery
surface or in deep snow.
● To help reduce wheel spin.
CONTINUED
Automatic Transmission
221
Driving
Table of Contents
Page 242 of 351

When you accelerate from a stop, the
transmission starts in first gear, and
you must manually upshift between
first and fifth gears. Make sure you
upshift before the engine speed
reaches the tachometer's red zone.
The transmission remains in the
selected gear (5, 4, 3, 2, or 1). There
is no automatic downshift when you
push the accelerator pedal to thefloor.
When you are driving in 4th or 5th
gear, the transmission downshifts to
the lower gear under the followingconditions:● The vehicle slows down to a
certain speed.
● You press the brake pedal. Downshifting with the paddle shifter
allows you to increase the engine
braking when going down steep or
long hills, and provides more power
when climbing uphills. You can
upshift the transmission manually to
reduce the rpm. Driving in the
higher gear helps fuel economy.
The transmission also shifts
automatically as the vehicle comes to
a complete stop. It downshifts to first
gear when the vehicle speed reaches
6 mph (10 km/h) or less.
The automatic transmission will not
allow you to shift up or down if:
● You downshift before the engine
speed reaches the highest
threshold of the lower gear.
If you try to do this, the gear position
indicator will flash the number of the
lower gear several times, then return
to a higher gear.
CONTINUED
Driving with the Paddle Shifters (Sport only)
227
Driving
Table of Contents
Page 243 of 351

If the vehicle speed decreases below
the redline of the selected lower gear
while the indicator is flashing, the
transmission downshifts, and the
indicator displays the selected gear.● You upshift before the engine
speed reaches the lowest
threshold of the higher gear.
● You pull both paddle shifters at the
same time.Starting in Second Gear
When you are in sequential shift
mode, and the vehicle is stopped,
pull the +(right) paddle shifter to
shift to second gear. You will see‘‘ M2 ’’in the display. Starting in
second gear helps to reduce
wheelspin in deep snow or on a
slippery surface. Recommended Shift Points
Drive in the highest gear that lets the
engine run and accelerate smoothly.
This will give you good fuel economy
and effective emissions control. The
following shift points are
recommended:
Shift up Normal acceleration
1st to 2nd 15 mph (24 km/h)
2nd to 3rd 25 mph (40 km/h)
3rd to 4th 40 mph (64 km/h)
4th to 5th 47 mph (76 km/h )
Driving with the Paddle Shifters (Sport only)
228
Table of Contents
Page 250 of 351

U.S. models only
Your vehicle is equipped with a tire
pressure monitoring system (TPMS)
that turns on every time you start the
engine and monitors the pressure in
your tires while driving.
Each tire has its own pressure sensor
(not including the spare tire). If the
air pressure of a tire becomes
significantly low, the sensor in that
tire immediately sends a signal that
causes the low tire pressure indicator
to come on.
Low Tire Pressure Indicator
When the low tire pressure indicator
is on, one or more of your tires is
significantly underinflated. You
should stop and check your tires as
soon as possible, and inflate them to
the proper pressure as indicated on
the vehicle's tire information placard.
If you think you can safely drive a
short distance to a service station,
proceed slowly, and inflate the tire to
the recommended pressure shown
on the driver's doorjamb.
If the tire is flat, or if the tire pressure
is too low to continue driving, replace
the tire with the compact spare tire
(see page 284). If you cannot make the low tire
pressure indicator go out after
inflating the tires to the specified
values, have your dealer check the
system as soon as possible.
Driving on a significantly under-
inflated tire causes the tire to
overheat and can lead to tire failure.
Under-inflation also reduces fuel
efficiency and tire tread life, and may
affect the vehicle's handling and
stopping ability.
Because tire pressure varies by
temperature and other conditions,
the low tire pressure indicator may
come on unexpectedly.
CONTINUED
Tire Pressure Monitoring System (TPMS)
235
Driving
Table of Contents