Page 98 of 342
●Lock the hatch by pushing down
the lock tab on the driver's door
(see page 80), or by using the
master key in the driver's door lock.
● Lock or unlock the hatch with the
master door lock switch.
With the hatch unlocked, open it by
pulling the handle and lifting up.
To close the hatch, lower it, then
press down on the back edge.
When both the hatch and tailgate are
open, the hatch cannot be latched
without first closing the tailgate. Tailgate
You can open the tailgate only when
the hatch is open. To open the
tailgate, slide the lock lever to the left
and swing down the tailgate. To close
the tailgate, lift it up and push it
firmly until it latches.
Before closing the tailgate, make
sure the hatch is raised. Closing the
tailgate on the lowered hatch can
damage the hatch and the tailgate.
Door Locks
82
Table of Contents
Page 111 of 342

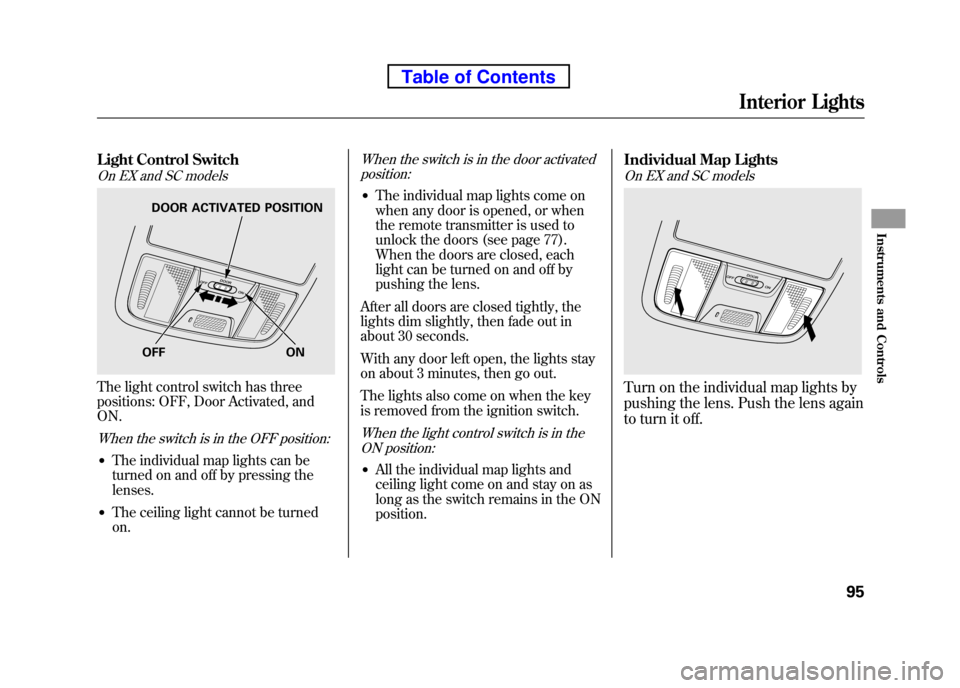
Light Control Switch
On EX and SC models
The light control switch has three
positions: OFF, Door Activated, andON.
When the switch is in the OFF position:
●The individual map lights can be
turned on and off by pressing thelenses.
● The ceiling light cannot be turnedon.
When the switch is in the door activated
position:
● The individual map lights come on
when any door is opened, or when
the remote transmitter is used to
unlock the doors (see page 77).
When the doors are closed, each
light can be turned on and off by
pushing the lens.
After all doors are closed tightly, the
lights dim slightly, then fade out in
about 30 seconds.
With any door left open, the lights stay
on about 3 minutes, then go out.
The lights also come on when the key
is removed from the ignition switch.
When the light control switch is in the ON position:
● All the individual map lights and
ceiling light come on and stay on as
long as the switch remains in the ONposition. Individual Map Lights
On EX and SC models
Turn on the individual map lights by
pushing the lens. Push the lens again
to turn it off.
OFF ON
DOOR ACTIVATED POSITION
Interior Lights
95
Instruments and Controls
Table of Contents
Page 112 of 342
Courtesy Light
On vehicles with navigation system
The courtesy light between the map
lights comes on when you turn the
parking lights on. To adjust its
brightness, turn the select/reset
knob on the instrument panel (see
page 72).Ceiling Light
The ceiling light has a three-position
switch: ON, Door Activated, and OFF.
In the Door Activated (center)
position, the light comes on when you:
● Open any door.
● Remove the key from the ignition.
If you do not open a door, the light
fades out in about 30 seconds.
● Unlock the doors with the key or
remote transmitter. Cargo Area Light
The cargo area light has a three-
position switch. In the center
position, the light comes on when
you open the hatch.
Ignition Switch Light
The ignition switch light comes on
when you unlock the driver's door,
and fades out about 30 seconds after
you close the door.COURTESY LIGHT
ON
OFF DOOR ACTIVATED
Interior Lights
96
Table of Contents
Page 116 of 342

Accessory Power Sockets
Your vehicle has one, two, or three
accessory power sockets, depending
on the model. All models have a front
accessory power socket on the
dashboard above the glove box.
EX and SC models have an accessory
power socket in the cargo area on
the passenger's side.
The SC model has one additional
socket in the center console.
These sockets are intended to supply
power for 12 volt DC accessories that
are rated 120 watts or less (10 amps).
None of the sockets will power an
automotive type cigarette lighter
element. When more than one
socket is being used, the combined
power rating of the accessories
should be 120 watts or less (10 amps).Glove Box
Open the glove box by pulling the
bottom of the handle. Close it with a
firm push. Lock or unlock the glove
box with the master key.
An open glove box can cause
serious injury to your passenger
in a crash, even if the
passenger is wearing the seat belt.
Always keep the glove box
closed while driving.
Sun Visor
To use the sun visor, pull it down.
When using the sun visor for the
side window, remove the support rod
from the clip, and swing it out.
In this position, the sun visor can be
adjusted by moving it on its slider.
Do not use the extended sun visor
over the inside mirror.
Make sure you put the sun visor
back in place when you are getting
into or out of the vehicle.
Slide
Interior Convenience Items
100
Table of Contents
Page 174 of 342
To go back to the normal playing
display, press the AUDIO button.
Pressing the CANCEL button goes
back to the previous screen and
pressing the MAP button cancels the
audio mode display.Song Search Function
When you select‘‘Song Search ’’from
the track list display, the song search
menu appears.
You can then select any of three
modes to search a file: Title by
Keyword, Artist, and Album.RETURN ICON
Folder mode is shown. SONG SEARCH ICON
TITLE BY KEYWORD ICON
ARTIST ICON ALBUM ICON
Playing a PC Card (Models with navigation system)
158
Table of Contents
Page 175 of 342

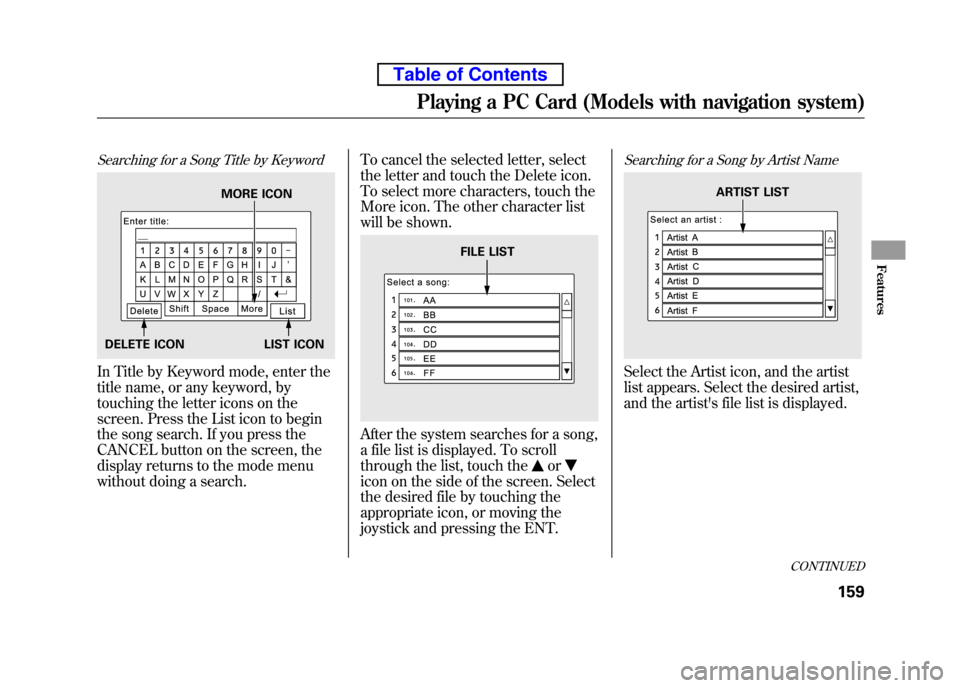
Searching for a Song Title by Keyword
In Title by Keyword mode, enter the
title name, or any keyword, by
touching the letter icons on the
screen. Press the List icon to begin
the song search. If you press the
CANCEL button on the screen, the
display returns to the mode menu
without doing a search.To cancel the selected letter, select
the letter and touch the Delete icon.
To select more characters, touch the
More icon. The other character list
will be shown.
After the system searches for a song,
a file list is displayed. To scroll
through the list, touch the
or
icon on the side of the screen. Select
the desired file by touching the
appropriate icon, or moving the
joystick and pressing the ENT.
Searching for a Song by Artist Name
Select the Artist icon, and the artist
list appears. Select the desired artist,
and the artist's file list is displayed.
MORE ICON
DELETE ICON LIST ICON
FILE LIST
ARTIST LIST
CONTINUED
Playing a PC Card (Models with navigation system)
159
Features
Table of Contents
Page 232 of 342

1. Apply the parking brake.
2. In cold weather, turn off allelectrical accessories to reduce the
drain on the battery.
3.
Manual transmission:
Press the clutch pedal down all the
way. The START (III) position
does not function unless the clutch
pedal is pressed.
Automatic transmission:
Make sure the shift lever is in
Park. Press on the brake pedal. 4. Without touching the accelerator
pedal, turn the ignition key to the
START (III) position. Do not hold
the key in the START (III) position
for more than 15 seconds at a time.
If the engine does not start right
away, pause for at least 10 seconds
before trying again.
The immobilizer system protects your
vehicle from theft. If an improperly
coded key (or other device) is used, the
engine's fuel system is disabled. For
more information, see page 76.
The engine is harder to start in cold
weather. Also, the thinner air found at
altitudes above 8,000 feet (2,400
meters) adds to this problem.
Starting the Engine
216
Table of Contents
Page 236 of 342

If you have done all of the above and
still cannot move the lever out of
Park, seeShift Lock Release on
page 221.
To avoid transmission damage, come
to a complete stop before shifting
into Park. You must also press the
release button to shift into Park. The
shift lever must be in Park before
you can remove the key from the
ignition switch.
Reverse (R) -Press the brake
pedal and press the release button to
shift from Park to reverse. To shift
from reverse to neutral, come to a
complete stop, and then shift. Neutral (N)
-Use neutral if you
need to restart a stalled engine, or if
it is necessary to stop briefly with the
engine idling. Shift to the Park
position if you need to leave your
vehicle for any reason. Press on the
brake pedal when you are moving
the shift lever from neutral to
another gear. Drive (D)
-Use this position for
your normal driving. The
transmission automatically selects a
suitable gear (1 through 5) for your
speed and acceleration. You may
notice the transmission shifting up at
higher engine speeds when the
engine is cold. This helps the engine
warm up faster.
Drive (D3) -To use D3, press the
D3 button when the shift lever is in the ‘‘D ’’position. This position is
similar to D, except only the first
three gears are selected instead of all
five. Use D3 when towing a trailer in
hilly terrain, or to provide engine
braking when going down a steep
hill. D3 can also keep the
transmission from cycling between
third and fourth gears in stop-and-godriving.
Automatic Transmission
220
Table of Contents