Page 362 of 441

�Î
�Î �Î
�Ì �Ì�Ì
�Î
�Î
Maintenance Minder
347
:See information on maintenance and emissions warranty on page .Inspect idle speed every 160,000 miles (256,000 km).
Adjust the valves during services A, B, 1, 2, or 3 only if they are noisy.
If the message ‘‘SERVICE’’ does not appear more than 12 months after the
display is reset, change the engine oil every year.
Independent of the maintenance items in the information display, replace
the brake fluid every 3 years.
NOTE: 1:
2: 4WD
346
Maintenance Sub Items
Rotate tires
Replace air cleaner element If you drive in dusty conditions, replace every
15,000 miles (24,000 km).
Replace dust and pollen filter If you drive primarily in urban areas that have high
concentrations of soot in the air from industry and
from diesel-powered vehicles, replace every 15,000
miles (24,000 km).
Inspect drive belt
Replace transmission fluid If you tow a CR-V behind a motorhome, the
transmission fluid must be changed every 2 years
or 30,000 miles (48,000 km), whichever comes first.
Replace spark plugs
Inspect valve clearance
Replace engine coolant
Replace rear differential fluid
Maintenance Main Items
Replace engine oil
Replace engine oil and oil filter
Inspect front and rear brakes
Check parking brake adjustment
Inspect these items:
Tie rod ends, steering gear box, and boots
Suspension components
Driveshaft boots
Brake hoses and lines (including ABS/VSA)
All fluid levels and condition of fluids
Exhaust system
Fuel lines and connections
AB
Symbol
Symbol
12 3 4 5 6
2
11
Maintenance Minder
Table of Contents
Page 363 of 441
Fluid Locations
348
ENGINE OIL
FILL CAPPOWER STEERINGFLUID
(Red cap) ENGINE
COOLANT
RESERVOIR
RADIATOR CAP
WASHER FLUID
(Blue cap)
AUTOMATIC
TRANSMISSION
FLUID DIPSTICK
(Yellow loop)
ENGINE OIL
DIPSTICK
(Orange handle)
BRAKE FLUID
(Black cap)
Table of Contents
Page 372 of 441

4WD model only
Brake f luid marked DOT 5 is not
compatible with your vehicle’s
braking system and can cause
extensive damage.
Using any non-Honda brake f luid can
cause corrosion and decrease the lif e
of the system. Have the brake
system f lushed and ref illed with
Honda Heavy Duty Brake Fluid
DOT 3 as soon as possible.
Always use Honda Heavy Duty
Brake Fluid DOT 3. If it is not
available, you should use only DOT 3
or DOT 4 f luid, f rom a sealed
container, as a temporary
replacement.
The rear dif f erential should be
drained and ref illed with new f luid
according to the maintenance
messages shown on the inf ormation
display. Have your dealer replace the
rear dif f erential f luid.
Replace the brake f luid according to
the maintenance messages shown on
the information display.
The f luid level should be between
theMINandMAXmarksontheside
of the reservoir. If the level is at or
below the MIN mark, your brake
system needs attention. Have the
brake system inspected f or leaks or
worn brake pads.
Check the f luid level in the brake
f luid reservoir monthly.
Use Honda Dual Pump Fluid II only.
Do not use automatic transmission
fluid (ATF).
Rear Dif f erential Fluid Brake Fluid
Rear Dif f erential Fluid, Brake Fluid
Maint enance
357
MAX
MIN
Table of Contents
Page 379 of 441
Reinstall the socket into the light
assembly by turning it clockwise
until it locks.
Align the clips on the taillight
assembly with the holes in the
body, then push the taillight
assembly into place. Tighten the
two mounting screws securely and
reinstall the covers.
Pull the bulb straight out of its
socket. Push the new bulb straight
into the socket until it bottoms.
Turn on the lights to make sure
the new bulb is working.
Open the tailgate. Place a cloth on the side edge ofthe cover to prevent scratches.
Remove the cover by caref ully
prying on the edge with a small
f lat-tip screwdriver and pulling the
cover off.
Unlatch the top of the cover by
pulling back on it with your hands.
Remove the socket f rom the light
assembly by turning it one-quarter
turn counterclockwise.
1.
2.
6. 7.8. 9.
3.
Replacing a High-mount Brake
Light Bulb
Lights
364
Table of Contents
Page 380 of 441

CONT INUED
Dirt build-up in the loops of the seat
belt anchors can cause the belts to
retract slowly. Wipe the insides of
the loops with a clean cloth
dampened in mild soap and warm
water or isopropyl alcohol.
If your seat belts get dirty, use a sof t
brush with a mixture of mild soap
and warm water to clean them. Do
not use bleach, dye, or cleaning
solvents. Let the belts air-dry bef ore
you use the vehicle.
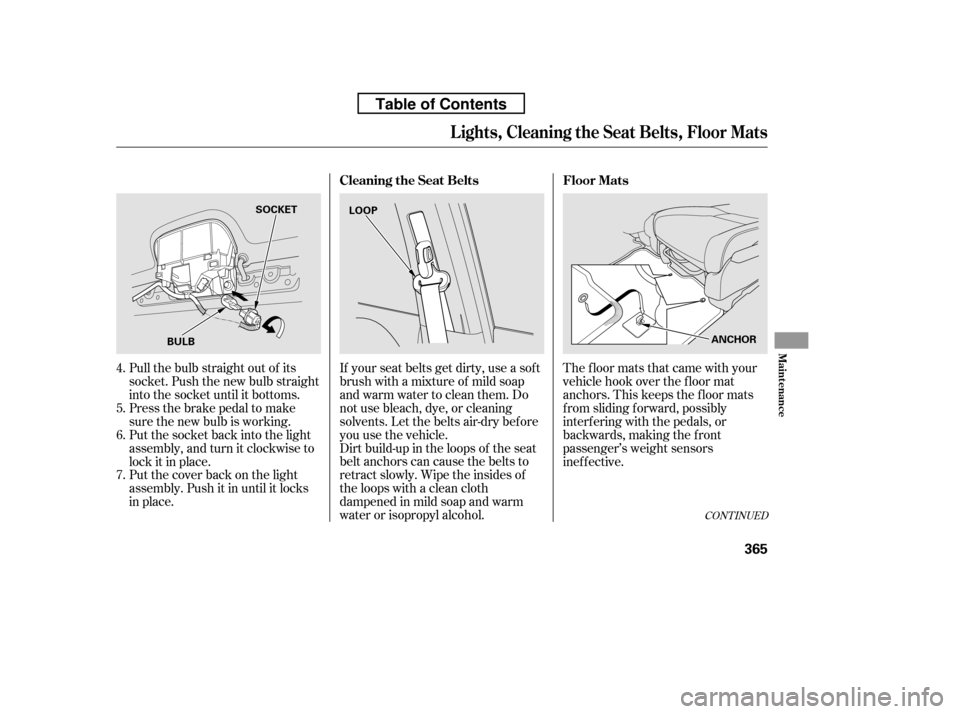
Pull the bulb straight out of its
socket. Push the new bulb straight
into the socket until it bottoms.
Press the brake pedal to make
sure the new bulb is working.
Put the socket back into the light
assembly, and turn it clockwise to
lock it in place.
Put the cover back on the light
assembly. Push it in until it locks
in place. The floor mats that came with your
vehicle hook over the f loor mat
anchors. This keeps the f loor mats
f rom sliding f orward, possibly
interf ering with the pedals, or
backwards, making the f ront
passenger’s weight sensors
inef f ective.
4. 5. 6. 7. Floor Mats
Cleaning the Seat Belts
Lights, Cleaning the Seat Belts, Floor Mats
Maint enance
365
BULB SOCKET
LOOP
ANCHOR
Table of Contents
Page 390 of 441

�´
CONT INUED
Tires marked ‘‘M S’’ or ‘‘All
Season’’ on the sidewall have an all-
weather tread design suitable for
most winter driving conditions.
For the best perf ormance in snowy
or icy conditions, you should install
snow tires or tire chains. They may
be required by local laws under
certain conditions.
If you mount snow tires on your
vehicle, make sure they are radial
tires of the same size and load range
as original tires. Mount snow tires on
all f our wheels. The traction
provided by snow tires on dry roads
maybelowerthanyouroriginaltires.
Check with the tire dealer f or
maximum speed recommendations.Mount tire chains on your tires when
required by driving conditions or
local laws. Install them only on the
f ront tires.
Because your vehicle has limited tire
clearance, Honda strongly
recommends using the chains listed
below, made by Security Chain
Company (SCC).
Cable-type: SCC Radial Chain
TC2111MM
Tires
Winter Driving
Snow T ires
T ire ChainsMaint enance
375
Using the wrong chains, or not
properly installing chains, can
damage the brake lines and
cause a crash in which you can
be seriously injured or killed.
Follow all instructions in this
owner’s manual regarding the
selection and use of tire chains.
Table of Contents
Page 391 of 441

When installing cables, f ollow the
manuf acturer’s instructions, and
mount them as tight as you can.
Make sure they are not contacting
the brake lines or suspension. Drive
slowly with them installed. If you
hear them coming into contact with
the body or chassis, stop and
investigate. Remove them as soon as
you begin driving on cleared roads.Clean the wheels as you would the
rest of the exterior. Wash them with
thesamesolution,andrinsethem
thoroughly.
Aluminum alloy wheels have a
protective clear-coat that keeps the
aluminum f rom corroding and
tarnishing. Cleaning the wheels with
harsh chemicals (including some
commercial wheel cleaners) or a stif f
brush can damage the clear-coat. To
clean the wheels, use a mild
detergent and a sof t brush or sponge.
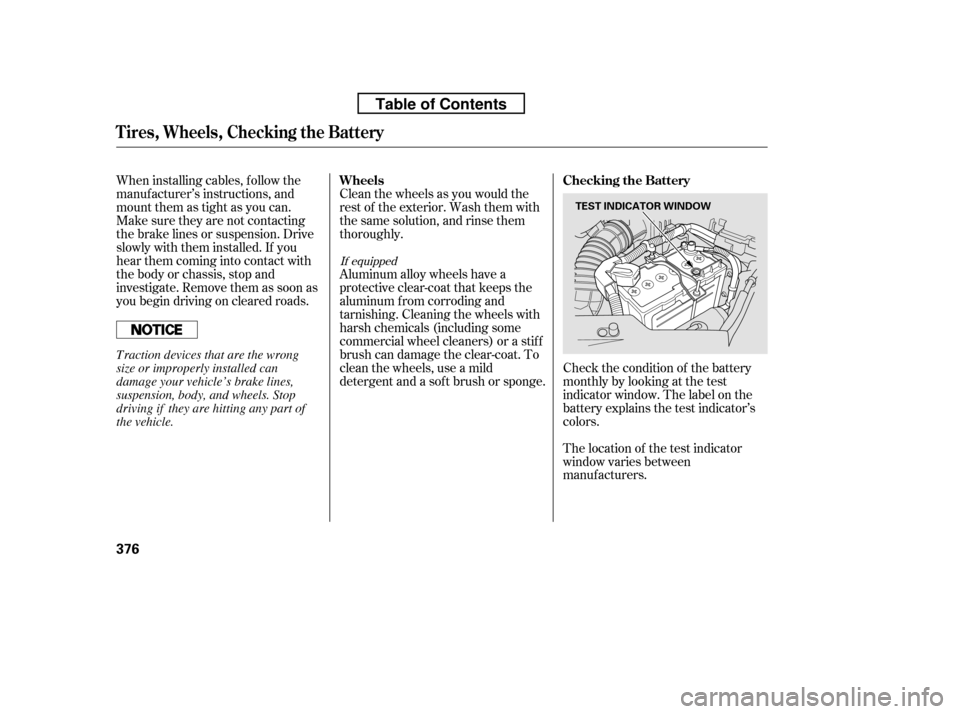
Check the condition of the battery
monthlybylookingatthetest
indicator window. The label on the
battery explains the test indicator’s
colors.
The location of the test indicator
window varies between
manuf acturers.
If equipped
Wheels Checking the Battery
T ires, Wheels, Checking the Battery
376
TEST INDICATOR WINDOW
Traction devices that are the wrong
size or improperly installed can
damage your vehicle’s brake lines,
suspension, body, and wheels. Stop
driving if they are hitting any part of
the vehicle.
Table of Contents
Page 393 of 441

Leave the parking brake off. Put
the transmission in Park.
Block the rear wheels.
If the vehicle is to be stored f or a
longer period, it should be
supported on jackstands so the
tires are of f the ground.
Leave one window open slightly (if
the vehicle is being stored
indoors).
Disconnect the battery.
If your vehicle’s battery is
disconnected, or goes dead, the time
setting may be lost. To reset the time,
see page .
If your vehicle’s battery is
disconnected, or goes dead, the
audio system will disable itself . The
nexttimeyouturnontheradio,you
may see ‘‘ENTER CODE’’ in the
f requency display. Use the preset
buttons to enter the code (see page
).
The navigation system will also
disableitself.Thenexttimeyouturn
on the ignition switch, the system
will require you to enter a PIN
bef ore it can be used. Ref er to the
navigation system manual. Cleantheinterior.Makesurethe
carpeting, floor mats, etc., are
completely dry.
Wash and dry the exterior
completely.
Fill the f uel tank.
If you need to park your vehicle f or
an extended period (more than 1
month), there are several things you
should do to prepare it f or storage.
Proper preparation helps prevent
deterioration and makes it easier to
get your vehicle back on the road. If
possible, store your vehicle indoors.
259
258On vehicles without navigation system
On vehicles with navigation system
Checking the Battery, Vehicle Storage
Vehicle Storage
378
Table of Contents