Page 371 of 441
Insert the dipstick all the way back
into the transmission securely as
shown in the illustration.
Make sure the rubber cap on the
dipstick f its in the dipstick guide
and that you push the dipstick in
all the way.
If you are not sure how to add f luid,
contact your dealer.
6.
Automatic Transmission Fluid
356
Use only Honda Genuine ATF-Z1
(automatic transmission f luid). Do not
mix with other transmission f luids.
Using transmission f luid other than
Honda Genuine ATF-Z1 may cause
deterioration in transmission operation
and durability, and could result in
damage to the transmission.
Damage resulting f rom the use of
transmission f luid other than Honda
Genuine ATF-Z1 is not covered by the
Honda new vehicle warranty.
Table of Contents
Page 375 of 441
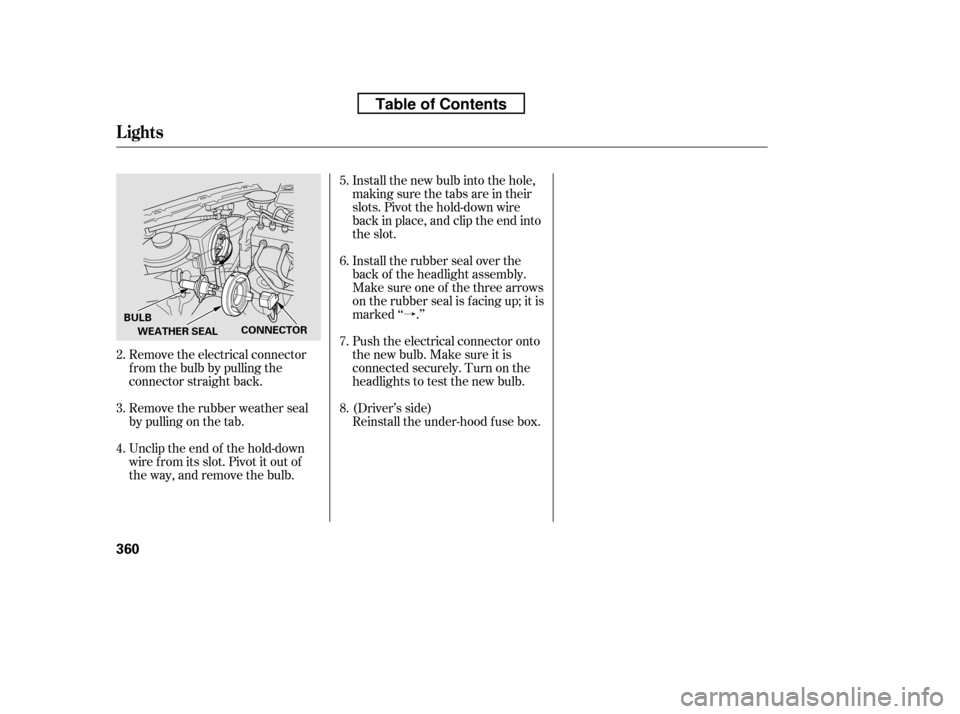
�à
Remove the electrical connector
f rom the bulb by pulling the
connector straight back.
Remove the rubber weather seal
by pulling on the tab.
Unclip the end of the hold-down
wire f rom its slot. Pivot it out of
the way, and remove the bulb. Install the new bulb into the hole,
making sure the tabs are in their
slots. Pivot the hold-down wire
back in place, and clip the end into
the slot.
Install the rubber seal over the
back of the headlight assembly.
Make sure one of the three arrows
on the rubber seal is f acing up; it is
marked ‘‘ .’’
Push the electrical connector onto
the new bulb. Make sure it is
connected securely. Turn on the
headlights to test the new bulb.
(Driver’s side)
Reinstall the under-hood f use box.
4.
2. 3. 5. 6.7. 8.
Lights
360
BULB
WEATHER SEAL CONNECTOR
Table of Contents
Page 377 of 441
Insert the socket back into the
headlight assembly. Turn it
clockwise to lock it in place.
Turn on the lights to make sure
the new bulb is working.
Reinstall the f use box in place
securely.
(Driver’s side)
Open the hood.
To change the parking light/f ront
side marker on the driver’s side,
removethefuseboxfromitsstay
by pulling out. Remove the socket from the
headlight assembly by turning it
one-quarter turn counterclockwise.
Pull the bulb straight out of its
socket. Push the new bulb straight
into the socket until it bottoms.
1.
2. 3.4.5. 6.
Lights
Replacing a Parking L ight/Front
Side Marker L ight Bulb
362
FUSE BOX
On the passenger’s sideBULB
SOCKET
Table of Contents
Page 379 of 441
Reinstall the socket into the light
assembly by turning it clockwise
until it locks.
Align the clips on the taillight
assembly with the holes in the
body, then push the taillight
assembly into place. Tighten the
two mounting screws securely and
reinstall the covers.
Pull the bulb straight out of its
socket. Push the new bulb straight
into the socket until it bottoms.
Turn on the lights to make sure
the new bulb is working.
Open the tailgate. Place a cloth on the side edge ofthe cover to prevent scratches.
Remove the cover by caref ully
prying on the edge with a small
f lat-tip screwdriver and pulling the
cover off.
Unlatch the top of the cover by
pulling back on it with your hands.
Remove the socket f rom the light
assembly by turning it one-quarter
turn counterclockwise.
1.
2.
6. 7.8. 9.
3.
Replacing a High-mount Brake
Light Bulb
Lights
364
Table of Contents
Page 384 of 441
Lower the wiper arm against the
windshield.
Install the wiper blade assembly
onto the wiper arm. Make sure it
locks in place.
Slide the new blade into the holder.
Make sure it is engaged in the slot
along its f ull length.
Insert both ends of the blade into
the holder. Make sure they are
secure.
Pull one end of the blade out f rom
the holder.
Slide the blade out of the holder.
Examine the new wiper blades. If
they have no plastic or metal
reinf orcement along the back
edge, remove the metal
reinf orcement strips f rom the old
wiper blade, and install them in
the slots along the edge of the new
blade.
To replace a rear wiper blade:
Raise the wiper arm of f the rear
window.
Disconnect the blade assembly
f rom the wiper arm by pivoting the
blade assembly upward. 3. 5.
4. 6. 7.
1. 2.
Wiper Blades
Maint enance
369
REAR
Table of Contents
Page 390 of 441

�´
CONT INUED
Tires marked ‘‘M S’’ or ‘‘All
Season’’ on the sidewall have an all-
weather tread design suitable for
most winter driving conditions.
For the best perf ormance in snowy
or icy conditions, you should install
snow tires or tire chains. They may
be required by local laws under
certain conditions.
If you mount snow tires on your
vehicle, make sure they are radial
tires of the same size and load range
as original tires. Mount snow tires on
all f our wheels. The traction
provided by snow tires on dry roads
maybelowerthanyouroriginaltires.
Check with the tire dealer f or
maximum speed recommendations.Mount tire chains on your tires when
required by driving conditions or
local laws. Install them only on the
f ront tires.
Because your vehicle has limited tire
clearance, Honda strongly
recommends using the chains listed
below, made by Security Chain
Company (SCC).
Cable-type: SCC Radial Chain
TC2111MM
Tires
Winter Driving
Snow T ires
T ire ChainsMaint enance
375
Using the wrong chains, or not
properly installing chains, can
damage the brake lines and
cause a crash in which you can
be seriously injured or killed.
Follow all instructions in this
owner’s manual regarding the
selection and use of tire chains.
Table of Contents
Page 401 of 441
Tighten the wheel nuts securely in
the same crisscross pattern. Have
the wheel nut torque checked at
the nearest automotive service
f acility.
Tighten the wheel nuts to:Place the flat tire face down in the
spare tire well.
Remove the spacer cone f rom the
wing bolt, turn it over, and put it
back on the bolt.
Remove the center cap before
storing the f lat tire.
14.
15.16. 17.Except LX model
Changing a Flat T ire
386
For spare tire
For normaltire
WING BOLT
CENTER CAP SPACER CONE
80 lbf·ft (108 N·m , 11 kgf·m)
Table of Contents
Page 402 of 441
Your vehicle’s original tire has a
tire pressure monitoring system
sensor. To replace a tire, ref er to(see
page ).
Store the jack in its holder. Turn
the jack’s end bracket to lock it in
place. Store the tools, and place
thecoverontheflattireof the
cargo area.
Store the center cap in the spare
tire well. Make sure it does not get
scratched or damaged.
Close the tailgate.
To remove the spacer cone, squeeze
the tabs on the wing bolt to
disengage it f rom the center of the
spacer cone, then pull the bolt
downward.
To install the wing bolt to the spacer
cone, reverse this procedure.
Securetheflattirebyscrewing
the wing bolt back into its hole. 22.
19. 20. 21.
18. 328
Changing a Flat T ire
Changing a T ire with T PMS
T aking Care of t he Unexpect ed
387
TAB
SPACER CONE
Loose items can fly around the
interiorinacrashandcould
seriously injure the occupants.
Store the wheel, jack, and tools
securely before driving.
Table of Contents


.
Store the jack in its holder. Turn
the jack’s end bracket to lock it in
place.")