Page 145 of 441
�Î
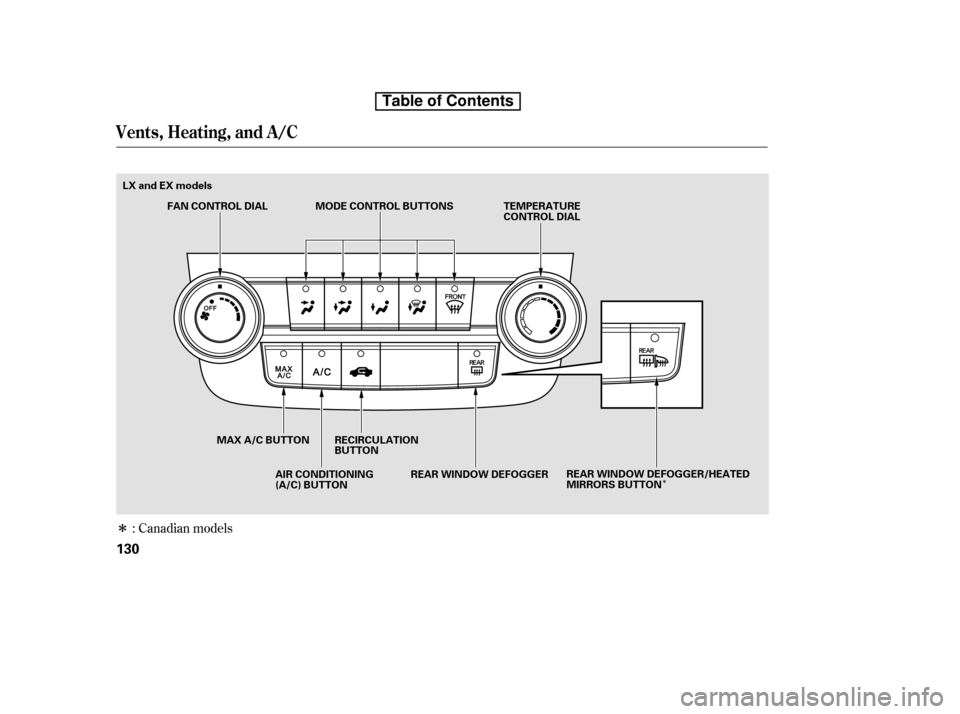
�Î: Canadian models
Vents, Heating, and A/C
130
TEMPERATURE
CONTROL DIAL
AIR CONDITIONING
(A/C) BUTTON
FAN CONTROL DIAL
MAX A/C BUTTON RECIRCULATION BUTTON
REAR WINDOW DEFOGGER/HEATED
MIRRORS BUTTON
MODE CONTROL BUTTONS
REAR WINDOW DEFOGGER
LX and EX models
Table of Contents
Page 146 of 441

Turn this dial to increase or decrease
the fan speed and airflow.
Turning this dial clockwise increases
the temperature of the airflow.When the recirculation indicator is
on, air f rom the vehicle’s interior is
sent throughout the system again.
When the indicator is off, air is
brought in f rom the outside of the
vehicle (fresh air mode).
The outside air intakes f or the
heating and cooling system are at
the base of the windshield. Keep this
area clear of leaves and other debris.
Thesystemshouldbeleftinfresh
air mode under almost all conditions.
Keeping the system in recirculation
mode, particularly with the A/C of f ,
can cause the windows to fog up.
Switch to recirculation mode when
driving through dusty or smoky
conditions, then return to fresh air
mode.
This button turns the air
conditioning on and of f . The
indicatorinthebuttonisonwhen
the A/C is on.
The system automatically
turns on the A/C and switches to
recirculation mode (see page to
use this setting). Air f lows f rom the
center and side vents in the
dashboard. Pressing the , A/C,
or any of the mode buttons cancels
MAX A/C, but the A/C stays on. Airf low is divided between
the vents in the dashboard and the
f loor vents. Air flows from the center
and corner vents in the dashboard.
Use the mode control buttons to
select the vents air flows from. Some
air will f low f rom the dashboard
corner vents in all modes.
This button turns the rear window
def ogger of f and on (see page ).
Pushing this button also turns the
power mirror heaters on and of f .
/
80
133
CONT INUED
Canadian models only
Vents, Heating, and A/C
Fan Control Dial
T emperature Control Dial
Air Conditioning (A/C) Button Recirculation Button
MAX A/C Button Mode Control
Rear Window Def ogger
Button
Features
131
Table of Contents
Page 150 of 441
Climat e Cont rol Syst em
Features
135
EX-L modelRECIRCULATION
BUTTON MODE BUTTON
DRIVER’S SIDE
TEMPERATURE
CONTROL DIAL
AUTO
BUTTON
OFF
BUTTON
FAN CONTROL
BAR AIR CONDITIONING
BUTTON
PASSENGER’S SIDE
TEMPERATURE
CONTROL DIAL
REAR WINDOW
DEFOGGER/MIRRORS
HEATER BUTTON
WINDSHIELD
DEFROSTER BUTTON
DUAL BUTTON
Table of Contents
Page 153 of 441

When the indicator in the button is
on, air f rom the vehicle’s interior is
sent through the system again.
When the indicator is off, air is
brought in f rom the outside of the
vehicle (fresh air mode).
The outside air intakes f or the
climate control system are at the
base of the windshield. Keep this
area clear of leaves and other debris.
Thesystemshouldbeleftinfresh
air mode under almost all conditions.
Keeping the system in recirculation
mode, particularly with the A/C of f ,
can cause the windows to fog up.
Switch to recirculation mode when
driving through dusty or smoky
conditions, then return to fresh air
mode.Pushing this button also turns the
power mirror heaters on and of f .
This button turns the rear window
def ogger of f and on (see page ).
Use the mode control button to
select the vents the air flows from.
Some air will flow from the
dashboard vents in all modes.
Air flows from the center
and corner vents in the dashboard.
Airf low is divided between
the vents in the dashboard and the
f loor vents.
Air f lows f rom the f loor
vents.
Airf low is divided between
the f loor and corner vents and the
defroster vents at the base of the
windshield.
80
Climat e Cont rol Syst em
Recirculat ion But t on Rear Window Def ogger
ButtonMode Cont rol
138
Table of Contents
Page 328 of 441
Check the adjustment of the
inside and outside mirrors (see
page ).
Check the steering wheel
adjustment (see page ).
Fasten your seat belt. Check that
your passengers have f astened
their seat belts (see page ).
Make sure the doors and the
tailgate are securely closed and
locked.
Youshoulddothefollowingchecks
and adjustments bef ore you drive
your vehicle.
Make sure all windows, mirrors,
and outside lights are clean and
unobstructed. Remove f rost, snow,
or ice.
Check that the hood is f ully closed.
Visually check the tires. If a tire
looks low, use a gauge to check its
pressure.
Check that any items you may be
carrying are stored properly or
f astened down securely. When you start the engine, check
the gauges and indicators in the
instrument panel (see pages to
).
Check the seat adjustment (see
pages and ).
1. 2.
10.
3. 4. 5. 6. 7. 8. 9.
114
81
15
68 61
97 98
Preparing to Drive
Driving
313
Table of Contents
Page 347 of 441

When preparing to tow, and bef ore
driving away, be sure to check the
f ollowing:The vehicle has been properly
serviced, and the suspension and
the cooling system are in good
operating condition.
The trailer has been properly
serviced and is in good condition.
All weights and loads are within
limits.
Thehitch,safetychains,andany
other attachments are secure.
All items in or on the trailer are
properly secured and cannot shif t
while you drive.
Many states and Canadian
provinces/territories require special
outside mirrors when towing a trailer.
Even if they don’t, you should install
special mirrors if you cannot clearly
see behind you, or if the trailer
creates a blind spot.
Since lighting and wiring vary by
trailer type and brand, you should
have a qualif ied technician install a
suitable connector between the
vehicle and the trailer. Improper
equipment or installation can cause
damage to your vehicle’s electrical
system and af f ect your vehicle
warranty.
Your vehicle has a trailer lighting
connector located behind the lef t
side panel in the cargo area. Ref er to
thedrawingaboveforthewiring
color code and purpose of each pin.
If you use a non-Honda trailer
lighting harness and converter, you
can get the connector and pins that
mate with the connector in your
vehicle f rom your dealer. Askyourtrailersalesorrental
agency if any other items are
recommended or required f or your
towing situation.
Towing a Trailer
Pre-T ow Checklist
A ddit ional T owing Equipment
332
HAZARD
(PINK)
TRAILER
(WHITE)
TAILLIGHT
(RED)
RIGHT
TURN
SIGNAL
(BROWN)
BRAKE
LIGHT
(LIGHT
GREEN) GROUND
(BLACK)
LEFT TURN
SIGNAL
(ORANGE)
Table of Contents
Page 425 of 441

�µ�µ�µ
�µ �µ�µ�µ
�Î
�Î
Specif ications
T echnical Inf ormation
409
Air Conditioning
Seating Capacities
Fuses
Alignment
Tires
Battery
Lights
Refrigerant type
Charge quantity
Lubricant type SP-10
15.5 17.3 oz (440 490 g)HFC-134a (R-134a) 523
Total
FrontRear
Interior
Under-hood
Toe-in
Camber
Caster2°44’1°00’0°
0.08 in (2.0 mm) 0.0in(0mm)
Size
Pressure 60 psi (420 kPa , 4.2 kgf/cm
)
30 psi (210 kPa , 2.1 kgf/cm)
30 psi (210 kPa , 2.1 kgf/cm)
T155/90R17 101M
T155/90D17 101M 225/65R17 102T
Capacity 12 V
12 V
12 V
12 V36 AH/5 HR
38 AH/5 HR
45 AH/20 HR
47 AH/20 HR
Headlights
Front turn signal lights
Parking lights/side marker
lights
Rear turn signal lights
Stop/Taillights
Back-up lights
Taillight/Rear side marker
lights
High-mount brake light
License plate light
Ceiling light
Spotlights
Cargo area light
Vanity mirror Lights 60/55 W
21 W
3CP
21 W
21/5 W
21 W5W
21 W 5W8W8W8W2W See page 401 or the fuse label
attached under the steering
column.
See page 402 or the fuse box
cover.
FrontRear
FrontRear
Front
High/Low (HB2)
(Amber)
(Amber)
Front/Rear
Spare
Front Rear
Spare
:EX,EX-L
Table of Contents
Page:
< prev 1-8 9-16 17-24

.
Check the steering wheel
adjustment (see page ).
Fasten your seat belt. Check that
your passengers have f astened
their seat be")