Page 315 of 387

Manual Transmission only All models except Si and Canadian DX-Gwith manual transmission
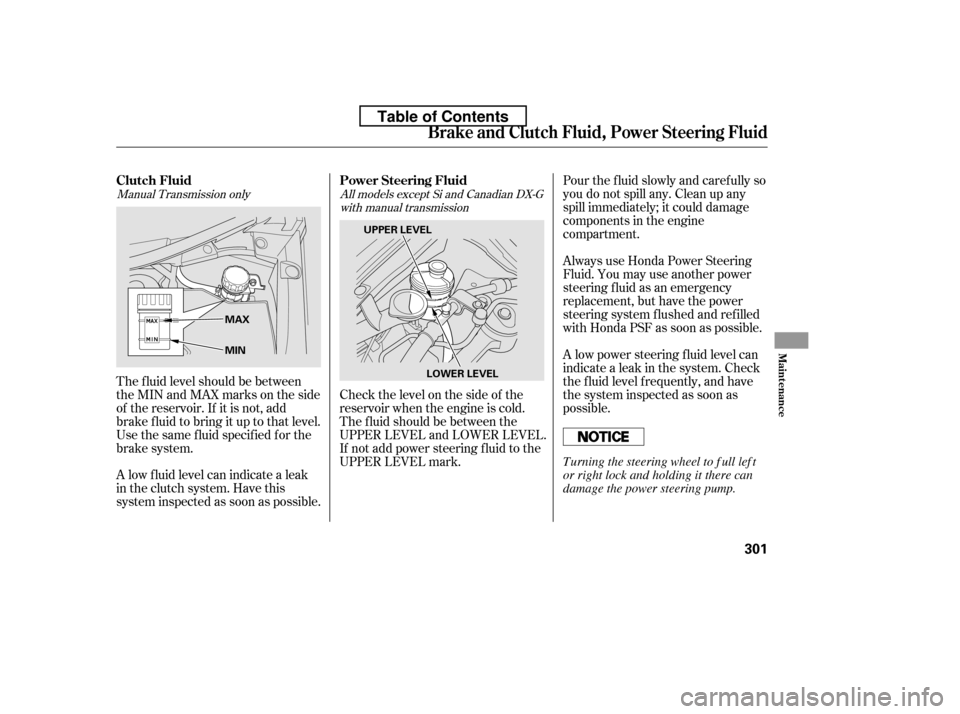
The f luid level should be between
theMINandMAXmarksontheside
of the reservoir. If it is not, add
brake f luid to bring it up to that level.
Use the same fluid specified for the
brake system.
A low f luid level can indicate a leak
in the clutch system. Have this
system inspected as soon as possible. Pour the f luid slowly and caref ully so
you do not spill any. Clean up any
spill immediately; it could damage
components in the engine
compartment.
Always use Honda Power Steering
Fluid. You may use another power
steering f luid as an emergency
replacement, but have the power
steering system f lushed and ref illed
with Honda PSF as soon as possible.
A low power steering f luid level can
indicate a leak in the system. Check
the f luid level f requently, and have
the system inspected as soon as
possible.
Check the level on the side of the
reservoir when the engine is cold.
The f luid should be between the
UPPER LEVEL and LOWER LEVEL.
If not add power steering f luid to the
UPPER LEVEL mark.
Brake and Clutch Fluid, Power Steering Fluid
Power Steering Fluid
Clutch Fluid
Maint enance
301
LOWER LEVEL
UPPER LEVEL
MAX
MIN
T urning the steering wheel to f ull lef t
or right lock and holding it there can
damage the power steering pump.
Table of Contents
Page 321 of 387
Remove the socket by turning it
one-quarter turn counterclockwise.Pull the bulb straight out of its
socket. Push the new bulb straight
into the socket until it bottoms.
Insert the socket back into the
light assembly. Turn it clockwise
to lock it in place.
Test the lights to make sure the
new bulb is working.
Put the f asteners into the holes on
the trunk lid trim. Reinstall the
screws.
Push the trunk lid trim back into
position.
Reinstall the socket. Turn it
clockwise until it locks. Make sure
the new bulb is working.
Pull the bulb straight out of its
socket. Push the new bulb straight
into the socket until it bottoms.
Open the trunk, and remove the
socket f rom the light assembly by
turning it one-quarter turn counter-
clockwise.
2.
1. 3.
4. 5.6. 7. 8.
3.Except Si model
OnallEX-L,CanadianSport,andSi
models
Lights
Replacing a High-mount Brake
Light Bulb
Maint enance
307
BULB
SOCKET
BULB
SOCKET
Table of Contents
Page 335 of 387

�´
Tires marked ‘‘M S’’ or ‘‘All
Season’’ on the sidewall have an all-
weather tread design suitable for
most winter driving conditions.
For the best perf ormance in snowy
or icy conditions, you should install
snow tires or tire chains. They may
be required by local laws under
certain conditions. If you mount snow tires on your
vehicle, make sure they are radial
tires of the same size and load range
as original tires. Mount snow tires on
all f our wheels. The traction
provided by snow tires on dry roads
maybelowerthanyouroriginaltires.
Check with the tire dealer f or
maximum speed recommendations.
Mount tire chains on your tires when
required by driving conditions or
local laws. Install them only on the
f ront tires.
Because your vehicle has limited tire
clearance, Honda strongly
recommends using the chains listed
below, made by Security Chain
Company (SCC).
If your vehicle is equipped with
summer tires, be aware that these
tires are not designed f or winter
driving conditions. For more
inf ormation, consult your dealer.
Cable-type: SCC RADIAL CHAIN
SC1030Cable-type: SCC RADIAL CHAIN
SC1032
When installing cables, f ollow the
manuf acturer’s instructions, and
mount them as tight as you can.
Make sure they are not contacting
the brake lines or suspension. Drive
slowly with them installed. If you
hear them coming into contact with
the body or chassis, stop and
investigate. Remove them as soon as
you begin driving on cleared roads.
CONT INUED
Except DX and Canadian DX-G models
On DX and Canadian DX-G models
U.S. Si model onlyWinter DrivingSnow T ires
T ire Chains
Summer T ires
Tires
Maint enance
321
Traction devices that are the wrong
size or improperly installed can
damage your vehicle’s brake lines,
suspension, body, and wheels. Stop
driving if they are hitting any part of
the vehicle.
Table of Contents
Page 336 of 387
Check the condition of the battery
monthlybylookingatthetest
indicator window. The label on the
battery explains the test indicator’s
colors.Check the terminals f or corrosion (a
white or yellowish powder). To
remove it, cover the terminals with a
solution of baking soda and water. It
will bubble up and turn brown. When
this stops, wash it of f with plain
water. Dry off the battery with a
cloth or paper towel. Coat the
terminals with grease to help prevent
f urther corrosion.
Checking the Battery
Tires, Checking the Battery
322
TEST INDICATOR WINDOW TEST INDICATOR WINDOW
Except Si SiUsing the wrong chains, or not
properly installing chains, can
damage the brake lines and
cause a crash in which you can
be seriously injured or killed.
Follow all instructions in this
owner’s manual regarding the
selection and use of tire chains.
Table of Contents
Page 338 of 387

Fill the f uel tank.Block the rear wheels.
If the vehicle is to be stored f or a
longer period, it should be
supported on jackstands so the
tires are of f the ground.
If you need to park your vehicle f or
an extended period (more than 1
month), there are several things you
should do to prepare it f or storage.
Proper preparation helps prevent
deterioration and makes it easier to
get your vehicle back on the road. If
possible, store your vehicle indoors. Leave one window open slightly (if
the vehicle is being stored
indoors).Cover the vehicle with a
‘‘breathable’’ cover, one made
f rom a porous material such as
cotton. Non-porous materials, such
as plastic sheeting, trap moisture,
which can damage the paint.
To minimize sticking, apply a
silicone spray lubricant to all door
and trunk seals. Also, apply a
vehiclebodywaxtothepainted
surfaces that mate with the door
and trunk seals.
Support the f ront wiper blade
arms with a f olded towel or rag so
they do not touch the windshield.
Disconnect the battery. If possible, periodically run the
engine until it reaches f ull
operating temperature (the
cooling f an cycles twice).
Pref erably, do this once a month.
Wash and dry the exterior
completely.
Cleantheinterior.Makesurethe
carpeting, floor mats, etc., are
completely dry.
Leave the parking brake off. Put
the transmission in reverse
(manual) or Park (automatic).
Vehicle Storage
324
Table of Contents
Page 339 of 387

This section covers the more
common problems that motorists
experience with their vehicles. It
gives you inf ormation about how to
safely evaluate the problem and what
to do to correct it. If the problem has
stranded you on the side of the road,
you may be able to get going again.
If not, you will also f ind instructions
on getting your vehicle towed.......................Compact Spare Tire . 326
....................
Changing a Flat Tire . 327
.............
If the Engine Won’t Start . 332
................................
Jump Starting . 334
..............
If the Engine Overheats . 337
.........
Low Oil Pressure Indicator . 339
..........
Charging System Indicator . 339
.......
Malf unction Indicator Lamp . 340
...............
Brake System Indicator . 341
..............................................
Fuses . 342
..............................
Fuse Locations . 346
......................
Emergency Towing . 348
Taking Care of the Unexpected
T aking Care of t he Unexpect ed
325
Page 341 of 387

Turn on the hazard warning lights,
and turn the ignition switch to the
LOCK (0) position. Have all
passengers get out of the vehicle
while you change the tire.
Park the vehicle on f irm, level, and
non-slippery ground. Put the
transmission in Park (automatic)
or reverse (manual). Apply the
parking brake.
Open the trunk. Raise the trunk
f loor by lif ting up on the back edge.
Take the tool case out of the spare
tire.
Unscrew the wing bolt, and take
the spare tire out of its well.
If you have a f lat tire while driving,
stop in a saf e place to change it.
Drive slowly along the shoulder until
you get to an exit or an area to stop
that is far away from the traffic lanes.
Thecompactsparetireissmaller
than a standard tire, and it will affect
the vehicle’s handling. Drive
cautiously when the spare is
mounted on your vehicle.
Thesizedifferencemayalsocause
damage to the dif f erential, so do not
mount the compact spare on the
f ront. If either f ront tire goes f lat,
removethereartireonthatsame
side, mount the compact spare tire
on the rear, then mount the rear tire
on the f ront.
5.
4.
3.
2.
1.
CONT INUED
On Si model only
Changing a Flat T ire
T aking Care of t he Unexpect ed
327
SPARE TIRE
TRUNK FLOOR JACK TOOL CASE
The vehicle can easily roll off
the jack, seriously injuring
anyone underneath.
Follow the directions for
changing a tire exactly, and
never get under the vehicle
when it is supported only by thejack.
Table of Contents
Page 343 of 387
CONT INUED
Bef ore mounting the spare tire,
wipe any dirt of f the mounting
surface of the wheel and hub with
a clean cloth. Wipe the hub
carefully;itmaybehotfrom
driving.
Do not attempt to forcibly pry the
wheel cover of f with a screwdriver or
other tool. The wheel cover cannot
be removed without f irst removing
the wheel nuts.
Use the extension and the wheel
nut wrench as shown to raise the
vehicle until the f lat tire is of f the
ground.
Remove the wheel nuts, then
remove the f lat tire. Handle the
wheel nuts caref ully; they may be
hot f rom driving. Place the f lat tire
on the ground with the outside
surface facing up. 10.
8. 9.DX and U.S. LX models:
Changing a Flat T ire
T aking Care of t he Unexpect ed
329
WHEEL NUTS WHEEL COVER
EXTENSION WHEEL NUTS
WHEEL NUT WRENCH BRAKE HUB
Table of Contents