Page 102 of 387
Even if your vehicle’s battery is
removed or goes dead, the system
keeps the auto door lock/unlock
setting which you selected.
push and hold the
brake pedal, then move the shift
lever out of the Park (P) position.
Pushandholdtherearof the
master door lock switch on the
driver’s door. You will hear a click.
Continue to hold the switch:
Release the switch, and within 5
seconds, turn the ignition switch
to the ACCESSORY (I) position. move the shif t
lever to the Park (P) position. Until you hear another click
(af ter about 5 seconds) to
activate
Or, until you hear two more
clicks (af ter about 10 seconds)
to activate
Turn the ignition switch to the
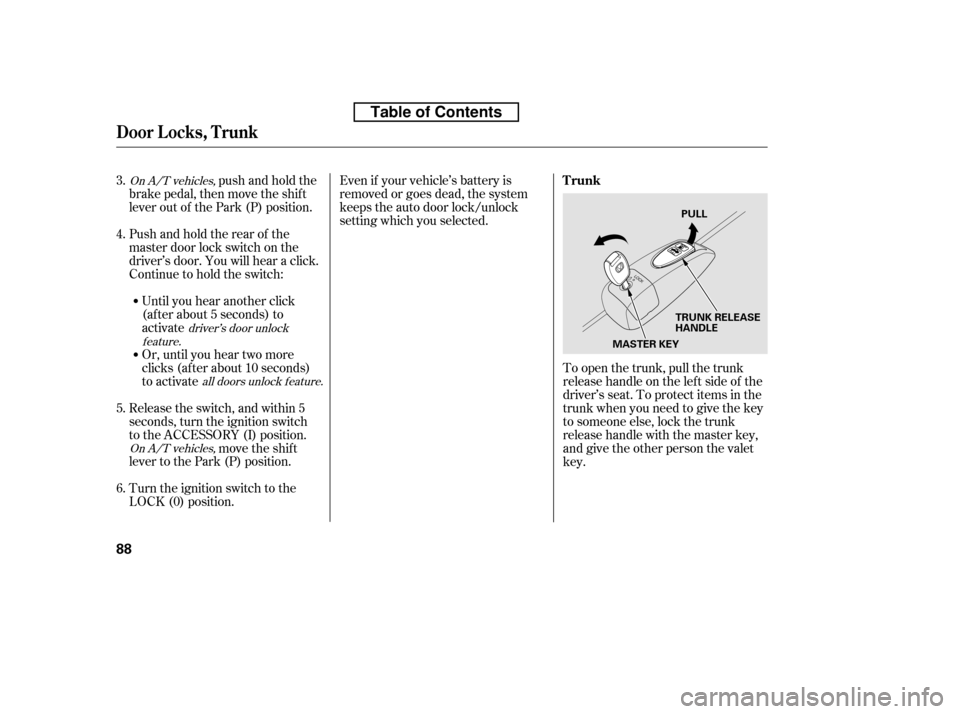
LOCK (0) position. To open the trunk, pull the trunk
release handle on the lef t side of the
driver’s seat. To protect items in the
trunk when you need to give the key
to someone else, lock the trunk
release handle with the master key,
and give the other person the valetkey.
3. 4. 5. 6.On A/T vehicles,
On A/T vehicles,driver’s door unlock
feature.
all doors unlock f eature.
Door L ocks, T runk
Trunk
88
MASTER KEYTRUNK RELEASE
HANDLEPULL
Table of Contents
Page 113 of 387
Make sure all items in the trunk, or
items extending through the opening
into the back seat, are secured.
Looseitemscanflyforwardand
cause injury if you have to brake
hard. See on page.
Never drive with the seat-back
f olded down and the trunk lid open.
See on
page .
Make sure that the folded seat-back
does not press against the f ront
passenger’s seat, as this could cause
the weight sensors to work
improperly.
Make sure all rear shoulder belts are
positioned in f ront of the rear seat-
back, and the center shoulder belt is
re-positioned in the guide whenever
the seat-back is in its upright position.
Be sure there are no twists in any
shoulder belt.
Do not put any heavy items on the
seat-back when it is folded down.
51
249
Carrying Cargo
Carbon Monoxide Hazard
Seats
Inst rument s and Cont rols
99
Table of Contents
Page 119 of 387
The ceiling light has a three-position
switch;ON(right),DoorActivated,
andOFF(left).IntheDoor
Activated (center) position, the light
comesonwhenyou:Open any door.
Unlock the doors with the key or
the remote transmitter.
Remove the key from the ignition.
To apply the parking brake, pull the
lever up f ully. To release it, pull up
slightly, push the button, and lower
the lever. The parking brake
indicator on the instrument panel
should go out when the parking
brake is f ully released (see page ).
59
CONT INUED
Parking Brake, Interior L ights
Ceiling L ight
Parking Brake
Inst rument s and Cont rols
105
PARKING BRAKE LEVER DOOR ACTIVATED
ON
OFF
Driving the vehicle with the parking
brake applied can damage the rear
brakes and hubs. A beeper will sound if
the vehicle is driven with the parking
brake on.
Table of Contents
Page 223 of 387
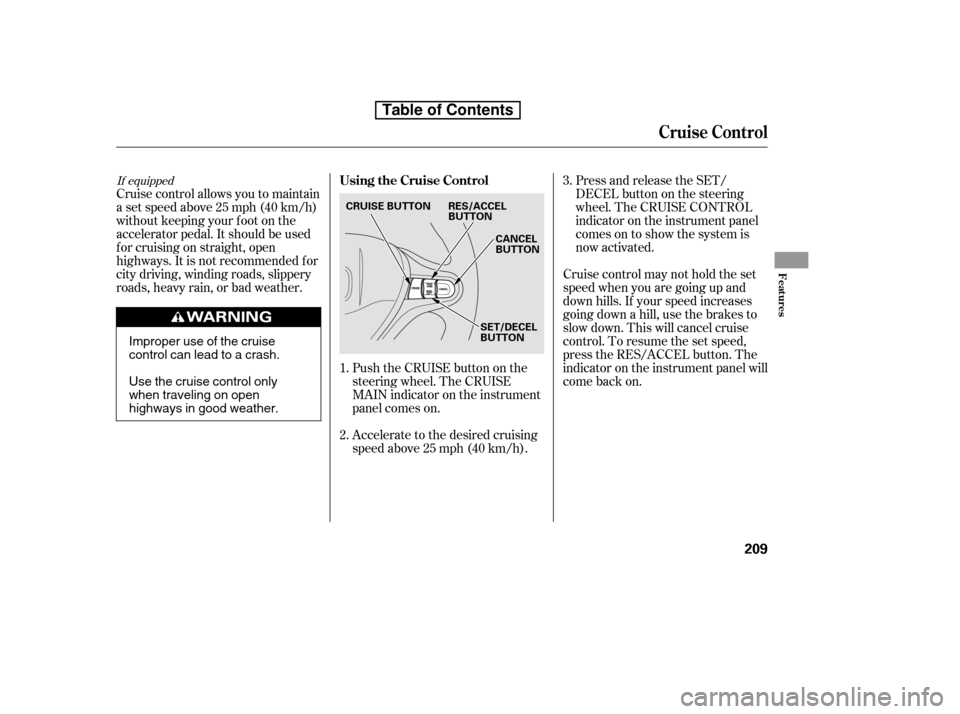
Push the CRUISE button on the
steering wheel. The CRUISE
MAIN indicator on the instrument
panel comes on.
Accelerate to the desired cruising
speedabove25mph(40km/h).
Cruise control allows you to maintain
asetspeedabove25mph(40km/h)
without keeping your f oot on the
accelerator pedal. It should be used
f or cruising on straight, open
highways. It is not recommended f or
city driving, winding roads, slippery
roads, heavy rain, or bad weather.
Cruise control may not hold the set
speed when you are going up and
down hills. If your speed increases
going down a hill, use the brakes to
slow down. This will cancel cruise
control. To resume the set speed,
press the RES/ACCEL button. The
indicator on the instrument panel will
come back on.Press and release the SET/
DECELbuttononthesteering
wheel. The CRUISE CONTROL
indicator on the instrument panel
comes on to show the system is
now activated.
1. 2. 3.
If equippedUsing the Cruise Control
Cruise Control
Features
209
CANCEL
BUTTON
RES/ACCEL
BUTTON
CRUISE BUTTON
SET/DECEL
BUTTON
Improper use of the cruise
control can lead to a crash.
Use the cruise control only
when traveling on open
highways in good weather.
Table of Contents
Page 224 of 387
You can increase the set cruising
speed in any of these ways:Press and hold the RES/ACCEL
button. When you reach the
desired cruising speed, release the
button. You can decrease the set cruising
speed in any of these ways:
Even with the cruise control turned
on, you can still use the accelerator
pedal to speed up f or passing. Af ter
completing the pass, take your foot
of f the accelerator pedal. The vehicle
will return to the set cruising speed.
Resting your f oot on the brake or
clutch pedal causes the cruise
control to cancel.
To increase the speed in very
small amounts, tap the RES/
ACCEL button. Each time you do
this, your vehicle will speed up
about 1 mph (1.6 km/h).
Push on the accelerator pedal until
you reach the desired cruising
speed, then press the SET/
DECEL button. Tap the brake or clutch pedal
lightly with your f oot. The
CRUISE CONTROL indicator on
the instrument panel goes out.
When the vehicle slows to the
desired speed, press the SET/
DECEL button.
To slow down in very small
amounts, tap the SET/DECEL
button. Each time you do this,
your vehicle will slow down about
1 mph (1.6 km/h).
Press and hold the SET/DECEL
button. Release the button when
you reach the desired speed.
If you need to decrease your
speed quickly, use the brakes as you
normally would.
Changing the Set Speed
Cruise Control
210
NOTE:
Table of Contents
Page 225 of 387
You can cancel cruise control in any
of these ways:Tap the brake or clutch pedal.
Push the CANCEL button on the
steering wheel. When you push the CANCEL button,
or tap the brake or clutch pedal, the
system will remember the previously
set cruising speed. To return to that
speed, accelerate to above 25 mph
(40 km/h), and then press and
release the RES/ACCEL button. The
CRUISE CONTROL indicator comes
on. The vehicle will accelerate to the
same cruising speed as bef ore.
Pressing the CRUISE button turns
the system off and erases the
previous cruising speed.
Push the CRUISE button on the
steering wheel.
Canceling Cruise Control Resuming the Set Speed
Cruise Control
Features
211
CRUISE BUTTON
CANCEL BUTTON
Table of Contents
Page 252 of 387
Help assure your vehicle’s f uture
reliability and perf ormance by paying
extra attention to how you drive
during the f irst 600 miles (1,000 km).
During this period:Avoid full-throttle starts and rapid
acceleration.
Avoidhardbrakingforthefirst
200 miles (300 km).
Do not change the oil until the
scheduled maintenance time. Your vehicle is designed to operate
on unleaded gasoline with a pump
octane number of 87 or higher. Use
of a lower octane gasoline can cause
a persistent, heavy, metallic rapping
noise that can lead to engine damage.
Your vehicle is designed to operate
on premium unleaded gasoline with a
pump octane number of 91 or higher.
Useof aloweroctanegasolinecan
cause occasional metallic knocking
noises in the engine and will result in
decreased engine perf ormance. Use
of a gasoline with a pump octane
number less than 87 can lead to
engine damage.
You should also f ollow these
recommendations with an
overhauled or exchanged engine, or
when the brakes are replaced. Do not tow a trailer.
We recommend using quality
gasolines containing detergent
additives that help prevent fuel
system and engine deposits. In addition, in order to maintain good
perf ormance, f uel economy, and
emissions control, we strongly
recommend, in areas where it is
available, the use of gasoline that
does NOT contain manganese-based
f uel additives such as MMT.
Use of gasoline with these additives
may adversely af f ect perf ormance,
and cause the malfunction indicator
lamp on your instrument panel to
come on. If this happens, contact
your authorized dealer f or service.
Some gasoline today is blended with
oxygenates such as ethanol or
MTBE. Your vehicle is designed to
operate on oxygenated gasoline
containing up to 10% ethanol by
volume and up to 15% MTBE by
volume. Do not use gasoline
containing methanol.
Break-in Period Fuel Recommendation
Break-in Period, Fuel Recommendation
A ll models except Si
Si model only
238
Table of Contents
Page 254 of 387
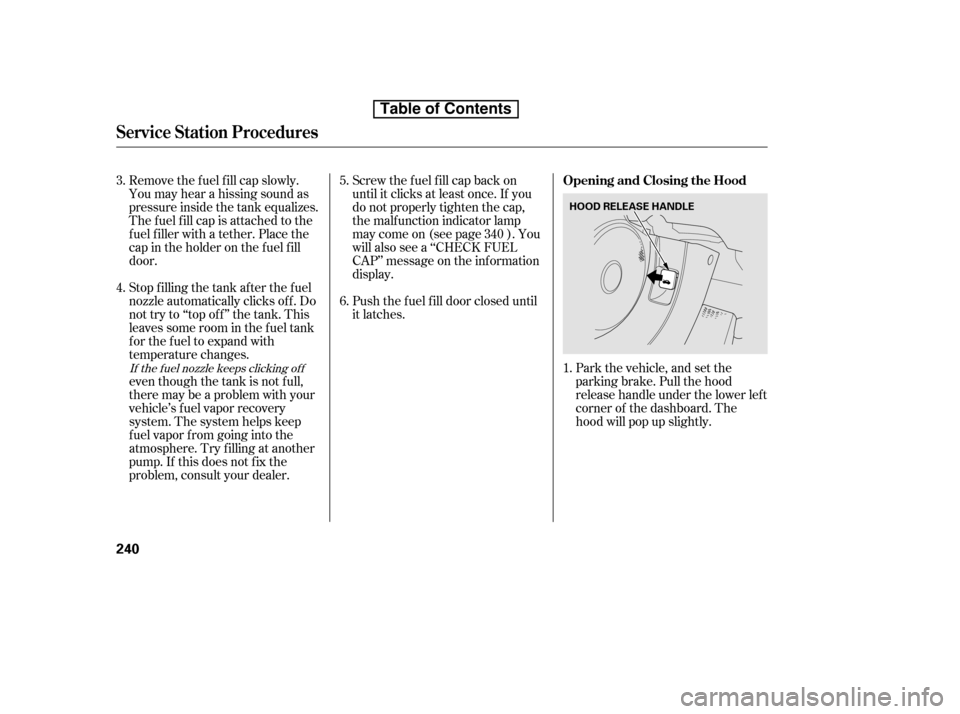
Park the vehicle, and set the
parking brake. Pull the hood
release handle under the lower lef t
corner of the dashboard. The
hood will pop up slightly.
Screw the f uel f ill cap back on
until it clicks at least once. If you
do not properly tighten the cap,
the malf unction indicator lamp
maycomeon(seepage ).You
will also see a ‘‘CHECK FUEL
CAP’’ message on the inf ormation
display.
Push the f uel f ill door closed until
it latches.
Remove the f uel f ill cap slowly.
You may hear a hissing sound as
pressure inside the tank equalizes.
The fuel fill cap is attached to the
f uel f iller with a tether. Place the
cap in the holder on the f uel f ill
door.
Stop f illing the tank af ter the f uel
nozzle automatically clicks of f . Do
not try to ‘‘top off’’ the tank. This
leaves some room in the f uel tank
for the fuel to expand with
temperature changes.
even though the tank is not f ull,
there may be a problem with your
vehicle’s fuel vapor recovery
system. The system helps keep
f uel vapor f rom going into the
atmosphere. Try f illing at another
pump. If this does not f ix the
problem, consult your dealer.
1.
5. 6.
4.
3.
340If the f uel nozzle keeps clicking of f
Service Station Procedures
Opening and Closing the Hood
240
HOOD RELEASE HANDLE
Table of Contents