Page 313 of 387

If Honda MTF is not available, you
may use an SAE 10W-30 or 10W-40
viscosity motor oil with the API
Certif ication Seal that says ‘‘FOR
GASOLINE ENGINES’’ as a
temporary replacement. However,
motor oil does not contain the proper
additives, and continued use can
cause stif f er shif ting. Replace as
soon as it is convenient.
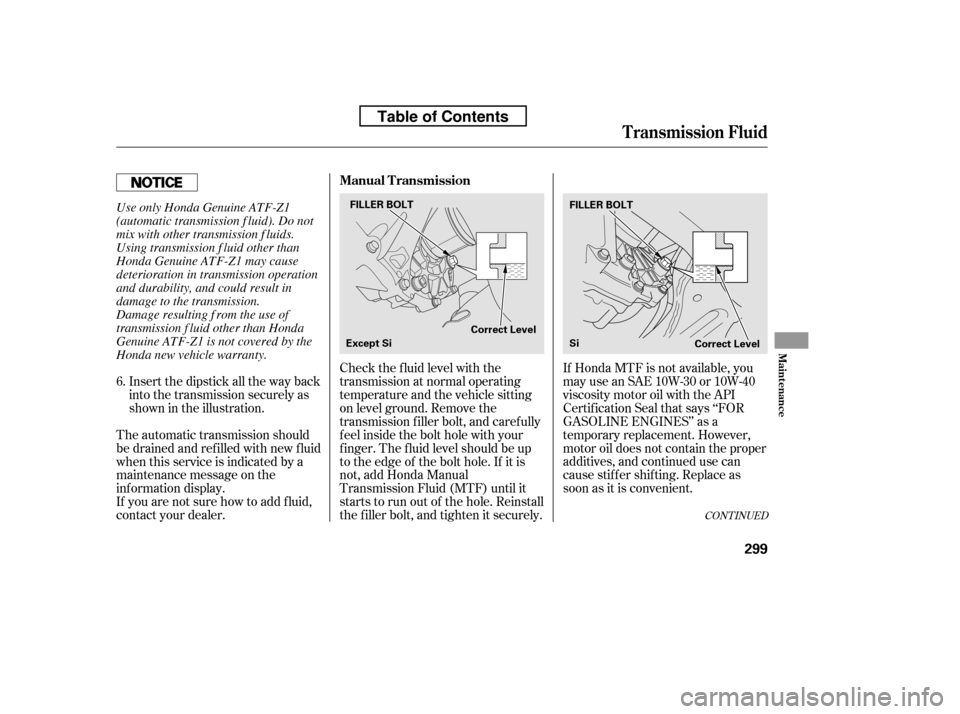
Check the f luid level with the
transmission at normal operating
temperature and the vehicle sitting
on level ground. Remove the
transmission f iller bolt, and caref ully
f eel inside the bolt hole with your
f inger. The f luid level should be up
to the edge of the bolt hole. If it is
not, add Honda Manual
Transmission Fluid (MTF) until it
starts to run out of the hole. Reinstall
the f iller bolt, and tighten it securely.
If you are not sure how to add f luid,
contact your dealer. Insert the dipstick all the way back
into the transmission securely as
shown in the illustration.
The automatic transmission should
be drained and ref illed with new f luid
when this service is indicated by a
maintenance message on the
inf ormation display.
6.
CONT INUED
T ransmission Fluid
Manual Transmission
Maint enance
299
FILLER BOLT
Correct LevelFILLER BOLT
Correct Level
Except Si
SiUse only Honda Genuine ATF-Z1
(automatic transmission f luid). Do not
mix with other transmission f luids.
Using transmission f luid other than
Honda Genuine ATF-Z1 may cause
deterioration in transmission operation
and durability, and could result in
damage to the transmission.
Damage resulting f rom the use of
transmission f luid other than Honda
Genuine ATF-Z1 is not covered by the
Honda new vehicle warranty.
Table of Contents
Page 323 of 387
Turn on the f og lights to test the
new bulb.
Align the two tabs on the f og light
assembly with the holes in the
bumper, then push the f og light
assembly into place. Tighten the
screw securely.
Remove the bulb by turning it one-
quarter turn counterclockwise.
Install the new bulb, and turn it
one-quarter turn clockwise to lock
it in place.
Push the electrical connector onto
the bulb. Make sure it is on all the
way. If your seat belts get dirty, use a sof t
brush with a mixture of mild soap
and warm water to clean them. Do
not use bleach, dye, or cleaning
solvents. Let the belts air dry bef ore
you use the vehicle.
Dirt build-up in the loops of the seat
belt anchors can cause the belts to
retract slowly. Wipe the insides of
the loops with a clean cloth
dampened in mild soap and warm
water or isopropyl alcohol.
6. 7.
3.4. 5.
Lights, Cleaning the Seat Belts
Cleaning the Seat Belts
Maint enance
309
TAB TAB CONNECTOR
BULB LOOP
Table of Contents
Page 335 of 387

�´
Tires marked ‘‘M S’’ or ‘‘All
Season’’ on the sidewall have an all-
weather tread design suitable for
most winter driving conditions.
For the best perf ormance in snowy
or icy conditions, you should install
snow tires or tire chains. They may
be required by local laws under
certain conditions. If you mount snow tires on your
vehicle, make sure they are radial
tires of the same size and load range
as original tires. Mount snow tires on
all f our wheels. The traction
provided by snow tires on dry roads
maybelowerthanyouroriginaltires.
Check with the tire dealer f or
maximum speed recommendations.
Mount tire chains on your tires when
required by driving conditions or
local laws. Install them only on the
f ront tires.
Because your vehicle has limited tire
clearance, Honda strongly
recommends using the chains listed
below, made by Security Chain
Company (SCC).
If your vehicle is equipped with
summer tires, be aware that these
tires are not designed f or winter
driving conditions. For more
inf ormation, consult your dealer.
Cable-type: SCC RADIAL CHAIN
SC1030Cable-type: SCC RADIAL CHAIN
SC1032
When installing cables, f ollow the
manuf acturer’s instructions, and
mount them as tight as you can.
Make sure they are not contacting
the brake lines or suspension. Drive
slowly with them installed. If you
hear them coming into contact with
the body or chassis, stop and
investigate. Remove them as soon as
you begin driving on cleared roads.
CONT INUED
Except DX and Canadian DX-G models
On DX and Canadian DX-G models
U.S. Si model onlyWinter DrivingSnow T ires
T ire Chains
Summer T ires
Tires
Maint enance
321
Traction devices that are the wrong
size or improperly installed can
damage your vehicle’s brake lines,
suspension, body, and wheels. Stop
driving if they are hitting any part of
the vehicle.
Table of Contents
Page 344 of 387
Tighten the wheel nuts securely in
the same crisscross pattern. Have
the wheel nut torque checked at
the nearest automotive service
f acility.
Tighten the wheel nuts to:
Put on the spare tire. Put the
wheel nuts back on f inger-tight,
then tighten them in a crisscross
pattern with the wheel nut wrench
until the wheel is f irmly against
the hub. Do not try to tighten the
wheel nuts f ully.
Lower the vehicle to the ground,
and remove the jack.
Remove the center cap before
storing the f lat tire in the trunk
well.
13.
11. 12.
14.On EX-L, Si, U.S. EX, LX-S, andCanadian Sport models
Changing a Flat T ire
330
CENTER CAP
80 lbf·ft (108 N·m , 11 kgf·m)
Table of Contents
Page 345 of 387
Place the flat tire face down in the
spare tire well.
Remove the spacer cone f rom the
wing bolt, turn it over, and put it
back on the bolt.
Securetheflattirebyscrewing
the wing bolt back into its hole.Lower the trunk f loor, and close
the trunk lid.
Store the jack and tools in the tool
case. Place the tool case in the
center of the f lat tire.
Store the wheel cover or center
cap in the trunk. Make sure it does
not get scratched or damaged.
Your vehicle’s original tire has a
tire pressure monitoring system
sensor. To replace a tire, ref er to
(see
page ).
15. 16. 17. 18. 19.
20. 21.
272
CONT INUED
On U.S. models
Changing a Flat T ire
Changing a T ire with T PMS
T aking Care of t he Unexpect ed
331
WING BOLT SPACER CONE
For normaltire For sparetire
Loose items can fly around the
interiorinacrashandcould
seriously injure the occupants.
Store the wheel, jack, and tools
securely before driving.
Table of Contents