Page 158 of 387
�¼
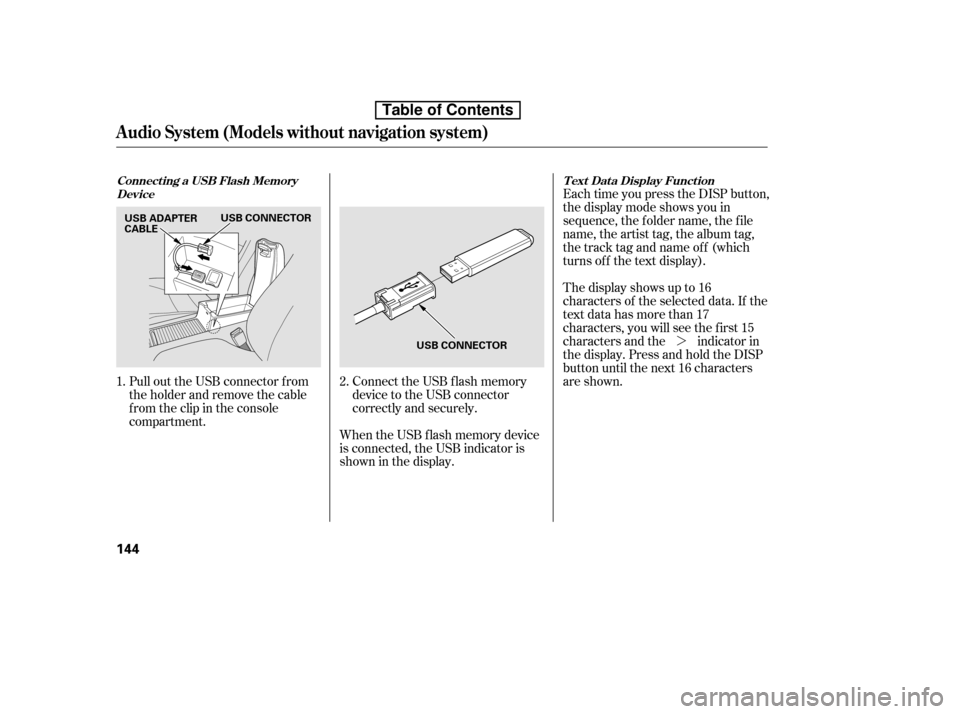
When the USB f lash memory device
is connected, the USB indicator is
showninthedisplay.
Pull out the USB connector f rom
the holder and remove the cable
f rom the clip in the console
compartment.
Connect the USB f lash memory
device to the USB connector
correctly and securely.Each time you press the DISP button,
the display mode shows you in
sequence, the f older name, the f ile
name, the artist tag, the album tag,
the track tag and name off (which
turns off the text display).
The display shows up to 16
characters of the selected data. If the
text data has more than 17
characters, you will see the f irst 15
characters and the indicator in
the display. Press and hold the DISP
button until the next 16 characters
are shown.
1. 2.
Connect ing a USB Flash Memory
Device T ext Data Display Function
Audio System (Models without navigation system)
144
USB ADAPTER
CABLE
USB CONNECTOR
USB CONNECTOR
Table of Contents
Page 200 of 387

�µ�µ
Pull out the USB connector f rom
the holder and remove the cable
f rom the clip in the console
compartment.
Connect your dock connector to
the iPod correctly and securely. Install the dock connector to the
USB adapter cable securely.
If the audio system still does not
recognize the iPod, the iPod may
need to be reset. Follow the
instructions that came with your
iPod, or you can f ind reset
instructions online at The current f ile number and total of
the selected playable f iles are
displayed on the screen. It also
shows the artist, album and track
(f ile) names on the screen.
Use the SKIP button while an iPod is
playing to change f iles.
Each time you press and
release (preset 6), the player
skips forward to the beginning of the
next f ile. Press and release (preset 5), to skip backward to
the beginning of the current f ile.
Press it again to skip to the
beginning of the previous f ile.
To move rapidly within
a f ile, press and hold (preset 4)
or (preset 3).
1. 2.
3.
www.apple.com/
ipod.
Connect ing an iPod
T o Change or Select Files
Audio System (Models with navigation system)
SK IP
FF/REW
186
DOCK CONNECTOR
USB ADAPTER CABLE USB CONNECTOR
USB CONNECTOR
Table of Contents
Page 206 of 387

�Î�Î
This audio system can select and
play the audio f iles f rom a USB f lash
memory device with the same
controls used f or the in-dash disc
player. To play a USB f lash memory
device, connect it to the USB adapter
cable in the console compartment.
The ignition switch must be in the
ACCESSORY (I) or ON (II) position.
Press the AUDIO button beside the
screen to show the audio display and
touch the AUX icon.
The audio system reads and plays
the audio f iles on the USB f lash
memory device in MP3, WMA or
AAC f ormats. Depending on the
f ormat, the display shows MP3,
WMA or AAC when a USB flash
memory device is playing. The USB
f lash memory device limit is up to
700 f olders or up to 65535 f iles. Only AAC f ormat f iles recorded
with iTunes are playable on this
audio unit.
The recommended USB f lash
memory devices are 256 MB or
higher, and f ormatted with the FAT
f ile system. Some digital audio
players may be compatible as well. Do not keep a USB f lash memory
device in the vehicle. Direct
sunlight and high heat will damage
it.
We recommend backing up your
data bef ore playing a USB f lash
memory device.
Some devices cannot be powered
or charged via the USB adapter. If
this is the case, use the accessory
adapter to supply power to your
device.
Depending on the sof tware the
f iles were made with, it may not be
possibletoplaysomefiles,or
display some text data.
Depending on the type and
number of f iles, it may take some
time bef ore they begin to play.
Do not use an extension cable to
the USB adapter cable equipped
with your vehicle.
Do not connect your USB f lash
memory device using a hub.
Do not use a device such as a card
reader or hard drive as the device
or your f iles may be damaged.
Some USB f lash memory devices
(such as devices with security lock-
out f eatures, etc.) will not work in
this audio unit. :
To Play a USB Flash Memory
Device
Audio System (Models with navigation system)
192
NOTE:
Table of Contents
Page 208 of 387

Some versions of MP3, WMA, or
AAC f ormat may not be supported. If
an unsupported f ile is f ound, the
audio unit displays UNSUPPORTED,
then skips to the next f ile.Connect the USB f lash memory
device to the USB connector
correctly and securely.
Pull out the USB connector f rom
the holder and remove the cable
f rom the clip in the console
compartment.
In WMA or AAC format, DRM
(digital rights management) f iles
cannot be played. If the system f inds
a DRM f ile, the audio unit displays
UNPLAYABLE FILE, and then skips
to the next file.
When the USB f lash memory device
is connected and the USB mode is
selected on the audio system, the
WMAorMP3indicatorisshownon
the navigation screen. It also shows
the f older and f ile numbers, and the
elapsed time on the screen.
1.
2.Connect ing a USB Flash Memory
Device
Audio System (Models with navigation system)
194
USB ADAPTER CABLE USB CONNECTOR
USB CONNECTOR
Combining a low sampling f requency
with a low bitrate may result in
extremely degraded sound quality.
Table of Contents
Page 222 of 387

The security system automatically
sets 15 seconds after you lock the
doors, hood, and trunk. For the
system to activate, you must lock the
doors f rom the outside with the key,
driver’s lock tab, door lock master
switch, or remote transmitter. The
security system indicator on the
instrument panel starts blinking
immediately to show you the system
is setting itself .With the system set, you can still
open the trunk with the master key
or the remote transmitter without
triggering the alarm. The alarm will
sound if the trunk lock is f orced, or
the trunk is opened with the trunk
release handle.
The security system will not set if
the hood, trunk, or any door is not
f ully closed. If the system will not set,
check the door and trunk open
indicators on the instrument panel
(see page ) to see if the doors and
trunk are f ully closed. Since it is not
part of the monitor display, manually
check the hood.
Do not attempt to alter this system
or add other devices to it.
To see if the system is set
af ter you exit the vehicle, press the
LOCK button on the remote
transmitter within 5 seconds. If the
system is set, the horn will beep
once.
The security system helps to protect
your vehicle and valuables f rom thef t.
The horn sounds and a combination
of headlights (low beam), parking
lights, side marker lights, and
taillights f lash if someone attempts
to break into your vehicle or remove
the radio. This alarm continues f or 2
minutes, then it stops. To reset an
activated system before the 2
minutes have elapsed, unlock the
driver’s door with the key or the
remote transmitter. Once the security system is set,
opening any door (without using the
key or the remote transmitter), the
hood, or the trunk will cause the
alarm to activate. It will also activate
if the audio unit is removed f rom the
dashboard or the wiring is cut. 61
If equipped
Security System
208
NOTE:
Except Si
Si
SECURITY SYSTEM INDICATOR
Table of Contents
Page 231 of 387
�Î�Î
CONT INUED
BluetoothHandsFreeL ink
Features
217
‘‘Change Language’’
‘‘Hands Free Help’’
‘‘System
Set up’’
‘‘Tutorial’’ ‘‘Clear’’
‘‘Auto Transfer’’
‘‘Call Notification’’ ‘‘Security’’
‘‘Change Passcode’’
Press HFL
Talk button
Press and release the HFL Talk button each time you give a command.
: Canadian models Apply a security passcode to the system that must be input at each key
cycle to access the system (See page 232)
Change your security passcode (See page 233)
Set how you would like to be notified of an incoming call
(See page 233)
Set calls to automatically transfer from your phone to HFL when you
enter the vehicle (See page 233)
Clear the system of all paired phones, phonebook entries and security
passcode (See page 234)
Hear a tutorial for general rules on using the system (See page 213)
Hear a list of available commands and additional information describing each comma nd
(See page 213)
Change language from English to French (See page 234)
Table of Contents
Page 246 of 387
This command group allows you to
change or customize HFL basic
settings.Press and release the HFL Talk
button bef ore a command.
Say ‘‘ .’’ Once a passcode is set, you
will need to enter it to use HFL each
time you start the vehicle. If you
f orget the code, your dealer will have
toresetitforyou,oryouwillhaveto
clear the entire system (see page ).
Follow the HFL prompts to
conf irm the number.
Follow the HFL prompts and say
the 4-digit passcode you want to
set.
Say‘‘ ’’aftertheprompts.
1. 2.3. 4. 234
System Setup
System setup
Security
T o set a 4-digit passcode t o lock t heHFL syst em f or securit y purposes:
BluetoothHandsFreeL ink
232
NOTE:
Table of Contents
Page 247 of 387
 position.
Press and release the HFL Talk")
�Î
�ÎIf you get into the vehicle while you
are on the phone, the call can be
automatically transferred to HFL
with the ignition switch in the
ACCESSORY (I) position.
Press and release the HFL Talk
button bef ore a command.
Say ‘‘ .’’
Press and release the HFL Talk
button bef ore a command.
Say ‘‘ .’’ Press and release the HFL Talk
button bef ore a command.
Say ‘‘ .’’
Follow the HFL prompts to
conf irm the number.
Follow the HFL prompts and say
the new 4-digit passcode.
Say ‘‘ ’’ af ter the
prompts.
The def ault setting is a ring tone.
Follow the HFL prompts and say
‘‘ ’’ or ‘‘ .’’ You
can also say ‘‘ ’’ f or no audible
incoming call notif ication.
Say ‘‘ ’’ af ter the
prompts.
HFL will let you know if auto
transf er is on or of f , depending on
the previous setting. Follow the
HFL prompts to change the
setting.
Say ‘‘ ’’ af ter the
prompts.
2. 3.
4.
1. 2. 3.
1. 2. 3.
1.
:
CONT INUED
System setup
System setup
System setup
Change passcode
Ring tone PromptOf f
Call notif ication
Auto transf er
T o change your securit y passcode: T o select eit her a ring t one or a prompt as t he incoming callnotification : To activate or deactivate the auto
transfer function:
BluetoothHandsFreeL ink
Features
233
Table of Contents