2010 HONDA CIVIC open hood
[x] Cancel search: open hoodPage 4 of 387

.................................................
Fuel . 238
......................
Fill Door and Cap . 239
...........................................
Gauge . 70
................
Octane Requirement . 238
...............................
Oxygenated . 238
........................
Reserve Indicator . 64
........................
Tank, Filling the . 239
.....................
Fuses, Checking the . 342
...............
Gas Mileage, Improving . 244
.........................................
Gasoline . 238
...............
Fuel Reserve Indicator . 64
...........................................
Gauge . 70
................
Octane Requirement . 238
........................
Tank, Filling the . 239
................
Gas Station Procedures . 239
Gauges
...
Engine Coolant Temperature . 70
...............................................
Fuel . 70
Gearshif t Lever Positions ..........
Automatic Transmission . 260
..............
Manual Transmission . 257
......................................
Glove Box . 108 .............
Halogen Headlight Bulbs . 302
...........................
HandsFreeLink
. 212
..............
Hazard Warning Flashers . 76
Headlights
........................................
Aiming . 302
............
Daytime Running Lights . 74
..................
High Beam Indicator . 61
........................
Reminder Beeper . 73
........
Replacing Halogen Bulbs . 302
...................................
Turning on . 73
..............................
Head Restraints . 94
.............................
Heated Mirrors . 104
.....................
Heating and Cooling . 110
.............
High Altitude, Starting at . 256
.................
High-Low Beam Switch . 73
..............
High-mount Brake Light . 307
.......................
Hood, Opening the . 240
..............................................
Horn .4,71
...
Identif ication Number, Vehicle . 352
Ignition
..............................................
Keys . 78 ...........................................
Switch . 80
............
Timing Control System . 364
.........
Important Safety Precautions . 6
.........
Indicators, Instrument Panel . 59
...............................
Inf ant Restraint . 38
Inf ant Seats
.............
LATCH Anchor System . 42
...........................
Lower Anchors . 42
................
Tether Anchor Points . 45
Inf lation, Recommended Tire ...................................
Pressures . 315
........................
Inf ormation Display . 67
.................................
Inside Mirror . 103
.............................
Inspection, Tire . 316
............................
Instrument Panel . 57
................
Instrument Panel Lights . 59
........
Instrument Panel Brightness . 75
..............
Instruments and Controls . 55
...............................
Interior Lights . 105
........................................
Introduction . i
.......................................
iPod
. 133, 184
.................
Jacking up the Vehicle . 328
.......................................
Jack, Tire . 327
Index
H I
G
J
IV
Page 222 of 387
The security system automatically
sets 15 seconds after you lock the
doors, hood, and trunk. For the
system to activate, you must lock the
doors f rom the outside with the key,
driver’s lock tab, door lock master
switch, or remote transmitter. The
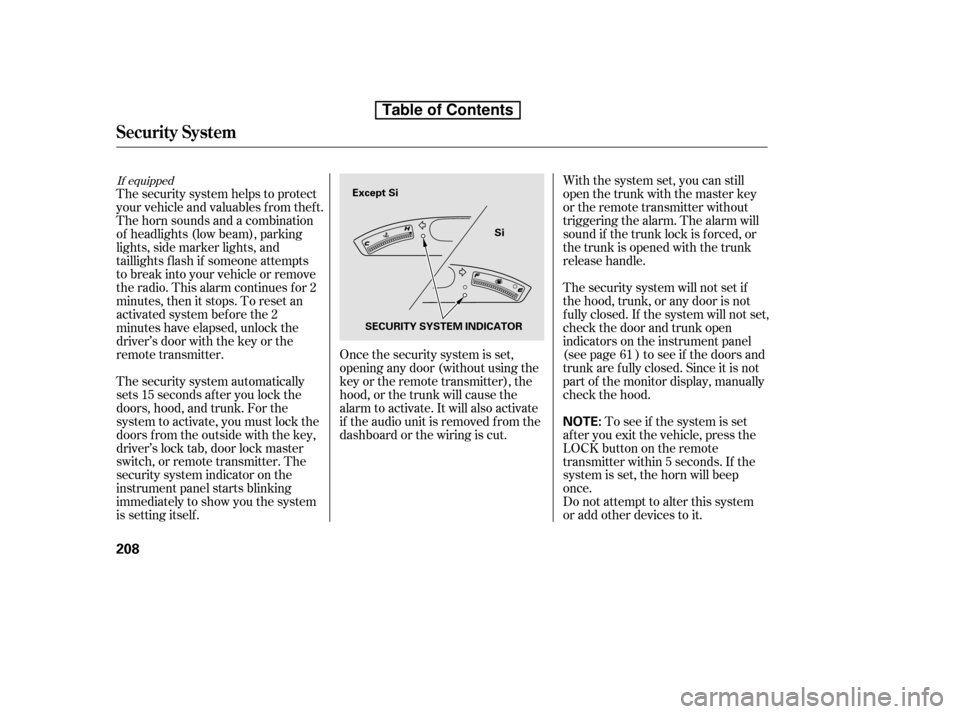
security system indicator on the
instrument panel starts blinking
immediately to show you the system
is setting itself .With the system set, you can still
open the trunk with the master key
or the remote transmitter without
triggering the alarm. The alarm will
sound if the trunk lock is f orced, or
the trunk is opened with the trunk
release handle.
The security system will not set if
the hood, trunk, or any door is not
f ully closed. If the system will not set,
check the door and trunk open
indicators on the instrument panel
(see page ) to see if the doors and
trunk are f ully closed. Since it is not
part of the monitor display, manually
check the hood.
Do not attempt to alter this system
or add other devices to it.
To see if the system is set
af ter you exit the vehicle, press the
LOCK button on the remote
transmitter within 5 seconds. If the
system is set, the horn will beep
once.
The security system helps to protect
your vehicle and valuables f rom thef t.
The horn sounds and a combination
of headlights (low beam), parking
lights, side marker lights, and
taillights f lash if someone attempts
to break into your vehicle or remove
the radio. This alarm continues f or 2
minutes, then it stops. To reset an
activated system before the 2
minutes have elapsed, unlock the
driver’s door with the key or the
remote transmitter. Once the security system is set,
opening any door (without using the
key or the remote transmitter), the
hood, or the trunk will cause the
alarm to activate. It will also activate
if the audio unit is removed f rom the
dashboard or the wiring is cut. 61
If equipped
Security System
208
NOTE:
Except Si
Si
SECURITY SYSTEM INDICATOR
Table of Contents
Page 251 of 387
Bef ore you begin driving your
vehicle, you should know what
gasoline to use and how to check the
levels of important f luids. You also
need to know how to properly store
luggage or packages. The
inf ormation in this section will help
you. If you plan to add any
accessories to your vehicle, please
read the information in this section
first..............................Break-in Period . 238
.................
Fuel Recommendation . 238
.........
Service Station Procedures . 239
....................................
Ref ueling . 239
Opening and Closing the
.......................................
Hood . 240
...................................
Oil Check . 241
.............
Engine Coolant Check . 243
...............................
Fuel Economy . 244
...
Accessories and Modif ications . 247
.............................
Carrying Cargo . 249
Bef ore Driving
Bef ore Driving
237
Page 254 of 387
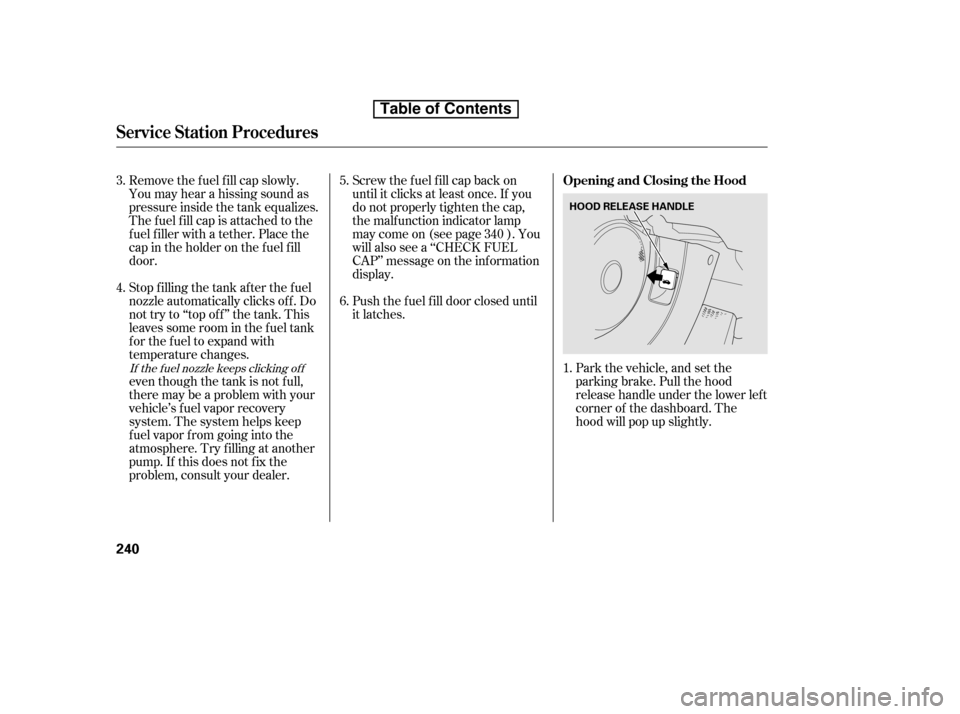
Park the vehicle, and set the
parking brake. Pull the hood
release handle under the lower lef t
corner of the dashboard. The
hood will pop up slightly.
Screw the f uel f ill cap back on
until it clicks at least once. If you
do not properly tighten the cap,
the malf unction indicator lamp
maycomeon(seepage ).You
will also see a ‘‘CHECK FUEL
CAP’’ message on the inf ormation
display.
Push the f uel f ill door closed until
it latches.
Remove the f uel f ill cap slowly.
You may hear a hissing sound as
pressure inside the tank equalizes.
The fuel fill cap is attached to the
f uel f iller with a tether. Place the
cap in the holder on the f uel f ill
door.
Stop f illing the tank af ter the f uel
nozzle automatically clicks of f . Do
not try to ‘‘top off’’ the tank. This
leaves some room in the f uel tank
for the fuel to expand with
temperature changes.
even though the tank is not f ull,
there may be a problem with your
vehicle’s fuel vapor recovery
system. The system helps keep
f uel vapor f rom going into the
atmosphere. Try f illing at another
pump. If this does not f ix the
problem, consult your dealer.
1.
5. 6.
4.
3.
340If the f uel nozzle keeps clicking of f
Service Station Procedures
Opening and Closing the Hood
240
HOOD RELEASE HANDLE
Table of Contents
Page 255 of 387

Wait a f ew minutes af ter turning the
engine of f bef ore you check the oil.
Put your f ingers under the f ront
edge of the hood near the center.
Slide your hand to the lef t until
you f eel the hood latch handle.
Push this handle up to release it.
Lif t up the hood.
If the hood latch handle moves
stif f ly, or if you can open the hood
without lifting the handle, the
mechanism should be cleaned and
lubricated. Pull the support rod out of its clip
by holding the grip, and insert the
end into the designated hole in thehood.
To close the hood, lif t it up slightly
to remove the support rod f rom
the hole. Put the support rod back
into its holding clip. Lower the
hood to about a f oot (30 cm) above
the fender, then let it drop. Make
sure it is securely latched.
Remove the dipstick (orange
handle).
Insert it all the way back in its tube.
Wipe of f the dipstick with a clean
cloth or paper towel.
3.
1. 2.
3.
2.
CONT INUED
Service Station Procedures
Oil Check
Bef ore Driving
241
DIPSTICK
SUPPORT ROD
LATCH GRIP
Except Si
Table of Contents
Page 306 of 387
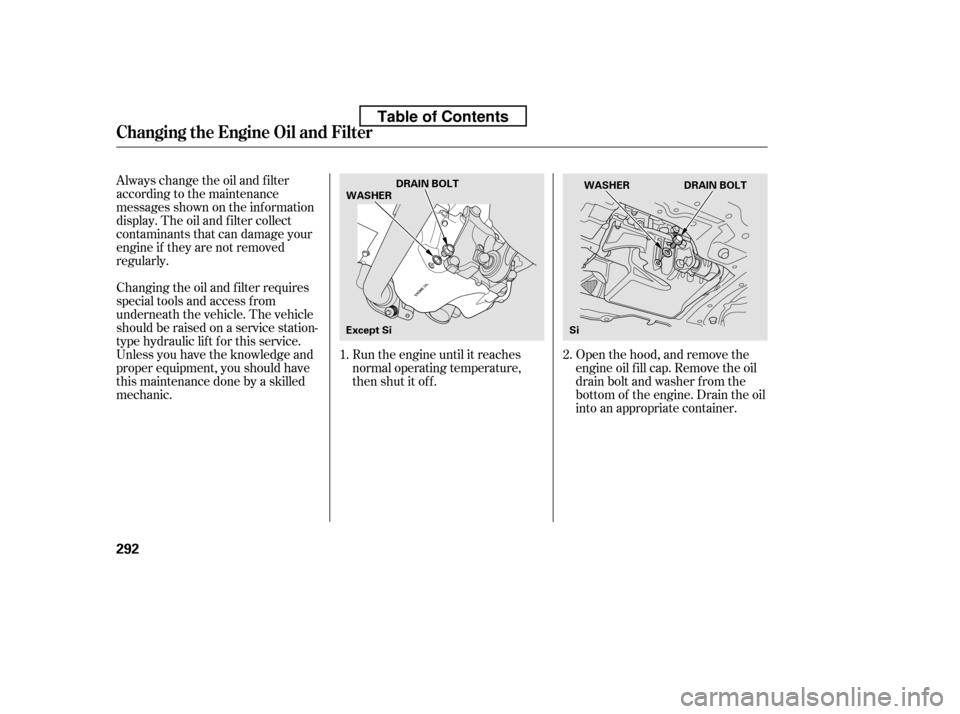
Open the hood, and remove the
engine oil f ill cap. Remove the oil
drain bolt and washer f rom the
bottom of the engine. Drain the oil
into an appropriate container.
Always change the oil and f ilter
according to the maintenance
messages shown on the inf ormation
display. The oil and f ilter collect
contaminants that can damage your
engine if they are not removed
regularly.
Changing the oil and f ilter requires
special tools and access f rom
underneath the vehicle. The vehicle
should be raised on a service station-
type hydraulic lif t f or this service.
Unless you have the knowledge and
proper equipment, you should have
this maintenance done by a skilled
mechanic.
Run the engine until it reaches
normal operating temperature,
then shut it off.
1.
2.
Changing the Engine Oil and Filter
292
WASHER
DRAIN BOLT
WASHER DRAIN BOLT
Except Si Si
Table of Contents
Page 325 of 387
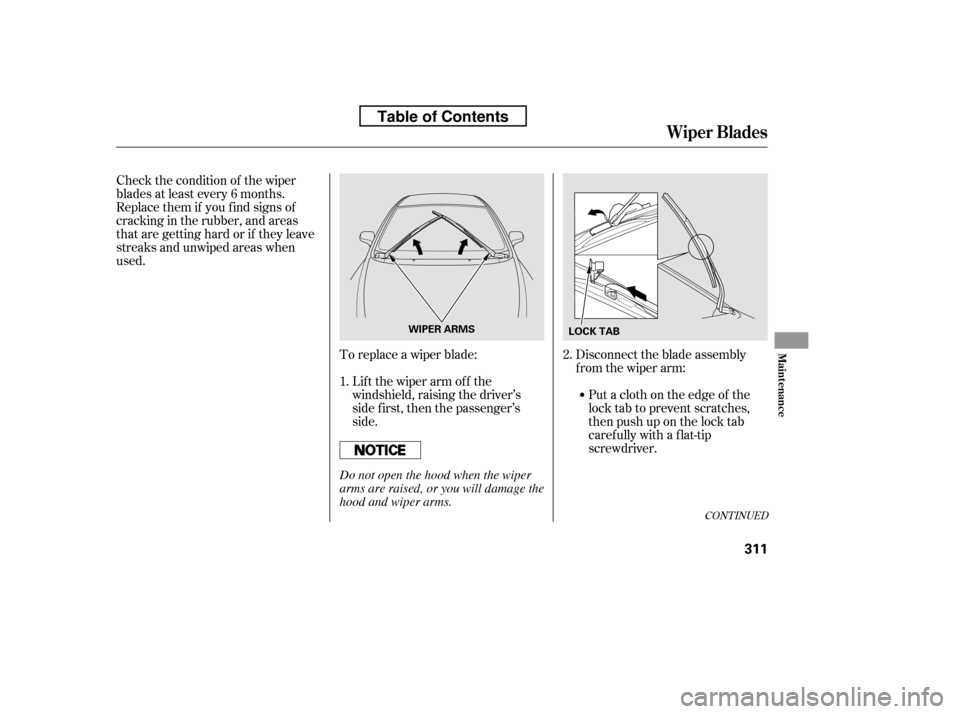
Check the condition of the wiper
blades at least every 6 months.
Replace them if you f ind signs of
cracking in the rubber, and areas
that are getting hard or if they leave
streaks and unwiped areas when
used.To replace a wiper blade:Lift the wiper arm off the
windshield, raising the driver’s
side first, then the passenger’s
side. Disconnect the blade assembly
from the wiper arm:
Put a cloth on the edge of the
lock tab to prevent scratches,
then push up on the lock tab
carefully with a flat-tip
screwdriver.
2.
1.
CONT INUED
Wiper Blades
Maint enance
311
WIPER ARMS LOCK TAB
Do not open the hood when the wiper
arms are raised, or you will damage the
hood and wiper arms.
Table of Contents
Page 348 of 387
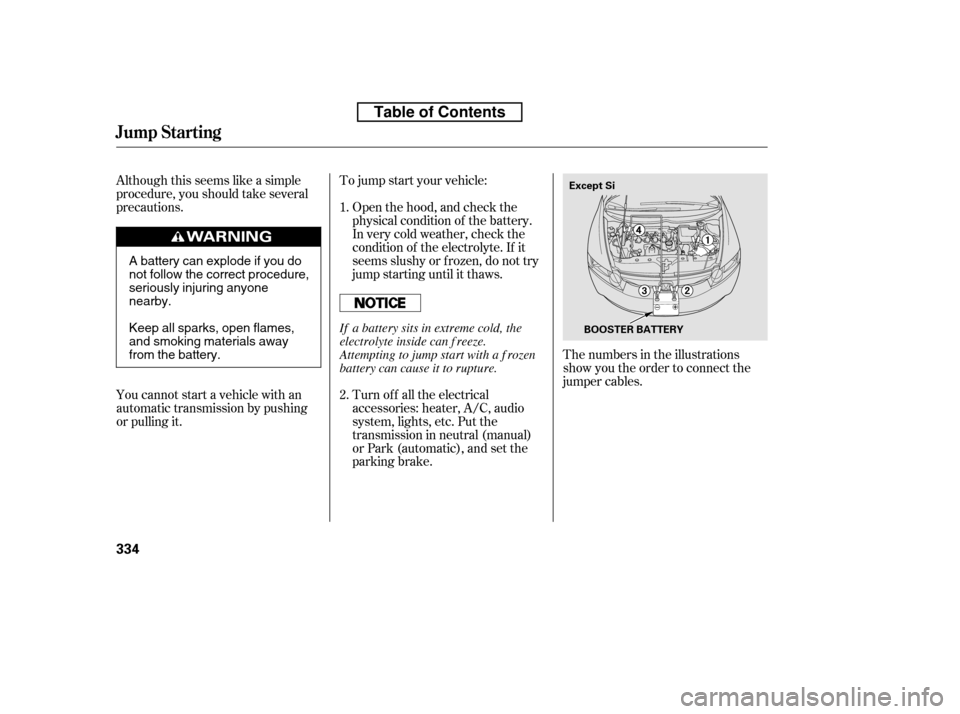
Although this seems like a simple
procedure, you should take several
precautions.To jump start your vehicle:
The numbers in the illustrations
show you the order to connect the
jumper cables.
Turn of f all the electrical
accessories: heater, A/C, audio
system, lights, etc. Put the
transmission in neutral (manual)
or Park (automatic), and set the
parking brake.
Open the hood, and check the
physical condition of the battery.
In very cold weather, check the
condition of the electrolyte. If it
seems slushy or f rozen, do not try
jump starting until it thaws.
You cannot start a vehicle with an
automatic transmission by pushing
or pulling it. 1. 2.
Jump Starting
334
Except Si
BOOSTER BATTERY
A battery can explode if you do
not follow the correct procedure,
seriously injuring anyonenearby.
Keep all sparks, open flames,
and smoking materials away
from the battery. If a battery sits in extreme cold, the
electrolyte inside can f reeze.
Attempting to jump start with a f rozen
battery can cause it to rupture.
Table of Contents