Page 376 of 614

Loading Your Vehicle for Off-Road
Driving
{WARNING:
.Cargo on the load floor piled higher than the
seatbacks can be thrown forward during a
sudden stop. You or your passengers could
be injured. Keep cargo below the top of the
seatbacks.
.Unsecured cargo on the load floor can be
tossed about when driving over rough terrain.
You or your passengers can be struck by
flying objects. Secure the cargo properly.(Continued)
WARNING: (Continued)
.Heavy loads on the roof raise the vehicle's
center of gravity, making it more likely to roll
over. You can be seriously or fatally injured if
the vehicle rolls over. Put heavy loads inside
the cargo area, not on the roof. Keep cargo
in the cargo area as far forward and low as
possible.
There are some important things to remember about
how to load your vehicle.
.The heaviest things should be on the floor, forward
of the rear axle. Put heavier items as far forward
as you can.
.Be sure the load is properly secured, so things are
not tossed around.
You will find other important information under Loading
the Vehicle
on page 5‑31and Tires on page 6‑63.
5-14
Page 398 of 614

And, if you do have a heavy load, you should
spread it out.
{CAUTION:
Do not load the vehicle any heavier than
the Gross Vehicle Weight Rating (GVWR),
or either the maximum front or rear Gross
Axle Weight Rating (GAWR). If you do, parts
on the vehicle can break, and it can change
the way your vehicle handles. These could
cause you to lose control and crash. Also,
overloading can shorten the life of the
vehicle.
Notice :Overloading the vehicle may cause
damage. Repairs would not be covered by the
vehicle warranty. Do not overload the vehicle.
The label will help you decide how much cargo
and installed equipment your truck can carry.
Using heavier suspension components to get
added durability might not change your weight
ratings. Ask your dealer to help you load your
vehicle the right way. If you put things inside your vehicle
—like
suitcases, tools, packages, or anything
else —they go as fast as the vehicle goes.
If you have to stop or turn quickly, or if there
is a crash, they will keep going.
{WARNING:
Things you put inside your vehicle can strike
and injure people in a sudden stop or turn,
or in a crash.
.Put things in the cargo area of your
vehicle. Try to spread the weight evenly.
.Never stack heavier things, like
suitcases, inside the vehicle so that some
of them are above the tops of the seats.
.Do not leave an unsecured child restraint
in your vehicle.
.When you carry something inside the
vehicle, secure it whenever you can.
.Do not leave a seat folded down unless
you need to.
5-36
Page 400 of 614

Here are some guidelines for safely carrying a snow
plow on your vehicle:
.Make sure the weight on the front and rear axles
does not exceed the axle rating for each.
.For the front axle, if more cargo or passengers
must be carried, appropriate counter ballast must
be installed rear of the rear axle. Counter ballast
must be properly secured so it will not move during
driving.
.Follow the snow plow manufacturer's
recommendations regarding rear ballast.
Rear ballast may be required to ensure a
proper front and rear weight distribution ratio,
even though the actual weight at the front axle
may be less than the front axle rating.
.The snow plow manufacturer or installer can assist
you in determining the amount of rear ballast
required, to help make sure your snowplow/vehicle
combination does not exceed the GVW rating, the
front and rear axle ratings, and the front and rear
weight distribution ratio.
.The total vehicle must not exceed the GVW rating.Front axle reserve capacity is the difference between
your front Gross Axle Weight Rating (GAWR) and the
front axle weight of your vehicle with full fuel and
passengers. Basically, it is the amount of weight
you can add to your front axle before reaching your
front GAWR.
The front axle reserve capacity for your vehicle can be
found in the lower right corner of the Certification/Tire
label, as shown.United StatesCanada
5-38
Page 405 of 614

Four-Wheel Drive Vehicles with a Two
Speed Automatic Transfer Case
Use the following procedure to dinghy tow a four-wheel
drive vehicle with a two speed automatic transfer case:1. Position the vehicle being towed behind the tow vehicle and shift the transmission to P (Park).
2. Turn the engine off and firmly set the parking brake.
3. Securely attach the vehicle being towed to the tow vehicle.
{WARNING:
Shifting a four-wheel-drive vehicle's transfer case
into N (Neutral) can cause the vehicle to roll even
if the transmission is in P (Park). The driver or
others could be injured. Make sure the parking
brake is firmly set before the transfer case is
shifted to N (Neutral).
4. Shift the transfer case to N (Neutral). See “Shifting
into Neutral” under“Four-Wheel Drive” for the
proper procedure to select the Neutral position
for the vehicle.
5. Release the parking brake only after the vehicle being towed is firmly attached to the towing
vehicle.
6. Turn the ignition to LOCK/OFF and remove the key —the steering wheel will still turn.
After towing, see “Shifting Out of Neutral” under
“Four-Wheel Drive” for the proper procedure to take
the vehicle out of the Neutral position.
5-43
Page 407 of 614

Four-Wheel Drive Vehicles with a Two
Speed Automatic Transfer Case
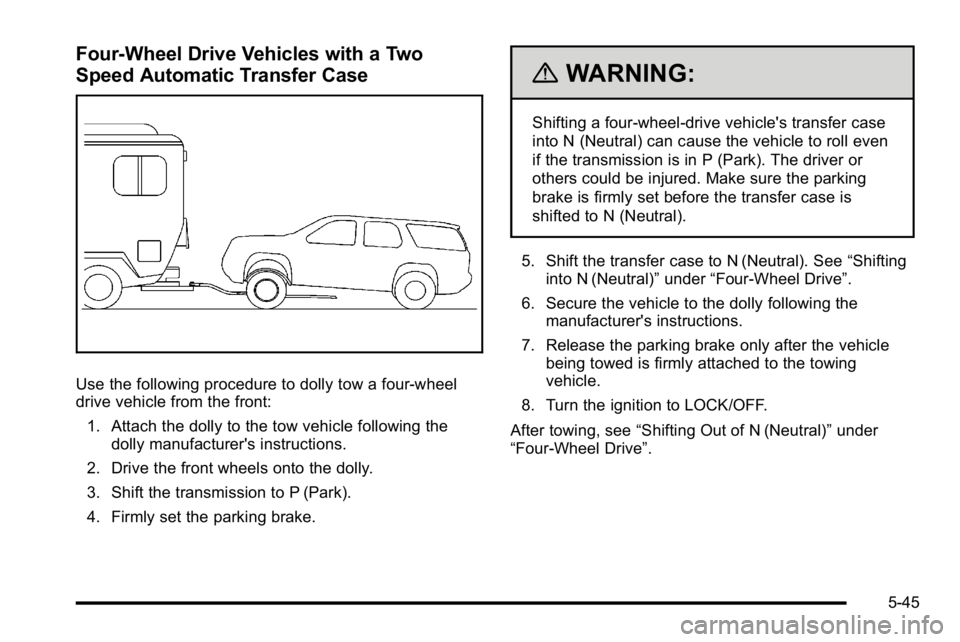
Use the following procedure to dolly tow a four-wheel
drive vehicle from the front:1. Attach the dolly to the tow vehicle following the dolly manufacturer's instructions.
2. Drive the front wheels onto the dolly.
3. Shift the transmission to P (Park).
4. Firmly set the parking brake.
{WARNING:
Shifting a four-wheel-drive vehicle's transfer case
into N (Neutral) can cause the vehicle to roll even
if the transmission is in P (Park). The driver or
others could be injured. Make sure the parking
brake is firmly set before the transfer case is
shifted to N (Neutral).
5. Shift the transfer case to N (Neutral). See “Shifting
into N (Neutral)” under“Four-Wheel Drive”.
6. Secure the vehicle to the dolly following the manufacturer's instructions.
7. Release the parking brake only after the vehicle being towed is firmly attached to the towing
vehicle.
8. Turn the ignition to LOCK/OFF.
After towing, see “Shifting Out of N (Neutral)” under
“Four-Wheel Drive”.
5-45
Page 408 of 614
Rear Towing (Rear Wheels Off the
Ground)Two-Wheel-Drive Vehicles and Four-Wheel
Drive Vehicles with a Single Speed
Automatic Transfer Case
Use the following procedure to dolly tow the vehicle
from the rear:1. Attach the dolly to the tow vehicle following the dolly manufacturer's instructions.
2. Drive the rear wheels onto the dolly.
3. Firmly set the parking brake. See Parking Brake
on page 3‑48.
4. Put the transmission in P (Park).
5. Secure the vehicle to the dolly following the manufacturer's instructions.
6. Use an adequate clamping device designed for towing to ensure that the front wheels are locked
into the straight position.
7. For four-wheel drive vehicles with a single speed automatic transfer case, turn the transfer case
knob to the Two-Wheel High position.
8. Turn the ignition to LOCK/OFF.
5-46
Page 409 of 614

Four-Wheel Drive Vehicles with a
Two Speed Automatic Transfer Case
Use the following procedure to dolly tow a four-wheel
drive vehicle from the rear:1. Attach the dolly to the tow vehicle following the dolly manufacturer's instructions.
2. Drive the rear wheels onto the dolly.
3. Firmly set the parking brake. See Parking Brake
on page 3‑48.
4. Put the transmission in P (Park).
5. Secure the vehicle to the dolly following the manufacturer's instructions.
6. Use an adequate clamping device designed for towing to ensure that the front wheels are locked
into the straight position.
{WARNING:
Shifting a four-wheel-drive vehicle's transfer case
into N (Neutral) can cause the vehicle to roll even
if the transmission is in P (Park). The driver or
others could be injured. Make sure the parking
brake is firmly set before the transfer case is
shifted to N (Neutral).
7. Shift the transfer case to N (Neutral). See “Shifting
into N (Neutral)” under“Four-Wheel Drive”.
8. Turn the ignition to LOCK/OFF.
After towing, see “Shifting Out of N (Neutral)” under
“Four-Wheel Drive”.
5-47
Page 426 of 614

Driving with a Trailer
{WARNING:
When towing a trailer, exhaust gases may collect
at the rear of the vehicle and enter if the liftgate,
trunk/hatch, or rear-most window is open.
Engine exhaust contains carbon monoxide (CO)
which cannot be seen or smelled. It can cause
unconsciousness and even death.
To maximize safety when towing a trailer:
.Have the exhaust system inspected for leaks
and make necessary repairs before starting
a trip.
.Never drive with the liftgate, trunk/hatch,
or rear-most window open.
.Fully open the air outlets on or under the
instrument panel.
.Adjust the Climate Control system to a setting
that brings in only outside air and set the fan
speed to the highest setting. See Climate
Control System in the Index.
For more information about carbon monoxide, see
Engine Exhaust on page 3‑52. Towing a trailer requires a certain amount of
experience. The combination you are driving is
longer and not as responsive as the vehicle itself.
Get acquainted with the handling and braking of the
rig before setting out for the open road.
Before starting, check all trailer hitch parts and
attachments, safety chains, electrical connectors,
lamps, tires and mirrors. If the trailer has electric
brakes, start the combination moving and then apply
the trailer brake controller by hand to be sure the
brakes work.
During the trip, check occasionally to be sure that the
load is secure and the lamps and any trailer brakes
still work.
Following Distance
Stay at least twice as far behind the vehicle ahead as
you would when driving the vehicle without a trailer.
This can help to avoid heavy braking and sudden turns.
Passing
More passing distance is needed when towing a trailer.
The combination will not accelerate as quickly and is
longer so it is necessary to go much farther beyond the
passed vehicle before returning to the lane.
5-64