2010 GMC YUKON HYBRID door lock
[x] Cancel search: door lockPage 9 of 120

A chime will sound if the driver door is opened while in
Auto Stop as a reminder that the ignition switch is not in
the LOCK/OFF position. Always turn the ignition switch
to LOCK/OFF and remove the key from the ignition
switch when exiting the vehicle.
Auto Start
The vehicle also has an Auto Start feature. The engine
will remain off while in Auto Stop mode until vehicle
conditions require the engine to run. The near-instant
starting of the engine from Auto Stop mode is called
Auto Start.
EV Mode
The vehicle also has an EV mode which uses only
the electric motor to move the vehicle. With light
acceleration, the vehicle will drive in EV mode.
EV mode is unavailable when the vehicle is out of fuel.
See Starting the Vehicle in the Two‐Mode Hybrid
supplement to the owner manual.
Regenerative Braking
Regenerative braking enables the electric drive motor
to operate as a generator when coasting or braking.
Energy from the moving vehicle recharges the hybrid
battery.
The hydraulic disc brakes work with the regenerative
braking to insure effective braking.
The braking system is computer controlled and blends
the regenerative braking with the conventional hydraulic
disc brakes to meet any requirements for deceleration.
Because the controller applies the hydraulic brakes
through its high pressure accumulator, you may
occasionally hear the motor driven pump when it
recharges the system. This is normal. In the event of a
controller problem, the brake pedal may be harder to
push and the stopping distance may be longer.
See Regenerative Braking, Warning Lights, Gages, and
Indicators and Driver Information Center (DIC) in the
owner manual.
1-5
Page 18 of 120

Auto Stop
The vehicle has an Auto Stop feature. After a
successful engine start, the engine may turn off and
operate in the Auto Stop mode. Some of the vehicle
conditions that allow the engine to stop running and
enter the Auto Stop mode are:
.Ignition switch is in the ON/RUN position.
.The hood is closed.
.The gear selector is in P (Park), R (Reverse),
N (Neutral) or D (Drive).
.The hybrid battery is at an acceptable state of
charge.
.The hybrid battery voltage, temperature or power
limits are not exceeded. In very hot conditions,
Auto Stop may be unavailable until the hybrid
battery has cooled.
.The engine is at operating temperature.
.The vehicle may enter Auto Stop after a remote
vehicle start.
If you are on an incline, the hybrid drive motor can help
keep the vehicle from rolling backwards, even if the
engine is in Auto Stop. With your foot off the brake and the vehicle on level
ground, the hybrid drive motor may cause the vehicle
to roll slowly forward, even when the engine is in
Auto Stop.
Keep your foot firmly on the brake pedal until you are
ready for the vehicle to move.
Engine OFF and AUTO STOP modes are indicated on
the tachometer display. When the tachometer needle
indicates OFF, the engine is not running and will remain
off until the ignition key is placed in the START position
or a remote vehicle start is performed. When the
tachometer needle indicates AUTO STOP, the hybrid
system is on, the engine is not running, but may Auto
Start at any time without notice. See
Tachometer
on
page 4‑4for more information.
A chime will sound if the driver door is opened while in
Auto Stop as a reminder that the ignition switch is not in
the LOCK/OFF position. Always turn the ignition switch
to LOCK/OFF and remove the key from the ignition
switch when exiting the vehicle.
3-4
Page 95 of 120

Always do a safety check first. SeeIf a Tire Goes Flaton page 6‑34.
1. Remove the tire sealant and compressor kit from its storage location. See Tire Sealant and
Compressor Kit Storage on page 6‑55.
Make sure the on/off button (D) is in the off (O)
position.
2. Unwrap the sealant/air hose (F) and the power plug (C).
3. Place the kit on the ground. Make sure the tire valve stem is positioned close to
the ground so the hose will reach it.
4. Remove the valve stem cap from the flat tire by turning it counterclockwise.
5. Attach the sealant/air hose (F) onto the tire valve stem. Turn it clockwise until it is tight. 6. Plug the power plug (C) into the accessory power
outlet in the vehicle. Unplug all items from other
accessory power outlets. See “Accessory Power
Outlet(s) in the owner manual.”
If the vehicle has an accessory power outlet,
do not use the cigarette lighter.
If the vehicle only has a cigarette lighter, use the
cigarette lighter.
Do not pinch the power plug cord in the door or
window.
7. Start the vehicle. The vehicle must be running while using the air compressor.
8. Press the on/off (D) button to turn the tire sealant and compressor kit on.
The compressor will inject sealant and air into
the tire.
The pressure gage (E) will initially show a high
pressure while the compressor pushes the sealant
into the tire. Once the sealant is completely
dispersed into the tire, the pressure will quickly
drop and start to rise again as the tire inflates with
air only.
6-39
Page 99 of 120

8. Plug the power plug (C) into the accessory poweroutlet in the vehicle. Unplug all items from other
accessory power outlets. See “Accessory Power
Outlet(s) in the owner manual.”
If the vehicle has an accessory power outlet,
do not use the cigarette lighter.
If the vehicle only has a cigarette lighter, use the
cigarette lighter.
Do not pinch the power plug cord in the door or
window.
9. Start the vehicle. The vehicle must be running while using the air compressor.
10. Press the on/off (D) button to turn the compressor on.
The compressor will inflate the tire with air only.
11. Inflate the tire to the recommended inflation pressure using the pressure gage (E).
The recommended inflation pressure can be
found on the Tire and Loading Information label.
See Inflation - Tire Pressure on page 6‑28. The pressure gage (E) may read higher than the
actual tire pressure while the compressor is on.
Turn the compressor off to get an accurate
reading. The compressor may be turned on/off until
the correct pressure is reached.
12. Press the on/off button (D) to turn the tire sealant and compressor kit off.
Be careful while handling the tire sealant and
compressor kit as it could be warm after usage.
13. Unplug the power plug (C) from the accessory power outlet in the vehicle.
14. Disconnect the air only hose (C) from the tire valve stem, by turning it counterclockwise, and replace
the tire valve stem cap.
15. Replace the air only hose (F) and the power plug (C) back in its original location.
16. Place the equipment in the original storage location in the vehicle.
6-43
Page 105 of 120

Always do a safety check first. SeeIf a Tire Goes Flaton page 6‑34. Do not remove any objects that have
penetrated the tire.
1. Remove the tire sealant and compressor kit from its storage location. See Tire Sealant and
Compressor Kit Storage on page 6‑55.
2. Unwrap the sealant/air hose (F) and the power plug (H).
3. Place the kit on the ground.
4. Remove the valve stem cap from the flat tire by turning it counterclockwise.
5. Attach the sealant/air hose (F) onto the tire valve stem. Turn it clockwise until it is tight.
6. Plug the power plug (H) into the accessory power outlet in the vehicle. Unplug all items from other
accessory power outlets. See “Accessory Power
Outlet(s) in the owner manual.”
If the vehicle has an accessory power outlet,
do not use the cigarette lighter. If the vehicle only has a cigarette lighter, use the
cigarette lighter.
Do not pinch the power plug cord in the door or
window.
7. Start the vehicle. The vehicle must be running while using the air compressor.
8. Turn the selector switch (A) counterclockwise to the Sealant + Air position.
9. Press the on/off (B) button to turn the tire sealant and compressor kit on.
The compressor will inject sealant and air into
the tire.
The pressure gage (C) will initially show a high
pressure while the compressor pushes the sealant
into the tire. Once the sealant is completely
dispersed into the tire, the pressure will quickly
drop and start to rise again as the tire inflates with
air only.
6-49
Page 108 of 120
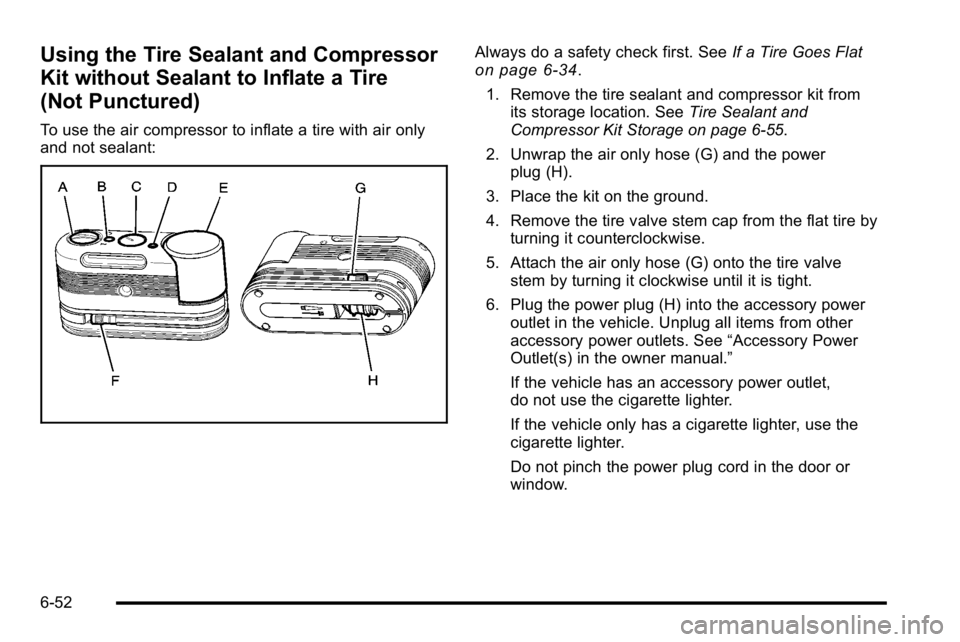
Using the Tire Sealant and Compressor
Kit without Sealant to Inflate a Tire
(Not Punctured)
To use the air compressor to inflate a tire with air only
and not sealant:
Always do a safety check first. SeeIf a Tire Goes Flaton page 6‑34.
1. Remove the tire sealant and compressor kit from its storage location. See Tire Sealant and
Compressor Kit Storage on page 6‑55.
2. Unwrap the air only hose (G) and the power plug (H).
3. Place the kit on the ground.
4. Remove the tire valve stem cap from the flat tire by turning it counterclockwise.
5. Attach the air only hose (G) onto the tire valve stem by turning it clockwise until it is tight.
6. Plug the power plug (H) into the accessory power outlet in the vehicle. Unplug all items from other
accessory power outlets. See “Accessory Power
Outlet(s) in the owner manual.”
If the vehicle has an accessory power outlet,
do not use the cigarette lighter.
If the vehicle only has a cigarette lighter, use the
cigarette lighter.
Do not pinch the power plug cord in the door or
window.
6-52