Page 50 of 120

Four-Wheel-Drive Vehicles (Except Denali)
Use the following procedure to dinghy tow a
four-wheel-drive vehicle:1. Position the vehicle being towed behind the tow vehicle and shift the transmission to P (Park).
2. Turn the engine off and firmly set the parking brake. See “Parking Brake” in the owner manual
index.
3. Securely attach the vehicle being towed to the tow vehicle.
{WARNING:
Shifting a four-wheel-drive vehicle's transfer case
into N (Neutral) can cause the vehicle to roll even
if the transmission is in P (Park). The driver or
others could be injured. Make sure the parking
brake is firmly set before the transfer case is
shifted to N (Neutral).
4. Shift the transfer case to N (Neutral). See “Shifting
into N (Neutral)” underFour-Wheel Drive
on
page 3‑10for the proper procedure to select the
Neutral position for the vehicle.
5. Release the parking brake only after the vehicle being towed is firmly attached to the towing
vehicle.
6. Turn the ignition to LOCK/OFF and remove the key —the steering wheel will still turn.
5-4
Page 52 of 120
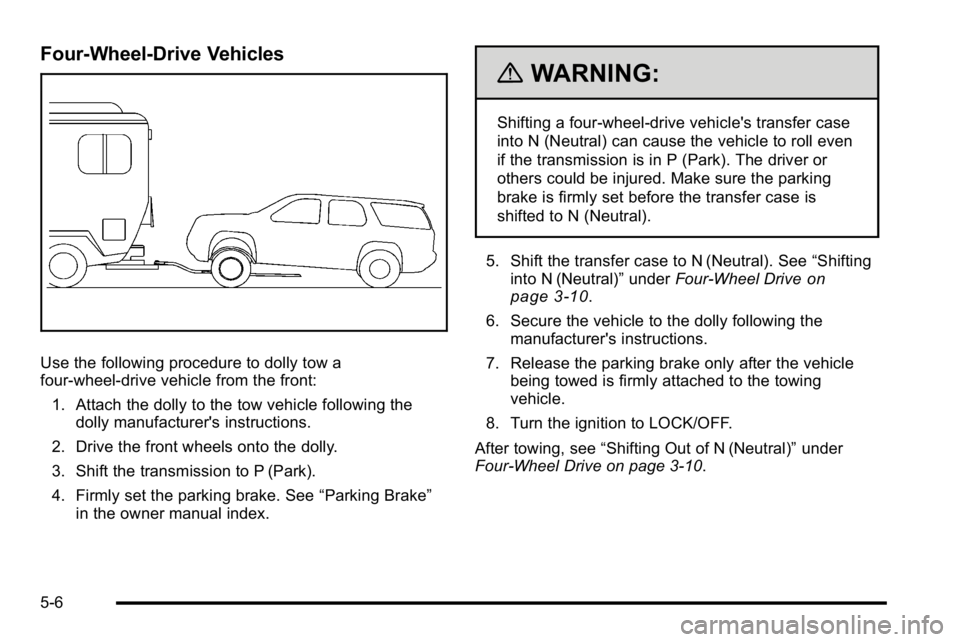
Four-Wheel-Drive Vehicles
Use the following procedure to dolly tow a
four-wheel-drive vehicle from the front:1. Attach the dolly to the tow vehicle following the dolly manufacturer's instructions.
2. Drive the front wheels onto the dolly.
3. Shift the transmission to P (Park).
4. Firmly set the parking brake. See “Parking Brake”
in the owner manual index.
{WARNING:
Shifting a four-wheel-drive vehicle's transfer case
into N (Neutral) can cause the vehicle to roll even
if the transmission is in P (Park). The driver or
others could be injured. Make sure the parking
brake is firmly set before the transfer case is
shifted to N (Neutral).
5. Shift the transfer case to N (Neutral). See “Shifting
into N (Neutral)” underFour-Wheel Drive
on
page 3‑10.
6. Secure the vehicle to the dolly following the manufacturer's instructions.
7. Release the parking brake only after the vehicle being towed is firmly attached to the towing
vehicle.
8. Turn the ignition to LOCK/OFF.
After towing, see “Shifting Out of N (Neutral)” under
Four-Wheel Drive on page 3‑10.
5-6
Page 53 of 120
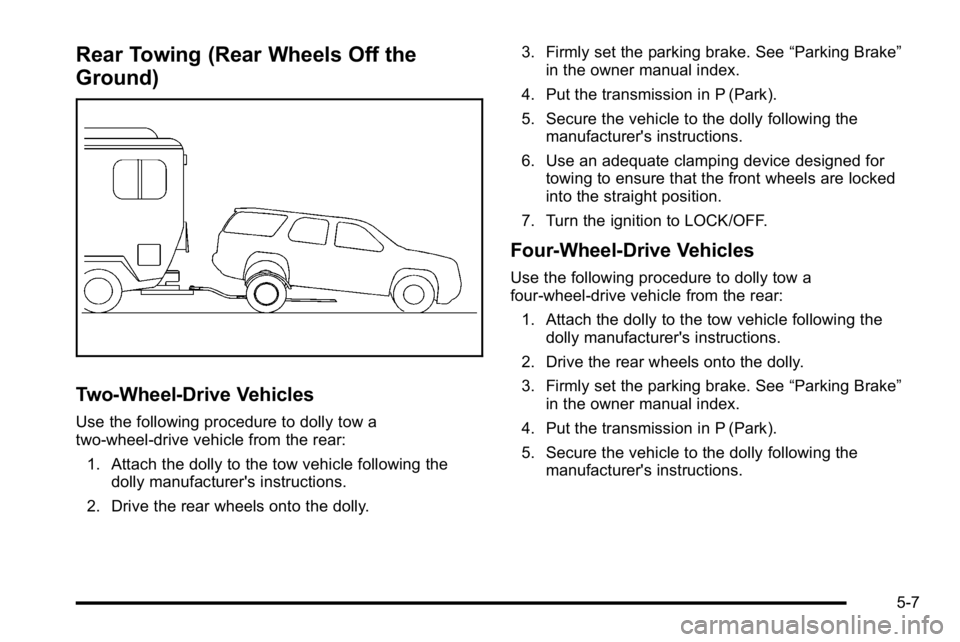
Rear Towing (Rear Wheels Off the
Ground)
Two‐Wheel‐Drive Vehicles
Use the following procedure to dolly tow a
two-wheel-drive vehicle from the rear:
1. Attach the dolly to the tow vehicle following the dolly manufacturer's instructions.
2. Drive the rear wheels onto the dolly. 3. Firmly set the parking brake. See
“Parking Brake”
in the owner manual index.
4. Put the transmission in P (Park).
5. Secure the vehicle to the dolly following the manufacturer's instructions.
6. Use an adequate clamping device designed for towing to ensure that the front wheels are locked
into the straight position.
7. Turn the ignition to LOCK/OFF.
Four‐Wheel‐Drive Vehicles
Use the following procedure to dolly tow a
four-wheel-drive vehicle from the rear: 1. Attach the dolly to the tow vehicle following the dolly manufacturer's instructions.
2. Drive the rear wheels onto the dolly.
3. Firmly set the parking brake. See “Parking Brake”
in the owner manual index.
4. Put the transmission in P (Park).
5. Secure the vehicle to the dolly following the manufacturer's instructions.
5-7
Page 54 of 120

6. Use an adequate clamping device designed fortowing to ensure that the front wheels are locked
into the straight position.
{WARNING:
Shifting a four-wheel-drive vehicle's transfer case
into N (Neutral) can cause the vehicle to roll even
if the transmission is in P (Park). The driver or
others could be injured. Make sure the parking
brake is firmly set before the transfer case is
shifted to N (Neutral).
7. Shift the transfer case to N (Neutral). See “Shifting
into N (Neutral)” underFour-Wheel Drive
on
page 3‑10
8. Turn the ignition to LOCK/OFF.
After towing, see “Shifting Out of N (Neutral)” under
Four-Wheel Drive on page 3‑10.
Towing a Trailer
For more information, see “Towing a Trailer”in the
owner manual Index.
Weight of the Trailer
How heavy can a trailer safely be?
It depends on how the rig is used. For example, speed,
altitude, road grades, outside temperature and how
much the vehicle is used to pull a trailer are all
important. It can depend on any special equipment
on the vehicle, and the amount of tongue weight the
vehicle can carry.
Maximum trailer weight is calculated assuming only the
driver is in the tow vehicle and it has all the required
trailering equipment. The weight of additional optional
equipment, passengers and cargo in the tow vehicle
must be subtracted from the maximum trailer weight.
Use the following charts to determine how much the
vehicle can weigh, based upon the vehicle model and
options.
5-8
Page 61 of 120

A. See“Engine Air Cleaner/Filter” in the owner
manual.
B. Drive Motor/Generator Control Module (DMCM). See Drive Motor/Generator Control Module
(DMCM) Cooling System on page 6‑9.
C. Engine Oil Dipstick. See “Engine Oil”in the owner
manual.
D. Automatic Transmission Fluid Dipstick. See Automatic Transmission Fluid on page 6‑5.
E. Brake Fluid Reservoir. See Brakes on page 6‑13.
F. See “Underhood Fuse Block” in the owner manual.
G. See “Windshield Washer Fluid” in the owner
manual.
H. Hybrid Auxiliary Fuse Block. See Underhood Fuse
Block on page 6‑26.
I. DMCM Coolant Surge Tank Pressure Cap. See Drive Motor/Generator Control Module (DMCM)
Coolant Surge Tank Pressure Cap on page 6‑8.
J. See “Coolant Surge Tank Pressure Cap” in the
owner manual.
K. Engine Oil Fill Cap. See “Engine Oil”in the owner
manual.Automatic Transmission Fluid
When to Check and Change Automatic
Transmission Fluid
It is usually not necessary to check the transmission
fluid level. The only reason for fluid loss is a
transmission leak or overheating the transmission.
If you suspect a small leak, then use the following
checking procedures to check the fluid level. However,
if there is a large leak, then it may be necessary to have
the vehicle towed to a dealer/retailer service department
and have it repaired before driving the vehicle further.
Notice: Use of the incorrect automatic transmission
fluid may damage the vehicle, and the damages may
not be covered by the vehicle's warranty. Always
use the automatic transmission fluid listed in
Recommended Fluids and Lubricants on page 7‑2.
Change the fluid and filter at the intervals listed in the
Maintenance Schedule. See Scheduled Maintenance in
the owner manual. Be sure to use the transmission fluid
listed in Recommended Fluids and Lubricants
on
page 7‑2.
6-5
Page 75 of 120

2. Get the vehicles close enough so the jumpercables can reach, but be sure the vehicles are not
touching each other. It could cause a ground
connection you do not want. You would not be able
to start your vehicle, and the bad grounding could
damage the electrical systems.
To avoid the possibility of the vehicles rolling, set
the parking brake firmly on both vehicles involved
in the jump start procedure. Put the automatic
transmission in P (Park) or a manual transmission
in N (Neutral) before setting the parking brake.
If you have a four-wheel-drive vehicle, be sure the
transfer case is in a drive gear, not in N (Neutral).
Notice: If you leave the radio or other accessories
on during the jump starting procedure, they could
be damaged. The repairs would not be covered by
the warranty. Always turn off the radio and other
accessories when jump starting the vehicle. 3. Turn off the ignition on both vehicles. Unplug
unnecessary accessories plugged into the
cigarette lighter or the accessory power outlets.
Turn off the radio and all the lamps that are not
needed.
This avoids sparks and helps save both batteries.
It could save the radio!
4. Open the hood on the other vehicle and locate the positive (+) and negative (−) terminal locations on
that vehicle.
Your vehicle has a remote positive (+) and a
remote negative (−) jump starting terminal.
You should always use these remote terminals
instead of the terminals on the battery.
6-19