Page 472 of 630

How to Add Automatic Transmission
Fluid
Refer to the Maintenance Schedule to determine what
kind of transmission fluid to use. SeeRecommended
Fluids and Lubricants on page 7‑12.
Using a funnel, add fluid down the transmission dipstick
tube only after checking the transmission fluid while it is
hot. A cold check is used only as a reference. If the fluid
level is low, add only enough of the proper fluid to bring
the level up to the HOT area for a hot check. It does
not take much fluid, generally less than 0.5 Liter (1 Pint).
Do not overfill.
Notice: Use of the incorrect automatic transmission
fluid may damage the vehicle, and the damages may
not be covered by the vehicle's warranty. Always
use the automatic transmission fluid listed in
Recommended Fluids and Lubricants on page 7‑12.
.After adding fluid, recheck the fluid level as
described under “How to Check Automatic
Transmission Fluid,” earlier in this section.
.When the correct fluid level is obtained, push the
dipstick back in all the way; then flip the handle
down to lock the dipstick in place.
Automatic Transmission Fluid
(6-Speed Transmission)
When to Check and Change Automatic
Transmission Fluid
It is usually not necessary to check the transmission
fluid level. The only reason for fluid loss is a
transmission leak or overheating the transmission.
If you suspect a small leak, then use the following
checking procedures to check the fluid level. However,
if there is a large leak, then it may be necessary to have
the vehicle towed to a dealer/retailer service department
and have it repaired before driving the vehicle further.
Notice:Use of the incorrect automatic transmission
fluid may damage the vehicle, and the damages may
not be covered by the vehicle's warranty. Always
use the automatic transmission fluid listed in
Recommended Fluids and Lubricants on page 7‑12.
Change the fluid and filter at the intervals listed in the
Maintenance Schedule. See Scheduled Maintenance
on page 7‑3. Be sure to use the transmission fluid
listed in Recommended Fluids and Lubricantson
page 7‑12.
6-26
Page 486 of 630

Do not top off the brake fluid. Adding fluid does not
correct a leak. If fluid is added when the linings are
worn, there will be too much fluid when new brake
linings are installed. Add or remove brake fluid, as
necessary, only when work is done on the brake
hydraulic system.
{WARNING:
If too much brake fluid is added, it can spill on the
engine and burn, if the engine is hot enough. You
or others could be burned, and the vehicle could
be damaged. Add brake fluid only when work is
done on the brake hydraulic system. See
“Checking Brake Fluid”in this section.
Refer to the Maintenance Schedule to determine when
to check the brake fluid. See Scheduled Maintenance
on page 7‑3.
Checking Brake Fluid
Check brake fluid by looking at the brake fluid reservoir.
SeeEngine Compartment Overview on page 6‑16.
The fluid level should be
above MIN. If it is not,
have the brake hydraulic
system checked to see if
there is a leak.
After work is done on the brake hydraulic system, make
sure the level is above the MIN but not over the
MAX mark.
What to Add
Use only new DOT 3 brake fluid from a sealed
container. See Recommended Fluids and Lubricantson
page 7‑12.
Always clean the brake fluid reservoir cap and the area
around the cap before removing it. This helps keep dirt
from entering the reservoir.
6-40
Page 488 of 630

Properly torqued wheel nuts are necessary to help
prevent brake pulsation. When tires are rotated, inspect
brake pads for wear and evenly tighten wheel nuts in
the proper sequence to torque specifications in
Capacities and Specifications on page 6‑126.
If the vehicle has rear drum brakes, they do not have
wear indicators, but if a rear brake rubbing noise is
heard, have the rear brake linings inspected
immediately. Rear brake drums should be removed and
inspected each time the tires are removed for rotation or
changing. Drum brakes have an inspection hole to
inspect lining wear during scheduled maintenance.
When the front brake pads are replaced, have the rear
brakes inspected, too.
Brake linings should always be replaced as complete
axle sets.
Brake Pedal Travel
See your dealer/retailer if the brake pedal does not
return to normal height, or if there is a rapid increase in
pedal travel. This could be a sign that brake service
might be required.
Brake Adjustment
Every brake stop, the brakes adjust for wear.
Replacing Brake System Parts
The braking system on a vehicle is complex. Its many
parts have to be of top quality and work well together if
the vehicle is to have really good braking. The vehicle
was designed and tested with top-quality brake parts.
When parts of the braking system are replaced—for
example, when the brake linings wear down and new
ones are installed —be sure to get new approved
replacement parts. If this is not done, the brakes might
not work properly. For example, if someone puts in
brake linings that are wrong for the vehicle, the balance
between the front and rear brakes can change —for the
worse. The braking performance expected can change
in many other ways if the wrong replacement brake
parts are installed.
6-42
Page 489 of 630
Battery
If the vehicle is a Two‐mode Hybrid, see the Two‐mode
Hybrid manual for more information.
This vehicle has a maintenance free battery (or
batteries). Refer to the replacement number on the
original battery label when a new battery is needed.
SeeEngine Compartment Overview
on page 6‑16for
battery location.
{DANGER:
Battery posts, terminals, and related accessories
contain lead and lead compounds, chemicals
known to the State of California to cause cancer
and reproductive harm. Wash hands after
handling.
Vehicle Storage
{WARNING:
Batteries have acid that can burn you and gas
that can explode. You can be badly hurt if you are
not careful. See Jump Starting
on page 6‑44for
tips on working around a battery without
getting hurt.
Infrequent Usage: Remove the black, negative (−) cable
from the battery to keep the battery from running down.
Extended Storage: Remove the black, negative (−)
cable from the battery or use a battery trickle charger.
6-43
Page 496 of 630

.For all 6.0L and 6.2L 2500HD Series applications,
the proper level is from 0 to 0.5 inches (0 mm to
13 mm) below the bottom of the filler plug hole,
located on the rear axle. Add only enough fluid to
reach the proper level.
.For all 6.6L DURAMAX DIESEL 2500HD Series
applications and all 3500 Series applications, the
proper level is from 0.6 inches to 0.8 inches
(17 mm to 21 mm) below the bottom of the filler
plug hole, located on the rear axle. Add only
enough fluid to reach the proper level.
What to Use
Refer to the Maintenance Schedule to determine what
kind of lubricant to use. SeeRecommended Fluids and
Lubricants on page 7‑12.
Four-Wheel Drive
Lubricant checks in this section also apply to these
vehicles.
Transfer Case
When to Check Lubricant
It is not necessary to regularly check transfer case fluid
unless you suspect there is a leak, or you hear an
unusual noise. A fluid loss could indicate a problem.
Have it inspected and repaired.
How to Check Lubricant
Electric Shift Transfer Case
A. Fill Plug
B. Drain Plug
6-50
Page 498 of 630
When to Change Lubricant
Refer to the Maintenance Schedule to determine how
often to change the lubricant. SeeScheduled
Maintenance on page 7‑3.
What to Use
Refer to the Maintenance Schedule to determine what
kind of lubricant to use. See Recommended Fluids and
Lubricants on page 7‑12.
Front Axle
When to Check and Change Lubricant
It is not necessary to regularly check front axle fluid
unless you suspect there is a leak or you hear an
unusual noise. A fluid loss could indicate a problem.
Have it inspected and repaired.
How to Check Lubricant
To get an accurate reading, the vehicle should be
on a level surface.
1500 Series
A : Fill Plug
B : Drain Plug
6-52
Page 499 of 630

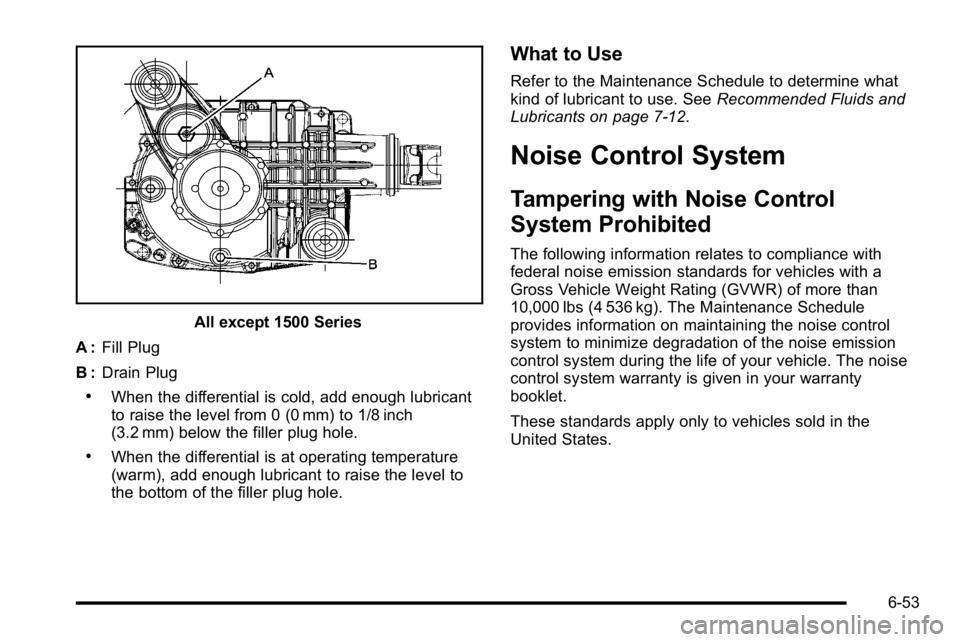
All except 1500 Series
A : Fill Plug
B : Drain Plug
.When the differential is cold, add enough lubricant
to raise the level from 0 (0 mm) to 1/8 inch
(3.2 mm) below the filler plug hole.
.When the differential is at operating temperature
(warm), add enough lubricant to raise the level to
the bottom of the filler plug hole.
What to Use
Refer to the Maintenance Schedule to determine what
kind of lubricant to use. See Recommended Fluids and
Lubricants on page 7‑12.
Noise Control System
Tampering with Noise Control
System Prohibited
The following information relates to compliance with
federal noise emission standards for vehicles with a
Gross Vehicle Weight Rating (GVWR) of more than
10,000 lbs (4 536 kg). The Maintenance Schedule
provides information on maintaining the noise control
system to minimize degradation of the noise emission
control system during the life of your vehicle. The noise
control system warranty is given in your warranty
booklet.
These standards apply only to vehicles sold in the
United States.
6-53
Page 500 of 630

Federal law prohibits the following acts or the causing
thereof:1. The removal or rendering inoperative by any person, other than for purposes of maintenance,
repair or replacement, of any device or element of
design incorporated into any new vehicle for the
purpose of noise control, prior to its sale or delivery
to the ultimate purchaser or while it is in use; or
2. The use of the vehicle after such device or element of design has been removed or rendered
inoperative by any person.
Among those acts presumed to constitute tampering are
the acts listed below.
Insulation:
.Removal of the noise shields or any underhood
insulation.
Engine:
.Removal or rendering engine speed governor,
if the vehicle has one, inoperative so as to allow
engine speed to exceed manufacturer
specifications.
Fan and Drive:
.Removal of fan clutch, if the vehicle has one,
or rendering clutch inoperative.
.Removal of the fan shroud, if the vehicle has one.
Air Intake:
.Removal of the air cleaner silencer.
.Modification of the air cleaner.
Exhaust:
.Removal of the muffler and/or resonator.
.Removal of the exhaust pipes and exhaust pipe
clamps.
Headlamp Aiming
The vehicle has a visual optical headlamp aiming
system. The aim of the headlamps have been preset at
the factory and should need no further adjustment.
However, if the vehicle is damaged in a crash, the aim
of the headlamps may be affected and adjustment may
be necessary.
If oncoming vehicles flash their high beams at you, this
may mean the vertical aim of your headlamps needs to
be adjusted.
It is recommended that the vehicle is taken to your
dealer/retailer for service if the headlamps need to be
adjusted. It is possible however, to re-aim the
headlamps as described.
6-54