2010 GMC SIERRA torque
[x] Cancel search: torquePage 488 of 630

Properly torqued wheel nuts are necessary to help
prevent brake pulsation. When tires are rotated, inspect
brake pads for wear and evenly tighten wheel nuts in
the proper sequence to torque specifications in
Capacities and Specifications on page 6‑126.
If the vehicle has rear drum brakes, they do not have
wear indicators, but if a rear brake rubbing noise is
heard, have the rear brake linings inspected
immediately. Rear brake drums should be removed and
inspected each time the tires are removed for rotation or
changing. Drum brakes have an inspection hole to
inspect lining wear during scheduled maintenance.
When the front brake pads are replaced, have the rear
brakes inspected, too.
Brake linings should always be replaced as complete
axle sets.
Brake Pedal Travel
See your dealer/retailer if the brake pedal does not
return to normal height, or if there is a rapid increase in
pedal travel. This could be a sign that brake service
might be required.
Brake Adjustment
Every brake stop, the brakes adjust for wear.
Replacing Brake System Parts
The braking system on a vehicle is complex. Its many
parts have to be of top quality and work well together if
the vehicle is to have really good braking. The vehicle
was designed and tested with top-quality brake parts.
When parts of the braking system are replaced—for
example, when the brake linings wear down and new
ones are installed —be sure to get new approved
replacement parts. If this is not done, the brakes might
not work properly. For example, if someone puts in
brake linings that are wrong for the vehicle, the balance
between the front and rear brakes can change —for the
worse. The braking performance expected can change
in many other ways if the wrong replacement brake
parts are installed.
6-42
Page 520 of 630

If you overfill the tire, release air by pushing on
the metal stem in the center of the tire valve.
Recheck the tire pressure with the tire gage.
Be sure to put the valve caps back on the valve
stems. They help prevent leaks by keeping out dirt
and moisture.
High-Speed Operation
{WARNING:
Driving at high speeds, 160 km/h (100 mph) or
higher, puts an additional strain on tires.
Sustained high-speed driving causes excessive
heat build up and can cause sudden tire failure.
You could have a crash and you or others could
be killed. Some high-speed rated tires require
inflation pressure adjustment for high speed
operation. When speed limits and road conditions
are such that a vehicle can be driven at high
speeds, make sure the tires are rated for high
speed operation, in excellent condition, and set to
the correct cold tire inflation pressure for the
vehicle load.Vehicles with P265/70R17 or P275/55R20 size tires
require inflation pressure adjustment when driving the
vehicle at speeds of 100 mph (160 km/h) or higher.
Set the cold tire inflation pressure to 3 psi (20 kPa)
above the recommended cold tire pressure shown on
the Tire and Loading Information label.
When you end this high‐speed driving, return the tires
to the cold inflation pressure shown on the Tire and
Loading Information label. See
Loading the Vehicle
on
page 5‑30and Inflation - Tire Pressure on page 6‑72.
Dual Tire Operation
When the vehicle is new, or whenever a wheel, wheel
bolt or wheel nut is replaced, check the wheel nut
torque after 100, 1,000 and 6,000 miles (160, 1 600 and
10 000 km) of driving. For proper torque and wheel nut
tightening information, see Removing the Spare Tire
and Tools on page 6‑92.
The outer tire on a dual wheel setup generally wears
faster than the inner tire. Your tires will wear more
evenly and last longer if you rotate the tires periodically,
see Tire Inspection and Rotation
on page 6‑80. Also
see Scheduled Maintenance on page 7‑3.
6-74
Page 528 of 630

Make certain that all wheel nuts are properly
tightened. See“Wheel Nut Torque” under
Capacities and Specifications
on page 6‑126.
{WARNING:
Rust or dirt on a wheel, or on the parts to
which it is fastened, can make wheel nuts
become loose after time. The wheel could
come off and cause an accident. When you
change a wheel, remove any rust or dirt from
places where the wheel attaches to the
vehicle. In an emergency, you can use a
cloth or a paper towel to do this; but be sure
to use a scraper or wire brush later,
if needed, to get all the rust or dirt off.
See Changing a Flat Tire
on page 6‑90.
If your vehicle has a Tire Pressure Monitor
System (TPMS), reset the TPMS sensors after
rotating the tires. See Tire Pressure Monitor
Operation
on page 6‑76. Make sure the spare tire, if your vehicle has one,
is stored securely. Push, pull, and then try to
rotate or turn the tire. If it moves, tighten the
cable. See
Storing a Flat or Spare Tire and Tools
on page 6‑106.
When It Is Time for New Tires
Various factors, such as maintenance, temperatures,
driving speeds, vehicle loading, and road conditions,
influence when you need new tires.
One way to tell when it is
time for new tires is to
check the treadwear
indicators, which appear
when your tires have only
1/16 inch (1.6 mm) or less
of tread remaining. Some
commercial truck tires
may not have treadwear
indicators.
6-82
Page 534 of 630

If you need to replace any of the wheels, wheel bolts,
wheel nuts or Tire Pressure Monitor System (TPMS)
sensors, replace them only with new GM original
equipment parts. This way, you will be sure to have the
right wheel, wheel bolts, wheel nuts, and TPMS sensors
for the vehicle.
{WARNING:
Using the wrong replacement wheels, wheel bolts,
or wheel nuts on your vehicle can be dangerous.
It could affect the braking and handling of your
vehicle, make your tires lose air and make you
lose control. You could have a collision in which
you or others could be injured. Always use the
correct wheel, wheel bolts, and wheel nuts for
replacement.
Notice: The wrong wheel can also cause problems
with bearing life, brake cooling, speedometer or
odometer calibration, headlamp aim, bumper height,
vehicle ground clearance, and tire or tire chain
clearance to the body and chassis. Whenever a wheel, wheel bolt or wheel nut is replaced
on a dual wheel setup, check the wheel nut torque after
100, 1,000 and 6,000 miles (160, 1 600 and 10 000 km)
of driving. For proper torque, see
“Wheel Nut Torque”
under Capacities and Specifications on page 6‑126.
See Changing a Flat Tire
on page 6‑90for more
information.
Used Replacement Wheels
{WARNING:
Putting a used wheel on the vehicle is dangerous.
You cannot know how it has been used or how far
it has been driven. It could fail suddenly and
cause a crash. If you have to replace a wheel, use
a new GM original equipment wheel.
6-88
Page 548 of 630

{WARNING:
Wheel nuts that are improperly or incorrectly
tightened can cause the wheels to become loose
or come off. The wheel nuts should be tightened
with a torque wrench to the proper torque
specification after replacing. Follow the torque
specification supplied by the aftermarket
manufacturer when using accessory locking wheel
nuts. SeeCapacities and Specifications
on
page 6‑126
for original equipment wheel nut
torque specifications.
Notice: Improperly tightened wheel nuts can lead
to brake pulsation and rotor damage. To avoid
expensive brake repairs, evenly tighten the wheel
nuts in the proper sequence and to the proper
torque specification. See Capacities and
Specifications
on page 6‑126for the wheel nut
torque specification.
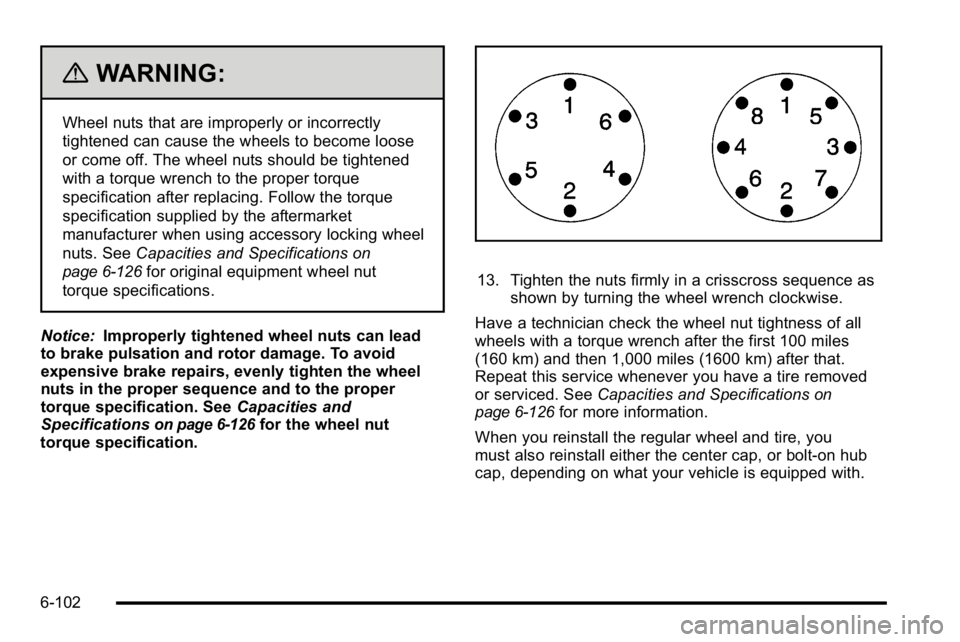
13. Tighten the nuts firmly in a crisscross sequence as
shown by turning the wheel wrench clockwise.
Have a technician check the wheel nut tightness of all
wheels with a torque wrench after the first 100 miles
(160 km) and then 1,000 miles (1600 km) after that.
Repeat this service whenever you have a tire removed
or serviced. See Capacities and Specifications
on
page 6‑126for more information.
When you reinstall the regular wheel and tire, you
must also reinstall either the center cap, or bolt-on hub
cap, depending on what your vehicle is equipped with.
6-102
Page 573 of 630

ApplicationCapacities
English Metric
Fuel Tank
1500 Series Standard and Short Box 26.0 gal 98.0 L
1500 Series Long Box 34.0 gal 128.7 L
2500 Series Standard Box 26.0 gal 98.0 L
2500 Series and 3500 Series Long Box 34.0 gal 128.7 L
3500 Series Chassis Cab 50.0 gal 189.0 L
3500 Chassis Cab –Front Tank 27.0 gal 102.0 L
3500 Chassis Cab –Rear Tank (if equipped) 23.0 gal 87.0 L
Transmission Fluid (Pan Removal and Filter Replacement) Auto 4-Speed Transmission 4L60-E Electronic Transmission 5.0 qt4.7 L
Auto 6-Speed Transmission 6L80-E 6.0 qt5.7 L
Auto 6-Speed Transmission 6L90-E 6.3 qt6.0 L
Auto 6-Speed Transmission Allison 7.4 qt7.0 L
Transfer Case Fluid 1.6 qt1.5 L
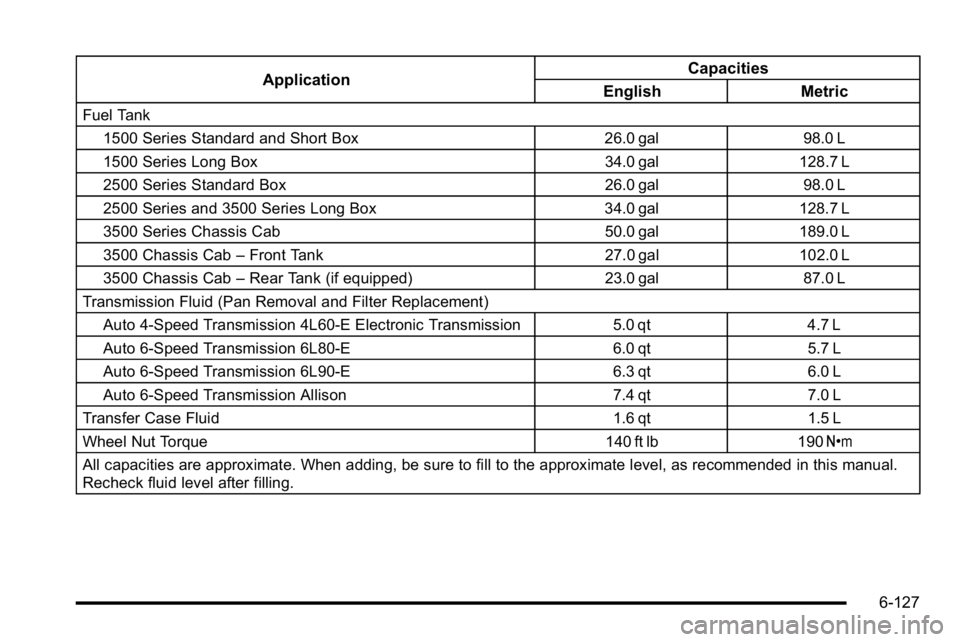
Wheel Nut Torque 140 ft lb190Y
All capacities are approximate. When adding, be sure to fill to the approximate level, as recommended in this manual.
Recheck fluid level after filling.
6-127
Page 579 of 630

.Engine cooling system inspection. Visual
inspection of hoses, pipes, fittings, and clamps and
replacement, if needed.
.Windshield wiper blade inspection for wear,
cracking, or contamination and windshield and
wiper blade cleaning, if contaminated. See
Windshield and Wiper Blades
on page 6‑114.
Worn or damaged wiper blade replacement.
See Windshield Wiper Blade Replacement
on
page 6‑63.
.Body hinges and latches, key lock cylinders,
folding seat hardware, and tailgate hinges,
linkage, and handle pivot points lubrication.
See Recommended Fluids and Lubricants
on
page 7‑12. More frequent lubrication may be
required when vehicle is exposed to a corrosive
environment. Applying silicone grease on
weatherstrips with a clean cloth makes them last
longer, seal better, and not stick or squeak.
.Restraint system component check. See Checking
the Restraint Systems on page 2‑93.
.Automatic transmission fluid level check and
adding fluid, if needed. See Automatic
Transmission Fluid (4-Speed Transmission)
on
page 6‑23or Automatic Transmission Fluid
(6-Speed Transmission) on page 6‑26.
.Four‐wheel drive vehicles: Transfer case fluid level
check and adding fluid, if needed.
.Engine air cleaner filter inspection. See Engine Air
Cleaner/Filter on page 6‑21.
.Vehicles with diesel engine or GVWR above
4 536 kg (10,000 lbs) only: Shields inspection for
damage or looseness. Adjust or replace as
required. This is a Noise Emission Control Service.
Applicable to vehicles sold in the United States
and recommended for vehicles sold in Canada.
Additional Required Services
At the First 160 km/100 Miles, 1 600 km/
1,000 Miles, and 10 000 km/6,000 Miles
.For vehicles with dual wheels: Check dual wheel
nut torque. For proper torque, see Capacities and
Specifications on page 6‑126.
At Each Fuel Stop
.Engine oil level check. See Engine Oilon
page 6‑18.
.Engine coolant level check. See Engine Coolanton page 6‑31.
.Windshield washer fluid level check. See
Windshield Washer Fluid on page 6‑38.
7-5