2010 GMC SIERRA brake light
[x] Cancel search: brake lightPage 176 of 630
Shifting In or Out of Four-Wheel-Drive Low
Notice:Shifting the transfer case into
Four-Wheel-Drive Low while moving at speeds
faster than 3 mph (5 km/h) may cause premature
wear to the transfer case, and may cause the gears
to grind. To avoid causing premature wear, and
grinding the gears, do not shift the transfer case
into Four-Wheel-Drive Low while the vehicle is
moving faster than 3 mph (5 km/h).
Shifting into Four-Wheel-Drive Low should be done,
if possible, with the vehicle at a slight roll, 3 mph
(5 km/h) or less.
.Shift the transmission into N (Neutral).
{WARNING:
Shifting the transfer case to Neutral can cause
the vehicle to roll even if the transmission is in
P (Park). You or someone else could be seriously
injured. Be sure to set the parking brake before
placing the transfer case in Neutral. See Parking
Brake on page 3‑50.
.Shifting into Four-Wheel-Drive Low with the vehicle
at a stop may be more difficult. You may be unable
to complete the shift to Four-Wheel-Drive Low, and
the transfer case will end up in N (Neutral). This is
normal, and is a function of the gear teeth aligning
in the transfer case. When this happens, make
sure the engine is on, shift the transmission
momentarily to D (Drive) and back to N (Neutral),
and then complete the transfer case shift.
.Shift the transfer case shift lever in one continuous
motion into the Four-Wheel-Drive Low position.
.When Four-Wheel-Drive Low do not drive faster
than 45 mph. This will reduce wear and extend the
life of your transfer case.
Shifting In or Out of Neutral
1. With the vehicle running and the engine at an idle set the parking brake.
2. Place the transmission into N (Neutral).
Shift the transfer case in one continuous motion into or
out of the N (Neutral) position.
3-40
Page 180 of 630
Shifting Out of Four-Wheel-Drive Low
To shift from Four-Wheel-Drive Low to
Four-Wheel-Drive High, or Two-Wheel-Drive High, the
vehicle must be stopped or moving less than 3 mph
(5 km/h) with the transmission in N (Neutral) and the
ignition in ON/RUN. The preferred method for shifting
out of Four-Wheel-Drive Low is to have the vehicle
moving 1 to 2 mph (1.6 to 3.2 km/h). Turn the knob to the
Four-Wheel-Drive High, or Two-Wheel-Drive High
position. You must wait for the Four-Wheel-Drive High,
or Two-Wheel-Drive High indicator light to stop flashing
and remain on before shifting the transmission
into gear.
Notice:Shifting the transmission into gear before
the requested mode indicator light has stopped
flashing could damage the transfer case. To help
avoid damaging the vehicle, always wait for the
mode indicator lights to stop flashing before
shifting the transmission into gear.
It is typical for the vehicle to exhibit significant
engagement noise and bump when shifting between
Four-Wheel-Drive Low and Four-Wheel-Drive High
ranges or from transfer case N (Neutral) with the engine
running. If the knob is turned to the Four-Wheel-Drive High,
or Two-Wheel-Drive High switch position when the
vehicle is in gear and/or moving, the Four-Wheel-Drive
High, or Two-Wheel-Drive High indicator light will flash
for 30 seconds but will not complete the shift unless
your vehicle is moving less than 3 mph (5 km/h) and the
transmission is in N (Neutral).
Shifting into Neutral
To shift the transfer case to N (Neutral) do the following:
1. Make sure the vehicle is parked so that it will not roll.
2. Set the parking brake and press and hold the regular brake pedal. See Parking Brake
on
page 3‑50for more information.
3. Start the vehicle or turn the ignition to ON/RUN.
4. Shift the transmission to N (Neutral).
5. Shift the transfer case to Two-Wheel-Drive High.
6. Turn the transfer case dial clockwise to N (Neutral) until it stops and hold it there until the Neutral light
starts blinking. This will take at least 10 seconds.
Then slowly release the dial to the four low
position. The N (Neutral) light will come on when
the transfer case shift to N (Neutral) is complete.
3-44
Page 181 of 630
7. If the engine is running, verify that the transfercase is in N (Neutral) by shifting the transmission
to R (Reverse) for one second, then shift the
transmission to D (Drive) for one second.
8. Turn the ignition to ACC/ACCESSORY, which will turn the engine off.
9. Place the transmission shift lever in P (Park).
10. Release the parking brake prior to moving the vehicle.
11. Turn the ignition to LOCK/OFF.
Shifting Out of Neutral
To shift the transfer case out of N (Neutral) do the
following: 1. Set the parking brake and apply the regular brake pedal.
2. Turn the ignition to ON/RUN with the engine off, and shift the transmission to N (Neutral). 3. Turn the transfer case dial to
Two-Wheel-Drive High.
After the transfer case has shifted out of
N (Neutral), the N (Neutral) light will go out.
4. Release the parking brake prior to moving the vehicle.
Notice: Shifting the transmission into gear before
the requested mode indicator light has stopped
flashing could damage the transfer case. To help
avoid damaging the vehicle, always wait for the
mode indicator lights to stop flashing before
shifting the transmission into gear.
5. Start the engine and shift the transmission to the desired position.
Excessively shifting the transfer case into or out of the
different modes may cause the transfer case to enter
the shift protection mode. This will protect the transfer
case from possible damage and will only allow the
transfer case to respond to one shift per 10 seconds.
The transfer case may stay in this mode for up to
three minutes.
3-45
Page 183 of 630

If the vehicle has StabiliTrak®, shifting into
Four-Wheel-Drive Low will turn Traction Control and
StabiliTrak
®off. See StabiliTrak®System on page 5‑6.
{WARNING:
Shifting the transfer case to N (Neutral) can cause
the vehicle to roll even if the transmission is in
P (Park). You or someone else could be seriously
injured. Be sure to set the parking brake before
placing the transfer case in N (Neutral). See
Parking Brake on page 3‑50.
N (Neutral) : Shift the vehicle's transfer case to
N (Neutral) only when towing the vehicle. See
Recreational Vehicle Towing
on page 5‑43or Towing
Your Vehicleon page 5‑43for more information.
If the SERVICE 4–Wheel Drive message stays on,
you should take the vehicle to your dealer/retailer for
service. See “Service 4–Wheel Drive message” under
DIC Warnings and Messages on page 4‑65.
Shifting Into Four-Wheel-Drive High or
AUTO (Automatic Four-Wheel Drive)
Turn the knob to the Four-Wheel-Drive High or AUTO
position. This can be done at any speed, except when
shifting from Four-Wheel-Drive Low. The indicator light
will flash while shifting. It will remain on when the shift is
completed.
Shifting Into Two-Wheel-Drive High
Turn the knob to the Two-Wheel-Drive High position.
This can be done at any speed, except when shifting
from Four-Wheel-Drive Low. The indicator light will
flash while shifting. It will remain on when the shift is
completed.
Shifting Into Four-Wheel-Drive Low
When Four-Wheel-Drive Low is engaged, vehicle speed
should be kept below 45 mph. Extended high-speed
operation in Four-Wheel-Drive Low may damage or
shorten the life of the drivetrain.
To shift to the Four-Wheel-Drive Low position, the
ignition must be in ON/RUN and the vehicle must be
stopped or moving less than 3 mph (5 km/h) with the
transmission in N (Neutral). The preferred method for
shifting into Four-Wheel-Drive Low is to have the
vehicle moving 1 to 2 mph (1.6 to 3.2 km/h). Turn the
knob to the Four-Wheel-Drive Low position.
3-47
Page 185 of 630
Shifting into Neutral
To shift the transfer case to N (Neutral) do the following:1. Make sure the vehicle is parked so that it will not roll.
2. Set the parking brake and apply the regular brake pedal. See Parking Brake
on page 3‑50for more
information.
3. Shifting the transfer case into N (Neutral) can be done with or without the engine running. Shifting
without the engine running should be done with the
ignition in ON/RUN.
4. Put the transmission in N (Neutral).
5. Shift the transfer case to Two-Wheel Drive High.
6. Turn the transfer case dial clockwise to N (Neutral) until it stops and hold it there until the N (Neutral)
light starts blinking. This will take at least
10 seconds. Then slowly release the dial to the
four low position. The N (Neutral) light will come on
when the transfer case shift to N (Neutral) is
complete.
7. If the engine is running, make sure that the transfer case is in N (Neutral) by shifting the transmission
to R (Reverse) for one second, then shift the
transmission to D (Drive) for one second.
8. Turn the ignition to ACC/ACCESSORY, which will turn the engine off. 9. Place the transmission shift lever in P (Park).
10. Release the parking brake prior to moving the vehicle.
11. Turn the ignition to LOCK/OFF.Shifting Out of Neutral
To shift out of N (Neutral) do the following: 1. Set the parking brake and apply the regular brake pedal.
2. Turn the ignition to ON/RUN with the engine off, and shift the transmission to N (Neutral).
3. Turn the transfer case dial to Two-Wheel-Drive High, Four-Wheel-Drive High, AUTO.
After the transfer case has shifted out of
N (Neutral), the N (Neutral) light will go out.
4. Release the parking brake prior to moving the vehicle.
Notice: Shifting the transmission into gear before
the requested mode indicator light has stopped
flashing could damage the transfer case. To help
avoid damaging the vehicle, always wait for the
mode indicator lights to stop flashing before
shifting the transmission into gear.
5. Start the engine and shift the transmission to the desired position.
3-49
Page 186 of 630
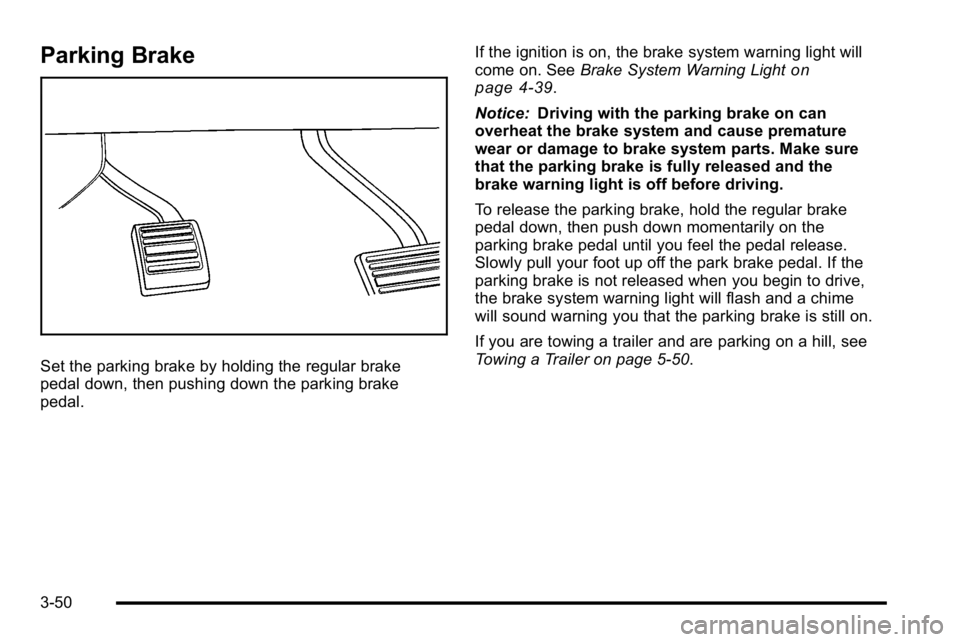
Parking Brake
Set the parking brake by holding the regular brake
pedal down, then pushing down the parking brake
pedal.If the ignition is on, the brake system warning light will
come on. See
Brake System Warning Light
on
page 4‑39.
Notice: Driving with the parking brake on can
overheat the brake system and cause premature
wear or damage to brake system parts. Make sure
that the parking brake is fully released and the
brake warning light is off before driving.
To release the parking brake, hold the regular brake
pedal down, then push down momentarily on the
parking brake pedal until you feel the pedal release.
Slowly pull your foot up off the park brake pedal. If the
parking brake is not released when you begin to drive,
the brake system warning light will flash and a chime
will sound warning you that the parking brake is still on.
If you are towing a trailer and are parking on a hill, see
Towing a Trailer on page 5‑50.
3-50
Page 219 of 630
Section 4 Instrument Panel
Instrument Panel Overview. . . . . . . . . . . . . . . . . . . . . . . .4-3
Hazard Warning Flashers . . . . . . . . . . . . . . . . . . . . . . . 4-3
Horn . . . . . . . . . . . . . . . . . . . . . . . . . . . . . . . . . . . . . . . . . . . . 4-3
Tilt Wheel . . . . . . . . . . . . . . . . . . . . . . . . . . . . . . . . . . . . . . . 4-3
Turn Signal/Multifunction Lever . . . . . . . . . . . . . . . . . . 4-4
Turn and Lane-Change Signals . . . . . . . . . . . . . . . . . 4-4
Headlamp High/Low-Beam Changer . . . . . . . . . . . . 4-5
Flash-to-Pass . . . . . . . . . . . . . . . . . . . . . . . . . . . . . . . . . . . 4-5
Windshield Wipers . . . . . . . . . . . . . . . . . . . . . . . . . . . . . . 4-6
Windshield Washer . . . . . . . . . . . . . . . . . . . . . . . . . . . . . 4-6
Cruise Control . . . . . . . . . . . . . . . . . . . . . . . . . . . . . . . . . . 4-7
Exterior Lamps . . . . . . . . . . . . . . . . . . . . . . . . . . . . . . . . 4-10
Headlamps on Reminder . . . . . . . . . . . . . . . . . . . . . . . 4-11
Daytime Running Lamps (DRL) . . . . . . . . . . . . . . . . 4-12
Automatic Headlamp System . . . . . . . . . . . . . . . . . . 4-12
Puddle Lamps . . . . . . . . . . . . . . . . . . . . . . . . . . . . . . . . . 4-13
Fog Lamps . . . . . . . . . . . . . . . . . . . . . . . . . . . . . . . . . . . . 4-13
Auxiliary Roof-Mounted Lamp . . . . . . . . . . . . . . . . . 4-14
Instrument Panel Brightness . . . . . . . . . . . . . . . . . . . 4-14
Dome Lamps . . . . . . . . . . . . . . . . . . . . . . . . . . . . . . . . . . 4-14
Dome Lamp Override . . . . . . . . . . . . . . . . . . . . . . . . . . 4-15
Entry Lighting . . . . . . . . . . . . . . . . . . . . . . . . . . . . . . . . . . 4-15
Exit Lighting . . . . . . . . . . . . . . . . . . . . . . . . . . . . . . . . . . . 4-15
Reading Lamps . . . . . . . . . . . . . . . . . . . . . . . . . . . . . . . . 4-15
Cargo Lamp . . . . . . . . . . . . . . . . . . . . . . . . . . . . . . . . . . . 4-15 Electric Power Management . . . . . . . . . . . . . . . . . . . 4-16
Battery Run-Down Protection . . . . . . . . . . . . . . . . . . 4-16
Accessory Power Outlet(s) . . . . . . . . . . . . . . . . . . . . . 4-17
Ashtray(s) and Cigarette Lighter . . . . . . . . . . . . . . . 4-18
Climate Controls . . . . . . . . . . . . . . . . . . . . . . . . . . . . . . . . . . 4-18
Climate Control System (With Heater Only) . . . . 4-18
Climate Control System (With Air Conditioning) . . . . . . . . . . . . . . . . . . . . . . . 4-20
Dual Automatic Climate Control System . . . . . . . 4-22
Outlet Adjustment . . . . . . . . . . . . . . . . . . . . . . . . . . . . . . 4-29
Warning Lights, Gages, and Indicators . . . . . . . . . .4-29
Instrument Panel Cluster . . . . . . . . . . . . . . . . . . . . . . . 4-30
Speedometer and Odometer . . . . . . . . . . . . . . . . . . . 4-31
Trip Odometer . . . . . . . . . . . . . . . . . . . . . . . . . . . . . . . . . 4-31
Tachometer . . . . . . . . . . . . . . . . . . . . . . . . . . . . . . . . . . . . 4-31
Safety Belt Reminders . . . . . . . . . . . . . . . . . . . . . . . . . 4-32
Airbag Readiness Light . . . . . . . . . . . . . . . . . . . . . . . . 4-33
Airbag Off Light . . . . . . . . . . . . . . . . . . . . . . . . . . . . . . . . 4-34
Passenger Airbag Status Indicator . . . . . . . . . . . . . 4-36
Charging System Light . . . . . . . . . . . . . . . . . . . . . . . . 4-37
Voltmeter Gage . . . . . . . . . . . . . . . . . . . . . . . . . . . . . . . . 4-38
Brake System Warning Light . . . . . . . . . . . . . . . . . . . 4-39
Antilock Brake System (ABS) Warning Light . . . 4-40
StabiliTrak
®Indicator Light . . . . . . . . . . . . . . . . . . . . . 4-41
Engine Coolant Temperature Gage . . . . . . . . . . . . 4-41
4-1
Page 226 of 630
The cruise control buttons
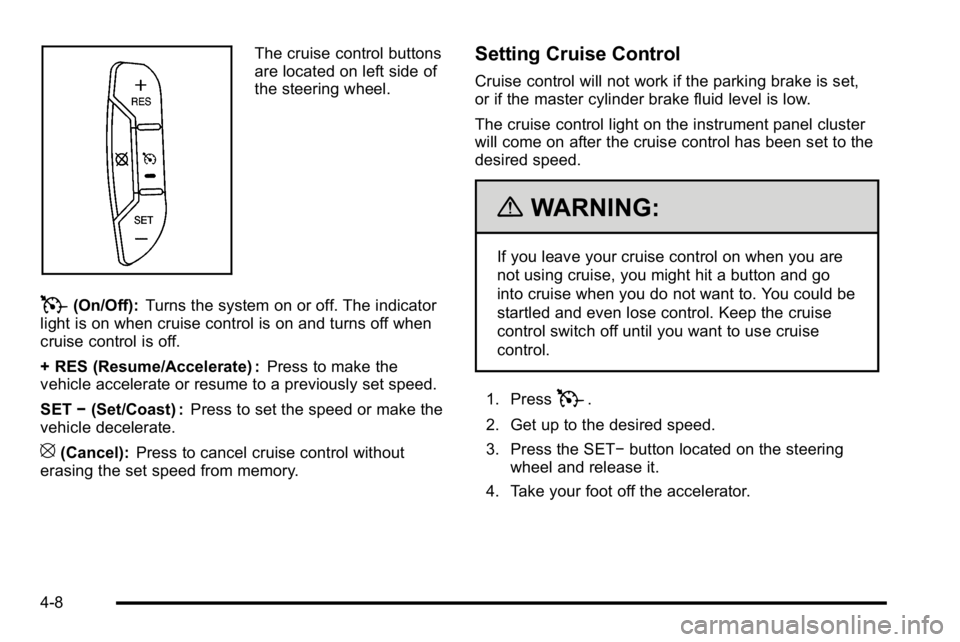
are located on left side of
the steering wheel.
T(On/Off):Turns the system on or off. The indicator
light is on when cruise control is on and turns off when
cruise control is off.
+ RES (Resume/Accelerate) : Press to make the
vehicle accelerate or resume to a previously set speed.
SET −(Set/Coast) : Press to set the speed or make the
vehicle decelerate.
[(Cancel): Press to cancel cruise control without
erasing the set speed from memory.
Setting Cruise Control
Cruise control will not work if the parking brake is set,
or if the master cylinder brake fluid level is low.
The cruise control light on the instrument panel cluster
will come on after the cruise control has been set to the
desired speed.
{WARNING:
If you leave your cruise control on when you are
not using cruise, you might hit a button and go
into cruise when you do not want to. You could be
startled and even lose control. Keep the cruise
control switch off until you want to use cruise
control.
1. Press
T.
2. Get up to the desired speed.
3. Press the SET− button located on the steering
wheel and release it.
4. Take your foot off the accelerator.
4-8