2010 GMC SIERRA lock
[x] Cancel search: lockPage 312 of 630

3. Turn thefknob, press the buttons below the
right or left arrows displayed, or press either
SEEK arrow to go to the previous or to the next
XM station within the selected category.
4. To exit the category search mode, press the FAV button or BAND button to display the
favorites again.
Undesired XM categories can be removed through the
setup menu. To remove an undesired category: 1. Press the MENU button to display the radio setup menu.
2. Press the softkey located below the XM CAT tab.
3. Turn the
fknob to display the category to be
removed.
4. Press the softkey located under the Remove tab until the category name along with the word
Removed displays.
5. Repeat the steps to remove more categories.
Removed categories can be restored by pressing the
softkey under the Add tab when a removed category
is displayed or by pressing the softkey under the
Restore All tab.
Categories cannot be removed or added while the
vehicle is moving faster than 5 mph (8 km/h).
Radio Messages
Calibration Error : The audio system has been
calibrated for the vehicle from the factory. If Calibration
Error displays, it means that the radio has not been
configured properly for the vehicle and it must be
returned to your dealer/retailer for service.
Locked or Loc : One of these messages will display
when the THEFTLOCK
®system has locked up the
radio. Take the vehicle to your dealer/retailer for service.
If any error occurs repeatedly or if an error cannot be
corrected, contact your dealer/retailer.
XM™ Satellite Radio Service
XM is a satellite radio service that is based in the
48 contiguous United States and 10 Canadian
provinces. XM Satellite Radio has a wide variety
of programming and commercial-free music,
coast-to-coast, and in digital-quality sound. A service
fee is required to receive the XM service. For more
information, contact XM at www.xmradio.com or call
1-800-929-2100 in the U.S. and www.xmradio.ca or
call 1-877-438-9677 in Canada.
Radio Messages for XM Only
SeeXM Radio Messageson page 4‑122later in this
section for further detail.
4-94
Page 320 of 630

Playing a DVD
DVD/CD AUX (Auxiliary) :Press this button to cycle
through DVD, CD, or Auxiliary when listening to the
radio. The DVD/CD text tab and a message showing
track or chapter number displays when a disc is in
either slot. Press this button again and the system
automatically searches for an auxiliary input device,
such as a portable audio player. If a portable audio
player is not connected, “No Aux Input Device”displays.
If a disc is in both the DVD slot and the CD slot the
DVD/CD AUX button cycles between the two sources
and not indicate “No Aux Input Device”. If a front
auxiliary device is connected, the DVD/CD AUX button
cycles through all available options, such as: DVD slot,
CD slot, Front Auxiliary, and Rear Auxiliary (if available).
See “Using the Auxiliary Input Jack(s)” later in this
section, or “Audio/Video (A/V) Jacks” under,Rear Seat
Entertainment (RSE) System
on page 4‑134for more
information.
O(Power): Press to turn the radio on or off. Turn this
knob clockwise or counterclockwise to increase or
decrease the volume. Press and hold for more than
two seconds to turn off the entire radio and Rear Seat
Entertainment (RSE) system and to start the parental
control feature. Parental control prevents the rear seat
occupant from operating the Rear Seat Audio (RSA)
system or remote control. A lock symbol displays next to the clock display.
The parental control feature remains on until the knob
is pressed and held for more than two seconds again,
or until the driver turns the ignition off and exits the
vehicle.
f(Tune):
Turn to change tracks on a CD or DVD, to
manually tune a radio station, or to change clock or
date settings, while in the clock or date setting mode.
See the information given earlier in this section specific
to the radio, CD, and the DVD. Also, see “Setting the
Time” in the index, for setting the clock and date.
©SEEK (Previous Track/Chapter): Press the left
arrow to return to the start of the current track or
chapter. Press the left arrow again to go to the previous
track or chapter. This button might not work when the
DVD is playing the copyright information or the
previews.
SEEK
¨(Next Track/Chapter): Press the right arrow
to go to the next track or chapter. This button might not
work when the DVD is playing the copyright information
or the previews.
sREV (Fast Reverse): Press to quickly reverse the
CD or DVD at five times the normal speed. The radio
displays the elapsed time while in fast reverse. To stop
fast reversing, press again. This button might not work
when the DVD is playing the copyright information or
the previews.
4-102
Page 324 of 630

Drivers are encouraged to set up any auxiliary device
while the vehicle is in P (Park). SeeDefensive Driving
on page 5‑2for more information on driver distraction.
To use a portable audio player, connect a 3.5 mm
(1/8 in) cable to the radio's front auxiliary input jack.
When a device is connected, press the radio CD/AUX
button to begin playing audio from the device over the
vehicle speakers.
For optimal sound quality, increase the portable audio
device's volume to the loudest level.
It is always best to power the portable audio device
through its own battery while playing.
O(Power/Volume): Turn clockwise or
counterclockwise to increase or decrease the
volume of the portable player. Additional volume
adjustments might have to be made from the portable
device if the volume is not loud or soft enough.
BAND : Press to listen to the radio when a portable
audio device is playing. The portable audio device
continues playing.
CD/AUX (CD/Auxiliary) : Press to play a CD when a
portable audio device is playing. Press again and the
system begins playing audio from the connected
portable audio player. If a portable audio player is not
connected, “No Input Device Found” displays.DVD/CD AUX (CD/Auxiliary) :
Press to cycle thro
ugh DVD, CD, or Auxiliary when listening to the radio.
The DVD/CD text tab and a message showing track or
chapter number displays when a disc is in either slot.
Press again and the system automatically searches for
an auxiliary input device, such as a portable audio
player. If a portable audio player is not connected,
“No Aux Input Device” displays. If a disc is in both the
DVD slot and the CD slot the DVD/CD AUX button
cycles between the two sources and not indicate
“No Aux Input Device”. If a front auxiliary device is
connected, the DVD/CD AUX button cycles through
all available options, such as: DVD slot, CD slot,
Front Auxiliary, and Rear Auxiliary (if available).
See “Using the Auxiliary Input Jack(s)” later in this
section, or “Audio/Video (A/V) Jacks” under,Rear Seat
Entertainment (RSE) System
on page 4‑134for more
information.
Using the USB Port
Radios with a USB port can control a USB storage
device or an iPod®using the radio buttons and knobs.
See Using an MP3 (Radios with CD)on page 4‑107or
Using an MP3 (Radios with CD and DVD)on
page 4‑114for information about how to connect and
control a USB storage device or an iPod.
4-106
Page 340 of 630

XM Radio Messages
XL (Explicit Language Channels) :These channels,
or any others, can be blocked at a customer's request,
by calling 1-800-852-XMXM (9696).
XM Updating : The encryption code in the receiver is
being updated, and no action is required. This process
should take no longer than 30 seconds.
No XM Signal : The system is functioning correctly, but
the vehicle is in a location that is blocking the XM™
signal. When the vehicle is moved into an open area,
the signal should return.
Loading XM : The audio system is acquiring and
processing audio and text data. No action is needed.
This message should disappear shortly.
Channel Off Air : This channel is not currently in
service. Tune in to another channel.
Channel Unauth : This channel is blocked or cannot
be received with your XM Subscription package.
Channel Unavail : This previously assigned channel is
no longer assigned. Tune to another station. If this
station was one of the presets, choose another station
for that preset button. No Artist Info :
No artist information is available at this
time on this channel. The system is working properly.
No Title Info : No song title information is available at
this time on this channel. The system is working
properly.
No CAT Info : No category information is available at
this time on this channel. The system is working
properly.
No Information : No text or informational messages are
available at this time on this channel. The system is
working properly.
CAT Not Found : There are no channels available for
the selected category. The system is working properly.
XM Theftlocked : The XM receiver in the vehicle could
have previously been in another vehicle. For security
purposes, XM receivers cannot be swapped between
vehicles. If this message is received after having the
vehicle serviced, check with your dealer/retailer.
XM Radio ID : If tuned to channel 0, this message
alternates with the XM™ Radio 8 digit radio ID label.
This label is needed to activate the service.
4-122
Page 352 of 630

Rear Seat Entertainment (RSE)
System
The vehicle may have a DVD Rear Seat Entertainment
(RSE) system. The RSE system works with the
vehicle's audio system. The DVD player is part of the
front radio. The RSE system includes a radio with a
DVD player, a video display screen, audio/video jacks,
two wireless headphones, and a remote control. See
Radio(s)
on page 4‑87for more information on the
vehicle's audio/DVD system.
Before Driving
The RSE is designed for rear seat passengers only.
The driver cannot safely view the video screen while
driving and should not try to do so.
In severe or extreme weather conditions the RSE
system might not work until the temperature is within
the operating range. The operating range for the RSE
system is above −4°F (−20°C) or below 140°F (60°C).
If the temperature of the vehicle is outside of this range,
heat or cool the vehicle until the temperature is within
the operating range of the RSE system.
Parental Control
The RSE system may have a Parental Control feature,
depending on which radio the vehicle has. To start
Parental Control, press and hold the radio power button
for more than two seconds to stop all system features
such as: radio, video screen, RSA, DVD and/or CD.
While Parental Control is on, a padlock icon displays.
The radio can be turned back on with a single press of
the power button, but the RSE system will remain under
Parental Control.
To turn Parental Control off, press and hold the radio
power button for more than two seconds. The RSE
returns from where it was previously left and the
padlock icon disappears from the radio display.
Parental Control can also be turned off by inserting or
ejecting any disc, pressing the play icon on the radio
DVD display menu, or changing an ignition position.
4-134
Page 356 of 630

Video Screen
The video screen is located in the overhead console.
To use the video screen, do the following:1. Push the release button located on the overhead console.
2. Move the screen to the desired position.
When the video screen is not in use, push it up into its
locked position.
If a DVD is playing and the screen is raised to its locked
position, the screen remains on. This is normal, and the
DVD continues to play through the previous audio
source. Use the remote control power button or eject
the disc to turn off the screen.
The overhead console contains the infrared transmitters
for the wireless headphones and the infrared receivers
for the remote control. They are located at the rear of
the console.
Notice: Avoid directly touching the video screen, as
damage may occur. See “Cleaning the Video
Screen” later in this section for more information.
Remote Control
To use the remote control, aim it at the transmitter
window at the rear of the RSE overhead console and
press the desired button. Direct sunlight or very bright
light could affect the ability of the RSE transmitter to
receive signals from the remote control. If the remote
control does not seem to be working, the batteries might
need to be replaced. See “Battery Replacement”later in
this section. Objects blocking the line of sight could also
affect the function of the remote control.
If a CD or DVD is in the Radio DVD slot, the remote
control
O(power) button can be used to turn on the
video screen display and start the disc. The radio can
also turn on the video screen display. See Radio(s)
on
page 4‑87for more information.
Notice: Storing the remote control in a hot area or
in direct sunlight can damage it, and the repairs will
not be covered by the warranty. Storage in extreme
cold can weaken the batteries. Keep the remote
control stored in a cool, dry place.
If the remote control becomes lost or damaged, a new
universal remote control can be purchased. If this
happens, make sure the universal remote control uses
a code set of Toshiba
®.
4-138
Page 363 of 630

While a CD or DVD audio disc is playing, press this
button to go to the beginning of the CD or DVD audio.
This function is inactive, with some radios, if the front
seat passengers are listening to the CD or DVD audio.
While a disc is playing in the CD or DVD changer, press
this button to select the next disc, if multiple discs are
loaded. This function is inactive, with some radios, if the
front seat passengers are listening to the disc.
While a DVD video menu is being displayed, press the
PROG button to perform the menu function, Enter.
Theft-Deterrent Feature
THEFTLOCK®is designed to discourage theft of the
vehicle's radio by learning a portion of the Vehicle
Identification Number (VIN). The radio does not operate
if it is stolen or moved to a different vehicle.
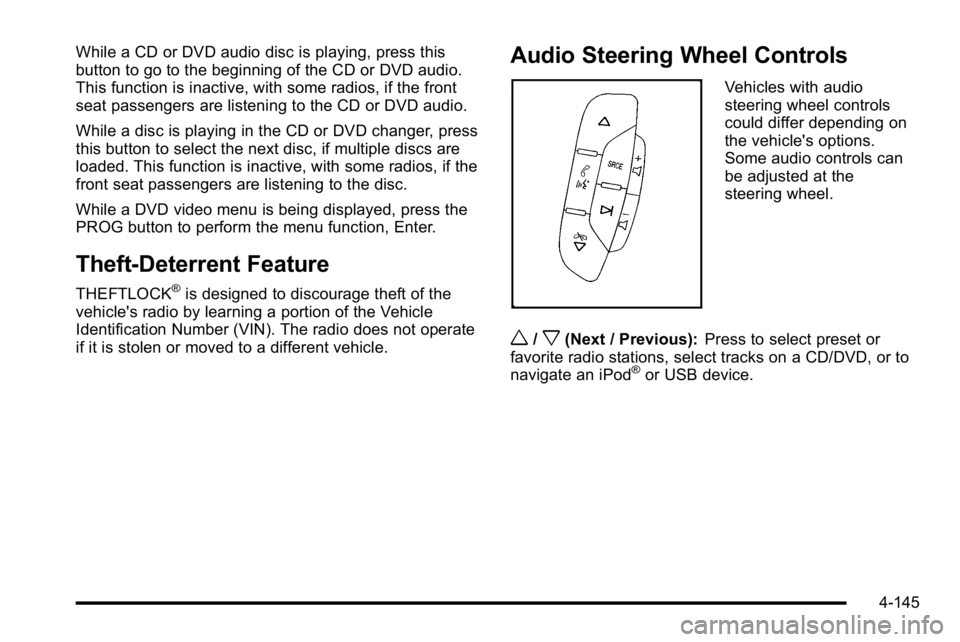
Audio Steering Wheel Controls
Vehicles with audio
steering wheel controls
could differ depending on
the vehicle's options.
Some audio controls can
be adjusted at the
steering wheel.
w/x(Next / Previous): Press to select preset or
favorite radio stations, select tracks on a CD/DVD, or to
navigate an iPod
®or USB device.
4-145
Page 369 of 630

Section 5 Driving Your Vehicle
Your Driving, the Road, and the Vehicle. . . . . . . . . .5-2
Defensive Driving . . . . . . . . . . . . . . . . . . . . . . . . . . . . . . . 5-2
Drunk Driving . . . . . . . . . . . . . . . . . . . . . . . . . . . . . . . . . . . 5-2
Control of a Vehicle . . . . . . . . . . . . . . . . . . . . . . . . . . . . . 5-3
Braking . . . . . . . . . . . . . . . . . . . . . . . . . . . . . . . . . . . . . . . . . 5-3
Antilock Brake System (ABS) . . . . . . . . . . . . . . . . . . . 5-4
Braking in Emergencies . . . . . . . . . . . . . . . . . . . . . . . . . 5-5
StabiliTrak
®System . . . . . . . . . . . . . . . . . . . . . . . . . . . . . 5-6
Locking Rear Axle . . . . . . . . . . . . . . . . . . . . . . . . . . . . . . 5-8
Steering . . . . . . . . . . . . . . . . . . . . . . . . . . . . . . . . . . . . . . . . . 5-8
Off-Road Recovery . . . . . . . . . . . . . . . . . . . . . . . . . . . . 5-10
Passing . . . . . . . . . . . . . . . . . . . . . . . . . . . . . . . . . . . . . . . . 5-10
Loss of Control . . . . . . . . . . . . . . . . . . . . . . . . . . . . . . . . 5-10
Off-Road Driving . . . . . . . . . . . . . . . . . . . . . . . . . . . . . . . 5-11
Driving at Night . . . . . . . . . . . . . . . . . . . . . . . . . . . . . . . . 5-23
Driving in Rain and on Wet Roads . . . . . . . . . . . . . 5-23
Before Leaving on a Long Trip . . . . . . . . . . . . . . . . . 5-24 Highway Hypnosis . . . . . . . . . . . . . . . . . . . . . . . . . . . . . 5-24
Hill and Mountain Roads . . . . . . . . . . . . . . . . . . . . . . . 5-25
Winter Driving . . . . . . . . . . . . . . . . . . . . . . . . . . . . . . . . . 5-26
If Your Vehicle is Stuck in Sand,
Mud, Ice, or Snow . . . . . . . . . . . . . . . . . . . . . . . . . . 5-28
Rocking Your Vehicle to Get It Out . . . . . . . . . . . . . 5-28
Recovery Hooks . . . . . . . . . . . . . . . . . . . . . . . . . . . . . . . 5-29
Loading the Vehicle . . . . . . . . . . . . . . . . . . . . . . . . . . . . 5-30
Adding a Snow Plow or Similar Equipment . . . . 5-36
Truck-Camper Loading Information . . . . . . . . . . . . 5-40
Pickup Conversion to Chassis Cab . . . . . . . . . . . . 5-43
Towing . . . . . . . . . . . . . . . . . . . . . . . . . . . . . . . . . . . . . . . . . . . . 5-43
Towing Your Vehicle . . . . . . . . . . . . . . . . . . . . . . . . . . . 5-43
Recreational Vehicle Towing . . . . . . . . . . . . . . . . . . . 5-43
Towing a Trailer . . . . . . . . . . . . . . . . . . . . . . . . . . . . . . . . 5-50
Trailer Recommendations . . . . . . . . . . . . . . . . . . . . . . 5-77
5-1