2010 GMC SIERRA key
[x] Cancel search: keyPage 382 of 630

.Take extreme care with open fires (where
permitted), camp stoves, and lanterns.
.Never park your vehicle over dry grass or other
combustible materials that could catch fire from the
heat of the vehicle's exhaust system.
Traveling to Remote Areas
It makes sense to plan your trip, especially when going
to a remote area. Know the terrain and plan your route.
Get accurate maps of trails and terrain. Check to see if
there are any blocked or closed roads.
It is also a good idea to travel with at least one other
vehicle in case something happens to one of them.
For vehicles with a winch, be sure to read the winch
instructions. In a remote area, a winch can be handy
if you get stuck but you will want to know how to use
it properly.
Getting Familiar with Off-Road Driving
It is a good idea to practice in an area that is safe and
close to home before you go into the wilderness.
Off-roading requires some new and different skills.
Tune your senses to different kinds of signals.
Your eyes need to constantly sweep the terrain for
unexpected obstacles. Your ears need to listen forunusual tire or engine sounds. Use your arms,
hands, feet, and body to respond to vibrations and
vehicle bounce.
Controlling the vehicle is the key to successful off-road
driving. One of the best ways to control the vehicle is to
control the speed. At higher speeds:
.You approach things faster and have less time
to react.
.There is less time to scan the terrain for obstacles.
.The vehicle has more bounce when driving over
obstacles.
.More braking distance is needed, especially on an
unpaved surface.
{WARNING:
When you are driving off-road, bouncing and
quick changes in direction can easily throw you
out of position. This could cause you to lose
control and crash. So, whether you are driving on
or off the road, you and your passengers should
wear safety belts.
5-14
Page 413 of 630

Four-Wheel-Drive Vehicles
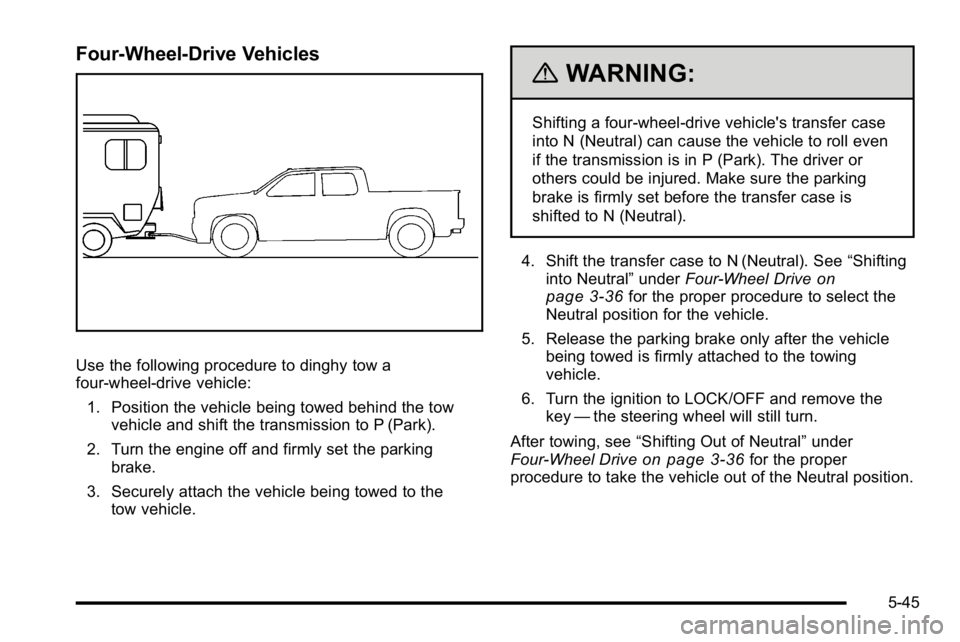
Use the following procedure to dinghy tow a
four-wheel-drive vehicle:1. Position the vehicle being towed behind the tow vehicle and shift the transmission to P (Park).
2. Turn the engine off and firmly set the parking brake.
3. Securely attach the vehicle being towed to the tow vehicle.
{WARNING:
Shifting a four-wheel-drive vehicle's transfer case
into N (Neutral) can cause the vehicle to roll even
if the transmission is in P (Park). The driver or
others could be injured. Make sure the parking
brake is firmly set before the transfer case is
shifted to N (Neutral).
4. Shift the transfer case to N (Neutral). See “Shifting
into Neutral” underFour-Wheel Drive
on
page 3‑36for the proper procedure to select the
Neutral position for the vehicle.
5. Release the parking brake only after the vehicle being towed is firmly attached to the towing
vehicle.
6. Turn the ignition to LOCK/OFF and remove the key —the steering wheel will still turn.
After towing, see “Shifting Out of Neutral” under
Four-Wheel Drive
on page 3‑36for the proper
procedure to take the vehicle out of the Neutral position.
5-45
Page 451 of 630

California Proposition 65 Warning
Most motor vehicles, including this one, contain
and/or emit chemicals known to the State of California
to cause cancer and birth defects or other reproductive
harm. Engine exhaust, many parts and systems, many
fluids, and some component wear by-products contain
and/or emit these chemicals.
California Perchlorate Materials
Requirements
Certain types of automotive applications, such as airbag
initiators, seat belt pretensioners, and lithium batteries
contained in remote keyless transmitters, may contain
perchlorate materials. Special handling may be
necessary. For additional information, see
www.dtsc.ca.gov/hazardouswaste/perchlorate.
Doing Your Own Service Work
If this vehicle is a Two‐mode Hybrid, see the Two‐mode
Hybrid manual for more information.
{WARNING:
You can be injured and the vehicle could be
damaged if you try to do service work on a
vehicle without knowing enough about it.
.Be sure you have sufficient knowledge,
experience, the proper replacement parts, and
tools before attempting any vehicle
maintenance task.
.Be sure to use the proper nuts, bolts, and
other fasteners. English and metric fasteners
can be easily confused. If the wrong fasteners
are used, parts can later break or fall off. You
could be hurt.
If doing some of your own service work, use the proper
service manual. It tells you much more about how to
service the vehicle than this manual can. To order the
proper service manual, see Service Publications
Ordering Information on page 8‑16.
This vehicle has an airbag system. Before attempting
to do your own service work, see Servicing Your
Airbag-Equipped Vehicle on page 2‑91.
6-5
Page 484 of 630

How to Check Power Steering Fluid
To check the power steering fluid:1. Turn the key off and let the engine compartment cool down.
2. Wipe the cap and the top of the reservoir clean.
3. Unscrew the cap and wipe the dipstick with a clean rag.
4. Replace the cap and completely tighten it.
5. Remove the cap again and look at the fluid level on the dipstick.
The level should be at the FULL COLD mark.
If necessary, add only enough fluid to bring the level up
to the mark.
What to Use
To determine what kind of fluid to use, see
Recommended Fluids and Lubricantson page 7‑12.
Always use the proper fluid.
Notice: Use of the incorrect fluid may damage the
vehicle and the damages may not be covered by the
vehicle's warranty. Always use the correct fluid
listed in Recommended Fluids and Lubricants
on
page 7‑12.
Windshield Washer Fluid
What to Use
When windshield washer fluid needs to be added, be
sure to read the manufacturer's instructions before use.
Use a fluid that has sufficient protection against freezing
in an area where the temperature may fall below
freezing.
Adding Washer Fluid
The vehicle has a low washer fluid message in the
DIC that comes on when the washer fluid is low. The
message is displayed for 15 seconds at the start of
each ignition cycle. When the WASHER FLUID LOW
ADD FLUID message displays, you will need to add
washer fluid to the windshield washer fluid reservoir.
Open the cap with the
washer symbol on it.
Add washer fluid until the
tank is full. See Engine
Compartment Overview
on page 6‑16for
reservoir location.
6-38
Page 524 of 630

.One or more TPMS sensors are missing or
damaged. The DIC message and the TPMS
malfunction light should go off when the TPMS
sensors are installed and the sensor matching
process is performed successfully. See your
dealer/retailer for service.
.Replacement tires or wheels do not match your
vehicle's original equipment tires or wheels. Tires
and wheels other than those recommended for
your vehicle could prevent the TPMS from
functioning properly. SeeBuying New Tires
on
page 6‑83.
.Operating electronic devices or being near facilities
using radio wave frequencies similar to the TPMS
could cause the TPMS sensors to malfunction.
If the TPMS is not functioning it cannot detect or signal
a low tire condition. See your dealer/retailer for service
if the TPMS malfunction light and DIC message comes
on and stays on.
TPMS Sensor Matching Process
Each TPMS sensor has a unique identification code.
Any time you rotate your vehicle's tires or replace one
or more of the TPMS sensors, the identification codes
will need to be matched to the new tire/wheel position.
The sensors are matched to the tire/wheel positions in
the following order: driver side front tire, passenger side
front tire, passenger side rear tire, and driver side rear
tire using a TPMS diagnostic tool. See your dealer/
retailer for service.
The TPMS sensors can also be matched to each
tire/wheel position by increasing or decreasing the tire's
air pressure. If increasing the tire's air pressure, do not
exceed the maximum inflation pressure indicated on the
tire's sidewall.
To decrease air-pressure out of a tire you can use the
pointed end of the valve cap, a pencil-style air pressure
gage, or a key.
You have two minutes to match the first tire/wheel
position, and five minutes overall to match all four tire/
wheel positions. If it takes longer than two minutes, to
match the first tire and wheel, or more than five minutes
to match all four tire and wheel positions the matching
process stops and you need to start over.
6-78
Page 525 of 630

The TPMS sensor matching process is outlined below:1. Set the parking brake.
2. Turn the ignition switch to ON/RUN with the engine off.
3. Press the Remote Keyless Entry (RKE) transmitter's LOCK and UNLOCK buttons at the
same time for approximately five seconds. The
horn sounds twice to signal the receiver is in
relearn mode and TIRE LEARNING ACTIVE
message displays on the DIC screen.
If your vehicle does not have RKE, press the
Driver Information Center (DIC) vehicle information
button until the PRESS
VTO RELEARN TIRE
POSITIONS message displays. The horn sounds
twice to signal the receiver is in relearn mode and
TIRE LEARNING ACTIVE message displays on
the DIC screen.
If your vehicle does not have RKE or DIC buttons,
press the trip odometer reset stem located on the
instrument panel cluster until the PRESS
VTO
RELEARN TIRE POSITIONS message displays.
The horn sounds twice to signal the receiver is in
relearn mode and TIRE LEARNING ACTIVE
message displays on the DIC screen.
4. Start with the driver side front tire. 5. Remove the valve cap from the valve cap stem.
Activate the TPMS sensor by increasing or
decreasing the tire's air pressure for five seconds,
or until a horn chirp sounds. The horn chirp, which
may take up to 30 seconds to sound, confirms that
the sensor identification code has been matched to
this tire and wheel position.
6. Proceed to the passenger side front tire, and repeat the procedure in Step 5.
7. Proceed to the passenger side rear tire, and repeat the procedure in Step 5.
8. Proceed to the driver side rear tire, and repeat the procedure in Step 5. The horn sounds two times to
indicate the sensor identification code has been
matched to the driver side rear tire, and that the
TPMS sensor matching process is no longer
active. The TIRE LEARNING ACTIVE message on
the DIC display screen goes off.
9. Turn the ignition switch to LOCK/OFF.
10. Set all four tires to the recommended air pressure level as indicated on the Tire and Loading
Information label.
11. Put the valve caps back on the valve stems.
6-79
Page 540 of 630

A. Spare Tire(Valve Stem
Pointed Down)
B. Hoist Assembly
C. Hoist Cable
D. Tire/Wheel Retainer
E. Hoist Shaft F. Hoist End of
Extension Tool
G. Hoist Shaft Access Hole
H. Wheel Wrench
I. Jack Handle Extensions
J. Spare Tire Lock (If equipped) 1. Open the spare tire lock cover on the bumper and
use the ignition key to remove the spare tire
lock (J). To remove the spare tire lock, insert the
ignition key turn and pull straight out.
2. Assemble the wheel wrench (H) and the two jack
handle extensions (I) as shown.
6-94
Page 566 of 630

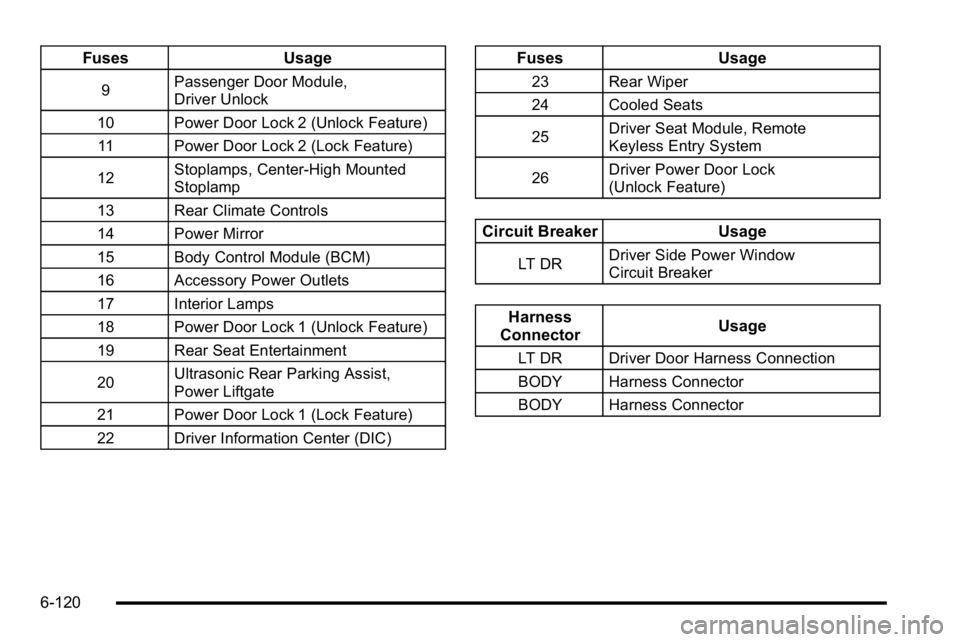
FusesUsage
9Passenger Door Module,
Driver Unlock
10 Power Door Lock 2 (Unlock Feature) 11 Power Door Lock 2 (Lock Feature)
12 Stoplamps, Center-High Mounted
Stoplamp
13 Rear Climate Controls
14 Power Mirror
15 Body Control Module (BCM)
16 Accessory Power Outlets
17 Interior Lamps
18 Power Door Lock 1 (Unlock Feature)
19 Rear Seat Entertainment
20 Ultrasonic Rear Parking Assist,
Power Liftgate
21 Power Door Lock 1 (Lock Feature)
22 Driver Information Center (DIC)
Fuses Usage
23 Rear Wiper
24 Cooled Seats
25Driver Seat Module, Remote
Keyless Entry System
26 Driver Power Door Lock
(Unlock Feature)
Circuit Breaker
Usage
LT DRDriver Side Power Window
Circuit Breaker
Harness
Connector Usage
LT DR Driver Door Harness Connection
BODY Harness Connector
BODY Harness Connector
6-120