2010 GMC SIERRA DENALI change time
[x] Cancel search: change timePage 365 of 550
The trailer and the vehicle's brake lamps will come on
when either vehicle braking or manual trailer brakes are
applied.
Trailer Gain Adjustment Procedure
Trailer Gain should be set for a specific trailering
condition and must be adjusted any time vehicle
loading, trailer loading or road surface conditions
change.
Setting the Trailer Gain properly is needed for the best
trailer stopping performance. A trailer that is
over-gained may result in locked trailer brakes. A trailer
that is under-gained may result in not enough trailer
braking. Both of these conditions may result in poorer
stopping and stability of the vehicle and trailer.
Use the following procedure to correctly adjust Trailer
Gain for each towing condition:1. Make sure the trailer brakes are in proper working condition.
2. Connect a properly loaded trailer to the vehicle and make all necessary mechanical and electrical
connections. See Loading the Vehicle
on
page 5‑31for more information. 3. After the electrical connection is made to a trailer
equipped with electric brakes:
.A TRAILER CONNECTED message will be
briefly displayed on the DIC display.
.The Trailer Brake Display Page will appear on
the DIC showing TRAILER GAIN and TRAILER
OUTPUT.
.In the Trailer Output display on the
DIC, “- - - - - -“ will disappear if there is no error
present. Connecting a trailer without electric
brakes will not clear the six dashed lines.
4. Adjust the Trailer Gain by using the gain adjustment (+ / -) buttons on the Trailer Brake
Control Panel.
5. Drive the vehicle with the trailer attached on a level road surface representative of the towing
condition and free of traffic at about 20 to 25 mph
(32 to 40 km/h) and fully apply the Manual Trailer
Brake Apply lever.
Adjusting trailer gain at speeds lower than
20 to 25 mph (32 to 40 km/h) may result in an
incorrect gain setting.
5-53
Page 366 of 550
6. Adjust the Trailer Gain to just below the point oftrailer wheel lock-up, indicated by trailer wheel
squeal or tire smoke when a trailer wheel locks.
Trailer wheel lock-up may not occur if towing a
heavily loaded trailer. In this case, adjust the
Trailer Gain to the highest allowable setting for the
towing condition.
7. Re-adjust Trailer Gain any time vehicle loading, trailer loading or road surface conditions change or
if trailer wheel lock-up is noticed at any time while
towing.
Other ITBC Related DIC Messages
In addition to displaying TRAILER GAIN and TRAILER
OUTPUT through the DIC, trailer connection and ITBC
system status is displayed in the DIC.
TRAILER CONNECTED –This message will be briefly
displayed when a trailer with electric brakes is first
connected to the vehicle. This message will
automatically turn off in about ten seconds. The driver
can also acknowledge this message before it
automatically turns off. CHECK TRAILER WIRING
–This message will be
displayed if:
1. The ITBC system first determines connection to a trailer with electric brakes and then the trailer
harness becomes disconnected from the vehicle.
If the disconnect occurs while the vehicle is
stationary, this message will automatically turn off
in about thirty seconds. This message will also turn
off if the driver acknowledges this message off or if
the trailer harness is re-connected.
If the disconnect occurs while the vehicle is
moving, this message will continue until the ignition
is turned off. This message will also turn off if the
driver acknowledges this message off or if the
trailer harness is re-connected.
2. There is an electrical fault in the wiring to the electric trailer brakes. This message will continue
as long as there is an electrical fault in the trailer
wiring. This message will also turn off if the driver
acknowledges this message off.
5-54
Page 383 of 550
Fuel E85 (85% Ethanol)
This vehicle can use either unleaded gasoline or
85% ethanol fuel (E85). We encourage the use of
E85 in vehicles that are designed to use it. The ethanol
in E85 is a“renewable” fuel, meaning it is made from
renewable sources such as corn and other crops.
Many service stations will not have an 85% ethanol
fuel (E85) pump available. The U.S. Department
of Energy has an alternative fuels website
(www.eere.energy.gov/afdc/infrastructure/locator.html)
that can help you find E85 fuel. Those stations that do
have E85 should have a label indicating ethanol
content. Do not use the fuel if the ethanol content is
greater than 85%.
At a minimum, E85 should meet ASTM Specification
D 5798. By definition, this means that fuel labeled E85
will have an ethanol content between 70% and 85%.
Filling the fuel tank with fuel mixtures that do not meet
ASTM specifications can affect driveability and could
cause the malfunction indicator lamp to come on.
To ensure quick starts in the wintertime, the E85 fuel
must be formulated properly for your climate according
to ASTM specification D 5798. If you have trouble
starting on E85, it could be because the E85 fuel is not
properly formulated for your climate. If this happens, switching to gasoline or adding gasoline to the fuel tank
can improve starting. For good starting and heater
efficiency below 0°C (32°F), the fuel mix in the fuel tank
should contain no more than 70% ethanol. It is best not
to alternate repeatedly between gasoline and E85.
If you do switch fuels, it is recommended that you add
as much fuel as possible
—do not add less than
11 L (three gallons) when refueling. You should drive
the vehicle immediately after refueling for at least
11 km (seven miles) to allow the vehicle to adapt to the
change in ethanol concentration.
E85 has less energy per gallon than gasoline, so you
will need to refill the fuel tank more often when using
E85 than when you are using gasoline. See Filling the
Tank on page 6‑10.
Notice: Some additives are not compatible with
E85 fuel and can harm the vehicle's fuel system. Do
not add anything to E85. Damage caused by
additives would not be covered by the vehicle
warranty.
Notice: This vehicle was not designed for fuel that
contains methanol. Do not use fuel containing
methanol. It can corrode metal parts in the fuel
system and also damage plastic and rubber parts.
That damage would not be covered under the
vehicle warranty.
6-9
Page 394 of 550
Engine Oil Additives / Engine Oil
Flushes
Do not add anything to the oil. The recommended oils
with the starburst symbol that meet GM Standard
GM6094M are all that is needed for good performance
and engine protection.
Engine oil system flushes are not recommended and
could cause engine damage not covered by the vehicle
warranty.
Engine Oil Life System
When to Change Engine Oil
This vehicle has a computer system that indicates when
to change the engine oil and filter. This is based on
engine revolutions and engine temperature, and not on
mileage. Based on driving conditions, the mileage at
which an oil change is indicated can vary considerably.
For the oil life system to work properly, the system must
be reset every time the oil is changed.
On some vehicles, when the system has calculated that
oil life has been diminished, a CHANGE ENGINE OIL
SOON message comes on to indicate that an oil
change is necessary. SeeDIC Warnings and Messages
on page 4‑57. Change the oil as soon as possible
within the next 1 000 km (600 miles). It is possible that,
if driving under the best conditions, the oil life system might not indicate that an oil change is necessary for
over a year. However, the engine oil and filter must be
changed at least once a year and at this time the
system must be reset. For vehicles without the
CHANGE ENGINE OIL SOON message, An oil change
is needed when the OIL LIFE REMAINING percentage
is near 0%. Your dealer/retailer has trained service
people who will perform this work using genuine parts
and reset the system. It is also important to check the
oil regularly and keep it at the proper level.
If the system is ever reset accidentally, the oil must be
changed at 5 000 km (3,000 miles) since the last oil
change. Remember to reset the oil life system
whenever the oil is changed.
How to Reset the Engine Oil Life
System
The Engine Oil Life System calculates when to change
the engine oil and filter based on vehicle use.
Whenever the oil is changed, reset the system so it can
calculate when the next oil change is required. If a
situation occurs where the oil is changed prior to a
CHANGE ENGINE OIL SOON message coming on,
reset the system.
6-20
Page 395 of 550
Always reset the engine oil life to 100% after every oil
change. It will not reset itself. To reset the Engine Oil
Life System on most vehicles:1. Display the OIL LIFE REMAINING on the DIC. If the vehicle does not have DIC buttons, the
vehicle must be in P (Park) to access this display.
See DIC Operation and Displays (Using Trip
Odometer Reset Stem)
on page 4‑44or DIC
Operation and Displays (Using DIC Buttons)on
page 4‑48.
2. Press and hold the SET/RESET button on the DIC, or the trip odometer reset stem if the vehicle does
not have DIC buttons, for more than five seconds.
The oil life will change to 100%.
On all vehicles, the Engine Oil Life System can be reset
as follows: 1. Turn the ignition to ON/RUN with the engine off
2. Fully press the accelerator pedal slowly three times within five seconds.
3. Display the OIL LIFE REMAINING on the DIC. If the display shows 100%, the system is reset.
See DIC Operation and Displays (Using Trip
Odometer Reset Stem)
on page 4‑44or DIC
Operation and Displays (Using DIC Buttons)on
page 4‑48. If the vehicle has a CHANGE ENGINE OIL SOON
message and it comes back on when the vehicle is
started and/or the OIL LIFE REMAINING is near 0%,
the Engine Oil Life System has not reset. Repeat the
procedure.
What to Do with Used Oil
Used engine oil contains certain elements that can be
unhealthy for your skin and could even cause cancer.
Do not let used oil stay on your skin for very long. Clean
your skin and nails with soap and water, or a good hand
cleaner. Wash or properly dispose of clothing or rags
containing used engine oil. See the manufacturer's
warnings about the use and disposal of oil products.
Used oil can be a threat to the environment. If you
change your own oil, be sure to drain all the oil from the
filter before disposal. Never dispose of oil by putting it in
the trash, pouring it on the ground, into sewers, or into
streams or bodies of water. Recycle it by taking it to a
place that collects used oil.
6-21
Page 453 of 550
Reset the Tire Pressure Monitor System. SeeTire
Pressure Monitor Operation
on page 6‑74.
Make certain that all wheel nuts are properly
tightened. See “Wheel Nut Torque” under
Capacities and Specifications
on page 6‑122.
{WARNING:
Rust or dirt on a wheel, or on the parts to
which it is fastened, can make wheel nuts
become loose after time. The wheel could
come off and cause an accident. When you
change a wheel, remove any rust or dirt from
places where the wheel attaches to the
vehicle. In an emergency, you can use a
cloth or a paper towel to do this; but be sure
to use a scraper or wire brush later,
if needed, to get all the rust or dirt off. See
Changing a Flat Tire
on page 6‑86.
Make sure the spare tire is stored securely. Push,
pull, and then try to rotate or turn the tire. If it
moves, tighten the cable. See Storing a Flat or
Spare Tire and Tools
on page 6‑100.
When It Is Time for New Tires
Various factors, such as maintenance, temperatures,
driving speeds, vehicle loading, and road conditions,
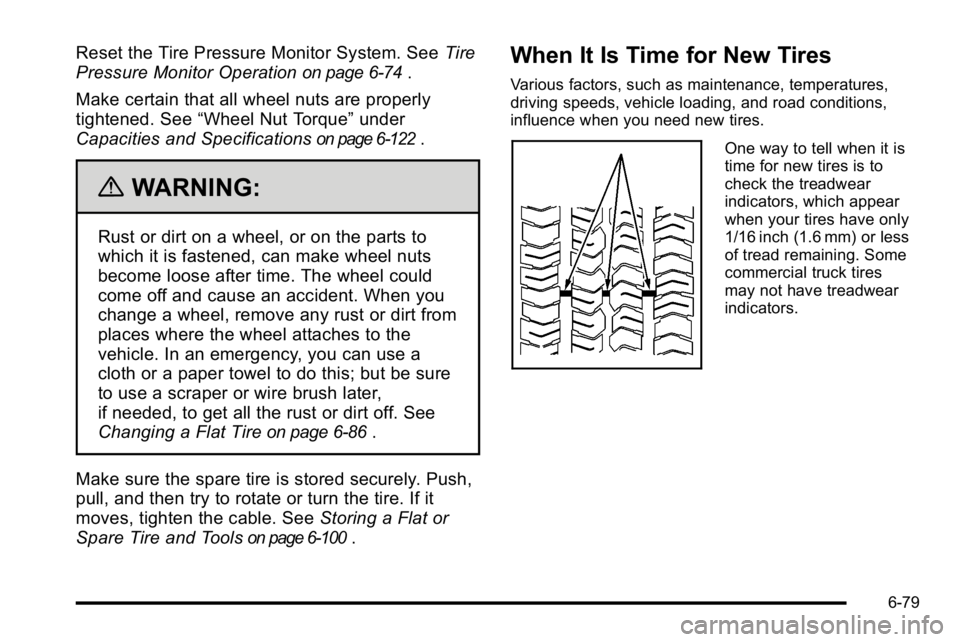
influence when you need new tires.
One way to tell when it is
time for new tires is to
check the treadwear
indicators, which appear
when your tires have only
1/16 inch (1.6 mm) or less
of tread remaining. Some
commercial truck tires
may not have treadwear
indicators.
6-79
Page 469 of 550
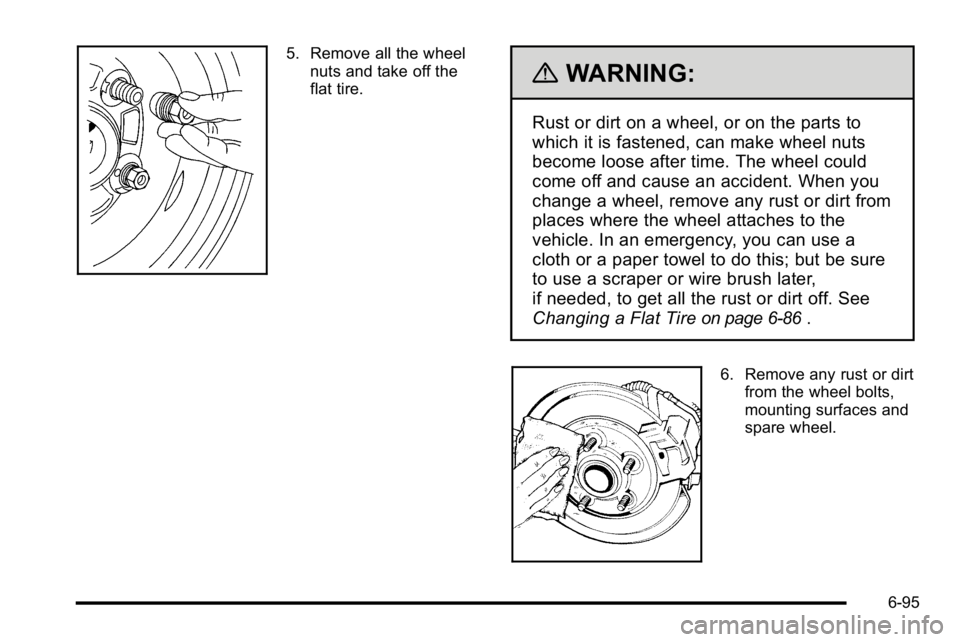
5. Remove all the wheelnuts and take off the
flat tire.
{WARNING:
Rust or dirt on a wheel, or on the parts to
which it is fastened, can make wheel nuts
become loose after time. The wheel could
come off and cause an accident. When you
change a wheel, remove any rust or dirt from
places where the wheel attaches to the
vehicle. In an emergency, you can use a
cloth or a paper towel to do this; but be sure
to use a scraper or wire brush later,
if needed, to get all the rust or dirt off. See
Changing a Flat Tire
on page 6‑86.
6. Remove any rust or dirtfrom the wheel bolts,
mounting surfaces and
spare wheel.
6-95
Page 499 of 550
Rotation of New Tires
To maintain ride, handling, and performance of the
vehicle, it is important that the first rotation service for
new tires be performed when they have 8 000 to
13 000 km (5,000 to 8,000 miles). SeeTire Inspection
and Rotation on page 6‑78.
Scheduled Maintenance
When the Change Engine Oil Soon
Message Displays
Change engine oil and filter. See Engine Oilon
page 6‑18. An Emission Control Service.
When the Change Engine Oil Soon message displays,
service is required for the vehicle as soon as possible,
within the next 1 000 km/600 miles. If driving under the
best conditions, the engine oil life system might not
indicate the need for vehicle service for more than a
year. The engine oil and filter must be changed at least
once a year and the oil life system must be reset. Your
dealer/retailer has trained service technicians who will
perform this work and reset the system. If the engine oil
life system is reset accidentally, service the vehicle
within 5 000 km/3,000 miles since the last service. Reset
the oil life system whenever the oil is changed. See
Engine Oil Life System on page 6‑20. When the Change Engine Oil Soon message displays,
certain services, checks, and inspections are required.
The services described for Maintenance
Ishould be
performed at every engine oil change. The services
described for Maintenance IIshould be
performed when:
.Maintenance Iwas performed the last time the
engine oil was changed.
.It has been 10 months or more since the Change
Engine Oil Soon message has displayed or since
the last service.
Maintenance I
.Change engine oil and filter. See Engine Oilon
page 6‑18. An Emission Control Service.
.Engine coolant level check. See Engine Coolanton page 6‑29.
.Windshield washer fluid level check. See
Windshield Washer Fluid on page 6‑39.
.Tire inflation check. SeeInflation - Tire Pressureon page 6‑71.
.Tire wear inspection. See Tire Inspection and
Rotation on page 6‑78.
.Rotate tires. See Tire Inspection and Rotationon
page 6‑78.
7-3