2010 GMC SIERRA DENALI brake
[x] Cancel search: brakePage 179 of 550
Cruise Control
{WARNING:
Cruise control can be dangerous where you
cannot drive safely at a steady speed. So, do not
use the cruise control on winding roads or in
heavy traffic.
Cruise control can be dangerous on slippery
roads. On such roads, fast changes in tire traction
can cause excessive wheel slip, and you could
lose control. Do not use cruise control on slippery
roads.
With cruise control, a speed of about 40 km/h (25 mph)
or more can be maintained without keeping your foot on
the accelerator. Cruise control does not work at speeds
below about 40 km/h (25 mph).
When the brakes are applied, the cruise control
turns off.
If your vehicle has the Stabilitrak
®system and begins to
limit wheel spin while you are using cruise control, the
cruise control will automatically disengage. See
StabiliTrak
®Systemon page 5‑6. When road
conditions allow the cruise control to be safely used
again, it can be turned back on.
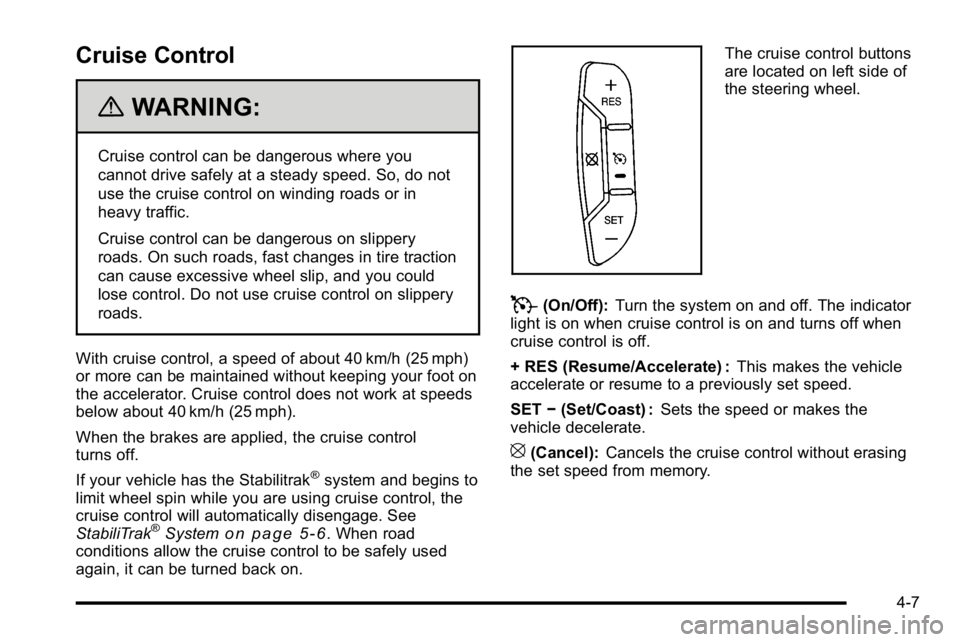
The cruise control buttons
are located on left side of
the steering wheel.
T(On/Off): Turn the system on and off. The indicator
light is on when cruise control is on and turns off when
cruise control is off.
+ RES (Resume/Accelerate) : This makes the vehicle
accelerate or resume to a previously set speed.
SET −(Set/Coast) : Sets the speed or makes the
vehicle decelerate.
[(Cancel): Cancels the cruise control without erasing
the set speed from memory.
4-7
Page 180 of 550
Setting Cruise Control
Cruise control will not work if the parking brake is set,
or if the master cylinder brake fluid level is low.
The cruise control light on the instrument panel cluster
comes on after the cruise control has been set to the
desired speed.
{WARNING:
If you leave your cruise control on when you are
not using cruise, you might hit a button and go
into cruise when you do not want to. You could be
startled and even lose control. Keep the cruise
control switch off until you want to use cruise
control.
1. Press
T.
2. Get up to the desired speed.
3. Press the SET− button located on the steering
wheel and release it.
4. Take your foot off the accelerator.
Resuming a Set Speed
If the brakes are applied while the cruise control is set,
the cruise control is disengaged. But it does not need to
be reset.
Once the vehicle speed reaches about 40 km/h
(25 mph) or more, press the +RES button on the
steering wheel. The vehicle will go back to the previous
set speed and stay there.
Increasing Speed While Using Cruise
Control
To increase the cruise speed while using cruise control:
.Press and hold the +RES button on the steering
wheel until the new desired speed is reached, then
release it.
.To increase vehicle speed in small increments,
press the +RES button. Each time this is done, the
vehicle goes about 1.6 km/h (1 mph) faster.
4-8
Page 181 of 550
Reducing Speed While Using Cruise
Control
To reduce the vehicle speed while using cruise control:
.Press and hold the SET–button on the steering
wheel until the desired lower speed is reached,
then release it.
.To slow down in very small amounts, press the
SET– button on the steering wheel briefly. Each
time this is done, the vehicle goes about 1.6 km/h
(1 mph) slower.
Passing Another Vehicle While Using
Cruise Control
Use the accelerator pedal to increase the vehicle
speed. When you take your foot off the pedal, the
vehicle will slow down to the previous set cruise speed.
Using Cruise Control on Hills
How well the cruise control works on hills depends upon
the vehicle speed, load, and the steepness of the hills.
While going up steep hills, you might have to step on
the accelerator pedal to maintain the vehicle's speed.
While going downhill, you might have to brake or shift to
a lower gear to keep the vehicle's speed down. When
the brakes are applied the cruise control turns off.
Ending Cruise Control
There are three ways to end cruise control:
.Step lightly on the brake pedal.
.Press[on the steering wheel.
.PressTon the steering wheel.
Erasing Speed Memory
The cruise control set speed memory is erased when
the cruise control or the ignition is turned off.
4-9
Page 206 of 550
The voltmeter gage may also read lower when in fuel
economy mode. This is normal.
Readings in the low warning zone can occur when a
large number of electrical accessories are operating in
the vehicle and the engine is left at an idle for an
extended period. This condition is normal since the
charging system is not able to provide full power at
engine idle. As engine speeds are increased, this
condition should correct itself as higher engine speeds
allow the charging system to create maximum power.
The vehicle can only be driven for a short time with the
reading in either warning zone. If the vehicle must be
driven, turn off all unnecessary accessories.
Readings in either warning zone indicate a possible
problem in the electrical system. Have the vehicle
serviced as soon as possible.Brake System Warning Light
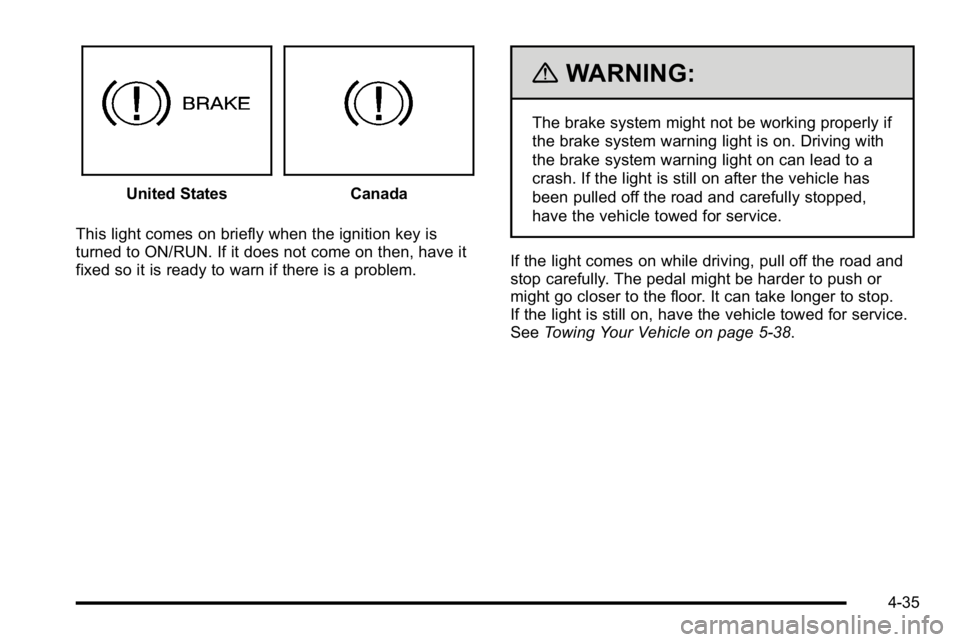
With the ignition on, the brake system warning light
comes on when the parking brake is set. If the vehicle
is driven with the parking brake engaged, a chime
sounds when the vehicle speed is greater than
8 km/h (5 mph).
The vehicle's hydraulic brake system is divided into two
parts. If one part is not working, the other part can still
work and stop the vehicle. For good braking, both parts
need to be working well.
If the warning light comes on and a chime sounds there
could be a brake problem. Have the brake system
inspected right away.
This light can also come on due to low brake fluid. See
Brakes
on page 6‑40for more information.
4-34
Page 207 of 550
United StatesCanada
This light comes on briefly when the ignition key is
turned to ON/RUN. If it does not come on then, have it
fixed so it is ready to warn if there is a problem.
{WARNING:
The brake system might not be working properly if
the brake system warning light is on. Driving with
the brake system warning light on can lead to a
crash. If the light is still on after the vehicle has
been pulled off the road and carefully stopped,
have the vehicle towed for service.
If the light comes on while driving, pull off the road and
stop carefully. The pedal might be harder to push or
might go closer to the floor. It can take longer to stop.
If the light is still on, have the vehicle towed for service.
See Towing Your Vehicle on page 5‑38.
4-35
Page 208 of 550
Antilock Brake System (ABS)
Warning Light
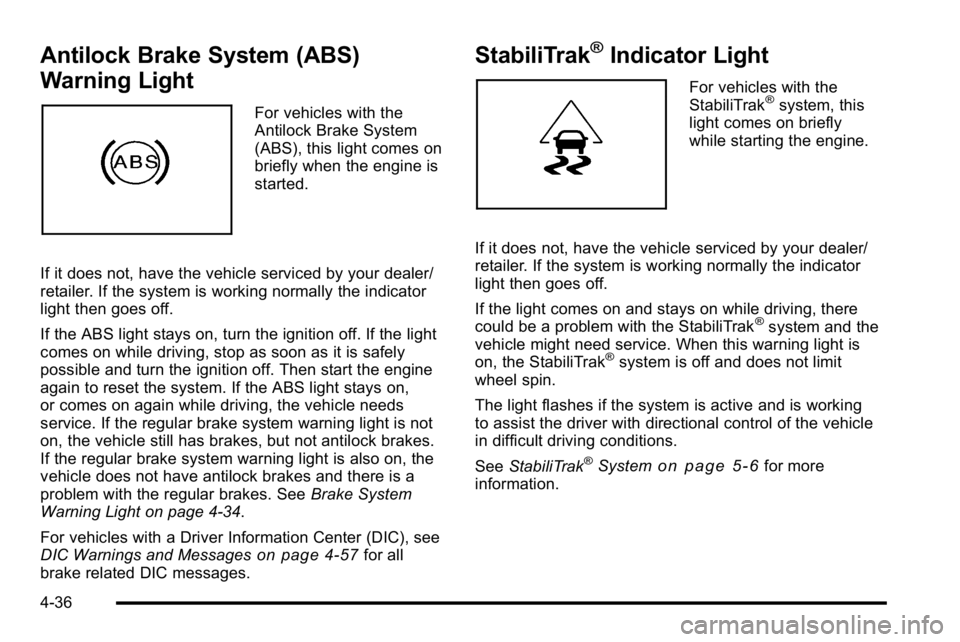
For vehicles with the
Antilock Brake System
(ABS), this light comes on
briefly when the engine is
started.
If it does not, have the vehicle serviced by your dealer/
retailer. If the system is working normally the indicator
light then goes off.
If the ABS light stays on, turn the ignition off. If the light
comes on while driving, stop as soon as it is safely
possible and turn the ignition off. Then start the engine
again to reset the system. If the ABS light stays on,
or comes on again while driving, the vehicle needs
service. If the regular brake system warning light is not
on, the vehicle still has brakes, but not antilock brakes.
If the regular brake system warning light is also on, the
vehicle does not have antilock brakes and there is a
problem with the regular brakes. See Brake System
Warning Light on page 4‑34.
For vehicles with a Driver Information Center (DIC), see
DIC Warnings and Messages
on page 4‑57for all
brake related DIC messages.
StabiliTrak®Indicator Light
For vehicles with the
StabiliTrak®system, this
light comes on briefly
while starting the engine.
If it does not, have the vehicle serviced by your dealer/
retailer. If the system is working normally the indicator
light then goes off.
If the light comes on and stays on while driving, there
could be a problem with the StabiliTrak
®system and the
vehicle might need service. When this warning light is
on, the StabiliTrak
®system is off and does not limit
wheel spin.
The light flashes if the system is active and is working
to assist the driver with directional control of the vehicle
in difficult driving conditions.
See StabiliTrak
®Systemon page 5‑6for more
information.
4-36
Page 216 of 550
Here are some situations customers may experience
with the fuel gage. None of these indicate a problem
with the fuel gage.
.At the gas station, the fuel pump shuts off before
the gage reads full.
.It takes a little more or less fuel to fill up than the
fuel gage indicated. For example, the gage may
have indicated the tank was half full, but it actually
took a little more or less than half the tank's
capacity to fill the tank.
.The gage goes back to empty when the ignition is
turned off.
Driver Information Center (DIC)
Your vehicle has a Driver Information Center (DIC).
The DIC displays information about your vehicle. It also
displays warning messages if a system problem is
detected.
All messages will appear in the DIC display located
below the tachometer in the instrument panel cluster.
The DIC comes on when the ignition is on. After a short
delay, the DIC will display the information that was last
displayed before the engine was turned off.For the displays available using DIC buttons, see
“DIC
Operation and Displays (Using DIC Buttons)” later in
this section and DIC Vehicle Customization (With DIC
Buttons) on page 4‑67.
For the displays available using the trip odometer reset
stem, see “DIC Operation and Displays (Using Trip
Odometer Reset Stem)” later in this section.
DIC Operation and Displays (Using
Trip Odometer Reset Stem)
The DIC has different displays which can be accessed
by pressing the trip odometer reset stem located on the
instrument panel cluster. Pressing the trip odometer
reset stem will also turn off, or acknowledge, DIC
messages.
You can use the trip odometer reset stem to view the
following displays: language selection, trip odometer,
trailer brake gain and output information for vehicles
with the Integrated Trailer Brake Control (ITBC) system,
compass zone setting, compass recalibration, oil life,
Tire Pressure Monitor System (TPMS) programming for
vehicles with the TPMS, and Remote Keyless Entry
(RKE) transmitter programming.
4-44
Page 218 of 550
Trailer Gain and Output
On vehicles with the Integrated Trailer Brake Control
(ITBC) system, the trailer brake display appears in the
DIC. Press the trip odometer reset stem until TRAILER
GAIN and OUTPUT display.
TRAILER GAIN shows the trailer gain setting. This
setting can be adjusted from 0.0 to 10.0 with either a
trailer connected or disconnected. To adjust this setting,
see“Integrated Trailer Brake Control System” under
Towing a Trailer
on page 5‑42for more information.
OUTPUT shows the power output to the trailer anytime
a trailer with electric brakes is connected. Output is
displayed in 0 to 10 bars. Dashes may appear in the
OUTPUT display. See “Integrated Trailer Brake Control
System” underTowing a Trailer
on page 5‑42for more
information.
Compass Zone Setting
This display allows for setting the compass zone. See
DIC Compasson page 4‑55for more information.
Compass Recalibration
This display allows for calibrating the compass. See
DIC Compasson page 4‑55for more information.
Oil Life
To access this display, the vehicle must be in P (Park).
Press the trip odometer reset stem until OIL LIFE
REMAINING displays. This display shows an estimate
of the oil's remaining useful life. If you see 99% OIL
LIFE REMAINING on the display, that means 99% of
the current oil life remains. The engine oil life system
will alert you to change the oil on a schedule consistent
with your driving conditions.
When the remaining oil life is low, the CHANGE
ENGINE OIL SOON message will appear on the
display. See "CHANGE ENGINE OIL SOON" under DIC
Warnings and Messages
on page 4‑57. You should
change the oil as soon as you can. See Engine Oilon
page 6‑18. In addition to the engine oil life system
monitoring the oil life, additional maintenance is
recommended in the Maintenance Schedule in this
manual. See Scheduled Maintenance
on page 7‑3for
more information.
Remember, you must reset the OIL LIFE display
yourself after each oil change. It will not reset itself.
Also, be careful not to reset the OIL LIFE display
accidentally at any time other than when the oil has just
been changed. It cannot be reset accurately until the
next oil change. To reset the engine oil life system, see
Engine Oil Life System on page 6‑20.
4-46