2010 GMC SIERRA DENALI tire size
[x] Cancel search: tire sizePage 440 of 550
(F) Tire Ply Material:The type of cord and
number of plies in the sidewall and under the
tread.
(G) Single Tire Maximum Load
:Maximum load
that can be carried and the maximum pressure
needed to support that load when used as a
single. For information on recommended tire
pressure see Inflation - Tire Pressure
on page 6‑71
andLoading the Vehicleon page 5‑31.
Tire Size
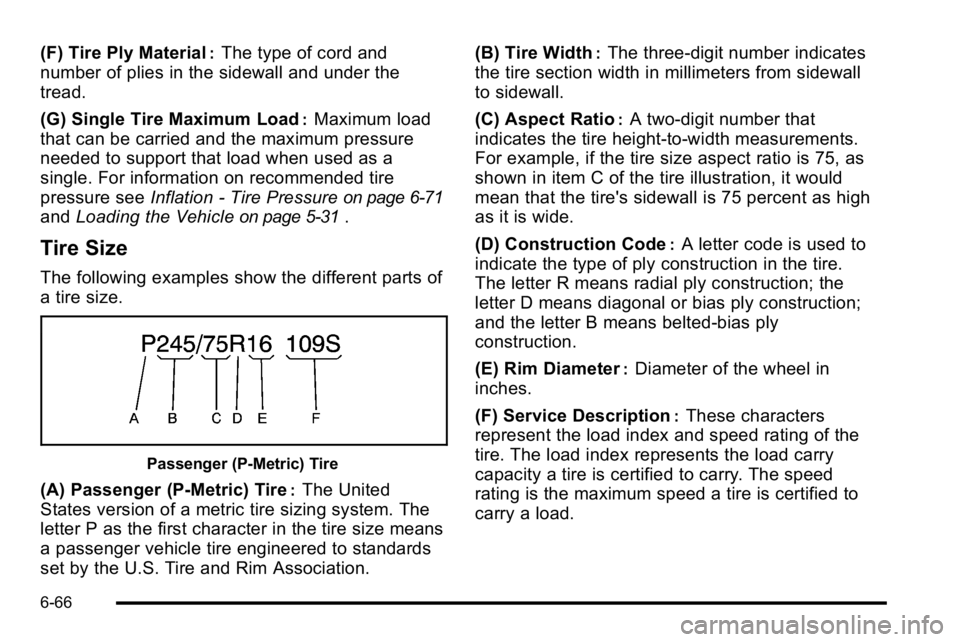
The following examples show the different parts of
a tire size.
Passenger (P‐Metric) Tire
(A) Passenger (P‐Metric) Tire:The United
States version of a metric tire sizing system. The
letter P as the first character in the tire size means
a passenger vehicle tire engineered to standards
set by the U.S. Tire and Rim Association. (B) Tire Width
:The three‐digit number indicates
the tire section width in millimeters from sidewall
to sidewall.
(C) Aspect Ratio
:A two‐digit number that
indicates the tire height‐to‐width measurements.
For example, if the tire size aspect ratio is 75, as
shown in item C of the tire illustration, it would
mean that the tire's sidewall is 75 percent as high
as it is wide.
(D) Construction Code
:A letter code is used to
indicate the type of ply construction in the tire.
The letter R means radial ply construction; the
letter D means diagonal or bias ply construction;
and the letter B means belted‐bias ply
construction.
(E) Rim Diameter
:Diameter of the wheel in
inches.
(F) Service Description
:These characters
represent the load index and speed rating of the
tire. The load index represents the load carry
capacity a tire is certified to carry. The speed
rating is the maximum speed a tire is certified to
carry a load.
6-66
Page 441 of 550
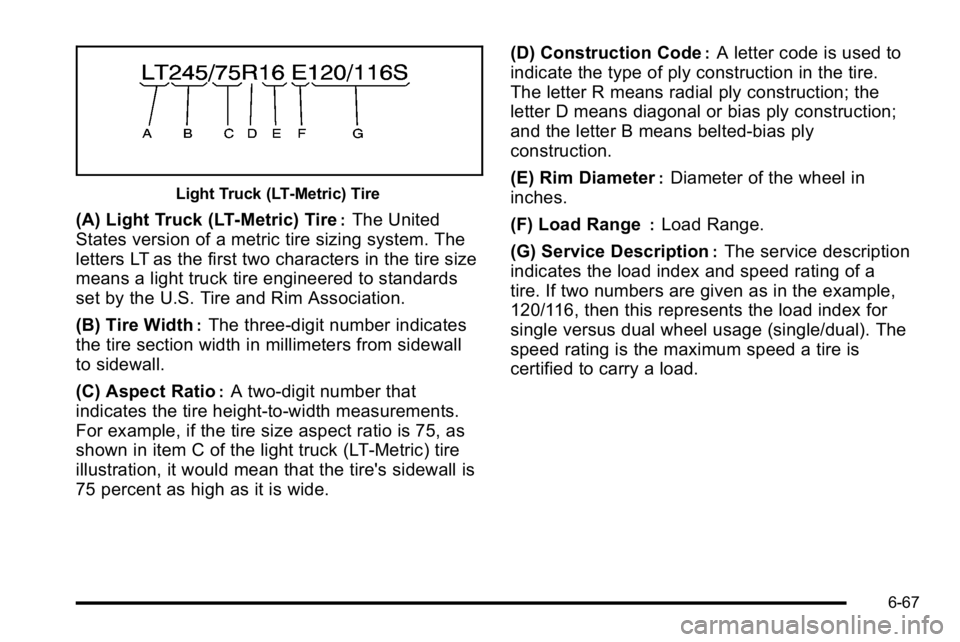
Light Truck (LT‐Metric) Tire
(A) Light Truck (LT‐Metric) Tire:The United
States version of a metric tire sizing system. The
letters LT as the first two characters in the tire size
means a light truck tire engineered to standards
set by the U.S. Tire and Rim Association.
(B) Tire Width
:The three‐digit number indicates
the tire section width in millimeters from sidewall
to sidewall.
(C) Aspect Ratio
:A two‐digit number that
indicates the tire height‐to‐width measurements.
For example, if the tire size aspect ratio is 75, as
shown in item C of the light truck (LT‐Metric) tire
illustration, it would mean that the tire's sidewall is
75 percent as high as it is wide. (D) Construction Code
:A letter code is used to
indicate the type of ply construction in the tire.
The letter R means radial ply construction; the
letter D means diagonal or bias ply construction;
and the letter B means belted‐bias ply
construction.
(E) Rim Diameter
:Diameter of the wheel in
inches.
(F) Load Range
:Load Range.
(G) Service Description
:The service description
indicates the load index and speed rating of a
tire. If two numbers are given as in the example,
120/116, then this represents the load index for
single versus dual wheel usage (single/dual). The
speed rating is the maximum speed a tire is
certified to carry a load.
6-67
Page 444 of 550

Radial Ply Tire:A pneumatic tire in which the ply
cords that extend to the beads are laid at
90 degrees to the centerline of the tread.
Rim
:A metal support for a tire and upon which
the tire beads are seated.
Sidewall
:The portion of a tire between the tread
and the bead.
Speed Rating
:An alphanumeric code assigned
to a tire indicating the maximum speed at which a
tire can operate.
Traction
:The friction between the tire and the
road surface. The amount of grip provided.
Tread
:The portion of a tire that comes into
contact with the road.
Treadwear Indicators
:Narrow bands, sometimes
called wear bars, that show across the tread of a
tire when only 1/16 inch (1.6 mm) of tread
remains. See When It Is Time for New Tires
on
page 6‑79
. UTQGS (Uniform Tire Quality Grading
Standards)
:A tire information system that
provides consumers with ratings for a tire's
traction, temperature, and treadwear. Ratings are
determined by tire manufacturers using
government testing procedures. The ratings are
molded into the sidewall of the tire. See Uniform
Tire Quality Grading
on page 6‑82.
Vehicle Capacity Weight
:The number of
designated seating positions multiplied by 150 lbs
(68 kg) plus the rated cargo load. See Loading the
Vehicle
on page 5‑31.
Vehicle Maximum Load on the Tire
:Load on an
individual tire due to curb weight, accessory
weight, occupant weight, and cargo weight.
Vehicle Placard
:A label permanently attached to
a vehicle showing the vehicle's capacity weight
and the original equipment tire size and
recommended inflation pressure. See “Tire and
Loading Information Label” underLoading the
Vehicle
on page 5‑31.
6-70
Page 446 of 550
How to Check
Use a good quality pocket-type gage to check tire
pressure. You cannot tell if your tires are properly
inflated simply by looking at them. Radial tires
may look properly inflated even when they are
underinflated. Check the tire's inflation pressure
when the tires are cold. Cold means your vehicle
has been sitting for at least three hours or driven
no more than 1 mile (1.6 km).
Remove the valve cap from the tire valve stem.
Press the tire gage firmly onto the valve to get a
pressure measurement. If the cold tire inflation
pressure matches the recommended pressure on
the Tire and Loading Information label, no further
adjustment is necessary. If the pressure is low,
add air until you reach the recommended amount.
If you overfill the tire, release air by pushing on
the metal stem in the center of the tire valve.
Recheck the tire pressure with the tire gage.
Be sure to put the valve caps back on the valve
stems. They help prevent leaks by keeping out dirt
and moisture.
High-Speed Operation
{WARNING:
Driving at high speeds, 160 km/h (100 mph) or
higher, puts an additional strain on tires.
Sustained high-speed driving causes excessive
heat build up and can cause sudden tire failure.
You could have a crash and you or others could
be killed. Some high-speed rated tires require
inflation pressure adjustment for high speed
operation. When speed limits and road conditions
are such that a vehicle can be driven at high
speeds, make sure the tires are rated for high
speed operation, in excellent condition, and set to
the correct cold tire inflation pressure for the
vehicle load.
Vehicles with P265/70R17 or P275/55R20 size tires
require inflation pressure adjustment when driving the
vehicle at speeds of 100 mph (160 km/h) or higher. Set
the cold tire inflation pressure to 3 psi (20 kPa) above
the recommended cold tire pressure shown on the Tire
and Loading Information label.
6-72
Page 447 of 550

When you end this high‐speed driving, return the tires to
the cold inflation pressure shown on the Tire and
Loading Information label. SeeLoading the Vehicle
on
page 5‑31and Inflation - Tire Pressure on page 6‑71.
Tire Pressure Monitor System
The Tire Pressure Monitor System (TPMS) uses radio
and sensor technology to check tire pressure levels.
The TPMS sensors monitor the air pressure in your
vehicle's tires and transmit tire pressure readings to a
receiver located in the vehicle.
Each tire, including the spare (if provided), should be
checked monthly when cold and inflated to the inflation
pressure recommended by the vehicle manufacturer on
the vehicle placard or tire inflation pressure label. (If
your vehicle has tires of a different size than the size
indicated on the vehicle placard or tire inflation pressure
label, you should determine the proper tire inflation
pressure for those tires.)
As an added safety feature, your vehicle has been
equipped with a tire pressure monitoring system
(TPMS) that illuminates a low tire pressure telltale when
one or more of your tires is significantly under‐inflated. Accordingly, when the low tire pressure telltale
illuminates, you should stop and check your tires as
soon as possible, and inflate them to the proper
pressure. Driving on a significantly under‐inflated tire
causes the tire to overheat and can lead to tire failure.
Under‐inflation also reduces fuel efficiency and tire
tread life, and may affect the vehicle's handling and
stopping ability.
Please note that the TPMS is not a substitute for proper
tire maintenance, and it is the driver's responsibility to
maintain correct tire pressure, even if under‐inflation
has not reached the level to trigger illumination of the
TPMS low tire pressure telltale.
Your vehicle has also been equipped with a TPMS
malfunction indicator to indicate when the system is not
operating properly. The TPMS malfunction indicator is
combined with the low tire pressure telltale. When the
system detects a malfunction, the telltale will flash for
approximately one minute and then remain continuously
illuminated. This sequence will continue upon
subsequent vehicle start‐ups as long as the malfunction
exists.
6-73
Page 449 of 550

At the same time a message to check the pressure in a
specific tire appears on the Driver Information Center
(DIC) display. The low tire pressure warning light and
the DIC warning message come on at each ignition
cycle until the tires are inflated to the correct inflation
pressure. Using the DIC, tire pressure levels can be
viewed by the driver. For additional information and
details about the DIC operation and displays seeDIC
Operation and Displays (Using Trip Odometer Reset
Stem)
on page 4‑44or DIC Operation and Displays
(Using DIC Buttons)on page 4‑48and DIC Warnings
and Messages on page 4‑57.
The low tire pressure warning light may come on in cool
weather when the vehicle is first started, and then turn
off as you start to drive. This could be an early indicator
that the air pressure in the tire(s) are getting low and
need to be inflated to the proper pressure. A Tire and Loading Information label, attached to your
vehicle, shows the size of your vehicle's original
equipment tires and the correct inflation pressure for
your vehicle's tires when they are cold. See
Loading the
Vehicle
on page 5‑31, for an example of the Tire and
Loading Information label and its location on your
vehicle. Also see Inflation - Tire Pressure on page 6‑71.
Your vehicle's TPMS can warn you about a low tire
pressure condition but it does not replace normal tire
maintenance. See Tire Inspection and Rotation
on
page 6‑78and Tires on page 6‑62.
Notice: Liquid tire sealants could damage the Tire
Pressure Monitor System (TPMS) sensors. Sensor
damage caused by using a tire sealant is not
covered by your warranty. Do not use liquid tire
sealants.
6-75
Page 454 of 550
You need new tires if any of the following statements
are true:
.You can see the indicators at three or more places
around the tire.
.You can see cord or fabric showing through the
tire's rubber.
.The tread or sidewall is cracked, cut, or snagged
deep enough to show cord or fabric.
.The tire has a bump, bulge, or split.
.The tire has a puncture, cut, or other damage that
cannot be repaired well because of the size or
location of the damage.
The rubber in tires degrades over time, even if they are
not being used. This is also true for the spare tire,
if your vehicle has one. Multiple conditions affect how
fast this aging takes place, including temperatures,
loading conditions, and inflation pressure maintenance.
With proper care and maintenance tires will typically
wear out before they degrade due to age. If you are
unsure about the need to replace your tires as they get
older, consult the tire manufacturer for more information.
Buying New Tires
GM has developed and matched specific tires for your
vehicle. The original equipment tires installed on your
vehicle, when it was new, were designed to meet
General Motors Tire Performance Criteria Specification
(TPC spec) system rating. If you need replacement
tires, GM strongly recommends that you get tires with
the same TPC Spec rating. This way, your vehicle will
continue to have tires that are designed to give the
same performance and vehicle safety, during normal
use, as the original tires.
GM's exclusive TPC Spec system considers over a
dozen critical specifications that impact the overall
performance of your vehicle, including brake system
performance, ride and handling, traction control, and tire
pressure monitoring performance. GM's TPC Spec
number is molded onto the tire's sidewall near the tire
size. If the tires have an all‐season tread design, the
TPC spec number will be followed by an MS for mud
and snow. See Tire Sidewall Labeling
on page 6‑63for
additional information.
GM recommends replacing tires in sets of four. This is
because uniform tread depth on all tires will help keep
your vehicle performing most like it did when the tires
were new. Replacing less than a full set of tires can
affect the braking and handling performance of your
vehicle. See Tire Inspection and Rotation
on page 6‑78for information on proper tire rotation.
6-80
Page 455 of 550
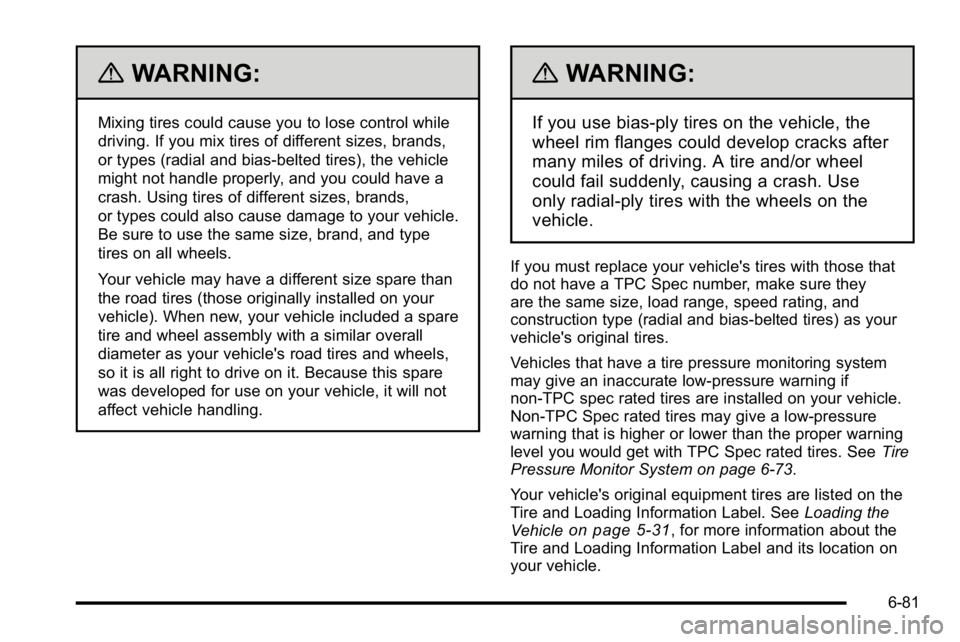
{WARNING:
Mixing tires could cause you to lose control while
driving. If you mix tires of different sizes, brands,
or types (radial and bias-belted tires), the vehicle
might not handle properly, and you could have a
crash. Using tires of different sizes, brands,
or types could also cause damage to your vehicle.
Be sure to use the same size, brand, and type
tires on all wheels.
Your vehicle may have a different size spare than
the road tires (those originally installed on your
vehicle). When new, your vehicle included a spare
tire and wheel assembly with a similar overall
diameter as your vehicle's road tires and wheels,
so it is all right to drive on it. Because this spare
was developed for use on your vehicle, it will not
affect vehicle handling.
{WARNING:
If you use bias-ply tires on the vehicle, the
wheel rim flanges could develop cracks after
many miles of driving. A tire and/or wheel
could fail suddenly, causing a crash. Use
only radial-ply tires with the wheels on the
vehicle.
If you must replace your vehicle's tires with those that
do not have a TPC Spec number, make sure they
are the same size, load range, speed rating, and
construction type (radial and bias‐belted tires) as your
vehicle's original tires.
Vehicles that have a tire pressure monitoring system
may give an inaccurate low‐pressure warning if
non‐TPC spec rated tires are installed on your vehicle.
Non‐TPC Spec rated tires may give a low‐pressure
warning that is higher or lower than the proper warning
level you would get with TPC Spec rated tires. SeeTire
Pressure Monitor System on page 6‑73.
Your vehicle's original equipment tires are listed on the
Tire and Loading Information Label. See Loading the
Vehicle
on page 5‑31, for more information about the
Tire and Loading Information Label and its location on
your vehicle.
6-81