2010 GMC SIERRA DENALI radio
[x] Cancel search: radioPage 133 of 550

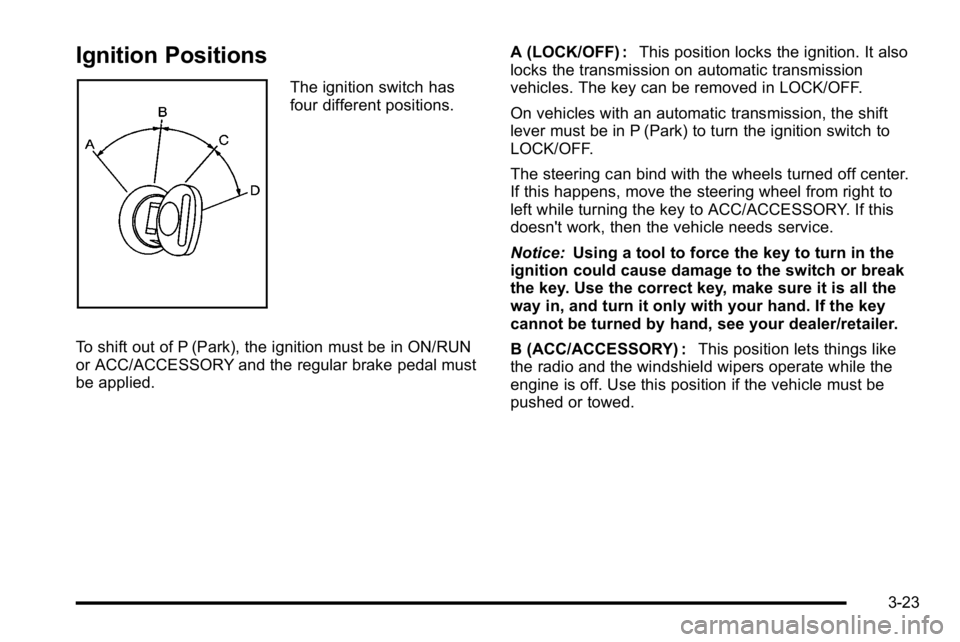
Ignition Positions
The ignition switch has
four different positions.
To shift out of P (Park), the ignition must be in ON/RUN
or ACC/ACCESSORY and the regular brake pedal must
be applied. A (LOCK/OFF) :
This position locks the ignition. It also
locks the transmission on automatic transmission
vehicles. The key can be removed in LOCK/OFF.
On vehicles with an automatic transmission, the shift
lever must be in P (Park) to turn the ignition switch to
LOCK/OFF.
The steering can bind with the wheels turned off center.
If this happens, move the steering wheel from right to
left while turning the key to ACC/ACCESSORY. If this
doesn't work, then the vehicle needs service.
Notice: Using a tool to force the key to turn in the
ignition could cause damage to the switch or break
the key. Use the correct key, make sure it is all the
way in, and turn it only with your hand. If the key
cannot be turned by hand, see your dealer/retailer.
B (ACC/ACCESSORY) : This position lets things like
the radio and the windshield wipers operate while the
engine is off. Use this position if the vehicle must be
pushed or towed.
3-23
Page 134 of 550

C (ON/RUN) :This position can be used to operate the
electrical accessories and to display some instrument
panel cluster warning and indicator lights. The switch
stays in this position when the engine is running. The
transmission is also unlocked in this position on
automatic transmission vehicles.
If you leave the key in the ACC/ACCESSORY or ON/
RUN position with the engine off, the battery could be
drained. You may not be able to start the vehicle if the
battery is allowed to drain for an extended period
of time.
D (START) : This is the position that starts the engine.
When the engine starts, release the key. The ignition
switch returns to ON/RUN for driving.
A warning tone will sound when the driver door is
opened, the ignition is in ACC/ACCESSORY or LOCK/
OFF and the key is in the ignition.Retained Accessory Power (RAP)
The following vehicle accessories can be used for up to
10 minutes after the engine is turned off:
.Audio System
.Power Windows
.OnStar®System (if equipped)
.Sunroof (if equipped)
These features work when the key is in ON/RUN or
ACC/ACCESSORY. Once the key is turned from ON/
RUN to LOCK/OFF, the windows and sunroof continue
to work up to 10 minutes until any door is opened. The
radio continues to work for up to 10 minutes or until the
driver door is opened.
Starting the Engine
Move the shift lever to P (Park) or N (Neutral). The
engine will not start in any other position. To restart the
engine when the vehicle is already moving, use
N (Neutral) only.
Notice: Do not try to shift to P (Park) if the vehicle is
moving. If you do, you could damage the
transmission. Shift to P (Park) only when the vehicle
is stopped.
3-24
Page 154 of 550

The system can be
disabled by pressing the
rear park aid disable
button located next to the
radio.
The indicator light will come on and PARK ASSIST OFF
displays on the Driver Information Center (DIC) to
indicate that URPA is off, see DIC Warnings and
Messages on page 4‑57.
Notice: If you use URPA while the tailgate is
lowered, it may not detect an object behind your
vehicle, and you might back into the object and
damage your vehicle. Always verify the tailgate is
closed when using URPA or turn off URPA when
driving with the tailgate lowered.
When the System Does Not Seem to
Work Properly
If the URPA system will not activate due to a temporary
condition, the messages PARK ASSIST OFF or PARK
ASST BLOCKED SEE OWNERS MANUAL will be
displayed on the DIC.
SERVICE PARK ASSIST : If this message occurs, take
the vehicle to your dealer/retailer to repair the system. PARK ASSIST OFF :
This message occurs if the driver
disables the system.
PARK ASST BLOCKED SEE OWNERS MANUAL :
This message can occur under the following conditions:
.The ultrasonic sensors are not clean. Keep the
vehicle's rear bumper free of mud, dirt, snow, ice
and slush. For cleaning instructions, see Washing
Your Vehicle on page 6‑108.
.The park assist sensors are covered by frost or
ice. Frost or ice can form around and behind the
sensors and may not always be seen; this can
occur after washing the vehicle in cold weather.
The message may not clear until the frost or ice
has melted.
.A trailer was attached to the vehicle, or a bicycle or
an object was hanging out of the tailgate during the
last drive cycle. Once the attached object is
removed and the tailgate is raised, URPA will
return to normal operation.
.A tow bar is attached to the vehicle.
.The vehicle's bumper is damaged. Take the vehicle
to your dealer/retailer to repair the system.
.Other conditions may affect system performance,
such as vibrations from a jackhammer or the
compression of air brakes on a very large truck.
3-44
Page 161 of 550

Universal Home Remote
System
SeeRadio Frequency Statementon page 8‑20for
information regarding Part 15 of the Federal
Communications Commission (FCC) Rules and
RSS-210/211 of Industry and Science Canada.
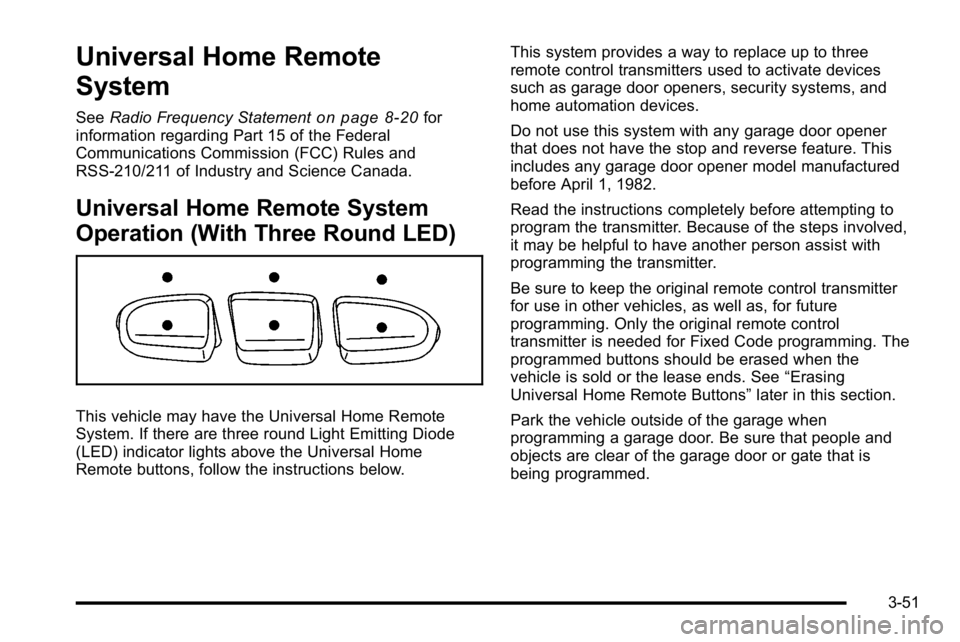
Universal Home Remote System
Operation (With Three Round LED)
This vehicle may have the Universal Home Remote
System. If there are three round Light Emitting Diode
(LED) indicator lights above the Universal Home
Remote buttons, follow the instructions below. This system provides a way to replace up to three
remote control transmitters used to activate devices
such as garage door openers, security systems, and
home automation devices.
Do not use this system with any garage door opener
that does not have the stop and reverse feature. This
includes any garage door opener model manufactured
before April 1, 1982.
Read the instructions completely before attempting to
program the transmitter. Because of the steps involved,
it may be helpful to have another person assist with
programming the transmitter.
Be sure to keep the original remote control transmitter
for use in other vehicles, as well as, for future
programming. Only the original remote control
transmitter is needed for Fixed Code programming. The
programmed buttons should be erased when the
vehicle is sold or the lease ends. See
“Erasing
Universal Home Remote Buttons” later in this section.
Park the vehicle outside of the garage when
programming a garage door. Be sure that people and
objects are clear of the garage door or gate that is
being programmed.
3-51
Page 174 of 550

Section 4 Instrument Panel
Malfunction Indicator Lamp . . . . . . . . . . . . . . . . . . . . 4-38
Oil Pressure Gage . . . . . . . . . . . . . . . . . . . . . . . . . . . . . 4-40
Oil Pressure Light . . . . . . . . . . . . . . . . . . . . . . . . . . . . . 4-41
Security Light . . . . . . . . . . . . . . . . . . . . . . . . . . . . . . . . . . 4-42
Fog Lamp Light . . . . . . . . . . . . . . . . . . . . . . . . . . . . . . . . 4-42
Cruise Control Light . . . . . . . . . . . . . . . . . . . . . . . . . . . 4-42
Highbeam On Light . . . . . . . . . . . . . . . . . . . . . . . . . . . . 4-42
Tow/Haul Mode Light . . . . . . . . . . . . . . . . . . . . . . . . . . 4-43
Fuel Gage . . . . . . . . . . . . . . . . . . . . . . . . . . . . . . . . . . . . . 4-43
Driver Information Center (DIC) . . . . . . . . . . . . . . . . . .4-44
DIC Operation and Displays (Using Trip Odometer Reset Stem) . . . . . . . . . . . . . . . . . . . . . . 4-44
DIC Operation and Displays (Using DIC Buttons) . . . . . . . . . . . . . . . . . . . . . . . . . . . . . . . . . . . . . 4-48
DIC Compass . . . . . . . . . . . . . . . . . . . . . . . . . . . . . . . . . . 4-55
DIC Warnings and Messages . . . . . . . . . . . . . . . . . . 4-57
DIC Vehicle Customization (With DIC Buttons) . . . . . . . . . . . . . . . . . . . . . . . . . . . . . . . . . . . . . 4-67 Audio System(s)
. . . . . . . . . . . . . . . . . . . . . . . . . . . . . . . . . . 4-76
Setting the Clock . . . . . . . . . . . . . . . . . . . . . . . . . . . . . . 4-77
Radio(s) . . . . . . . . . . . . . . . . . . . . . . . . . . . . . . . . . . . . . . . 4-79
Using an MP3 (Radios with CD) . . . . . . . . . . . . . . . 4-99
Using an MP3 (Radios with CD and DVD) . . . . 4-106
XM Radio Messages . . . . . . . . . . . . . . . . . . . . . . . . . 4-114
Navigation/Radio System . . . . . . . . . . . . . . . . . . . . . 4-115
Bluetooth
®. . . . . . . . . . . . . . . . . . . . . . . . . . . . . . . . . . . . 4-115
Rear Seat Entertainment (RSE) System . . . . . . 4-126
Rear Seat Audio (RSA) . . . . . . . . . . . . . . . . . . . . . . . 4-135
Theft-Deterrent Feature . . . . . . . . . . . . . . . . . . . . . . 4-136
Audio Steering Wheel Controls . . . . . . . . . . . . . . . 4-137
Radio Reception . . . . . . . . . . . . . . . . . . . . . . . . . . . . . . 4-139
Fixed Mast Antenna . . . . . . . . . . . . . . . . . . . . . . . . . . 4-140
XM™ Satellite Radio Antenna System . . . . . . . . 4-140
4-2
Page 184 of 550

Automatic Headlamp System
When it is dark enough outside, the automatic
headlamp system turns on the headlamps at the normal
brightness, along with the taillamps, sidemarker, parking
lamps, and the instrument panel lights. The radio lights
will also be dim.
To turn off the automatic headlamp system, turn the
exterior lamps switch to the off position and then
release it. For vehicles first sold in Canada, the
transmission must be in the P (Park) position, before the
automatic headlamp system can be turned off.
The vehicle has a light sensor located on the top of the
instrument panel in the defroster grille that regulates
when the automatic headlamps turn on. Do not cover
the sensor or the headlamps will come on whenever the
ignition is on.
The system may also turn on the headlamps when
driving through a parking garage, heavy overcast
weather, or a tunnel. This is normal.
There is a delay in the transition between the daytime
and nighttime operation of the Daytime Running Lamps
(DRL) and the automatic headlamp systems so that
driving under bridges or bright overhead street lightsdoes not affect the system. The DRL and automatic
headlamp system is only affected when the light sensor
detects a change in lighting lasting longer than the
delay.
If the vehicle is started in a dark garage, the automatic
headlamp system will come on immediately. Once the
vehicle leaves the garage, it takes approximately
one minute for the automatic headlamp system to
change to DRL if it is bright enough outside. During that
delay, the instrument panel cluster may not be as bright
as usual. Make sure the instrument panel brightness
control is in the full bright position. See
Instrument
Panel Brightness on page 4‑13.
To idle the vehicle with the automatic headlamp system
off, turn the control to the off position.
The headlamps will also stay on after you exit the
vehicle. This feature can be programmed using the
Driver Information Center (DIC). See DIC Vehicle
Customization (With DIC Buttons) on page 4‑67.
The regular headlamp system can be turned on when
needed.
4-12
Page 205 of 550

Charging System Light
This light comes on briefly
when the ignition key is
turned to START, but the
engine is not running, as
a check to show it is
working.
If it does not, have the vehicle serviced by your dealer/
retailer.
The light should go out once the engine starts. If it stays
on, or comes on while driving, there could be a problem
with the charging system. A charging system message
in the Driver Information Center (DIC) can also appear.
See DIC Warnings and Messages
on page 4‑57for
more information. This light could indicate that there are
problems with a generator drive belt, or that there is an
electrical problem. Have it checked right away. If the
vehicle must be driven a short distance with the light on,
turn off accessories, such as the radio and air
conditioner.
Voltmeter Gage
When the engine is not
running, but the ignition is
on, this gage shows the
battery's state of charge
in DC volts.
When the engine is running, the gage shows the
condition of the charging system. The gage can
transition from a higher to lower or a lower to higher
reading. This is normal. Readings between the low and
high warning zones indicate the normal operating
range.
4-33
Page 248 of 550

Audio System(s)
Determine which radio the vehicle has and read the
following pages to become familiar with its features.
{WARNING:
Taking your eyes off the road for extended periods
could cause a crash resulting in injury or death to
you or others. Do not give extended attention to
entertainment tasks while driving.
This system provides access to many audio and non
audio listings. To minimize taking your eyes off the road while driving,
do the following while the vehicle is parked:
.Become familiar with the operation and controls of
the audio system.
.Set up the tone, speaker adjustments, and preset
radio stations.
For more information, see Defensive Driving
on
page 5‑2.
Notice: Contact your dealer/retailer before adding
any equipment.
Adding audio or communication equipment could
interfere with the operation of the vehicle's engine,
radio, or other systems, and could damage them.
Follow federal rules covering mobile radio and
telephone equipment.
The vehicle has Retained Accessory Power (RAP). With
RAP, the audio system can be played even after the
ignition is turned off. See Retained Accessory Power
(RAP)
on page 3‑24for more information.
4-76