2010 GMC SIERRA DENALI change wheel
[x] Cancel search: change wheelPage 324 of 550
While driving on a surface with reduced traction, try
your best to avoid sudden steering, acceleration,
or braking, including reducing vehicle speed by shifting
to a lower gear. Any sudden changes could cause the
tires to slide. You might not realize the surface is
slippery until the vehicle is skidding. Learn to recognize
warning clues—such as enough water, ice, or packed
snow on the road to make a mirrored surface —and
slow down when you have any doubt.
Remember: Antilock brakes help avoid only the
braking skid.
Off-Road Driving
Vehicles with 20‐inch tire/wheel assemblies should not
be driven off-road except on a level, solid surface.
Many of the vehicle design features that help make the
vehicle more responsive on paved roads during poor
weather conditions also help make it better suited for
off‐road use than conventional passenger vehicles.
The vehicle does not have features usually thought to
be necessary for extended or severe off‐road use such
as special underbody shielding and transfer case low
gear range. The airbag system is designed to work properly under a
wide range of conditions, including off‐road usage.
Always wear your safety belt and observe safe driving
speeds, especially on rough terrain.
Drinking and driving can be very dangerous on any
road and this is certainly true for off-road driving. At the
very time you need special alertness and driving skills,
your reflexes, perceptions, and judgment can be
affected by even a small amount of alcohol. You could
have a serious
—or even fatal —accident if you drink
and drive or ride with a driver who has been drinking.
Off-roading can be great fun but has some definite
hazards. The greatest of these is the terrain itself. When
off-road driving, traffic lanes are not marked, curves are
not banked, and there are no road signs. Surfaces can
be slippery, rough, uphill, or downhill.
Avoid sharp turns and abrupt maneuvers. Failure to
operate the vehicle correctly off‐road could result in loss
of vehicle control or vehicle rollover.
Off-roading involves some new skills. That is why it is
very important that you read these driving tips and
suggestions to help make off-road driving safer and
more enjoyable.
5-12
Page 328 of 550
Controlling the vehicle is the key to successful off-road
driving. One of the best ways to control the vehicle is to
control the speed. At higher speeds:
.You approach things faster and have less time to
react.
.There is less time to scan the terrain for obstacles.
.The vehicle has more bounce when driving over
obstacles.
.More braking distance is needed, especially on an
unpaved surface.
{WARNING:
When you are driving off-road, bouncing and
quick changes in direction can easily throw you
out of position. This could cause you to lose
control and crash. So, whether you are driving on
or off the road, you and your passengers should
wear safety belts.
Scanning the Terrain
Off-road driving can take you over many different kinds
of terrain. Be familiar with the terrain and its many
different features.
Surface Conditions :Off-roading surfaces can be
hard-packed dirt, gravel, rocks, grass, sand, mud, snow,
or ice. Each of these surfaces affects the vehicle's
steering, acceleration, and braking in different ways.
Depending on the surface, slipping, sliding, wheel
spinning, delayed acceleration, poor traction, and longer
braking distances can occur.
Surface Obstacles : Unseen or hidden obstacles can
be hazardous. A rock, log, hole, rut, or bump can startle
you if you are not prepared for them. Often these
obstacles are hidden by grass, bushes, snow, or even
the rise and fall of the terrain itself.
Some things to consider:
.Is the path ahead clear?
.Will the surface texture change abruptly up ahead?
.Does the travel take you uphill or downhill?
.Will you have to stop suddenly or change direction
quickly?
5-16
Page 330 of 550
Approaching a Hill
When you approach a hill, decide if it is too steep to
climb, descend, or cross. Steepness can be hard to
judge. On a very small hill, for example, there may be a
smooth, constant incline with only a small change in
elevation where you can easily see all the way to the
top. On a large hill, the incline may get steeper as you
near the top, but you might not see this because the
crest of the hill is hidden by bushes, grass, or shrubs.
Consider this as you approach a hill:
.Is there a constant incline, or does the hill get
sharply steeper in places?
.Is there good traction on the hillside, or will the
surface cause tire slipping?
.Is there a straight path up or down the hill so you
will not have to make turning maneuvers?
.Are there obstructions on the hill that can block
your path, such as boulders, trees, logs, or ruts?
.What is beyond the hill? Is there a cliff, an
embankment, a drop-off, a fence? Get out and
walk the hill if you do not know. It is the smart way
to find out.
.Is the hill simply too rough? Steep hills often have
ruts, gullies, troughs, and exposed rocks because
they are more susceptible to the effects of erosion.
Driving Uphill
Once you decide it is safe to drive up the hill:
.Use a low gear and get a firm grip on the steering
wheel.
.Get a smooth start up the hill and try to maintain
speed. Not using more power than needed can
avoid spinning the wheels or sliding.
{WARNING:
Turning or driving across steep hills can be
dangerous. You could lose traction, slide
sideways, and possibly roll over. You could be
seriously injured or killed. When driving up hills,
always try to go straight up.
.Try to drive straight up the hill if at all possible.
If the path twists and turns, you might want to find
another route.
.Ease up on the speed as you approach the top of
the hill.
.Attach a flag to the vehicle to be more visible to
approaching traffic on trails or hills.
5-18
Page 334 of 550
Stalling on an Incline
{WARNING:
Getting out on the downhill (low) side of a vehicle
stopped across an incline is dangerous. If the
vehicle rolls over, you could be crushed or killed.
Always get out on the uphill (high) side of the
vehicle and stay well clear of the rollover path.
If the vehicle stalls when crossing an incline, be sure
you, and any passengers, get out on the uphill side,
even if the door there is harder to open. If you get out
on the downhill side and the vehicle starts to roll over,
you will be right in its path.
If you have to walk down the slope, stay out of the path
the vehicle will take if it does roll over.
Driving in Mud, Sand, Snow, or Ice
When you drive in mud, snow, or sand, the wheels do
not get good traction. Acceleration is not as quick,
turning is more difficult, and braking distances are
longer.
It is best to use a low gear when in mud —the deeper
the mud, the lower the gear. In really deep mud, keep
the vehicle moving so it does not get stuck. When driving on sand, wheel traction changes. On
loosely packed sand, such as on beaches or sand
dunes, the tires will tend to sink into the sand. This
affects steering, accelerating, and braking. Drive at a
reduced speed and avoid sharp turns or abrupt
maneuvers.
Hard packed snow and ice offer the worst tire traction.
On these surfaces, it is very easy to lose control. On
wet ice, for example, the traction is so poor that you will
have difficulty accelerating. And, if the vehicle does get
moving, poor steering and difficult braking can cause it
to slide out of control.
{WARNING:
Driving on frozen lakes, ponds, or rivers can be
dangerous. Underwater springs, currents under
the ice, or sudden thaws can weaken the ice. Your
vehicle could fall through the ice and you and your
passengers could drown. Drive your vehicle on
safe surfaces only.
5-22
Page 366 of 550

6. Adjust the Trailer Gain to just below the point oftrailer wheel lock-up, indicated by trailer wheel
squeal or tire smoke when a trailer wheel locks.
Trailer wheel lock-up may not occur if towing a
heavily loaded trailer. In this case, adjust the
Trailer Gain to the highest allowable setting for the
towing condition.
7. Re-adjust Trailer Gain any time vehicle loading, trailer loading or road surface conditions change or
if trailer wheel lock-up is noticed at any time while
towing.
Other ITBC Related DIC Messages
In addition to displaying TRAILER GAIN and TRAILER
OUTPUT through the DIC, trailer connection and ITBC
system status is displayed in the DIC.
TRAILER CONNECTED –This message will be briefly
displayed when a trailer with electric brakes is first
connected to the vehicle. This message will
automatically turn off in about ten seconds. The driver
can also acknowledge this message before it
automatically turns off. CHECK TRAILER WIRING
–This message will be
displayed if:
1. The ITBC system first determines connection to a trailer with electric brakes and then the trailer
harness becomes disconnected from the vehicle.
If the disconnect occurs while the vehicle is
stationary, this message will automatically turn off
in about thirty seconds. This message will also turn
off if the driver acknowledges this message off or if
the trailer harness is re-connected.
If the disconnect occurs while the vehicle is
moving, this message will continue until the ignition
is turned off. This message will also turn off if the
driver acknowledges this message off or if the
trailer harness is re-connected.
2. There is an electrical fault in the wiring to the electric trailer brakes. This message will continue
as long as there is an electrical fault in the trailer
wiring. This message will also turn off if the driver
acknowledges this message off.
5-54
Page 453 of 550
Reset the Tire Pressure Monitor System. SeeTire
Pressure Monitor Operation
on page 6‑74.
Make certain that all wheel nuts are properly
tightened. See “Wheel Nut Torque” under
Capacities and Specifications
on page 6‑122.
{WARNING:
Rust or dirt on a wheel, or on the parts to
which it is fastened, can make wheel nuts
become loose after time. The wheel could
come off and cause an accident. When you
change a wheel, remove any rust or dirt from
places where the wheel attaches to the
vehicle. In an emergency, you can use a
cloth or a paper towel to do this; but be sure
to use a scraper or wire brush later,
if needed, to get all the rust or dirt off. See
Changing a Flat Tire
on page 6‑86.
Make sure the spare tire is stored securely. Push,
pull, and then try to rotate or turn the tire. If it
moves, tighten the cable. See Storing a Flat or
Spare Tire and Tools
on page 6‑100.
When It Is Time for New Tires
Various factors, such as maintenance, temperatures,
driving speeds, vehicle loading, and road conditions,
influence when you need new tires.
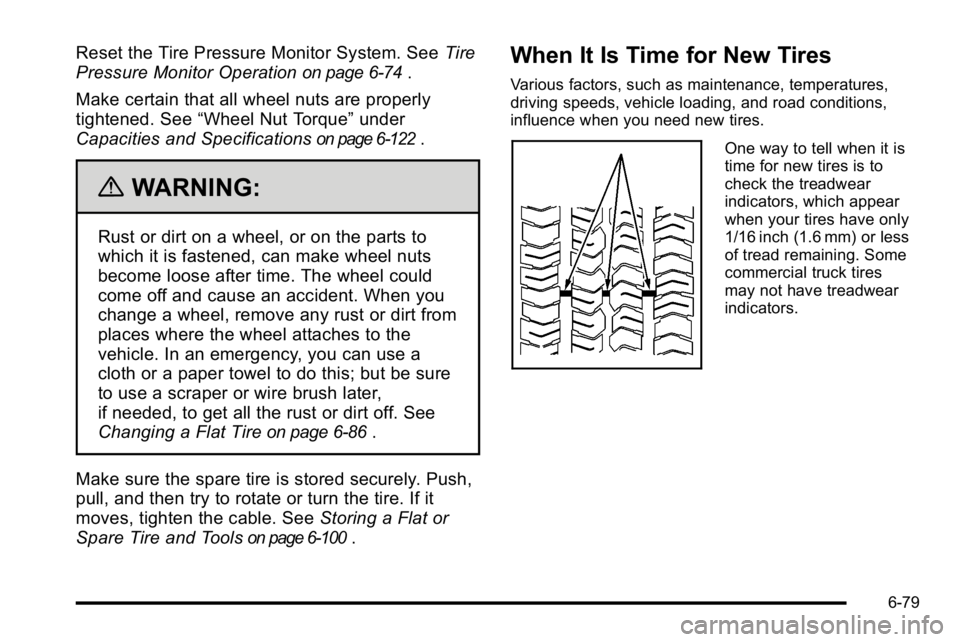
One way to tell when it is
time for new tires is to
check the treadwear
indicators, which appear
when your tires have only
1/16 inch (1.6 mm) or less
of tread remaining. Some
commercial truck tires
may not have treadwear
indicators.
6-79
Page 460 of 550
A rear blowout, particularly on a curve, acts much like a
skid and may require the same correction you would
use in a skid. In any rear blowout remove your foot from
the accelerator pedal. Get the vehicle under control by
steering the way you want the vehicle to go. It may be
very bumpy and noisy, but you can still steer. Gently
brake to a stop, well off the road if possible.
{WARNING:
Lifting a vehicle and getting under it to do
maintenance or repairs is dangerous without the
appropriate safety equipment and training. If a
jack is provided with the vehicle, it is designed
only for changing a flat tire. If it is used for
anything else, you or others could be badly
injured or killed if the vehicle slips off the jack. If a
jack is provided with the vehicle, only use it for
changing a flat tire.
If a tire goes flat, the next part shows how to use the
jacking equipment to change a flat tire safely.
Changing a Flat Tire
If a tire goes flat, avoid further tire and wheel damage
by driving slowly to a level place. Turn on the hazard
warning flashers. See Hazard Warning Flashers
on
page 4‑3.
{WARNING:
Changing a tire can be dangerous. The vehicle
can slip off the jack and roll over or fall on you or
other people. You and they could be badly injured
or even killed. Find a level place to change your
tire. To help prevent the vehicle from moving:
1. Set the parking brake firmly.
2. Put an automatic transmission shift lever in P (Park), or shift a manual transmission to
1 (First) or R (Reverse).
3. If you have a four-wheel-drive vehicle, be sure the transfer case is in a drive gear –not in
N (Neutral).
(Continued)
6-86
Page 461 of 550
WARNING: (Continued)
4. Turn off the engine and do not restart whilethe vehicle is raised.
5. Do not allow passengers to remain in the vehicle.
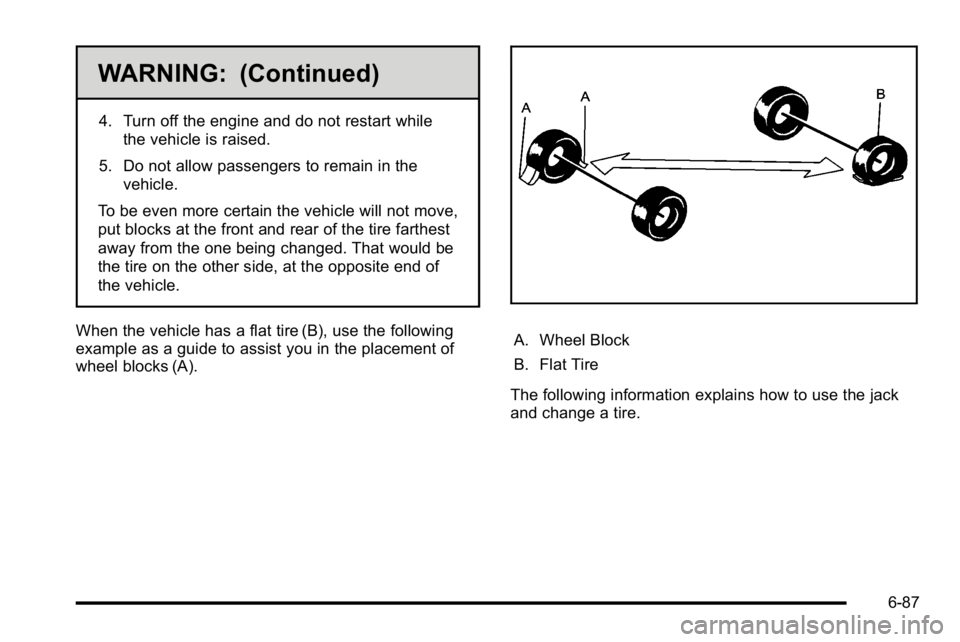
To be even more certain the vehicle will not move,
put blocks at the front and rear of the tire farthest
away from the one being changed. That would be
the tire on the other side, at the opposite end of
the vehicle.
When the vehicle has a flat tire (B), use the following
example as a guide to assist you in the placement of
wheel blocks (A).
A. Wheel Block
B. Flat Tire
The following information explains how to use the jack
and change a tire.
6-87