2010 GMC SAVANA service
[x] Cancel search: servicePage 285 of 424
How to Add Automatic Transmission
Fluid
Refer to the Maintenance Schedule to determine what
kind of transmission fluid to use. SeeRecommended
Fluids and Lubricants on page 7-11.
Using a funnel, add fluid down the transmission dipstick
tube only after checking the transmission fluid while it
is hot. A cold check is used only as a reference. If
the fluid level is low, add only enough of the proper fluid
to bring the level up to the HOT area for a hot check.
It does not take much fluid, generally less than one pint
(0.5 L). Do not overfill.
Notice:Use of the incorrect automatic transmission
�uid may damage the vehicle, and the damages
may not be covered by the vehicle’s warranty.
Always use the automatic transmission �uid listed
inRecommended Fluids and Lubricants on
page 7-11.
•After adding fluid, recheck the fluid level as
described under “How to Check Automatic
Transmission Fluid,” earlier in this section.
•When the correct fluid level is obtained, push the
dipstick back in all the way; then flip the handle
down to lock the dipstick in place.
Automatic Transmission Fluid
(6-Speed Transmission)
When to Check and Change Automatic
Transmission Fluid
It is usually not necessary to check the transmission
fluid level. The only reason for fluid loss is a
transmission leak or overheating the transmission. If a
small leak is suspected, use the following procedures to
check the fluid level. However, if there is a large leak,
then it may be necessary to have the vehicle towed to a
dealer/retailer service department and have it repaired
before driving the vehicle further.
Change the fluid and filter at the intervals listed in
Scheduled Maintenance on page 7-3, and be sure to
use the transmission fluid listed inRecommended Fluids
and Lubricants on page 7-11.
How to Check Automatic Transmission
Fluid
Because this operation can be difficult, it is
recommended to have this check done at the
dealer/retailer service department, which can monitor
the transmission temperature. The transmission
fluid level increases with temperature. To obtain a highly
accurate fluid level check, the transmission temperature
must be measured.
6-23
Page 291 of 424

Checking Coolant
The vehicle must be on a level surface when checking
the coolant level.
Check to see if coolant is visible in the coolant recovery
tank. If the coolant inside the coolant recovery tank is
boiling, do not do anything else until it cools down.
If coolant is visible but the coolant level is not at
or above the COLD FILL mark, add a 50/50 mixture of
clean, drinkable water and DEX-COOL
®coolant at
the coolant recovery tank, but be sure the cooling
system is cool before this is done.
When the engine is cold, the coolant level should be at
or above the COLD FILL mark. If it is not, there could
be a leak in the cooling system.
If the coolant is low, add the coolant or take the vehicle
to a dealer/retailer for service.
How to Add Coolant to the Recovery
Tank for Gasoline Engines
If your vehicle has a diesel engine, see “How to Add
Coolant to the Coolant Recovery Tank” under “Van
Models” in the Cooling System section of the
DURAMAX
®Diesel Supplement for the proper coolant
fill procedure.
{WARNING:
You can be burned if you spill coolant on hot
engine parts. Coolant contains ethylene glycol and
it will burn if the engine parts are hot enough. Do
not spill coolant on a hot engine.
Notice:This vehicle has a speci�c coolant �ll
procedure. Failure to follow this procedure could
cause the engine to overheat and be severely
damaged.
If coolant is needed, add the proper DEX-COOL
®
coolant mixture at the coolant recovery tank.
6-29
Page 295 of 424

Engine Overheating
If your vehicle has the DURAMAX Diesel engine, see
the DURAMAX Diesel manual for more information.
The vehicle has an indicator to warn of engine
overheating.
You will find an engine coolant temperature gage on
your vehicle’s instrument panel. SeeEngine Coolant
Temperature Gage on page 4-30for more information.
You may decide not to lift the hood when this warning
appears, but instead get service help right away.
SeeRoadside Assistance Program on page 8-6.
If you do decide to lift the hood, make sure the vehicle
is parked on a level surface.
Then check to see if the engine cooling fans are
running. If the engine is overheating, both fans should
be running. If they are not, do not continue to run
the engine and have the vehicle serviced.
See if the engine cooling fan speed increases when idle
speed is doubled by pushing the accelerator pedal
down. If it does not, your vehicle needs service. Turn off
the engine.Notice:Engine damage from running the engine
without coolant is not covered by the warranty.
Notice:If the engine catches �re because of being
driven with no coolant, your vehicle can be badly
damaged. The costly repairs would not be covered
by the vehicle warranty.
If Steam Is Coming From The Engine
Compartment
{WARNING:
Steam from an overheated engine can burn you
badly, even if you just open the hood. Stay away
from the engine if you see or hear steam coming
from it. Just turn it off and get everyone away from
the vehicle until it cools down. Wait until there is no
sign of steam or coolant before you open the hood.
If you keep driving when your engine is overheated,
the liquids in it can catch fire. You or others could
be badly burned. Stop your engine if it overheats,
and get out of the vehicle until the engine is cool.
6-33
Page 296 of 424
If No Steam Is Coming From The
Engine Compartment
If an engine overheat warning is displayed but no steam
can be seen or heard, the problem may not be too
serious. Sometimes the engine can get a little too hot
when the vehicle:
•Climbs a long hill on a hot day.
•Stops after high-speed driving.
•Idles for long periods in traffic.
•Tows a trailer. See “Driving on Grades” under
Towing a Trailer on page 5-26.
If the overheat warning is displayed with no sign of
steam:
1. Turn the air off.
2. Turn the heater on to the highest temperature and
to the highest fan speed. Open the windows as
necessary.
3. In heavy traffic, let the engine idle in N (Neutral)
while stopped. If it is safe to do so, pull off the
road, shift to P (Park) or N (Neutral) and let
the engine idle.
If the temperature overheat gage is no longer in the
overheat zone or an overheat warning no longer
displays, the vehicle can be driven. Continue to drive
the vehicle slow for about 10 minutes. Keep a safevehicle distance from the car in front of you. If the
warning does not come back on, continue to drive
normally.
If the warning continues, pull over, stop, and park the
vehicle right away.
If there is still no sign of steam, push down the
accelerator until the engine speed is about twice as fast
as normal idle speed for at least three minutes while
you are parked. If you still have the warning, turn off the
engine until it cools down.
You may decide not to lift the hood but to get service
help right away.
Engine Fan Noise
Your vehicle has a clutched engine cooling fan. When
the clutch is engaged, the fan spins faster to provide
more air to cool the engine. In most everyday driving
conditions, the fan is spinning slower and the clutch is
not fully engaged. This improves fuel economy and
reduces fan noise. Under heavy vehicle loading, trailer
towing, and/or high outside temperatures, the fan
speed increases as the clutch more fully engages, so
you may hear an increase in fan noise. This is
normal and should not be mistaken as the transmission
slipping or making extra shifts. It is merely the cooling
system functioning properly. The fan will slow down
when additional cooling is not required and the clutch
partially disengages.
6-34
Page 301 of 424
Brake Wear
This vehicle has disc brakes. Disc brake pads have
built-in wear indicators that make a high-pitched warning
sound when the brake pads are worn and new pads
are needed. The sound can come and go or be heard all
the time the vehicle is moving, except when applying
the brake pedal firmly.
{WARNING:
The brake wear warning sound means that soon
the brakes will not work well. That could lead to an
accident. When the brake wear warning sound is
heard, have the vehicle serviced.
Notice:Continuing to drive with worn-out brake
pads could result in costly brake repair.
Some driving conditions or climates can cause a brake
squeal when the brakes are first applied or lightly
applied. This does not mean something is wrong with
the brakes.
Properly torqued wheel nuts are necessary to help
prevent brake pulsation. When tires are rotated, inspect
brake pads for wear and evenly tighten wheel nuts in
the proper sequence to torque specifications in
Capacities and Speci�cations on page 6-110.Brake linings should always be replaced as complete
axle sets.
Brake Pedal Travel
See your dealer/retailer if the brake pedal does not
return to normal height, or if there is a rapid increase in
pedal travel. This could be a sign that brake service
might be required.
Brake Adjustment
Every brake stop, the brakes adjust for wear.
Replacing Brake System Parts
The braking system on a vehicle is complex. Its many
parts have to be of top quality and work well together if
the vehicle is to have really good braking. The vehicle
was designed and tested with top-quality brake parts.
When parts of the braking system are replaced — for
example, when the brake linings wear down and new
ones are installed — be sure to get new approved
replacement parts. If this is not done, the brakes might
not work properly. For example, if someone puts in brake
linings that are wrong for the vehicle, the balance
between the front and rear brakes can change — for the
worse. The braking performance expected can change in
many other ways if the wrong replacement brake parts
are installed.
6-39
Page 306 of 424
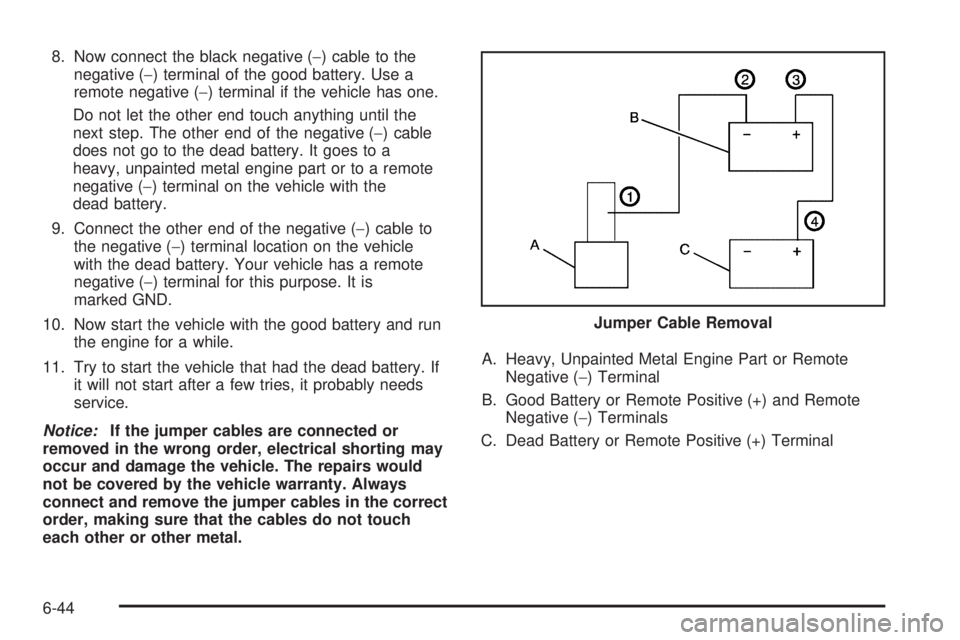
8. Now connect the black negative (−) cable to the
negative (−) terminal of the good battery. Use a
remote negative (−) terminal if the vehicle has one.
Do not let the other end touch anything until the
next step. The other end of the negative (−) cable
does not go to the dead battery. It goes to a
heavy, unpainted metal engine part or to a remote
negative (−) terminal on the vehicle with the
dead battery.
9. Connect the other end of the negative (−) cable to
the negative (−) terminal location on the vehicle
with the dead battery. Your vehicle has a remote
negative (−) terminal for this purpose. It is
marked GND.
10. Now start the vehicle with the good battery and run
the engine for a while.
11. Try to start the vehicle that had the dead battery. If
it will not start after a few tries, it probably needs
service.
Notice:If the jumper cables are connected or
removed in the wrong order, electrical shorting may
occur and damage the vehicle. The repairs would
not be covered by the vehicle warranty. Always
connect and remove the jumper cables in the correct
order, making sure that the cables do not touch
each other or other metal.A. Heavy, Unpainted Metal Engine Part or Remote
Negative (−) Terminal
B. Good Battery or Remote Positive (+) and Remote
Negative (−) Terminals
C. Dead Battery or Remote Positive (+) TerminalJumper Cable Removal
6-44
Page 317 of 424
Tires
Your new vehicle comes with high-quality tires
made by a leading tire manufacturer. If you ever
have questions about your tire warranty and where
to obtain service, see your vehicle Warranty
booklet for details. For additional information refer
to the tire manufacturer.
{WARNING:
Poorly maintained and improperly used tires
are dangerous.
•Overloading your vehicle’s tires can
cause overheating as a result of too
much flexing. You could have an air-out
and a serious accident. SeeLoading the
Vehicle on page 5-17.
•Underinflated tires pose the same danger
as overloaded tires. The resulting
accident could cause serious injury.
Check all tires frequently to maintain the
WARNING: (Continued)
WARNING: (Continued)
recommended pressure. Tire pressure
should be checked when your vehicle’s
tires are cold. SeeIn�ation - Tire
Pressure on page 6-63.
•Overinflated tires are more likely to be
cut, punctured, or broken by a sudden
impact — such as when you hit a
pothole. Keep tires at the recommended
pressure.
•Worn, old tires can cause accidents. If
the tire’s tread is badly worn, or if your
vehicle’s tires have been damaged,
replace them.
6-55
Page 318 of 424
Tire Sidewall Labeling
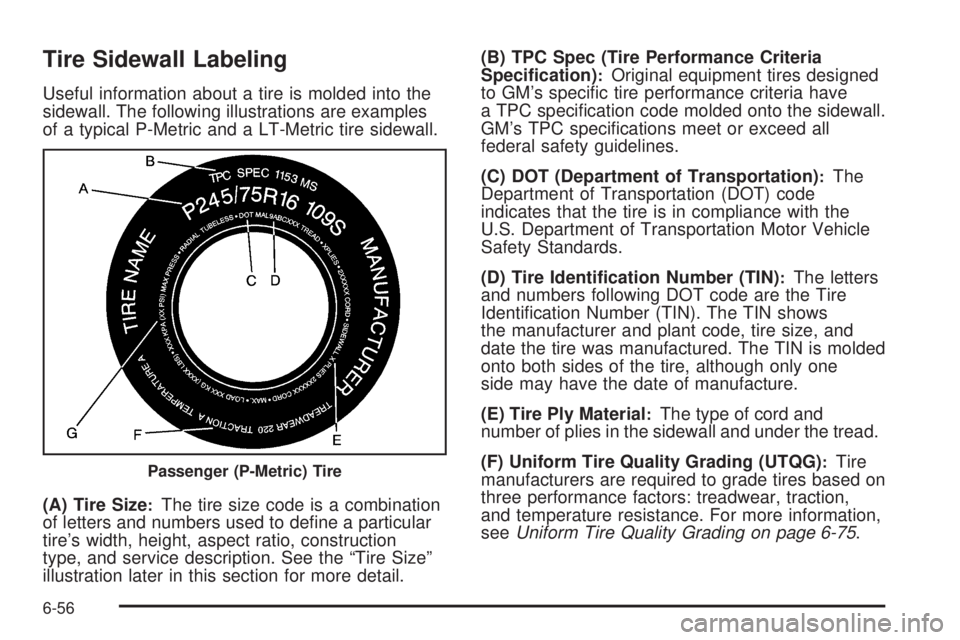
Useful information about a tire is molded into the
sidewall. The following illustrations are examples
of a typical P-Metric and a LT-Metric tire sidewall.
(A) Tire Size
:The tire size code is a combination
of letters and numbers used to define a particular
tire’s width, height, aspect ratio, construction
type, and service description. See the “Tire Size”
illustration later in this section for more detail.(B) TPC Spec (Tire Performance Criteria
Speci�cation)
:Original equipment tires designed
to GM’s specific tire performance criteria have
a TPC specification code molded onto the sidewall.
GM’s TPC specifications meet or exceed all
federal safety guidelines.
(C) DOT (Department of Transportation)
:The
Department of Transportation (DOT) code
indicates that the tire is in compliance with the
U.S. Department of Transportation Motor Vehicle
Safety Standards.
(D) Tire Identi�cation Number (TIN)
:The letters
and numbers following DOT code are the Tire
Identification Number (TIN). The TIN shows
the manufacturer and plant code, tire size, and
date the tire was manufactured. The TIN is molded
onto both sides of the tire, although only one
side may have the date of manufacture.
(E) Tire Ply Material
:The type of cord and
number of plies in the sidewall and under the tread.
(F) Uniform Tire Quality Grading (UTQG)
:Tire
manufacturers are required to grade tires based on
three performance factors: treadwear, traction,
and temperature resistance. For more information,
seeUniform Tire Quality Grading on page 6-75.Passenger (P-Metric) Tire
6-56