2010 GMC SAVANA display
[x] Cancel search: displayPage 219 of 424
•Minimize the length of the file, folder, or playlist
names. Long file, folder, or playlist names, or a
combination of a large number of files and folders,
or playlists could cause the player to be unable
to play up to the maximum number of files, folders,
playlists, or sessions. If you wish to play a large
number of files, folders, playlists or sessions,
minimize the length of the file, folder, or playlist
name. Long names also take up more space on the
display, potentially getting cut off.
•Finalize the audio disc before you burn it. Trying to
add music to an existing disc could cause the disc
not to function in the player.
Playlists can be changed by using the
Sc(previous)
and
cT(next) folder buttons, thefknob, or the
©SEEK¨arrows. You can also play an MP3 CD-R
or CD-RW that was recorded using no file folders. If
a CD-R or CD-RW contains more than the maximum of
50 folders, 15 playlists, and 512 folders and files, the
player lets you access and navigate up to the maximum,
but all items over the maximum are not accessible.
Root Directory
The root directory of the CD-R or CD-RW is treated as
a folder. If the root directory has compressed audio
files, the directory displays as the CD label. All
files contained directly under the root directory areaccessed prior to any root directory folders. However,
playlists (Px) are always accessed before root folders
or files.
If a disc contains both uncompressed CD audio (.CDA)
and MP3 files, a folder under the root directory called
CD accesses all of the CD audio tracks on the disc.
Empty Directory or Folder
If a root directory or a folder exists somewhere in the
file structure that contains only folders/subfolders and
no compressed files directly beneath them, the
player advances to the next folder in the file structure
that contains compressed audio files. The empty
folder does not display.
No Folder
When the CD contains only compressed files, the files
are located under the root folder. The next and previous
folder function does not display on a CD that was
recorded without folders or playlists.
When the CD contains only playlists and compressed
audio files, but no folders, all files are located under the
root folder. The folder down and up buttons search
playlists (Px) first and then goes to the root folder.
4-73
Page 220 of 424
Order of Play
Tracks recorded to the CD-R or CD-RW are played in
the following order:
•Play begins from the first track in the first playlist
and continues sequentially through all tracks in
each playlist. When the last track of the last playlist
has played, play continues from the first track of
the first playlist.
•Play begins from the first track in the first folder and
continues sequentially through all tracks in each
folder. When the last track of the last folder
has played, play continues from the first track of the
first folder.
When play enters a new folder, the display does not
automatically show the new folder name unless
you have chosen the folder mode as the default display.
The new track name displays.
File System and Naming
The song name that displays is the song name that is
contained in the ID3 tag. If the song name is not present
in the ID3 tag, then the radio displays the file name
without the extension (such as .mp3) as the track name.
Track names longer than 32 characters or four pages
are shortened. Parts of words on the last page of
text and the extension of the filename does not display.
Preprogrammed Playlists
Preprogrammed playlists that were created using
WinAmp™, MusicMatch™, or Real Jukebox™ software
can be accessed, however, they cannot be edited
using the radio. These playlists are treated as special
folders containing compressed audio song files.
Playing an MP3
Insert a CD-R or CD-RW partway into the slot (Single
CD Player), or press the load button and wait for
the message to insert disc (Six-Disc CD Player), label
side up. The player pulls it in, and the CD-R or CD-RW
should begin playing.
If the ignition or radio is turned off with a CD-R or
CD-RW in the player, it stays in the player. When the
ignition or radio is turned on, the CD-R or CD-RW starts
to play where it stopped, if it was the last selected
audio source.
As each new track starts to play, the track number and
song title displays.
ZEJECT:Press this button to eject CD-R(s) or
CD-RW(s). To eject the CD-R or CD-RW that is currently
playing, press and release this button. A beep sounds
and Ejecting Disc displays. Once the disc is ejected,
Remove Disc displays. The CD-R or CD-RW can be
removed. If the CD-R or CD-RW is not removed, after
several seconds, the CD-R or CD-RW automatically pulls
back into the player and begins playing.
4-74
Page 221 of 424
For the Six-Disc CD player, press and hold this button for
two seconds to eject all discs.
f(Tune):Turn this knob to select MP3 files on the
CD-R or CD-RW currently playing.
©SEEK¨:Press the left SEEK arrow to go to the
start of the current MP3 file, if more than 10 seconds
have played. Press the right arrow to go to the next MP3
file. If either SEEK arrow is held or pressed multiple
times, the player continues moving backward or forward
through MP3 files on the CD.
Sc(Previous Folder):Press the pushbutton
positioned under the Folder label to go to the first track in
the previous folder.
cT(Next Folder):Press the pushbutton positioned
under the Folder label to go to the first track in the next
folder.
sREV (Reverse):Press and hold this button to
reverse playback quickly within an MP3 file. Sound is
heard at a reduced volume. Release this button to
resume playing the file. The elapsed time of the file
displays.
\FWD (Fast Forward):Press and hold this button to
advance playback quickly within an MP3 file. Sound is
heard at a reduced volume. Release this button to
resume playing the file. The elapsed time of the file
displays.RDM (Random):With the random setting, MP3 files on
the CD-R or CD-RW can be listened to in random,
rather than sequential order, on one CD-R/CD-RW or all
discs in a six-disc CD player. To use random, do one
of the following:
1. To play MP3 files from the CD-R or CD-RW you
are listening to in random order, press the
pushbutton positioned under the RDM label until
Random Current Disc displays. Press the same
pushbutton again to turn off random play.
2. To play songs from all CDs loaded in a six-disc CD
player in random order, press the pushbutton
positioned under the RDM label until Randomize All
Discs displays. Press the same pushbutton again
to turn off random play.
h(Music Navigator):Use the music navigator
feature to play MP3 files on the CD-R or CD-RW in order
by artist or album. Press the pushbutton located below
the music navigator label. The player scans the disc to
sort the files by artist and album ID3 tag information. It
could take several minutes to scan the disc depending on
the number of MP3 files recorded to the CD-R or CD-RW.
The radio can begin playing while it is scanning the disc
in the background. When the scan is finished, the CD-R
or CD-RW begins playing again.
4-75
Page 222 of 424
Once the disc has scanned, the player defaults to playing
MP3 files in order by artist. The current artist playing is
shown on the second line of the display between the
arrows. Once all songs by that artist are played, the
player moves to the next artist in alphabetical order on
the CD-R/CD-RW and begins playing MP3 files by that
artist. If you want to listen to MP3 files by another artist,
press the pushbutton located below either arrow button.
You will go to the next or previous artist in alphabetical
order. Continue pressing either button until the desired
artist is displayed.
To change from playback by artist to playback by album,
press the pushbutton located below the Sort By label.
From the sort screen, push one of the buttons below the
album button. Press the pushbutton below the back label
to return to the main music navigator screen. Now the
album name is displayed on the second line between the
arrows and songs from the current album begins to play.
Once all songs from that album are played, the player
moves to the next album in alphabetical order on the
CD-R/CD-RW and begins playing MP3 files from that
album.
To exit music navigator mode, press the pushbutton
below the Back label to return to normal MP3 playback.
BAND:Press this button to listen to the radio when a
CD is playing. The inactive CD remains inside the radio
for future listening.CD/AUX (CD/Auxiliary):Press this button to play a CD
when listening to the radio. The CD icon and a
message showing disc and/or track number displays
when a CD is in the player. Press this button again and
the system automatically searches for an auxiliary
input device such as a portable audio player. If a
portable audio player is not connected, “No Input Device
Found” displays.
Theft-Deterrent Feature
Non-RDS Radios
THEFTLOCK®is designed to discourage theft of your
vehicle’s radio. The feature works automatically by
learning a portion of the Vehicle Identification Number
(VIN). If the radio is moved to a different vehicle, it does
not operate and LOC displays.
With THEFTLOCK
®activated, the radio does not
operate if stolen.
RDS Radios
THEFTLOCK®is designed to discourage theft of your
vehicle’s radio. The feature works automatically by
learning a portion of the Vehicle Identification Number
(VIN). If the radio is moved to a different vehicle, it does
not operate and LOCKED displays.
4-76
Page 223 of 424
When the radio and vehicle are turned off, the blinking
red light indicates that THEFTLOCK®is armed.
With THEFTLOCK
®activated, the radio does not
operate if stolen.
Audio Steering Wheel Controls
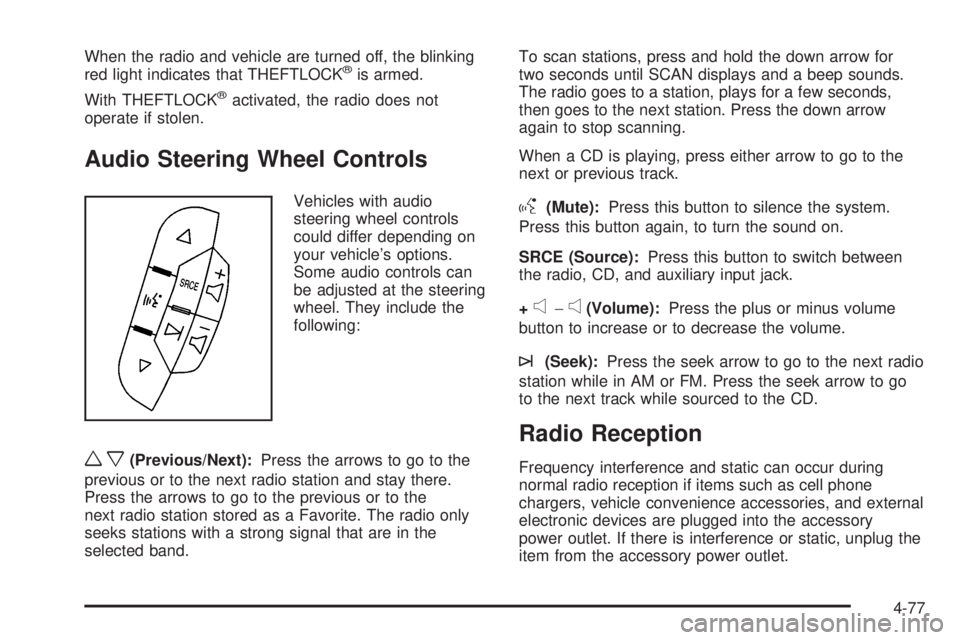
Vehicles with audio
steering wheel controls
could differ depending on
your vehicle’s options.
Some audio controls can
be adjusted at the steering
wheel. They include the
following:
wx(Previous/Next):Press the arrows to go to the
previous or to the next radio station and stay there.
Press the arrows to go to the previous or to the
next radio station stored as a Favorite. The radio only
seeks stations with a strong signal that are in the
selected band.To scan stations, press and hold the down arrow for
two seconds until SCAN displays and a beep sounds.
The radio goes to a station, plays for a few seconds,
then goes to the next station. Press the down arrow
again to stop scanning.
When a CD is playing, press either arrow to go to the
next or previous track.
g(Mute):Press this button to silence the system.
Press this button again, to turn the sound on.
SRCE (Source):Press this button to switch between
the radio, CD, and auxiliary input jack.
+
e−e(Volume):Press the plus or minus volume
button to increase or to decrease the volume.
¨(Seek):Press the seek arrow to go to the next radio
station while in AM or FM. Press the seek arrow to go
to the next track while sourced to the CD.
Radio Reception
Frequency interference and static can occur during
normal radio reception if items such as cell phone
chargers, vehicle convenience accessories, and external
electronic devices are plugged into the accessory
power outlet. If there is interference or static, unplug the
item from the accessory power outlet.
4-77
Page 296 of 424
If No Steam Is Coming From The
Engine Compartment
If an engine overheat warning is displayed but no steam
can be seen or heard, the problem may not be too
serious. Sometimes the engine can get a little too hot
when the vehicle:
•Climbs a long hill on a hot day.
•Stops after high-speed driving.
•Idles for long periods in traffic.
•Tows a trailer. See “Driving on Grades” under
Towing a Trailer on page 5-26.
If the overheat warning is displayed with no sign of
steam:
1. Turn the air off.
2. Turn the heater on to the highest temperature and
to the highest fan speed. Open the windows as
necessary.
3. In heavy traffic, let the engine idle in N (Neutral)
while stopped. If it is safe to do so, pull off the
road, shift to P (Park) or N (Neutral) and let
the engine idle.
If the temperature overheat gage is no longer in the
overheat zone or an overheat warning no longer
displays, the vehicle can be driven. Continue to drive
the vehicle slow for about 10 minutes. Keep a safevehicle distance from the car in front of you. If the
warning does not come back on, continue to drive
normally.
If the warning continues, pull over, stop, and park the
vehicle right away.
If there is still no sign of steam, push down the
accelerator until the engine speed is about twice as fast
as normal idle speed for at least three minutes while
you are parked. If you still have the warning, turn off the
engine until it cools down.
You may decide not to lift the hood but to get service
help right away.
Engine Fan Noise
Your vehicle has a clutched engine cooling fan. When
the clutch is engaged, the fan spins faster to provide
more air to cool the engine. In most everyday driving
conditions, the fan is spinning slower and the clutch is
not fully engaged. This improves fuel economy and
reduces fan noise. Under heavy vehicle loading, trailer
towing, and/or high outside temperatures, the fan
speed increases as the clutch more fully engages, so
you may hear an increase in fan noise. This is
normal and should not be mistaken as the transmission
slipping or making extra shifts. It is merely the cooling
system functioning properly. The fan will slow down
when additional cooling is not required and the clutch
partially disengages.
6-34
Page 328 of 424

Federal Communications Commission
(FCC) and Industry and Science
Canada
SeeRadio Frequency Statement on page 8-18for
information regarding Part 15 of the Federal
Communications Commission (FCC) Rules and
RSS-210/211 of Industry and Science Canada.
Tire Pressure Monitor Operation
This vehicle may have a Tire Pressure Monitor System
(TPMS). The TPMS is designed to warn the driver
when a low tire pressure condition exists. TPMS sensors
are mounted onto each tire and wheel assembly,
excluding the spare tire and wheel assembly. The TPMS
sensors monitor the air pressure in the vehicle’s tires
and transmits the tire pressure readings to a receiver
located in the vehicle.
When a low tire pressure
condition is detected, the
TPMS will illuminate
the low tire pressure
warning symbol located on
the instrument panel
cluster.At the same time a message to check the pressure in a
specific tire appears on the Driver Information Center
(DIC) display. The low tire pressure warning light
and the DIC warning message come on at each ignition
cycle until the tires are inflated to the correct inflation
pressure. If your vehicle has DIC buttons, tire pressure
levels can be viewed by the driver. For additional
information and details about the DIC operation and
displays seeDIC Operation and Displays on page 4-38
andDIC Warnings and Messages on page 4-44.
The low tire pressure warning light may come on in cool
weather when the vehicle is first started, and then
turn off as you start to drive. This could be an early
indicator that the air pressure in the tire(s) are getting
low and need to be inflated to the proper pressure.
A Tire and Loading Information label, attached to your
vehicle, shows the size of your vehicle’s original
equipment tires and the correct inflation pressure for
your vehicle’s tires when they are cold. SeeLoading the
Vehicle on page 5-17, for an example of the Tire and
Loading Information label and its location on your
vehicle. Also seeIn�ation - Tire Pressure on page 6-63.
6-66
Page 329 of 424

Your vehicle’s TPMS can warn you about a low tire
pressure condition but it does not replace normal
tire maintenance. SeeTire Inspection and Rotation on
page 6-69andTires on page 6-55.
Notice:Liquid tire sealants could damage the Tire
Pressure Monitor System (TPMS) sensors. Sensor
damage caused by using a tire sealant is not
covered by your warranty. Do not use liquid tire
sealants.
TPMS Malfunction Light and Message
The TPMS will not function properly if one or more of the
TPMS sensors are missing or inoperable. When the
system detects a malfunction, the low tire warning light
flashes for about one minute and then stays on for
the remainder of the ignition cycle. A DIC warning
message is also displayed. The low tire warning light
and DIC warning message come on at each ignition
cycle until the problem is corrected. Some of the
conditions that can cause the malfunction light and DIC
message to come on are:
•One of the road tires has been replaced with the
spare tire. The spare tire does not have a TPMS
sensor. The TPMS malfunction light and DIC
message should go off once you re-install the road
tire containing the TPMS sensor.
•The TPMS sensor matching process was started
but not completed or not completed successfully
after rotating the vehicle’s tires. The DIC message
and TPMS malfunction light should go off once
the TPMS sensor matching process is performed
successfully. See “TPMS Sensor Matching Process”
later in this section.
•One or more TPMS sensors are missing or
damaged. The DIC message and the TPMS
malfunction light should go off when the TPMS
sensors are installed and the sensor matching
process is performed successfully. See your
dealer/retailer for service.
•Replacement tires or wheels do not match your
vehicle’s original equipment tires or wheels.
Tires and wheels other than those recommended
for your vehicle could prevent the TPMS from
functioning properly. SeeBuying New Tires on
page 6-73.
•Operating electronic devices or being near facilities
using radio wave frequencies similar to the TPMS
could cause the TPMS sensors to malfunction.
If the TPMS is not functioning it cannot detect or signal
a low tire condition. See your dealer/retailer for
service if the TPMS malfunction light and DIC message
comes on and stays on.
6-67