2010 GMC SAVANA change time
[x] Cancel search: change timePage 158 of 424

There is a delay in the transition between the daytime
and nighttime operation of the Daytime Running Lamps
(DRL) and the automatic headlamp systems so that
driving under bridges or bright overhead street lights does
not affect the system. The DRL and automatic headlamp
system is only affected when the light sensor sees a
change in lighting lasting longer than the delay.
If the vehicle is started in a dark garage, the automatic
headlamp system comes on immediately. Once the
vehicle leaves the garage, it takes approximately
30 seconds for the automatic headlamp system to
change to DRL if it is light outside. During that delay,
the instrument panel cluster may not be as bright
as usual. Make sure the instrument panel brightness
control is in the full bright position. SeeInstrument Panel
Brightness on page 4-12.
Instrument Panel Brightness
The knob for this feature is located next to the exterior
lamps control.
D(Instrument Panel Lights):Push the knob to
extend and then turn clockwise or counterclockwise to
brighten or dim the instrument panel lights and the radio
display. This only works if the headlamps or parking
lamps are on.
To turn on the dome lamps, with the vehicle doors
closed, turn the knob all the way clockwise.
Dome Lamps
The dome lamps come on when any door is opened.
They turn off after all the doors are closed.
The dome lamps can also be turned on by turning the
instrument panel brightness knob, located on the
instrument panel to the left of the steering column,
clockwise to the farthest position. In this position, the
dome lamps remain on whether a door is opened
or closed.
4-12
Page 162 of 424
Air Delivery Mode Control:Turn the knob clockwise
or counterclockwise to change the current airflow mode.
H(Vent):Air is directed to the instrument panel
outlets.
)(Bi-Level):Air is divided between the instrument
panel and floor outlets, with some air directed toward the
windshield.
6(Floor):Air is directed to the floor outlets with
some air directed to the windshield and side windows.
-(Defog):This mode clears the windows of fog
or moisture. Outside air is directed to the floor and
defroster outlets. Adjust the temperature knob for
warmer or cooler air. The air conditioning compressor
might turn on in this setting to dehumidify the air.
1(Defrost):This mode clears the windshield of fog or
frost more quickly. Air is directed to the windshield,
with some to the floor outlets and front side windows.
The air conditioning compressor might turn on in
this setting to dehumidify the air.
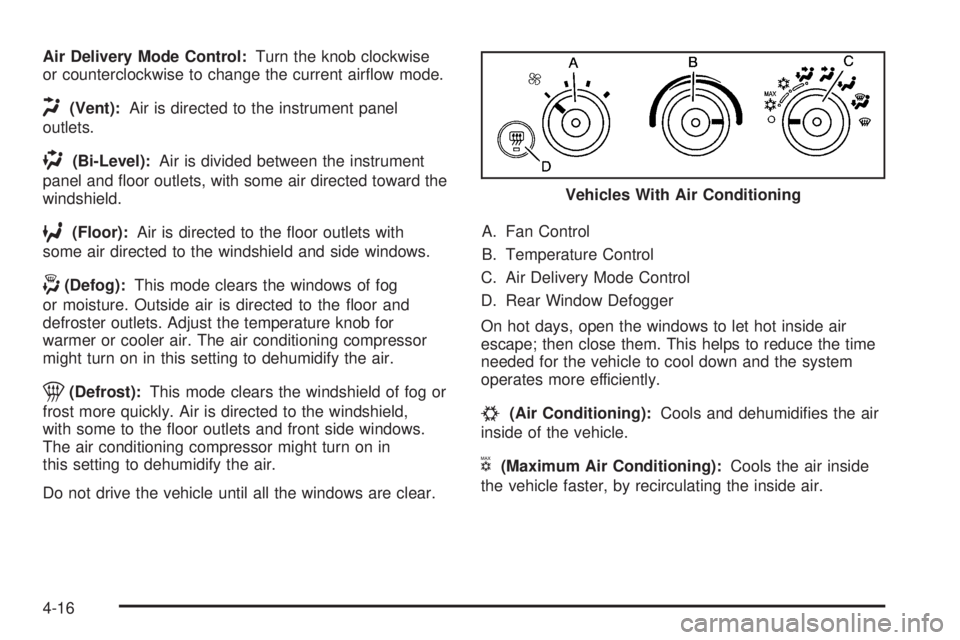
Do not drive the vehicle until all the windows are clear.A. Fan Control
B. Temperature Control
C. Air Delivery Mode Control
D. Rear Window Defogger
On hot days, open the windows to let hot inside air
escape; then close them. This helps to reduce the time
needed for the vehicle to cool down and the system
operates more efficiently.
#(Air Conditioning):Cools and dehumidifies the air
inside of the vehicle.
V(Maximum Air Conditioning):Cools the air inside
the vehicle faster, by recirculating the inside air.Vehicles With Air Conditioning
4-16
Page 185 of 424
Trip Odometers
Press the trip/fuel button until A or B displays. This
display shows the current distance traveled in either
kilometers (km) or miles (mi) since the last reset for each
trip odometer. Both trip odometers can be used at the
same time.
Each trip odometer can be reset to zero separately by
pressing the set/reset button while the desired trip
odometer is displayed.
The trip odometer has a feature called the retro-active
reset. This can be used to set the trip odometer to
the number of miles (kilometers) driven since the ignition
was last turned on. This can be used if the trip
odometer is not reset at the beginning of the trip.
To use the retro-active reset feature, press and hold
the set/reset button for at least four seconds. The trip
odometer will display the number of kilometers (km) or
miles (mi) driven since the ignition was last turned on and
the vehicle was moving. Once the vehicle begins moving,
the trip odometer will accumulate mileage. For example, if
the vehicle was driven 8 km (5 miles) before it is started
again, and then the retro-active reset feature is activated,
the display will show 8 km (5 miles). As the vehicle
begins moving, the display will then increase to 8.1 km
(5.1 miles), 8.2 km (5.2 miles), etc.If the retro-active reset feature is activated after the
vehicle is started, but before it begins moving, the
display will show the number of kilometers (km) or
miles (mi) that were driven during the last ignition cycle.
Fuel Range
Press the trip/fuel button until FUEL RANGE displays.
This display shows the approximate number of
remaining kilometers (km) or miles (mi) the vehicle can
be driven without refueling. The display will show
LOW if the fuel level is low.
The fuel range estimate is based on an average of the
vehicle’s fuel economy over recent driving history
and the amount of fuel remaining in the fuel tank.
This estimate will change if driving conditions change.
For example, if driving in traffic and making frequent
stops, this display may read one number, but if
the vehicle is driven on a freeway, the number may
change even though the same amount of fuel is in the
fuel tank. This is because different driving conditions
produce different fuel economies. Generally, freeway
driving produces better fuel economy than city driving.
If your vehicle is low on fuel, the FUEL LEVEL LOW
message will be displayed. See “FUEL LEVEL LOW”
underDIC Warnings and Messages on page 4-44
for more information.
4-39
Page 187 of 424
Vehicle Information Menu Items
T
(Vehicle Information):Press this button to scroll
through the following menu items:
Oil Life
Press the vehicle information button until OIL LIFE
REMAINING displays. This display shows an estimate
of the oil’s remaining useful life. If you see 99% OIL LIFE
REMAINING on the display, that means 99% of the
current oil life remains. The engine oil life system
will alert you to change the oil on a schedule consistent
with your driving conditions.
When the remaining oil life is low, the CHANGE
ENGINE OIL SOON message will appear on the display.
See “CHANGE ENGINE OIL SOON” underDIC
Warnings and Messages on page 4-44. You should
change the oil as soon as possible. SeeEngine Oil on
page 6-15. In addition to the engine oil life system
monitoring the oil life, additional maintenance is
recommended in the Maintenance Schedule in this
manual. SeeScheduled Maintenance on page 7-3for
more information.
Remember, you must reset the OIL LIFE yourself after
each oil change. It will not reset itself. Also, be
careful not to reset the OIL LIFE accidentally at any
time other than when the oil has just been changed.It cannot be reset accurately until the next oil change.
To reset the engine oil life system, seeEngine Oil
Life System on page 6-18.
Units
Press the vehicle information button until UNITS
displays. This display allows you to select between
English or Metric units of measurement. Once in this
display, press the set/reset button to select between
ENGLISH or METRIC units.
Tire Pressure
If your vehicle has the Tire Pressure Monitor System
(TPMS), the pressure for each tire can be viewed in
the DIC. The tire pressure will be shown in either
kilopascals (kPa) or pounds per square inch (psi). Press
the vehicle information button until the DIC displays
FRONT TIRES PSI (kPa) LEFT ## RIGHT ##. Press the
vehicle information button again until the DIC displays
REAR TIRES PSI (kPa) LEFT ## RIGHT ##.
If a low tire pressure condition is detected by the system
while driving, a message advising you to check the
pressure in a specific tire will appear in the display. See
Ination - Tire Pressure on page 6-63andDIC Warnings
and Messages on page 4-44for more information.
If the tire pressure display shows dashes instead of a
value, there may be a problem with your vehicle. If this
consistently occurs, see your dealer/retailer for service.
4-41
Page 188 of 424

Engine Hours
Press the vehicle information button until ENGINE
HOURS displays. This display shows the total number
of hours the engine has run.
Relearn Tire Positions
Your vehicle may have this display. To access this
display, the vehicle must be in P (Park). If your vehicle
has the Tire Pressure Monitor System (TPMS), after
rotating the tires or after replacing a tire or sensor, the
system must re-learn the tire positions. To re-learn
the tire positions, seeTire Pressure Monitor System on
page 6-65. SeeTire Inspection and Rotation on
page 6-69andDIC Warnings and Messages on
page 4-44for more information.
Change Compass Zone
Your vehicle may have this feature. To change the
compass zone through the DIC, seeDIC Compass on
page 4-43.
Calibrate Compass
Your vehicle may have this feature. The compass can
be manually calibrated. To calibrate the compass
through the DIC, seeDIC Compass on page 4-43.
Relearn Remote Key
To access this display, the vehicle must be in P (Park).
This display allows you to match Remote Keyless
Entry (RKE) transmitters to your vehicle. This procedure
will erase all previously learned transmitters. Therefore,
they must be relearned as additional transmitters.
To match an RKE transmitter to your vehicle:
1. Press the vehicle information button until PRESS
V
TO RELEARN REMOTE KEY displays.
2. Press the set/reset button until REMOTE KEY
LEARNING ACTIVE is displayed.
3. Press and hold the lock and unlock buttons on the
first transmitter at the same time for about
15 seconds.
A chime will sound indicating that the transmitter is
matched.
4. To match additional transmitters at this time, repeat
Step 3.
Each vehicle can have a maximum of four
transmitters matched to it.
5. To exit the programming mode, you must cycle the
key to LOCK/OFF.
Blank Display
This display shows no information.
4-42
Page 202 of 424
NO CHANGE:No change will be made to this feature.
The current setting will remain.
To select a setting, press the set/reset button while the
desired setting is displayed on the DIC.
DELAY DOOR LOCK
This feature allows you to select whether or not the
locking of the vehicle’s doors will be delayed. When
locking the doors with the power door lock switch and a
door is open, this feature will delay locking the doors
until five seconds after the last door is closed. You will
hear three chimes to signal that the delayed locking
feature is in use. The key must be out of the ignition for
this feature to work. You can temporarily override
delayed locking by pressing the power door lock switch
twice or the lock button on the RKE transmitter twice.
SeeDelayed Locking on page 3-9for more information.
Press the customization button until DELAY DOOR
LOCK appears on the DIC display. Press the set/reset
button once to access the settings for this feature.
Then press the customization button to scroll through
the following settings:
OFF:There will be no delayed locking of the vehicle’s
doors.
ON (default):The doors will not lock until five seconds
after the last door is closed.NO CHANGE:No change will be made to this feature.
The current setting will remain.
To select a setting, press the set/reset button while the
desired setting is displayed on the DIC.
EXIT LIGHTING
This feature allows you to select the amount of time you
want the exterior lamps to remain on when it is dark
enough outside. This happens after the key is turned
from ON/RUN to LOCK/OFF.
Press the customization button until EXIT LIGHTING
appears on the DIC display. Press the set/reset button
once to access the settings for this feature. Then
press the customization button to scroll through the
following settings:
OFF:The exterior lamps will not turn on.
10 SECONDS (default):The exterior lamps will stay on
for 10 seconds.
1 MINUTE:The exterior lamps will stay on for
one minute.
2 MINUTES:The exterior lamps will stay on for
two minutes.
4-56
Page 206 of 424
Setting the Clock
AM/FM Radio with Optional CD Player
If your vehicle has an AM/FM radio with an optional CD
player, it has a
Hbutton for setting the time. With
these types of radios, the clock can be set with either
the radio turned on or off.
Set the time by following these steps:
1. Press
Huntil the hour begins flashing on display.
Press this button a second time and the minutes
begin flashing on display.
Press
Ha third time and the 12HR or 24HR time
format begins flashing.
2. While either the hour or the minutes are flashing,
turn the
fknob, located on the upper right side of
the radio, clockwise or counterclockwise to
increase or decrease the time. While the 12HR or
24HR time format is flashing, turn the
fknob
clockwise or counterclockwise to select the default
time settings.
3. Press
Hagain until the clock display stops flashing
to set the currently displayed time; otherwise, the
flashing stops after five seconds and the current
time displayed is automatically set.
MP3 Radio with a Single CD Player
If your vehicle has a radio with a single CD (MP3)
player, the radio has a
Hbutton for setting the time
and date.
To set the time and date, follow the instructions:
1. Press the
Hbutton and the HR, MIN, MM, DD,
YYYY (hour, minute, month, day, and year)
displays.
2. Press the pushbutton located under any one of the
labels that you want to change. Every time the
pushbutton is pressed again, the time or the date if
selected, increases by one.
•Another way to increase the time or date, is to
press the right
¨SEEK arrow or the\FWD
(forward) button.
3. To decrease, press the left
©SEEK arrow or the
sREV button. You can also turn thefknob,
located on the upper right side of the radio, to adjust
the selected setting.
4-60
Page 207 of 424
Changing the Time and Date Default
Settings
You can change the time default setting from 12 hours
to 24 hours or change the date default setting from
month/day/year to day/month/year.
To change the time or date default settings, follow these
instructions:
1. Press
Hand then the pushbutton located under the
forward arrow that is currently displayed on the
radio screen until the time 12H (hour) and
24H (hour), and the date MM/DD (month and day)
and DD/MM (day and month) are displayed.
2. Press the pushbutton located under the desired
option.
3. Press the
Hbutton again to apply the selected
default, or let the screen time out.
MP3 Radio with a Six-Disc CD Player
If your vehicle has a radio with a six-disc CD player, the
radio has a MENU button instead of the
Hbutton to
set the time and date.
To set the time and date, follow these instructions:
1. Press the MENU button. Once the
Hoption
displays, press the pushbutton located under
that label. The HR, MIN, MM, DD, YYYY (hour,
minute, month, day, and year) displays.
2. Press the pushbutton located under any one of the
labels to change. Every time the pushbutton is
pressed again, the time or the date if selected,
increases by one.
•Another way to increase the time or date, is to
press the right
¨SEEK arrow or the\FWD
(forward) button.
3. To decrease, press the left
©SEEK arrow or the
sREV button, or turn thefknob, located on the
upper right side of the radio, to adjust the selected
setting.
4-61