Page 47 of 448
Sit up straight and always keep your feet on the floor in
front of you. The lap part of the belt should be worn
low and snug on the hips, just touching the thighs.In a crash, this applies force to the strong pelvic bones
and you would be less likely to slide under the lap belt.
If you slid under it, the belt would apply force on your
abdomen. This could cause serious or even fatal injuries.
The shoulder belt should go over the shoulder and across
the chest. These parts of the body are best able to take
belt restraining forces.
The shoulder belt locks if there is a sudden stop or
crash.
2-19
Page 55 of 448

Lap-Shoulder Belt
All seating positions in the vehicle have a lap-shoulder
belt except for the center front passenger position,
if equipped, which has a lap belt. SeeLap Belt
on page 2-33for more information.
The following instructions explain how to wear a
lap-shoulder belt properly.
1. Adjust the seat, if the seat is adjustable, so you can
sit up straight. To see how, see “Seats” in the Index.
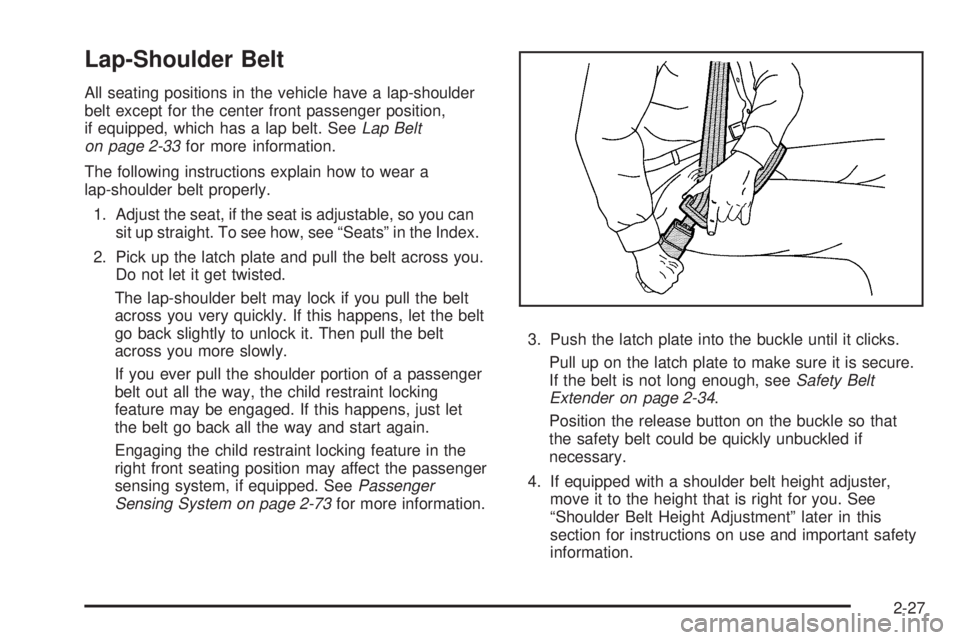
2. Pick up the latch plate and pull the belt across you.
Do not let it get twisted.
The lap-shoulder belt may lock if you pull the belt
across you very quickly. If this happens, let the belt
go back slightly to unlock it. Then pull the belt
across you more slowly.
If you ever pull the shoulder portion of a passenger
belt out all the way, the child restraint locking
feature may be engaged. If this happens, just let
the belt go back all the way and start again.
Engaging the child restraint locking feature in the
right front seating position may affect the passenger
sensing system, if equipped. SeePassenger
Sensing System on page 2-73for more information.3. Push the latch plate into the buckle until it clicks.
Pull up on the latch plate to make sure it is secure.
If the belt is not long enough, seeSafety Belt
Extender on page 2-34.
Position the release button on the buckle so that
the safety belt could be quickly unbuckled if
necessary.
4. If equipped with a shoulder belt height adjuster,
move it to the height that is right for you. See
“Shoulder Belt Height Adjustment” later in this
section for instructions on use and important safety
information.
2-27
Page 57 of 448

Shoulder Belt Height Adjuster
The vehicle has a shoulder belt height adjuster for the
driver and right front passenger seating position.
Adjust the height so that the shoulder portion of the belt
is centered on the shoulder. The belt should be away
from the face and neck, but not falling off the shoulder.
Improper shoulder belt height adjustment could
reduce the effectiveness of the safety belt in a crash.
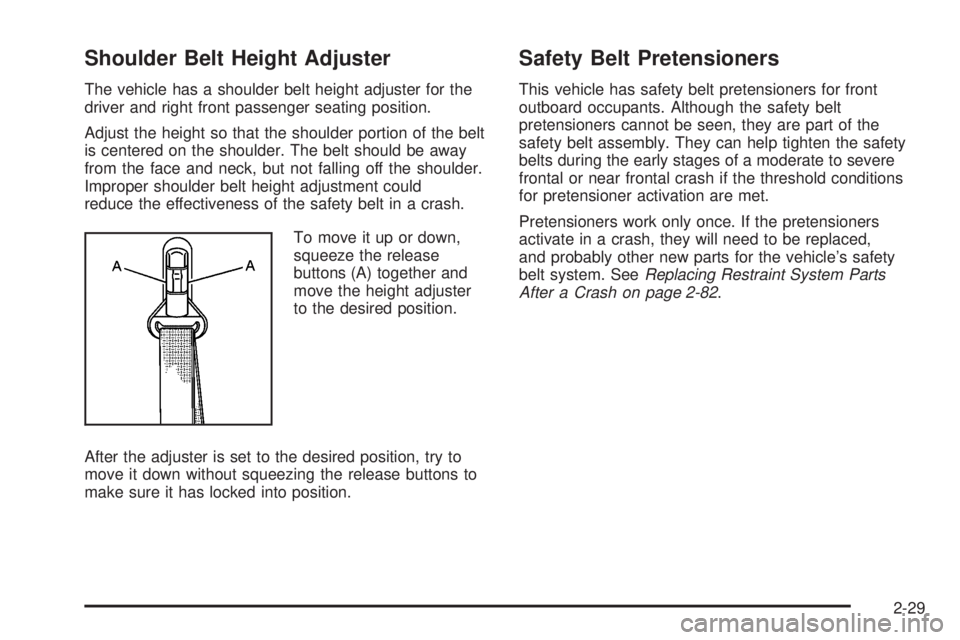
To move it up or down,
squeeze the release
buttons (A) together and
move the height adjuster
to the desired position.
After the adjuster is set to the desired position, try to
move it down without squeezing the release buttons to
make sure it has locked into position.
Safety Belt Pretensioners
This vehicle has safety belt pretensioners for front
outboard occupants. Although the safety belt
pretensioners cannot be seen, they are part of the
safety belt assembly. They can help tighten the safety
belts during the early stages of a moderate to severe
frontal or near frontal crash if the threshold conditions
for pretensioner activation are met.
Pretensioners work only once. If the pretensioners
activate in a crash, they will need to be replaced,
and probably other new parts for the vehicle’s safety
belt system. SeeReplacing Restraint System Parts
After a Crash on page 2-82.
2-29
Page 81 of 448

{WARNING:
Children can be seriously injured or strangled if a
shoulder belt is wrapped around their neck and
the safety belt continues to tighten. Buckle any
unused safety belts behind the child restraint so
children cannot reach them. Pull the shoulder belt
all the way out of the retractor to set the lock, if
your vehicle has one, after the child restraint has
been installed.
Notice:Do not let the LATCH attachments rub
against the vehicle’s safety belts. This may damage
these parts. If necessary, move buckled safety
belts to avoid rubbing the LATCH attachments.
Do not fold the empty rear seat with a safety belt
buckled. This could damage the safety belt or
the seat. Unbuckle and return the safety belt to its
stowed position, before folding the seat.
Crew Cab — Rear Seat
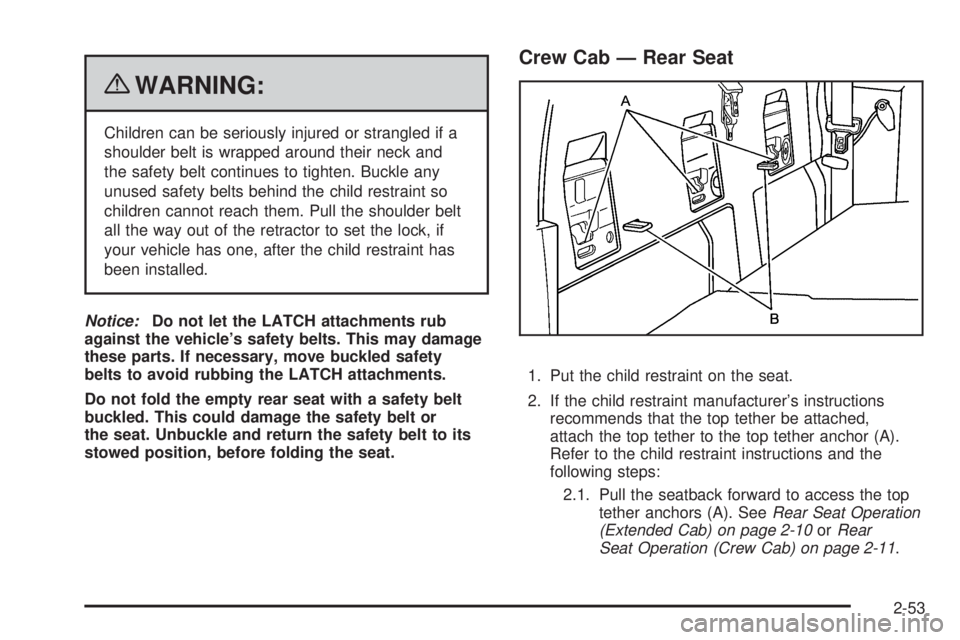
1. Put the child restraint on the seat.
2. If the child restraint manufacturer’s instructions
recommends that the top tether be attached,
attach the top tether to the top tether anchor (A).
Refer to the child restraint instructions and the
following steps:
2.1. Pull the seatback forward to access the top
tether anchors (A). SeeRear Seat Operation
(Extended Cab) on page 2-10orRear
Seat Operation (Crew Cab) on page 2-11.
2-53
Page 82 of 448
2.2. Route the top tether according to your child
restraint instructions and the following
instructions:
If the position you are using
has a fixed headrest or
head restraint and you are
using a single tether, route
the tether over the head
restraint.
If the position you are using
has an adjustable headrest
or head restraint and you
are using a single tether,
raise the headrest or head
restraint and route the
tether under the headrest
or head restraint and in
between the headrest or
head restraint posts.If the position you are using
has a fixed or adjustable
headrest or head restraint
and you are using a dual
tether, route the tether
around the headrest or
head restraint.
2.3. Attach the top tether to the anchor (A). Make
sure that you secure the top tether to the
top tether anchor and not to the seatback
latch (B).
2.4. Push rearward on the seatback until it locks
into its upright position. Push and pull on
the seatback to make sure it is secured
properly.
2-54
Page 87 of 448
4. Pull the rest of the shoulder belt all the way out of
the retractor to set the lock.
5. If your child restraint has a top tether, attach the top
tether to the top tether anchor. SeeLower Anchors
and Tethers for Children (LATCH) on page 2-46.6. To tighten the belt, push down on the child restraint,
pull the shoulder portion of the belt to tighten the lap
portion of the belt, and feed the shoulder belt back
into the retractor. If you are using a forward-facing
child restraint, you may find it helpful to use your
knee to push down on the child restraint as you
tighten the belt.
7. Tighten the top tether. SeeLower Anchors and
Tethers for Children (LATCH) on page 2-46.
8. Push and pull the child restraint in different
directions to be sure it is secure.
2-59
Page 91 of 448
5. Pull the rest of the shoulder belt all the way out of
the retractor to set the lock.
6. If the vehicle does not have a rear seat and the
child restraint manufacturer recommends using a
top tether anchor, attach the top tether to the
top tether anchor. Refer to the instructions that
came with the child restraint and toLower Anchors
and Tethers for Children (LATCH) on page 2-46.7. To tighten the belt, push down on the child restraint,
pull the shoulder portion of the belt to tighten the
lap portion of the belt and feed the shoulder
belt back into the retractor. When installing a
forward-facing child restraint, it might be helpful to
use your knee to push down on the child restraint
as you tighten the belt.
8. Tighten the top tether. SeeLower Anchors and
Tethers for Children (LATCH) on page 2-46.
9. Push and pull the child restraint in different
directions to be sure it is secure.
2-63
Page 96 of 448
If your vehicle has roof-rail airbags for the driver, right
front passenger, and second row outboard passengers,
they are in the ceiling above the side windows.
{WARNING:
If something is between an occupant and an
airbag, the airbag might not inflate properly or it
might force the object into that person causing
severe injury or even death. The path of an
inflating airbag must be kept clear. Do not put
anything between an occupant and an airbag,
and do not attach or put anything on the steering
wheel hub or on or near any other airbag
covering.
Never secure anything to the roof of a vehicle with
roof-rail airbags by routing a rope or tie down
through any door or window opening. If you do,
the path of an inflating roof-rail airbag will be
blocked. Driver Side shown, Passenger Side similar
2-68