Page 210 of 318

WARNING:Always set the parking brake fully and make sure
the gearshift is latched in P (Park). Turn the ignition to the
LOCK position and remove the key whenever you leave your vehicle.
R (Reverse)
With the gearshift lever in R (Reverse), the vehicle will move backward.
Always come to a complete stop before shifting into and out of R
(Reverse).
N (Neutral)
With the gearshift lever in N (Neutral), the vehicle can be started and is
free to roll. Hold the brake pedal down while in this position.
D (Drive) with Overdrive
The normal driving position for the best fuel economy. Transmission
operates in gears one through five.
D (Drive) without Overdrive
D (Drive) with Overdrive can be
deactivated by pressing the
transmission control switch on the
right side of the shift handle.
•This position allows for all
forward gears except Overdrive.
•O/D OFF lamp is illuminated.
•Provides engine braking.
•Use when driving conditions
cause excessive shifting from O/D to other gears. Examples: heavy city
traffic where continuous shifting in and out of overdrive occurs, hilly
terrain, heavy loads, trailer towing and when engine braking is
required.
•To return to Overdrive mode, press the transmission control switch.
The O/D OFF lamp will not be illuminated.
•Overdrive mode is automatically returned each time the key is turned
off.
O/D
OFF
2010 05+ Mustang(197)
Owners Guide, 1st Printing
USA(fus)
Driving
210
Page 211 of 318

3 (Third)
This position allows for third gear only.
•Provides engine braking.
•To return to D (Drive) without Overdrive, move the transmission shift
lever into the D (Drive) position.
•Selecting 3 (Third) at higher speeds will cause the transmission to
downshift to third gear at the appropriate vehicle speed.
2 (Second)
This position allows for second gear only.
•Provides engine braking.
•Use to start-up on slippery roads.
•To return to D (Drive) without Overdrive or 3 (Third), move the
transmission shift lever into the D (Drive) or 3 (Third) position.
•Selecting 2 (Second) at higher speeds will cause the transmission to
downshift to second gear at the appropriate vehicle speed.
1 (First)
This position allows for first gear only.
•Provides maximum engine braking.
•Will not downshift into first gear at high speeds; will cause the
transmission to downshift to a lower gear, then allows for first gear
when the vehicle reaches slower speeds.
Forced downshifts
•Allowed in Overdrive or Drive.
•Depress the accelerator to the floor.
•Allows transmission to select an appropriate gear.
If your vehicle gets stuck in mud or snow
If your vehicle gets stuck in mud or snow, it may be rocked out by
shifting between forward and reverse gears, stopping between shifts in a
steady pattern. Press lightly on the accelerator in each gear.
Do not rock the vehicle if the engine is not at normal operating
temperature or damage to the transmission may occur.
Do not rock the vehicle for more than a minute or damage to the
transmission and tires may occur, or the engine may overheat.
2010 05+ Mustang(197)
Owners Guide, 1st Printing
USA(fus)
Driving
211
Page 212 of 318

MANUAL TRANSMISSION OPERATION (IF EQUIPPED)
Using the clutch
Manual transmission vehicles have a starter interlock that prevents
cranking the engine unless the clutch pedal is fully depressed.
To start the vehicle:
1. Make sure the parking brake is fully set.
2. Press the clutch pedal to the
floor, then put the gearshift lever in
the neutral position.
3. Start the engine.
4. Press the brake pedal and move
the gearshift lever to the desired
gear; 1 (First) or R (Reverse).
5. Release the parking brake, then
slowly release the clutch pedal while
slowly pressing on the accelerator.
During each shift, the clutch pedal must be fully depressed to the floor.
Make sure the floor mat is properly positioned so it doesn’t interfere with
the full extension of the clutch pedal.
Failure to fully depress the clutch pedal to the floor may cause
increased shift efforts, prematurely wear transmission
components or damage the transmission.
Do not drive with your foot resting on the clutch pedal or use the
clutch pedal to hold your vehicle at a standstill while waiting on a
hill. These actions will severely reduce the life of the clutch and
could nullify a clutch warranty claim.
135
24
R
1
24R35
2010 05+ Mustang(197)
Owners Guide, 1st Printing
USA(fus)
Driving
212
Page 213 of 318

Recommended shift speeds
Do not downshift into 1 (First) when your vehicle is moving
faster than 15 mph (24 km/h). This will damage the clutch.
Upshift according to the following chart:
Upshifts when accelerating
(recommended for best fuel economy)
Shift from:
1 - 2 11 mph (18 km/h)
2 - 3 19 mph (31 km/h)
3 - 4 30 mph (48 km/h)
4 - 5 40 mph (64 km/h)
Reverse
1. Make sure that your vehicle is at a complete stop before you shift into
R (Reverse). Failure to do so may damage the transmission.
2. Move the gearshift lever into the
neutral position and wait at least
three seconds before shifting into R
(Reverse).
•The gearshift lever can only be
moved into R (Reverse) by
moving it from left of 3 (Third)
and 4 (Fourth) before shifting
into R (Reverse). This is a
lockout feature that protects the
transmission from accidentally
being shifted into R (Reverse) from 5 (Overdrive).
Parking your vehicle
1. Apply the brake and shift into the neutral position.
2. Fully apply the parking brake, then shift into 1 (First).
3. Turn the ignition off.
WARNING:Do not park your vehicle in Neutral, it may move
unexpectedly and injure someone. Use 1 (First) gear and set the
parking brake fully.
1
24R35
2010 05+ Mustang(197)
Owners Guide, 1st Printing
USA(fus)
Driving
213
Page 214 of 318

REARVIEW CAMERA SYSTEM (IF EQUIPPED)
The rearview camera system,
located on the trunk, provides a
video image which appears in the
rearview mirror or on the navigation
screen (if equipped), of the area
behind the vehicle. It adds
assistance to the driver while
reversing or reverse parking the
vehicle.
To use the camera system, place the transmission in R (Reverse); an
image will display in the rearview mirror or on the navigation screen (if
equipped). The area displayed on the screen may vary according to the
vehicle orientation and/or road condition.
•(1) Rear bumper
•(2) Red zone
•(3) Yellow zone
•(4) Green zone
Always use caution while backing.
Objects in the red zone are closest
to your vehicle and objects in the
green zone are further away. Objects
are getting closer to your vehicle as
they move from the green zone to the yellow or red zones.
Use the side mirrors and rearview mirror to get better coverage on both
sides and rear of the vehicle.
Image delay if displayed through the rearview mirror:
When shifting out of R (Reverse) and into any other gear, the image in
the rearview mirror will remain on for a few seconds before it shuts off
to assist in parking or trailer hookup.
Image delay if displayed through the Navigation screen:
After shifting out of R (Reverse) and into any gear other than P (Park),
the image in the navigation screen will remain until the vehicle speed
reaches five mph (8 km/h), only if the rear camera delay feature is on, or
until any navigation radio button is depressed.
Note:The default setting for the rear camera delay is off. Push the
“Settings” button found on the navigation screen to set the rear camera
delay feature to on or off. Refer to theNavigation Supplementfor more
information.
2010 05+ Mustang(197)
Owners Guide, 1st Printing
USA(fus)
Driving
214
Page 216 of 318
DRIVING THROUGH WATER
If driving through deep or standing
water is unavoidable, proceed very
slowly especially when the depth is
not known. Never drive through
water that is higher than the bottom
of the wheel rims (for cars) or the
bottom of the hubs (for trucks).
When driving through water, traction or brake capability may be limited.
Also, water may enter your engine’s air intake and severely damage your
engine or your vehicle may stall.Driving through deep water where
the transmission vent tube is submerged may allow water into the
transmission and cause internal transmission damage.
Once through the water, always dry the brakes by moving your
vehicle slowly while applying light pressure on the brake pedal.
Wet brakes do not stop the vehicle as quickly as dry brakes.
2010 05+ Mustang(197)
Owners Guide, 1st Printing
USA(fus)
Driving
216
Page 221 of 318
The fuses are coded as follows:
Fuse/Relay
LocationFuse Amp
RatingProtected Circuits
1 30A Driver rear window (convertible only)
2 15A Brake On/Off (BOO) power
3 15A MGM
4 30A Passenger rear window
(convertible only)
5 10A Brake Transmission Shift Interlock
(BTSI)
6 20A Turn signals, Hazard flashers
7 10A Left low beam headlamp
8 10A Right low beam headlamp
9 15A Courtesy lamps
10 15A Switch illumination
2010 05+ Mustang(197)
Owners Guide, 1st Printing
USA(fus)
Roadside Emergencies
221
Page 226 of 318
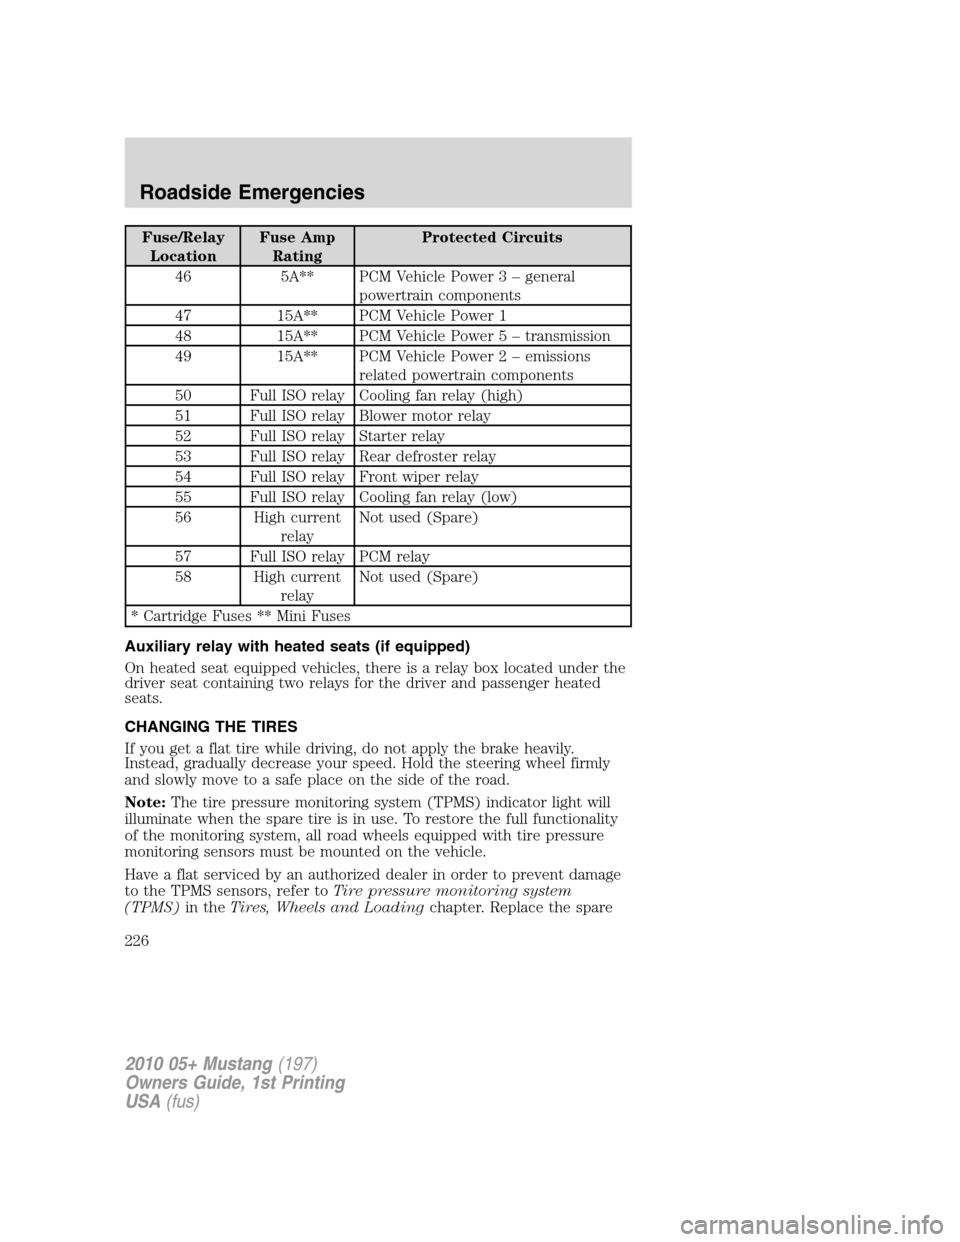
Fuse/Relay
LocationFuse Amp
RatingProtected Circuits
46 5A** PCM Vehicle Power 3 – general
powertrain components
47 15A** PCM Vehicle Power 1
48 15A** PCM Vehicle Power 5 – transmission
49 15A** PCM Vehicle Power 2 – emissions
related powertrain components
50 Full ISO relay Cooling fan relay (high)
51 Full ISO relay Blower motor relay
52 Full ISO relay Starter relay
53 Full ISO relay Rear defroster relay
54 Full ISO relay Front wiper relay
55 Full ISO relay Cooling fan relay (low)
56 High current
relayNot used (Spare)
57 Full ISO relay PCM relay
58 High current
relayNot used (Spare)
* Cartridge Fuses ** Mini Fuses
Auxiliary relay with heated seats (if equipped)
On heated seat equipped vehicles, there is a relay box located under the
driver seat containing two relays for the driver and passenger heated
seats.
CHANGING THE TIRES
If you get a flat tire while driving, do not apply the brake heavily.
Instead, gradually decrease your speed. Hold the steering wheel firmly
and slowly move to a safe place on the side of the road.
Note:The tire pressure monitoring system (TPMS) indicator light will
illuminate when the spare tire is in use. To restore the full functionality
of the monitoring system, all road wheels equipped with tire pressure
monitoring sensors must be mounted on the vehicle.
Have a flat serviced by an authorized dealer in order to prevent damage
to the TPMS sensors, refer toTire pressure monitoring system
(TPMS)in theTires, Wheels and Loadingchapter. Replace the spare
2010 05+ Mustang(197)
Owners Guide, 1st Printing
USA(fus)
Roadside Emergencies
226

