2010 FORD KUGA radio
[x] Cancel search: radioPage 181 of 226

Accepting a second incoming call
Second incoming calls can be accepted
by pressing either the call accept button,
the
PHONE button, or the MODEbutton
on the remote control.
Rejecting a second incoming call
Second incoming calls can be rejected by
pressing the call reject button. Units
without a telephone keypad can also
reject a second incoming call by pressing
the CD button, or the AM/FMbutton.
Muting the microphone
During a call, it is possible to mute the
microphone. Whilst muted, confirmation
will appear in the display.
Audio units with green call accept
button
Press the call accept button. Press the
button once again to turn this function off.
Audio units without green call
accept button
Press the seek up or down button. Press
the button once again to turn this function
off.
Changing the active phone
Note:Phones must be bonded to the
system before they can be made active.
Using the station storage button
Note:
This process is only for audio units
without a telephone keypad.
1. Press the PHONEbutton on the
audio unit.
2. Press the preset number required (using the station preset buttons 1 -
6). Using the audio unit menu
Note:
After bonding a phone to the
system, this becomes the active phone.
1. Press the PHONEor call accept
button.
2. Press the MENUbutton on the audio
unit.
3. Select the ACTIVE PHONE option
on the audio unit.
4. Scroll through the different stored phones by using the seek buttons to
display the bonded phones.
5. Press the MENUbutton to select the
phone which is to be the active phone.
Debonding a bonded phone
A bonded phone can be deleted from the
system at any time, unless a phone call is
in progress.
1. Press the PHONEor call accept
button.
2. Press the MENUbutton on the audio
unit.
3. Select the DEBOND option on the
audio unit.
4. Scroll through the different phones by using the seek buttons and display the
phone to be debonded.
5. Press the MENUbutton to select the
phone which is to be debonded.
Debonding a bonded phone -
Sony radio
A bonded phone can be deleted from the
system at any time, unless a phone call is
in progress.
1. Press the PHONEbutton.
2. Press the up/down arrow buttons until
you reach the DEBONDoption.
179
Telephone
Page 184 of 226

PRINCIPLE OF OPERATION
CAUTION
Using the system with the engine off
will drain the battery.
Voice recognition enables operation of
the system without the need to divert your
attention from the road ahead in order to
change settings, or receive feedback
from the system.
Whenever you issue one of the defined
commands with the system active, the
voice recognition system converts your
command into a control signal for the
system. Your inputs take the form of
dialogues or commands. You are guided
through these dialogues by
announcements or questions.
Please familiarise yourself with the
functions of the system before using voice
recognition.
Supported commands
The voice control system allows you to
control the following vehicle functions:
•
Bluetooth phone
• radio
• CD Player/CD Changer
• external device (USB)
• external device (iPod)
• automatic climate control
• navigation system (DVD units only -
refer to separate DVD navigation
handbook).
System response
As you work through a voice session the
system will prompt you with a beep tone
each time the system is ready to proceed. Do not try to give any commands until the
beep tone has been heard. The voice
control system will repeat each spoken
command back to you.
If you are not sure how to continue say
"HELP" for assistance or "CANCEL" if you
do not wish to continue.
The "HELP" function provides only a
subset of the available voice commands.
Detailed explanations of all possible voice
commands can be found on the following
pages.
Voice commands
All voice commands should be given using
a natural speaking voice, as if speaking to
a passenger or on the phone. Your voice
level should be dependant on the
surrounding noise level inside or outside
the vehicle but do not shout.
USING VOICE CONTROL
System operation
The order and content of the voice
controls are given in the following lists. The
tables show the sequence of user voice
commands and system responses for
each available function.
<>
indicates a number or stored name tag
to be inserted by the user.
Short cuts
There are a number of voice command
short cuts available, which allow you to
control some vehicle features without
having to follow the complete command
menu. These are:
• phone: "MOBILE NAME", "DIAL
NUMBER", "DIAL NAME", and
"REDIAL"
• CD player/CD changer: "DISC" and
"TRACK"
182
Voice control
Page 185 of 226

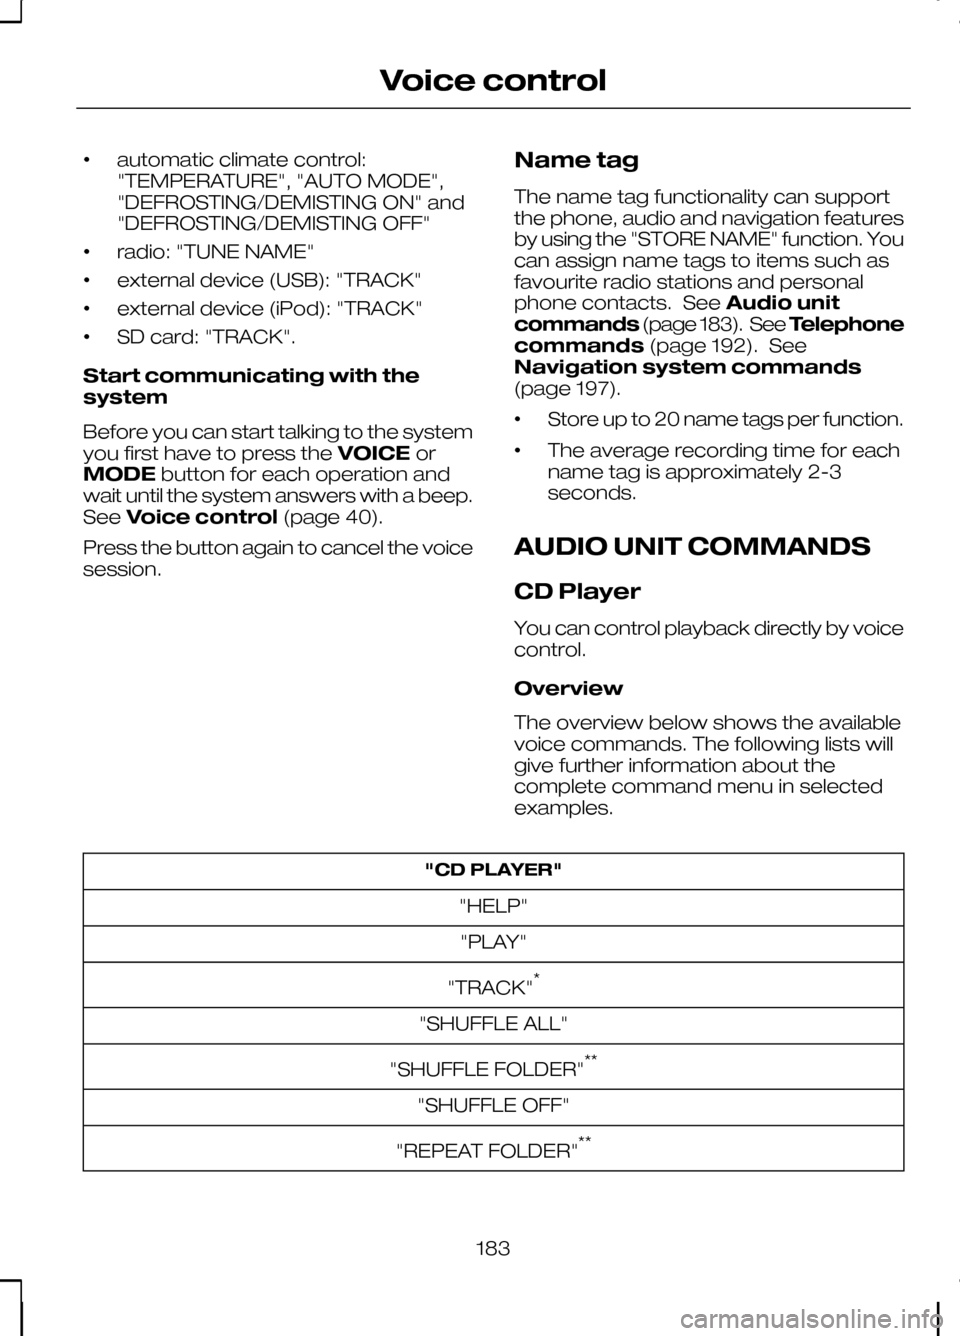
•
automatic climate control:
"TEMPERATURE", "AUTO MODE",
"DEFROSTING/DEMISTING ON" and
"DEFROSTING/DEMISTING OFF"
• radio: "TUNE NAME"
• external device (USB): "TRACK"
• external device (iPod): "TRACK"
• SD card: "TRACK".
Start communicating with the
system
Before you can start talking to the system
you first have to press the VOICEor
MODE button for each operation and
wait until the system answers with a beep.
See Voice control (page 40).
Press the button again to cancel the voice
session. Name tag
The name tag functionality can support
the phone, audio and navigation features
by using the "STORE NAME" function. You
can assign name tags to items such as
favourite radio stations and personal
phone contacts. See
Audio unit
commands (page 183). See Telephone
commands (page 192). See
Navigation system commands
(page 197).
• Store up to 20 name tags per function.
• The average recording time for each
name tag is approximately 2-3
seconds.
AUDIO UNIT COMMANDS
CD Player
You can control playback directly by voice
control.
Overview
The overview below shows the available
voice commands. The following lists will
give further information about the
complete command menu in selected
examples. "CD PLAYER"
"HELP""PLAY"
"TRACK" *
"SHUFFLE ALL"
"SHUFFLE FOLDER" **
"SHUFFLE OFF"
"REPEAT FOLDER" **
183
Voice control
Page 188 of 226

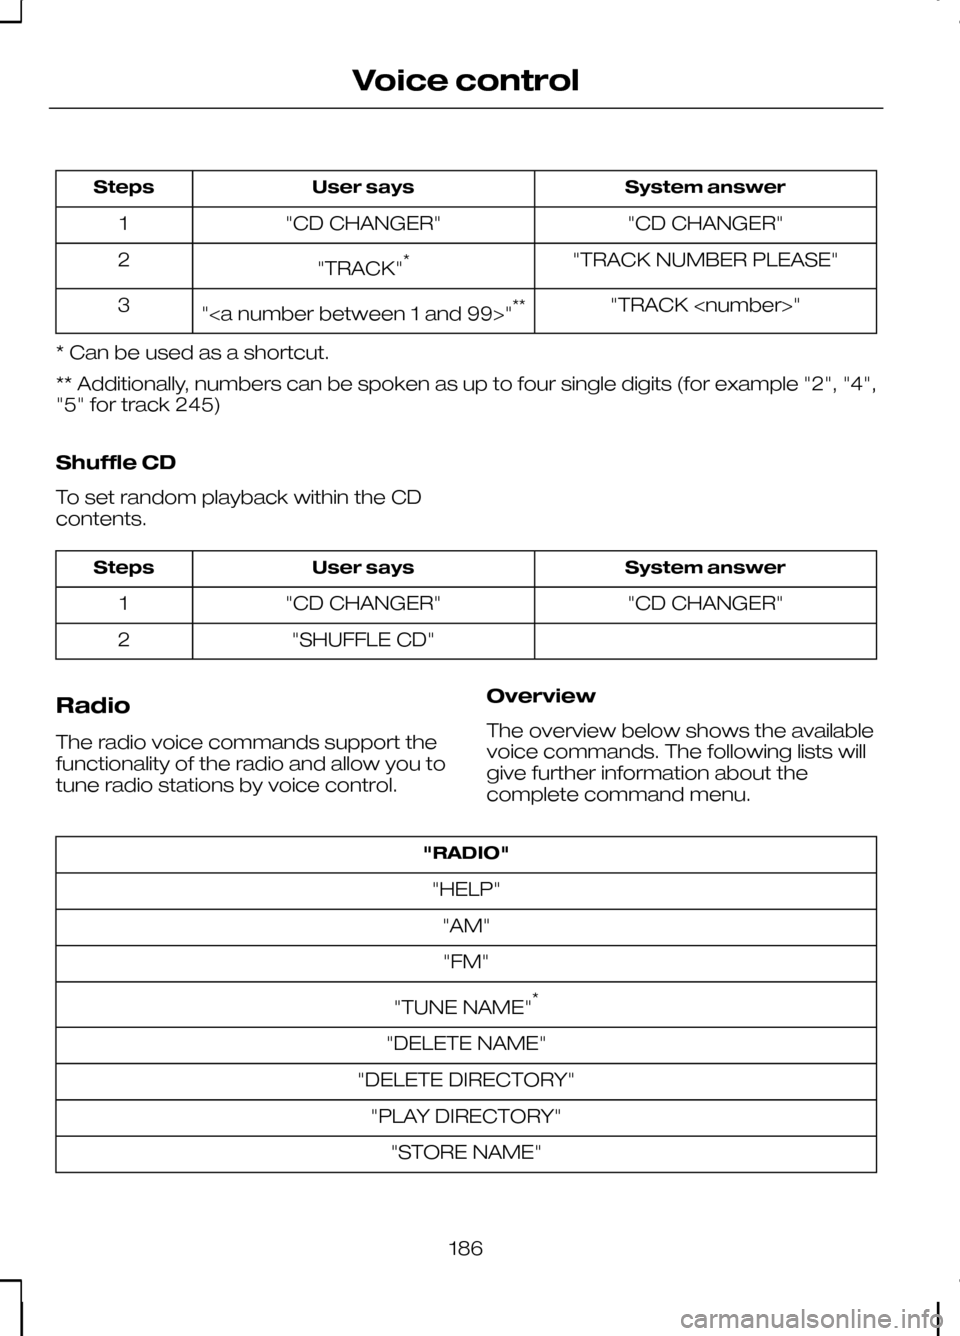
System answer
User says
Steps
"CD CHANGER"
"CD CHANGER"
1
"TRACK NUMBER PLEASE"
"TRACK" *
2
"TRACK
"" **
3
* Can be used as a shortcut.
** Additionally, numbers can be spoken as up to four single digits (for example "2", "4",
"5" for track 245)
Shuffle CD
To set random playback within the CD
contents. System answer
User says
Steps
"CD CHANGER"
"CD CHANGER"
1
"SHUFFLE CD"
2
Radio
The radio voice commands support the
functionality of the radio and allow you to
tune radio stations by voice control. Overview
The overview below shows the available
voice commands. The following lists will
give further information about the
complete command menu."RADIO"
"HELP" "AM""FM"
"TUNE NAME" *
"DELETE NAME"
"DELETE DIRECTORY" "PLAY DIRECTORY" "STORE NAME"
186
Voice control
Page 189 of 226

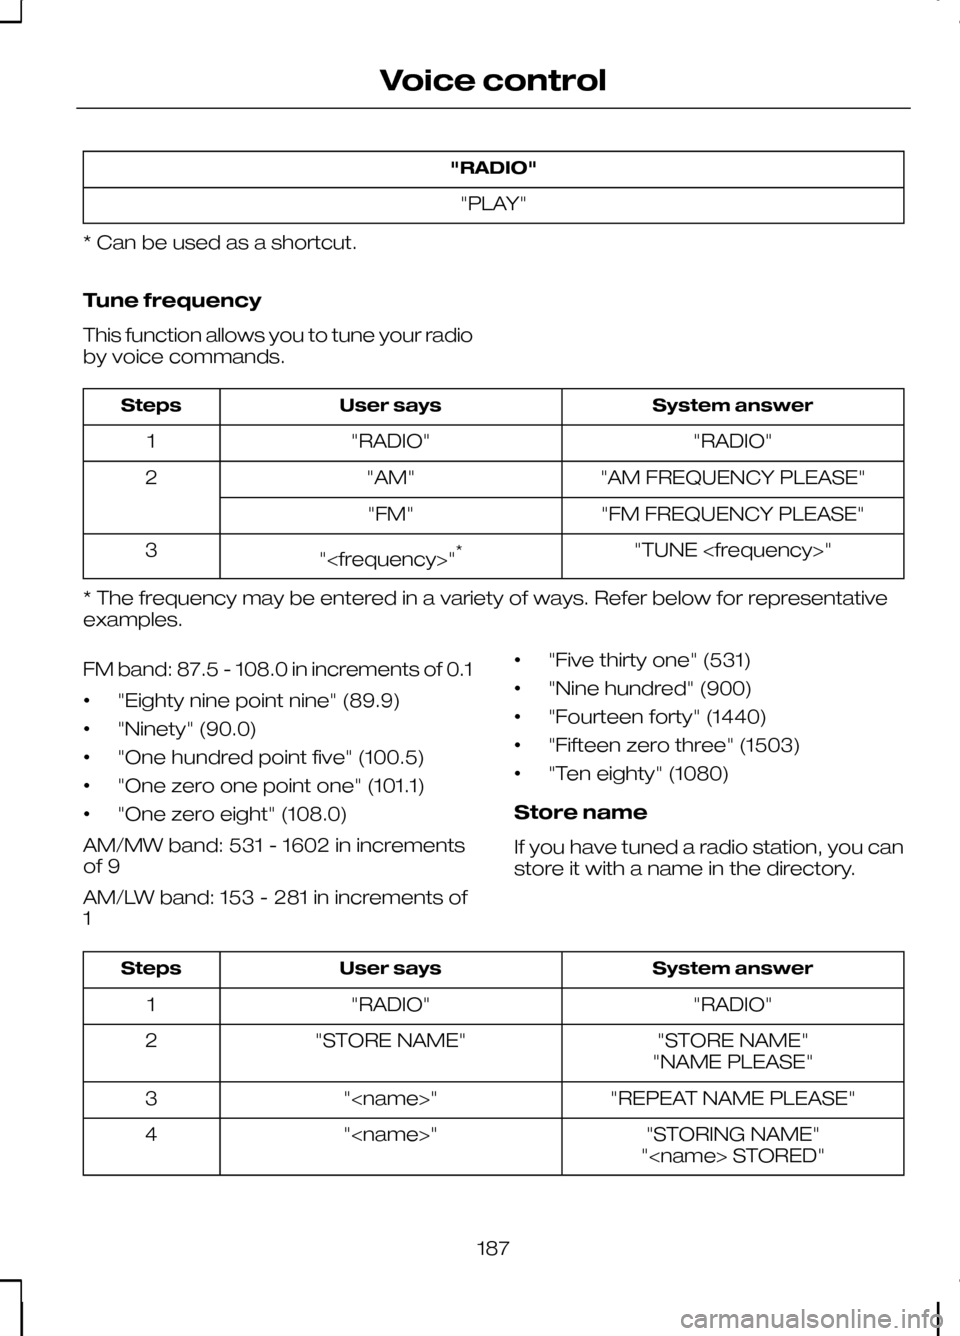
"RADIO"
"PLAY"
* Can be used as a shortcut.
Tune frequency
This function allows you to tune your radio
by voice commands. System answer
User says
Steps
"RADIO"
"RADIO"
1
"AM FREQUENCY PLEASE"
"AM"
2
"FM FREQUENCY PLEASE"
"FM"
"TUNE
"
3
* The frequency may be entered in a variety of ways. Refer below for representative
examples.
FM band: 87.5 - 108.0 in increments of 0.1
• "Eighty nine point nine" (89.9)
• "Ninety" (90.0)
• "One hundred point five" (100.5)
• "One zero one point one" (101.1)
• "One zero eight" (108.0)
AM/MW band: 531 - 1602 in increments
of 9
AM/LW band: 153 - 281 in increments of
1 •
"Five thirty one" (531)
• "Nine hundred" (900)
• "Fourteen forty" (1440)
• "Fifteen zero three" (1503)
• "Ten eighty" (1080)
Store name
If you have tuned a radio station, you can
store it with a name in the directory. System answer
User says
Steps
"RADIO"
"RADIO"
1
"STORE NAME"
"STORE NAME"
2
"NAME PLEASE"
"REPEAT NAME PLEASE"
"
3
"STORING NAME"
"
4
"
187
Voice control
Page 190 of 226

Tune name
This function allows you to call up a stored
radio station.
System answer
User says
Steps
"RADIO"
"RADIO"
1
"NAME PLEASE"
"TUNE NAME" *
2
"TUNE
"
3
* Can be used as a shortcut.
Delete name
This function allows you to delete a stored
radio station. System answer
User says
Steps
"RADIO"
"RADIO"
1
"NAME PLEASE"
"DELETE NAME"
2
"DELETE
"
3
"CONFIRM YES OR NO"
"DELETED"
"YES"
4
"COMMAND CANCELLED"
"NO"
Play directory
This function allows you to let the system
tell you all of the stored radio stations. System answer
User says
Steps
"RADIO"
"RADIO"
1
"PLAY
"PLAY DIRECTORY"
2
Delete directory
This function allows you to delete all
stored radio stations at once.
188
Voice control
Page 191 of 226

System answer
User says
Steps
"RADIO"
"RADIO"
1
"DELETE DIRECTORY"
"DELETE DIRECTORY"
2
"CONFIRM YES OR NO"
"RADIO DIRECTORY DELETED"
"YES"
3
"COMMAND CANCELLED"
"NO"
Play
This function switches the audio source
to the radio mode. System answer
User says
Steps
"RADIO"
"RADIO"
1
"PLAY"
2
Auxiliary input
This function allows you to switch the
audio source to the attached auxiliary
input device. System answer
User says
Steps
"EXTERNAL DEVICE"
"EXTERNAL DEVICE"
1
"LINE IN"
"LINE IN"
2
External devices - USB
These voice commands support the
functionality of an external USB device
which may be connected to the audio
unit. Overview
The overview below shows the available
voice commands. The following lists will
give further information about the
complete command menu in selected
examples."EXTERNAL DEVICE", "USB"
"HELP"
189
Voice control
Page 202 of 226

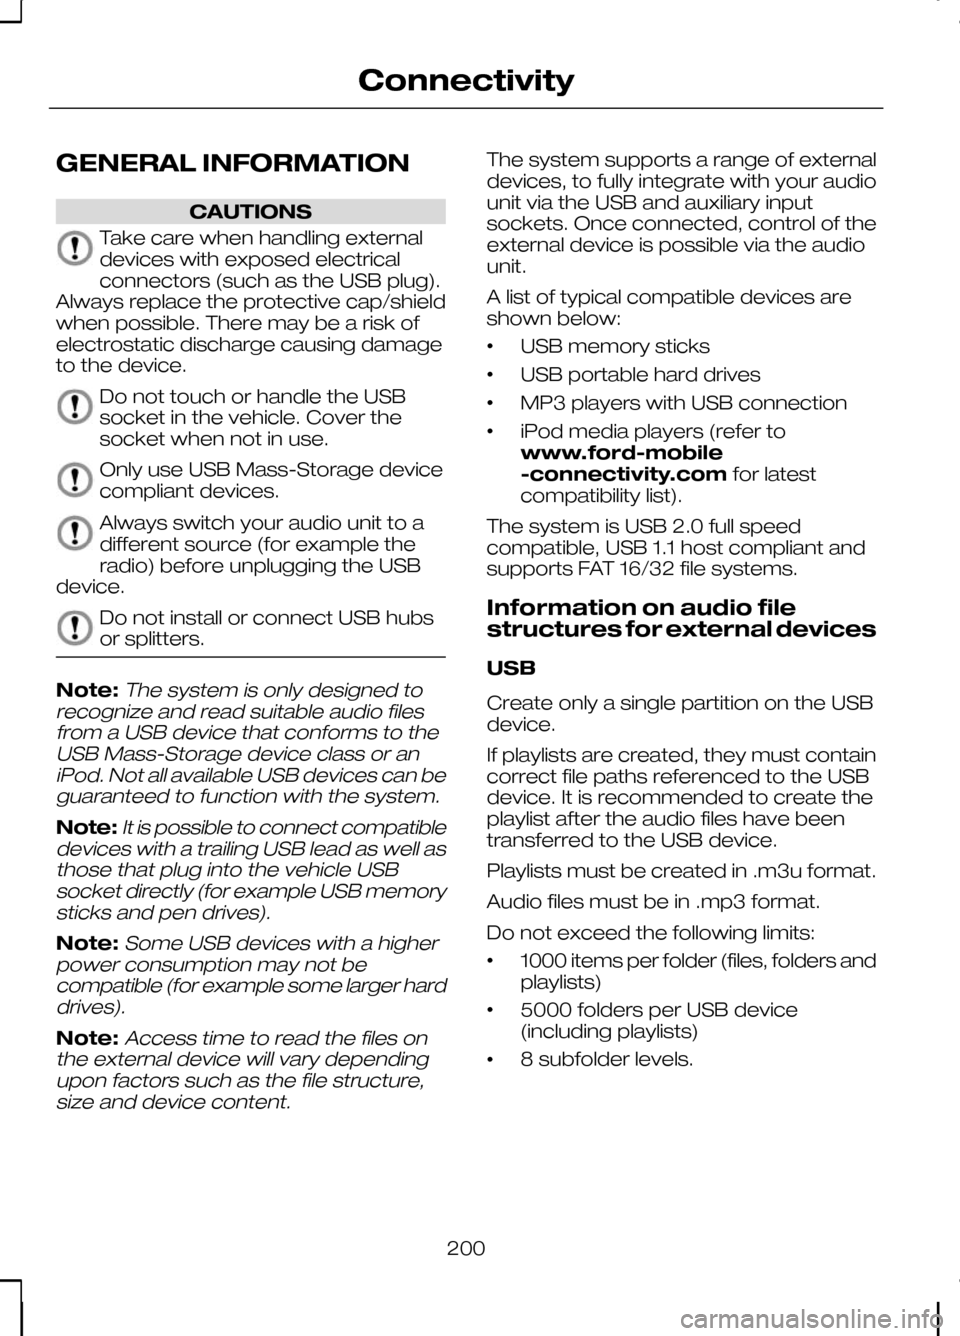
GENERAL INFORMATION
CAUTIONS
Take care when handling external
devices with exposed electrical
connectors (such as the USB plug).
Always replace the protective cap/shield
when possible. There may be a risk of
electrostatic discharge causing damage
to the device. Do not touch or handle the USB
socket in the vehicle. Cover the
socket when not in use.
Only use USB Mass-Storage device
compliant devices.
Always switch your audio unit to a
different source (for example the
radio) before unplugging the USB
device. Do not install or connect USB hubs
or splitters.
Note:The system is only designed to
recognize and read suitable audio files from a USB device that conforms to theUSB Mass-Storage device class or aniPod. Not all available USB devices can beguaranteed to function with the system.
Note:It is possible to connect compatible
devices with a trailing USB lead as well as those that plug into the vehicle USBsocket directly (for example USB memorysticks and pen drives).
Note:Some USB devices with a higher
power consumption may not be compatible (for example some larger harddrives).
Note:Access time to read the files on
the external device will vary depending upon factors such as the file structure,size and device content.
The system supports a range of external
devices, to fully integrate with your audio
unit via the USB and auxiliary input
sockets. Once connected, control of the
external device is possible via the audio
unit.
A list of typical compatible devices are
shown below:
• USB memory sticks
• USB portable hard drives
• MP3 players with USB connection
• iPod media players (refer to
www.ford-mobile
-connectivity.com
for latest
compatibility list).
The system is USB 2.0 full speed
compatible, USB 1.1 host compliant and
supports FAT 16/32 file systems.
Information on audio file
structures for external devices
USB
Create only a single partition on the USB
device.
If playlists are created, they must contain
correct file paths referenced to the USB
device. It is recommended to create the
playlist after the audio files have been
transferred to the USB device.
Playlists must be created in .m3u format.
Audio files must be in .mp3 format.
Do not exceed the following limits:
• 1000 items per folder (files, folders and
playlists)
• 5000 folders per USB device
(including playlists)
• 8 subfolder levels.
200
Connectivity