Page 121 of 274

Tractor-trailer connections
WARNING:To reduce the risk of personal injury, use extreme
caution when making brake and light connections. Inclement
weather and accumulated road contamination deposits on handhold
and stepping surfaces require extra care to avoid slip and falls. Provide
adequate lighting of working areas.
WARNING:Do not climb on the back of the tractor unless it
has been provided with a deck plate and handholds. Use a
three-point stance when climbing up and down from a deck plate. Do
not jump from the vehicle. Whenever possible, make all connections
while standing on the ground.
Connecting and disconnecting a trailer with air suspension
When connecting to a trailer:
•Press the lower portion of the switch and air will exhaust from the air
suspension system.
•After making the connection to the trailer, press the upper portion of
the switch, then raise the landing gear.
When disconnecting the trailer:
•Lower the landing gear, then press the lower portion of the switch.
•Disconnect the brake hoses, trailer-side and rear light connectors,
then pull the release lever on the fifth wheel.
The upper portion of the switch must be pressed before operating with a
trailer or operating in the bobtail mode.
Suspension conversions
It is not recommended, or approved, that suspension conversions be
performed. However, it is understood that, on occasion, aftermarket
add-on suspensions are installed by others on the truck chassis which
allow operator control for weight transfer from other axles (i.e., air lift
axles).
WARNING:When operating a loaded vehicle, the driver must
keep all adjustable axles on the ground at all times, supporting
their share of the vehicle’s load. Failure to do so can overload other
axles, tires, wheels, springs, steering components, brakes and frames,
resulting in early component failure, loss of vehicle control, possible
property damage and personal injury.
Driving
121
2010 F-650/750(f67)
Supplement(supplement), 1st Printing
USA(fus)
Page 133 of 274

When the differential is locked, the vehicle’s turning radius will increase
(vehicle will “under-steer”)
The differential can be locked or unlocked when the vehicle is moving at
a constant speed of less than 25 mph (40 km/h) and while the wheels
are not slipping. The differential must not be locked when the vehicle is
traveling down steep grades and traction is minimal.
Note:Never use the differential lock at vehicle speeds above 25 mph
(40 km/h).
The differential lock and differential lock light will automatically
disengage at speeds above 25 mph (40 km/h). The differential lock will
remain off until either the vehicle is restarted or the differential lock
switch is turned off then back on.
Axle conversions
It is not recommended, or approved, for axle conversions to be
performed. However, it is understood that, on occasion, aftermarket
add-on axles are installed by others on the truck chassis which allow
operator control for weight transfer from other axles (i.e., air lift axles).
WARNING:When operating a loaded vehicle, the driver must
keep all adjustable axles on the ground at all times, supporting
their share of the vehicle’s load. Failure to do so can overload other
axles, tires, wheels, springs, steering components, brakes and frames,
resulting in early component failure, loss of vehicle control, possible
property damage and personal injury.
TWO-SPEED REAR AXLE (IF EQUIPPED)
A two-speed rear axle allows the driver to select a LO range for greater
pulling power and a HI range for greater road speed and fuel economy.
These ranges can also be used to provide additional steps between
transmission shifts when driving on steep grades and/or fuel economy
may be factors.
Note:Do not shift between ranges when the speed control is on.
WARNING:Never shift a two-speed axle when descending a
steep grade as this may cause loss of vehicle control and result
in personal injury.
Driving
133
2010 F-650/750(f67)
Supplement(supplement), 1st Printing
USA(fus)
Page 134 of 274

Axle shifting
Manual transmissions:
•To downshift,select the next lower gear, release and press the
accelerator pedal rapidly, or while holding the accelerator pedal down,
release and engage the clutch rapidly.Note:The clutch method is
recommended when driving at slower speeds.
•To upshift,keep the accelerator pedal down, select the next higher
gear, release the accelerator and pause until the axle upshifts.Note:
De-clutch for smoother axle upshifts when driving at slower speeds.
Automatic transmissions:
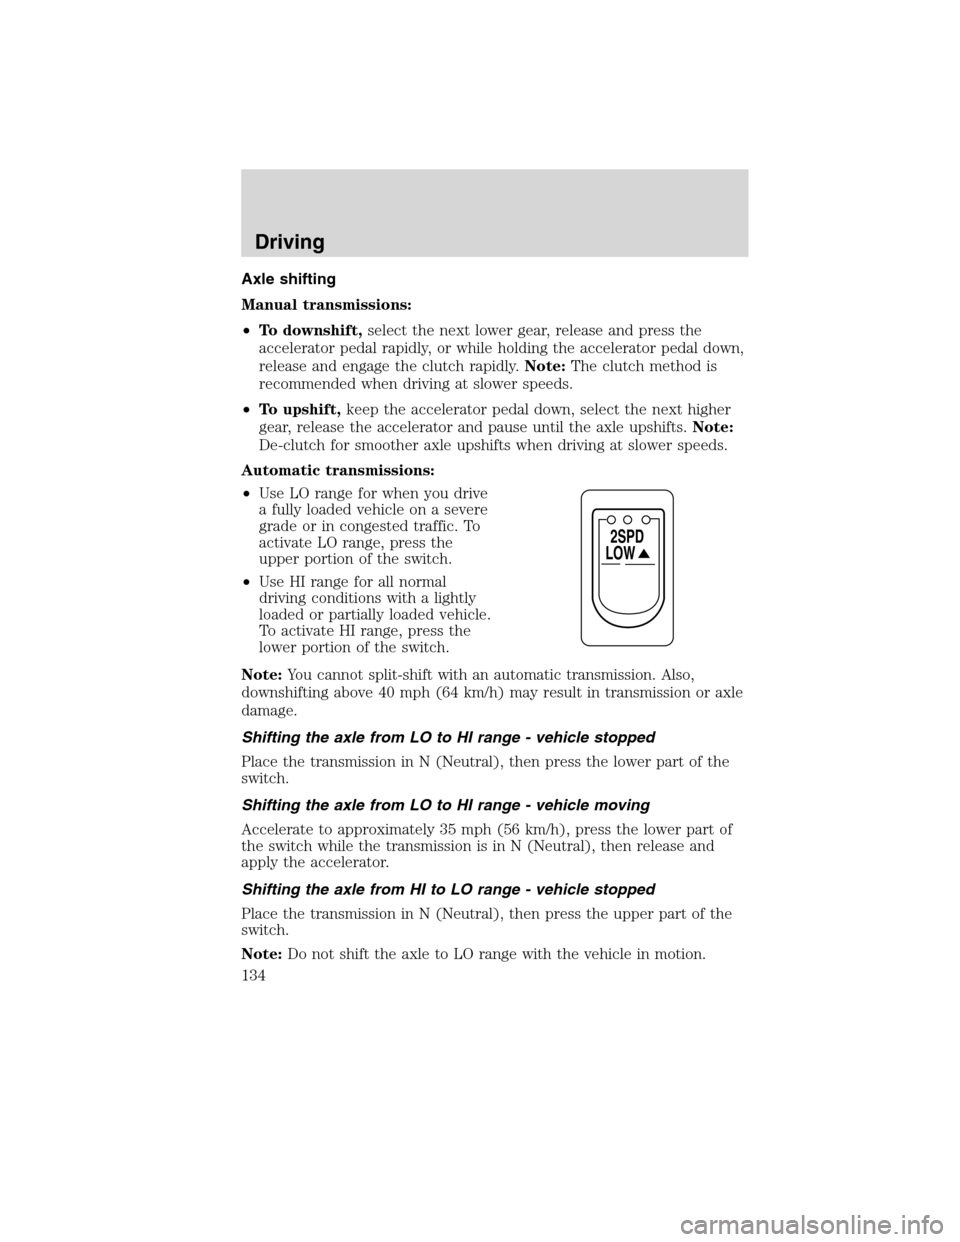
•Use LO range for when you drive
a fully loaded vehicle on a severe
grade or in congested traffic. To
activate LO range, press the
upper portion of the switch.
•Use HI range for all normal
driving conditions with a lightly
loaded or partially loaded vehicle.
To activate HI range, press the
lower portion of the switch.
Note:You cannot split-shift with an automatic transmission. Also,
downshifting above 40 mph (64 km/h) may result in transmission or axle
damage.
Shifting the axle from LO to HI range - vehicle stopped
Place the transmission in N (Neutral), then press the lower part of the
switch.
Shifting the axle from LO to HI range - vehicle moving
Accelerate to approximately 35 mph (56 km/h), press the lower part of
the switch while the transmission is in N (Neutral), then release and
apply the accelerator.
Shifting the axle from HI to LO range - vehicle stopped
Place the transmission in N (Neutral), then press the upper part of the
switch.
Note:Do not shift the axle to LO range with the vehicle in motion.
LOW
2SPD
Driving
134
2010 F-650/750(f67)
Supplement(supplement), 1st Printing
USA(fus)
Page 135 of 274

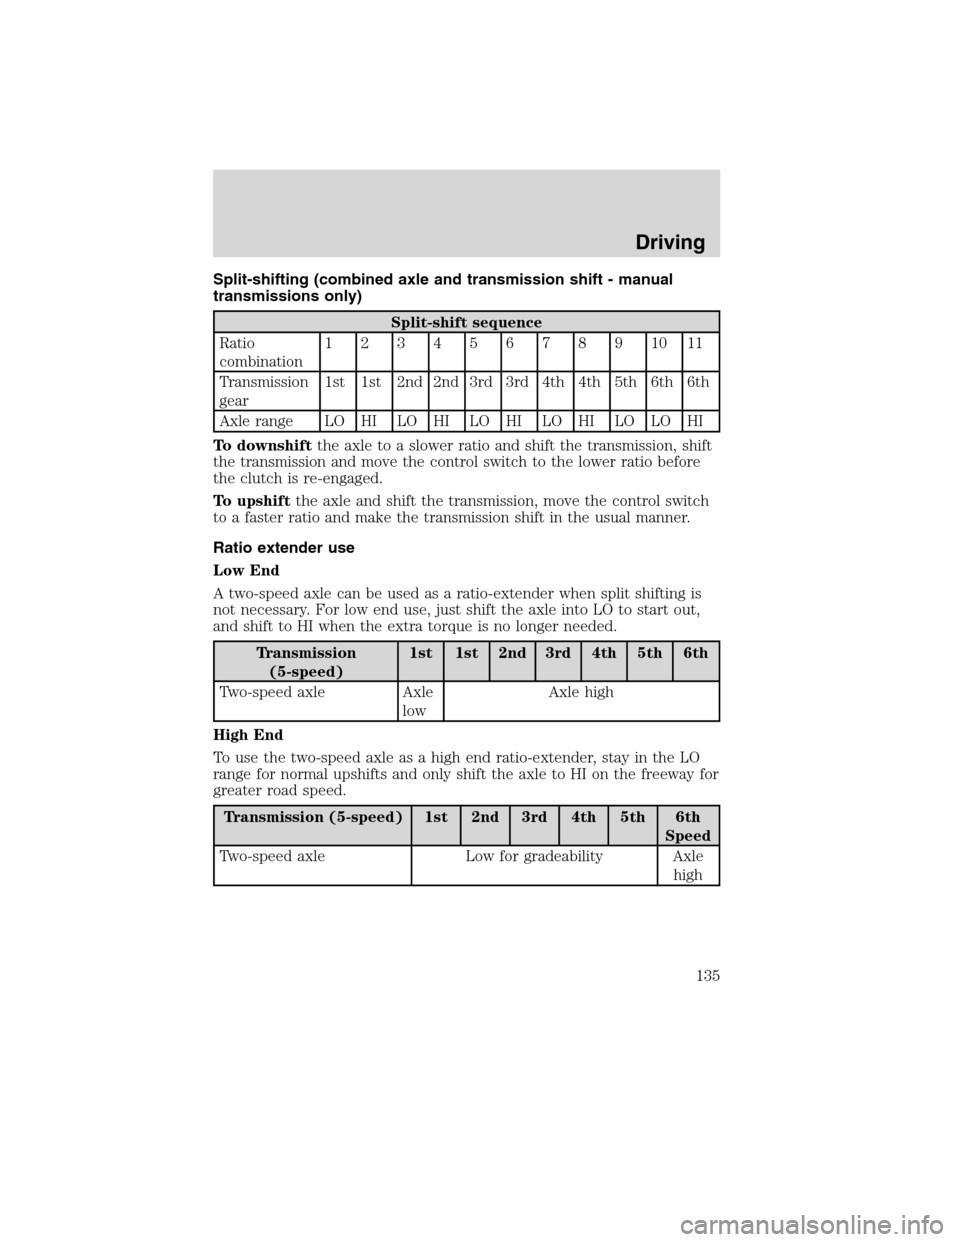
Split-shifting (combined axle and transmission shift - manual
transmissions only)
Split-shift sequence
Ratio
combination1234567891011
Transmission
gear1st 1st 2nd 2nd 3rd 3rd 4th 4th 5th 6th 6th
Axle range LO HI LO HI LO HI LO HI LO LO HI
To downshiftthe axle to a slower ratio and shift the transmission, shift
the transmission and move the control switch to the lower ratio before
the clutch is re-engaged.
To upshiftthe axle and shift the transmission, move the control switch
to a faster ratio and make the transmission shift in the usual manner.
Ratio extender use
Low End
A two-speed axle can be used as a ratio-extender when split shifting is
not necessary. For low end use, just shift the axle into LO to start out,
and shift to HI when the extra torque is no longer needed.
Transmission
(5-speed)1st 1st 2nd 3rd 4th 5th 6th
Two-speed axle Axle
lowAxle high
High End
To use the two-speed axle as a high end ratio-extender, stay in the LO
range for normal upshifts and only shift the axle to HI on the freeway for
greater road speed.
Transmission (5-speed) 1st 2nd 3rd 4th 5th 6th
Speed
Two-speed axle Low for gradeability Axle
high
Driving
135
2010 F-650/750(f67)
Supplement(supplement), 1st Printing
USA(fus)
Page 144 of 274
Passenger compartment fuse panel
Fuse/Relay
LocationFuse Amp
RatingFuse Description
1 20A Horn
2 15A Flasher relay
3 20A Cigar lighter
4 10A Data Link Connector (DLC), Engine
diagnostic connector, Parking brake warning
5 15A Blend door actuator, Function selector switch
assembly, Trailer tow relay, Trailer ABS,
Daytime Running Lights (DRL), Climate
mode, Heated seats, Exhaust brakes, Back-up
lamps switch
6 — Not used
7 — Not used
8 5A Radio, GEM
9 5A Power window switch LED and relay
10 15A Heated mirrors
11 5A Wiper and washer systems
Roadside Emergencies
144
2010 F-650/750(f67)
Supplement(supplement), 1st Printing
USA(fus)
Page 145 of 274

Fuse/Relay
LocationFuse Amp
RatingFuse Description
12 10A Brake pedal position switch, Transmission
shift selector, Stoplamp switch, Cruise
switches
13 20A Cluster, Radio
14 10A Interior lamp relay
15 10A Interior lamp relay, Vanity mirror lamps,
Generic Electronic Module (GEM)
16 15A High beams, Indicator
17 — Not used
18 5A Headlamp switch interior lighting
19 15A Engine control
20 5A Starting system
21 10A DRL resistor
22 15A Air horn, Air suspension dump, Two-speed
axle, Driver-controlled locking differential
23 10A Flasher relay
24 15A Vacuum pump motor, ABS relay, Fuel heater
relay, Air dryer
25 10A Function selector switch assembly
26 10A Right hand low beam headlamp
27 — Not used
28 10A Left hand low beam headlamp
29 10A Cluster, GEM
30 15A Allison electronic transmission
31 — Not used
Relay 1 — Interior lamps
Relay 2 — Not used
Relay 3 — Horn
Relay 4 — One-touch down window
Relay 5 — Not used
Roadside Emergencies
145
2010 F-650/750(f67)
Supplement(supplement), 1st Printing
USA(fus)
Page 146 of 274
Power distribution box
WARNING:Always disconnect the battery before servicing high
current fuses.
WARNING:To reduce risk of electrical shock, always replace
the cover to the Power Distribution Box before reconnecting the
battery or refilling fluid reservoirs.
Fuse/Relay
LocationFuse Amp
RatingFuse Description
1 15A* Main light switch
2 30A* Power seat (driver)
3 30A* Power seat (passenger)
4 15A* Windshield washer relay, Washer pump motor
5 5A* Brake warning switch
6 15A* Air intake heater (Caterpillar engine only)
7 15A* Brake pressure switches, Stoplamp relay
8 25A* Fuel heater relay
9 20A* Ignition switch, Starter cutoff
10 15A* Air tank moisture removal valve
503
502
501304
303
302 301
2119 22 2024
23401
207 201202 203204
209 206
208 205602
601118114
110106
102
117 113 109105
101
116 112 108104
115 111 107103
18 16
14 12 10 864
2
17 15
13 11 9 753
1
Roadside Emergencies
146
2010 F-650/750(f67)
Supplement(supplement), 1st Printing
USA(fus)
Page 147 of 274

Fuse/Relay
LocationFuse Amp
RatingFuse Description
11 30A* Electronic trailer brake
12 20A* Passenger compartment fuse box 5 and 21
13 — Not used
14 — Not used
15 — Not used
16 5A* Bendix Air ABS6
17 — Not used
18 10A* Fuel transfer pump
19 — Not used
20 — Not used
21 — Not used
22 — Not used
23 — Not used
24 — Not used
101 30A** Bendix Air ABS relay (Air brake vehicles
only)
Hydraulic brakes module (Hydraulic brake
vehicles only)
102 20A** Ignition switch
103 20A** Ignition switch, Passenger compartment fuse
box fuses 19, 29 and 30
104 20A** Power point
105 20A** Power door lock switches
106 30A** Main light switch, Multifunction switch
107 50A** Passenger compartment fuse box fuses 1, 2,
3, 4, 12, 13, 14 and 15
108 40A** Fuel heater relay
109 40A** Power window relay
110 30A** Windshield wiper relay
111 30A** Body builder relay, Parking lamps
112 40A** Blower motor relay, Blower motor
113 30A** Heated seats switches, Air ride seat
Roadside Emergencies
147
2010 F-650/750(f67)
Supplement(supplement), 1st Printing
USA(fus)