2010 FORD F750 warning
[x] Cancel search: warningPage 192 of 274
Instrument cluster lamp(s) will
illuminate and/or flash when
operator assistance is required. In
addition, engine performance will
become increasingly limited above
Level 1.
At Levels 1 and 2, two courses of action may be taken by the operator to
facilitate filter regeneration:
1. The vehicle may be driven on the highway at highway speeds,
2. The operator may perform a parked regeneration by following the
steps inParked regeneration procedure (Cummins engine only).
At Level 3, performing a parked regeneration is the only available course
of action (short of professional servicing) available to the operator for
regenerating the filter. At Level 4, professional servicing is the only way
to regenerate the filter.
Parked regeneration procedure (Cummins engine only)
WARNING:When performing the parked regeneration
procedure, make certain the vehicle is safely off roadway, and
the exhaust system is away from people, or any flammable materials,
vapors, or structures. Engine speed may increase during parked
regeneration.
Note:Parked regeneration is only available when the DPF lamp on the
instrument cluster is illuminated (solid or flashing).
1. Bring the vehicle to a complete stop on level ground and safely off the
road with the exhaust system away from people, flammable materials,
vapors or structures.
2. If your vehicle is equipped with an automatic transmission and a
steering column shift lever, place transmission in P (Park). Otherwise,
place the transmission in N (Neutral).
3. Remove feet from the accelerator pedal and clutch pedal (if
equipped).
4. Set the parking brake.
5.Within 5 seconds of setting the parking brake,remove foot from
the service brake pedal.
Maintenance and Specifications
192
2010 F-650/750(f67)
Supplement(supplement), 1st Printing
USA(fus)
Page 193 of 274
The engine speed may increase slightly. To allow parked regeneration to
continue uninterrupted:
1. The vehicle must remain parked
2. The transmission must remain in P (Park) or N (Neutral) (as
previously described in Step 2).
3. The accelerator pedal, service brake pedal, and clutch pedal (if
equipped) must not be pressed
4. The parking brake must remain set
On average (depending on filter level and other factors), the process will
take 20–30 minutes to complete. The DPF lamp will turn off when the
process is complete. Repeat Steps 1–5, if parked regeneration is interrupted.
To discontinue parked regeneration (Cummins engine only)
Press any of the floor pedals to discontinue parked regeneration.
Diesel particulate filter maintenance and service
The DPF is designed to retain a relatively large amount of residual ash
and provide many miles and hours of maintenance-free operation. At
some point, generally beyond 150,000 miles (240,000 km) or 5,000 hours
of operation (whichever comes first), the DPF will require professional
cleaning to remove the accumulated ash
The exact number of miles or hours of operation will vary greatly
depending upon vehicle/engine loading and operating conditions, ash
content of the engine oil, and quality of the diesel fuel used in your
truck. Adhering to your engine manufacturer’s recommended oil and fuel
specifications will maximize the miles and hours of operation before a
DPF professional cleaning is required. Refer to your engine
manufacturer’s owner’s manual for more details regarding recommended
maintenance and service of your DPF.
Exhaust outlet assembly
WARNING:The normal operating temperature of the exhaust
system is very high. Never work around or attempt to repair any
part of the exhaust system until it has cooled. Failure to follow these
instructions may result in serious personal injury.
The exhaust outlet assembly on your vehicle is a uniquely functioning
device that accompanies the DPF assembly. It is designed to help control
the temperature of the exhaust during the DPF regeneration process.Do
Maintenance and Specifications
193
2010 F-650/750(f67)
Supplement(supplement), 1st Printing
USA(fus)
Page 197 of 274
2. Visually inspect the fluid level; the level should be at the bottom of
the fill ports.
3. If necessary, add brake fluid from a clean unopened container until the
level reaches the bottom of the fill ports. Do not fill above this line.
4. Use only a DOT 3 brake fluid certified to meet manufacturer
specifications. Refer toLubricant specificationsin this chapter.
WARNING:Brake fluid is toxic. If brake fluid contacts the eyes,
flush eyes with running water for 15 minutes. Seek medical
attention if irritation persists. If taken internally, drink water and
induce vomiting. Seek medical attention immediately.
WARNING:If you use a brake fluid that is not DOT 3, you will
cause permanent damage to your brakes.
WARNING:Do not let the reservoir for the master cylinder run
dry. This may cause the brakes to fail.
CLUTCH FLUID/LINKAGE ADJUSTMENTS
Clutch fluid (if equipped)
Check the clutch fluid level. Refer to theScheduled Maintenance
Guidechapter for the service interval schedules.
During normal operation, the fluid level in the clutch reservoir should
remain constant. If the fluid level drops, maintain the fluid level at the
step in the reservoir.
Use only a DOT 3 brake fluid designed to meet manufacturer
specifications. Refer toLubricant specificationsin this chapter.
WARNING:Carefully read cautionary information on product
label. For MEDICAL EMERGENCY INFORMATION, contact a
physician or Poison Control Center immediately; on Ford-Motorcraft
products call: 1-800-959-3673 (FORD). Failure to follow these
instructions may result in personal injury.
Maintenance and Specifications
197
2010 F-650/750(f67)
Supplement(supplement), 1st Printing
USA(fus)
Page 203 of 274

WARNING:Do not use a jack when working under a vehicle. It
may give way, causing the vehicle to fall and result in property
damage, personal injury or death. Always use floor stands to support
the vehicle.
FRAME AND TOW HOOKS
Your vehicles chassis is manufactured with frame rails of either HSLA
steel or heat-treated steel. Each must be handled in a specific manner to
ensure maximum service life. Before attempting frame repair or
modification, consult the service manual or your dealer.
It is important, particularly on vehicles where the tow hooks are used
frequently, to inspect the front and rear tow hooks for damage or a loose
mounting.
U-BOLT NUT TORQUE
U-bolt diameter (nominal) (all
spring suspensions)U-bolt diameter (nominal)
Ft. lb. N•m
IROS Air w/15,500 lb. axles and
less260–300 353–407
IROS Air w/greater than 15,500 lb.
axles370–400 502–542
Hendrickson 23,000 lb. axle 370–400 502–542
Air suspension U-bolt checks and re-torquing procedures
1. Inspect the threads of the U-bolt and nut for rust and debris. Clean
the threads if contaminated.
2. Using a torque wrench, determine if any nuts can be turned with a
force below the specified torque.
3. Using the lowest discovered torqued nut as a starting point, retighten
the nuts using the sequence listed underAir suspension U-bolt and
U-bolt nut installation.
Air suspension U-bolt and U-bolt nut installation
1. Inspect the threads of the U-bolt and nut for rust and debris. Clean
the threads if contaminated.
2. Install the U-bolts and nuts and torque the nuts to 15 ft. lb. (20 N•m),
using a diagonal pattern.
Maintenance and Specifications
203
2010 F-650/750(f67)
Supplement(supplement), 1st Printing
USA(fus)
Page 210 of 274

Changing wheel types
Consult your dealer or wheel/rim distributor before attempting any wheel
or fastener changes.
WARNING:Use only the same type and style wheels and
mounting hardware to replace original parts. Failure to do so
may result in an assembly that looks fine, but does not fit together
properly. This could possibly cause wheel or fastener failures which
could result in property damage, personal injury or death.
Note:Do not attempt to mix stud-piloted wheels or fasteners with
hub-piloted wheels or fasteners.
Note:Do not change from aluminum wheels to steel wheels or
vice-versa without changing the mounting hardware required or, with
flange-nut mounting systems, changing the hub and stud assembly.
WHEEL NUT TORQUE
Size Nut mountingTorque
Ft. lb. N•m
22 mm Flange 450–500 610–678
Note:Do not use lubrication on dry threads. Where excessive corrosion
exists, a light coat of lubricant on the first three threads of the stud bolt
is permitted. Keep lubricant away from:
•Hex nut and rim clamp contact surfaces.
•Cap nut ball face and ball seat on the disc wheel.
•Flange nut washer surface and flat on the disc wheel.
TIRE INFORMATION
Inflation
WARNING:Always maintain your tires in good condition.
Frequently check and maintain correct inflation pressures as
specified by tire manufacturers. Inspect periodically for abnormal wear
patterns and repair/replace cut or broken tire casing. Always use
experienced, trained personnel with proper equipment and correct
procedures to mount or remove tires and wheels. Failure to adhere to
these warnings could result in wheel or tire malfunction, damage to
your vehicle, personal injury, or death.
Maintenance and Specifications
210
2010 F-650/750(f67)
Supplement(supplement), 1st Printing
USA(fus)
Page 211 of 274
WARNING:To avoid personal injury or death, always follow
these instructions when mounting radial tires on wheels:
•Only personnel that have had proper training and experience should
mount or remove tires from rims or wheels.
•Use only heavy-duty rims or approved rims for radial tires. It may be
necessary to contact your wheel and rim distributor to determine if
your rims are approved for radial tires.
•If a tube is to be used, make sure special radial tire tubes are used
because of the increased flexing of the sidewalls on radial tires.
•Never use anti-freeze, silicones, or petroleum based lubricants when
mounting radial tires. Only an approved lubricant should be used as
an aid for mounting tires.
•Always inflate tires in a safety cage.
•Do not attempt to mix stud piloted wheels or fasteners with hub
piloted wheels or fasteners. To do so may cause premature wheel
failure resulting in property damage, personal injury, or death.
•Do no mix foreign (not made in North America) wheel mounting
parts with domestic (made in North America) parts. Many foreign
wheel components look similar to, but not exactly the same as
domestic made components. Mixing components could cause wheel
or fastener failures and result in property damage, personal injury, or
death.
•Do not change from aluminum wheels to steel wheels or vice-versa
without changing the mounting hardware where required or, in some
cases with flange nut mounting systems, changing the hub and stud
assembly. Mixing components could cause wheel or fastener failures
and result in property damage, personal injury, or death.
Maintenance and Specifications
211
2010 F-650/750(f67)
Supplement(supplement), 1st Printing
USA(fus)
Page 212 of 274
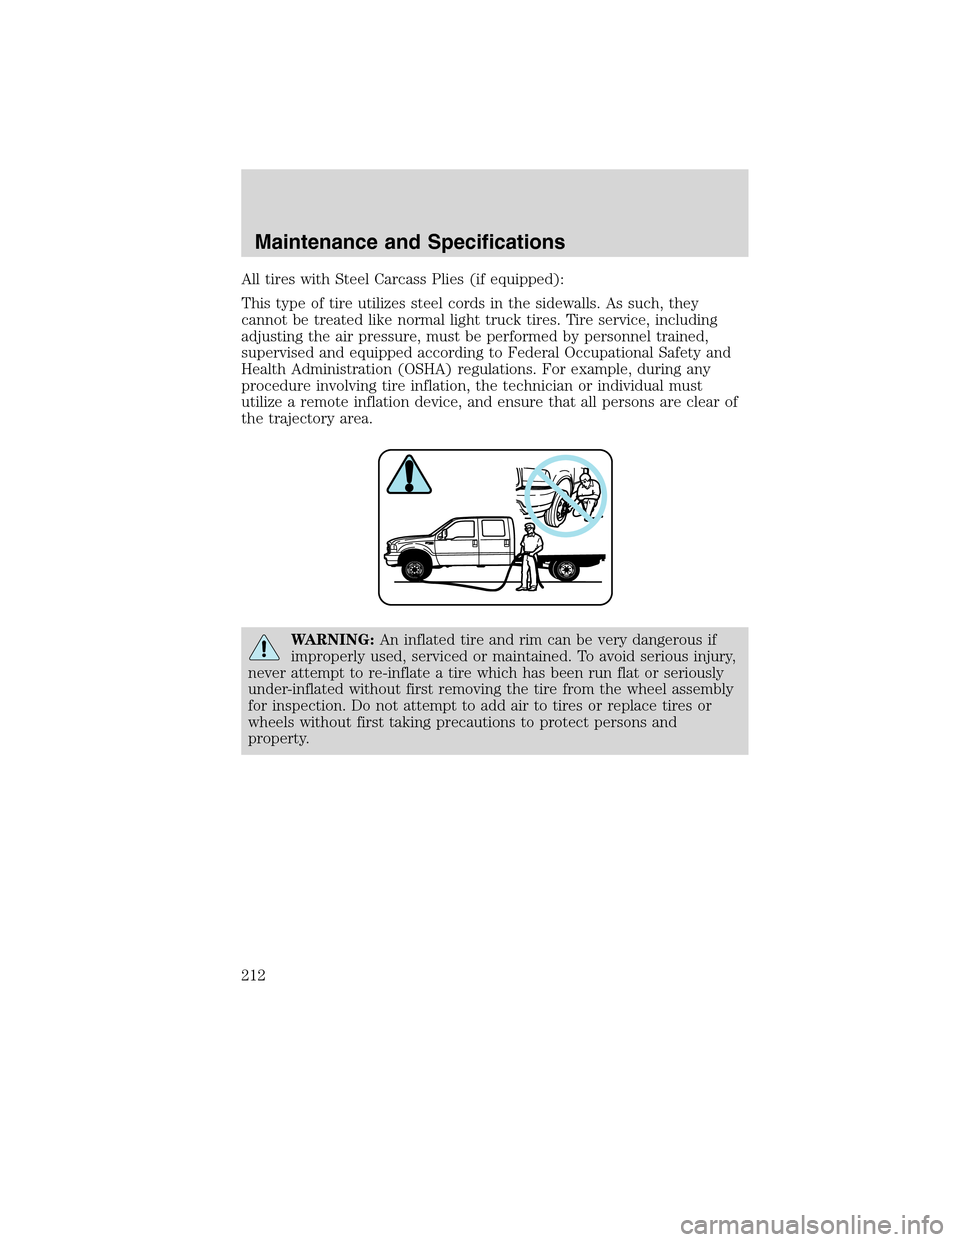
All tires with Steel Carcass Plies (if equipped):
This type of tire utilizes steel cords in the sidewalls. As such, they
cannot be treated like normal light truck tires. Tire service, including
adjusting the air pressure, must be performed by personnel trained,
supervised and equipped according to Federal Occupational Safety and
Health Administration (OSHA) regulations. For example, during any
procedure involving tire inflation, the technician or individual must
utilize a remote inflation device, and ensure that all persons are clear of
the trajectory area.
WARNING:An inflated tire and rim can be very dangerous if
improperly used, serviced or maintained. To avoid serious injury,
never attempt to re-inflate a tire which has been run flat or seriously
under-inflated without first removing the tire from the wheel assembly
for inspection. Do not attempt to add air to tires or replace tires or
wheels without first taking precautions to protect persons and
property.
Maintenance and Specifications
212
2010 F-650/750(f67)
Supplement(supplement), 1st Printing
USA(fus)
Page 213 of 274

Stay out of the trajectory (1) as indicated in the illustration.
WARNING:Do not mount tube type tires on tubeless wheels or
tubeless tires on tube type wheels. To do so could result in tire
or wheel failure and cause property damage, personal injury or death.
Preserving proper inflation pressure is a very important maintenance
practice to insure safe vehicle operation and long life for the tires.
Failure to maintain correct inflation pressure may result in sudden tire
destruction, improper vehicle handling, and may cause rapid and
irregular tire wear. Therefore, inflation pressures should be checked daily
and always before long distance trips.
Follow the tire manufacturer’s recommended cold inflation pressure for
the tire size, type, load range (ply rating) and axle loading typical for
your operation. (Each steer axle tire load will equal
1�2steer axle loading;
each drive tire load will be1�4the axle loading if fitted with four tires).
Maintenance and Specifications
213
2010 F-650/750(f67)
Supplement(supplement), 1st Printing
USA(fus)