2010 FORD F750 warning
[x] Cancel search: warningPage 122 of 274

AUTOMATIC TRANSMISSION OPERATION (IF EQUIPPED)
Main transmission, auxiliary transmission, transfer case and power
take-off (PTO) control shift patterns can be found on a placard or decal
on the driver’s sun visor, on the instrument panel or on the shift control
itself.
The main transmission control is used to select the various gear ratios or
speeds of the transmission. Selecting D (Direct Drive), does not change
the transmission gear ratio, but is used where the gear ratios in the main
transmission are adequate to handle the vehicle operation.
If the transmission fails to shift properly, check the inline 10A fuse
located in the battery cables above the battery.
WARNING:Hold the brake pedal down while you move the
gearshift lever between positions. If you don’t hold the brake
pedal down, your vehicle may move unexpectedly and cause property
damage, personal injury or death.
Allison 2200 with park pawl feature
Note:For Allison automatic transmission-equipped vehicles, also refer to
the separateAllison Transmission Operator’s Manual.
A parking pawl effectively grounds the transmission’s output shaft
preventing rotation of the driveline. If the vehicle is stationary, selecting
the P (Park) position places the transmission in neutral and engages the
parking pawl (always use the parking brake, also).
Note:If the P (Park) position is selected when the vehicle is in motion,
the parking pawl mechanism will ratchet andNOThold the truck.
WARNING:Always set the parking brake fully. Do not use the
gearshift in place of the parking brake.
WARNING: To avoid sudden, unexpected vehicle
movement and possible personal injury or death:
1. Bring the vehicle to a complete stop.
2. Shift the transmission into P (Park). Slowly lift your foot from the
brake pedal to engage the transmission parking pawl mechanism.
3. Apply the parking brake and make sure it is holding properly. Do not
rely solely on the parking mechanism of the transmission.)
4. Turn the engine off when you leave the vehicle.Never leave the
vehicle unattended when the engine is running.
Driving
122
2010 F-650/750(f67)
Supplement(supplement), 1st Printing
USA(fus)
Page 123 of 274

Allison 2500
This transmission is available with a column-mounted gearshift lever. The
gear positions are displayed on the RNDL in the instrument cluster.
WARNING: To avoid sudden, unexpected vehicle
movement and possible personal injury or death:
1. Bring the vehicle to a complete stop.
2. Shift the transmission into N (Neutral).
3. Apply the parking brake and make sure it is holding properly.
4. Turn the engine off when you leave the vehicle.Never leave the
vehicle unattended when the engine is running.
Allison 3000 series
Two modes are available for the Allison 3000 Series: Performance and
Economy. Performance mode will give you the best all-around
transmission operation; Economy provides operation at lower engine
RPM while maintaining adequate performance. The transmission will
automatically default to Performance mode when you start the engine.
Pressing MODE on the shifter will activate the Economy mode; this will
also illuminate the Mode ON lamp.
If the engine speed is above idle when a gear is selected using the
shifter, the vehicle will not move. To move the vehicle, the shifter must
be moved to re-select a gear after the engine speed returns to idle.
Note:For more information regarding the Allison 3000 Series, refer to
the separateAllison 3000 Series Operator’s Manual.
Torque lock
If your vehicle is parked on an incline and P (Park) is not properly
engaged (The parking brake is not applied before the transmission is
shifted into P [Park]), the weight of the vehicle may generate an
excessive amount of torque on the park pawl. In this situation, it may be
difficult to shift the transmission out of P (Park). Hold the brake pedal
down while shifting out of P (Park), then release the parking brake.
Driving
123
2010 F-650/750(f67)
Supplement(supplement), 1st Printing
USA(fus)
Page 127 of 274

Manual transmission shift patterns
are displayed on either the shift
lever knob or the sun visor.
Study this information carefully before you drive the vehicle even though
you may be familiar with similar units. Do not attempt to drive the
vehicle without knowing the exact shift pattern of the transmission.
Consult your authorized dealer if any questions exist as to the shifting
instructions posted in your vehicle.
WARNING:Do not coast the vehicle with the clutch pedal
pressed or with the transmission in neutral. This practice could
result in loss of vehicle control.
Driving hints
The following driving hints are provided as a brief, general guide in
operating the different manual transmissions used in your vehicle.
•When shifting into 1 (First) or R (Reverse) with vehicle standing still,
quickly release and press the clutch pedal (if necessary to complete
gear engagement).
•Always use the lowest (or most appropriate) gear to start the vehicle.
•Always use a gear ratio low enough to allow the engine to operate
above the minimum engine operation speed range.
•Do not lug the engine.
•Do not slam or jerk the gearshift lever into gear.
•When more power is required, shift to a lower gear and accelerate the
engine near the governed speed.
Shifting with a synchronized transmission
With the clutch pedal pressed in, use 2 (Second) gear synchronizer to
stop the clutch disc rotation; this allows smooth engagement of 1 (First)
or R (Reverse). To complete the gear engagement, it may be necessary
to apply light pressure to the gearshift lever during initial engagement of
the clutch. It takes a second or two to match gear speeds; steady
R 1 3 5
4
6 2
Driving
127
2010 F-650/750(f67)
Supplement(supplement), 1st Printing
USA(fus)
Page 130 of 274

If engagement is prevented by the gear teeth not meshing properly,
release the brakes and allow the vehicle to creep slightly or shift the
selector to N (Neutral) and then back into gear. The PTO should never
be engaged by clashing the gear teeth as this may damage the PTO unit
and the transmission PTO drive gear teeth. This could result in further
damage to the transmission and PTO.
PTO operation with vehicle stationary
Stop the vehicle, idle the engine and set the parking brake. Make sure
the gear selector is in any forward drive range, then engage the PTO.
After the PTO is engaged, move the range selector to N (Neutral).
Increase the engine speed until the desired power take-off operation
speed is obtained. To disengage the PTO after operation with the vehicle
standing, release the throttle, allow the drive equipment to come to a
stop, and then disengage the PTO.
WARNING:When the PTO is operated with the vehicle
stationary, the transmission must be placed in N (Neutral) with
the parking brake set. If the transmission is not in N (Neutral) and is
equipped with a remote throttle control, an increase in engine speed
can overpower the parking brake and cause the vehicle to move,
possibly resulting in personal injury and/or property damage.
PTO operation while vehicle is moving
After the PTO is engaged for driven vehicle operation, shift to the
desired range and drive the vehicle. The speed of the PTO, during this
period of operation, will always maintain direct relation to vehicle speed.
PTO speed will decrease in relation to vehicle (transmission output)
speed as shifts to a higher gear occur. When operating the PTO while the
vehicle is moving, the PTO may be disengaged whenever it is no longer
required. When there is no load on the PTO gear, it can be pulled out of
engagement.
Vehicles equipped with an Eaton UltraShift transmission
Refer to the operationTransmission Power Take Offsection of the
UltraShift Driver Instructions Manual.
Driving
130
2010 F-650/750(f67)
Supplement(supplement), 1st Printing
USA(fus)
Page 132 of 274

WARNING:Exceeding these ratings by overloading can cause
component failure resulting in property damage, personal injury
or death.
Rear axles with locking or limited-slip differentials (if equipped)
If your vehicle is equipped with a locking or limited-slip differential, note
the following:
•Power will be transmitted to the opposite wheel should one of the
wheels begin to slip.
•Both wheels must be raised off the ground should it be necessary to
operate one wheel with the vehicle stationary.
WARNING:If both wheels are not raised off the ground, the
one wheel that is not raised may pull the vehicle off its support,
possibly resulting in personal injury
Driver-controlled differential lock
To prevent the vehicle from moving when servicing the wheels, tires or
brakes, turn the engine off and raise all drive wheels of the locker
differential axle. Axles equipped with NoSPIN Detroit Locker differentials
deliver power to both wheels even when only one wheel is on the
ground.
WARNING:Failure to raise all drive wheels with this type of
differential could cause the vehicle to move unexpectedly,
resulting in property damage, personal injury or death.
Care should be taken to avoid sudden accelerations when both drive
wheels are on a slippery surface.
WARNING:Sudden accelerations on slippery surfaces could
cause the wheels to spin, the vehicle to turn sideways on a
crowned road surface or in a turn, possibly resulting in loss of vehicle
control and personal injury.
Some Dana/Spicer drive axles have a driver-controlled differential lock.
The differential lock can lock or unlock the differential when the vehicle
is moving or stopped. When extra traction is required, the differential
lock will provide full power to both axles.
Driving
132
2010 F-650/750(f67)
Supplement(supplement), 1st Printing
USA(fus)
Page 133 of 274

When the differential is locked, the vehicle’s turning radius will increase
(vehicle will “under-steer”)
The differential can be locked or unlocked when the vehicle is moving at
a constant speed of less than 25 mph (40 km/h) and while the wheels
are not slipping. The differential must not be locked when the vehicle is
traveling down steep grades and traction is minimal.
Note:Never use the differential lock at vehicle speeds above 25 mph
(40 km/h).
The differential lock and differential lock light will automatically
disengage at speeds above 25 mph (40 km/h). The differential lock will
remain off until either the vehicle is restarted or the differential lock
switch is turned off then back on.
Axle conversions
It is not recommended, or approved, for axle conversions to be
performed. However, it is understood that, on occasion, aftermarket
add-on axles are installed by others on the truck chassis which allow
operator control for weight transfer from other axles (i.e., air lift axles).
WARNING:When operating a loaded vehicle, the driver must
keep all adjustable axles on the ground at all times, supporting
their share of the vehicle’s load. Failure to do so can overload other
axles, tires, wheels, springs, steering components, brakes and frames,
resulting in early component failure, loss of vehicle control, possible
property damage and personal injury.
TWO-SPEED REAR AXLE (IF EQUIPPED)
A two-speed rear axle allows the driver to select a LO range for greater
pulling power and a HI range for greater road speed and fuel economy.
These ranges can also be used to provide additional steps between
transmission shifts when driving on steep grades and/or fuel economy
may be factors.
Note:Do not shift between ranges when the speed control is on.
WARNING:Never shift a two-speed axle when descending a
steep grade as this may cause loss of vehicle control and result
in personal injury.
Driving
133
2010 F-650/750(f67)
Supplement(supplement), 1st Printing
USA(fus)
Page 136 of 274

MAXIMUM VEHICLE LOADING
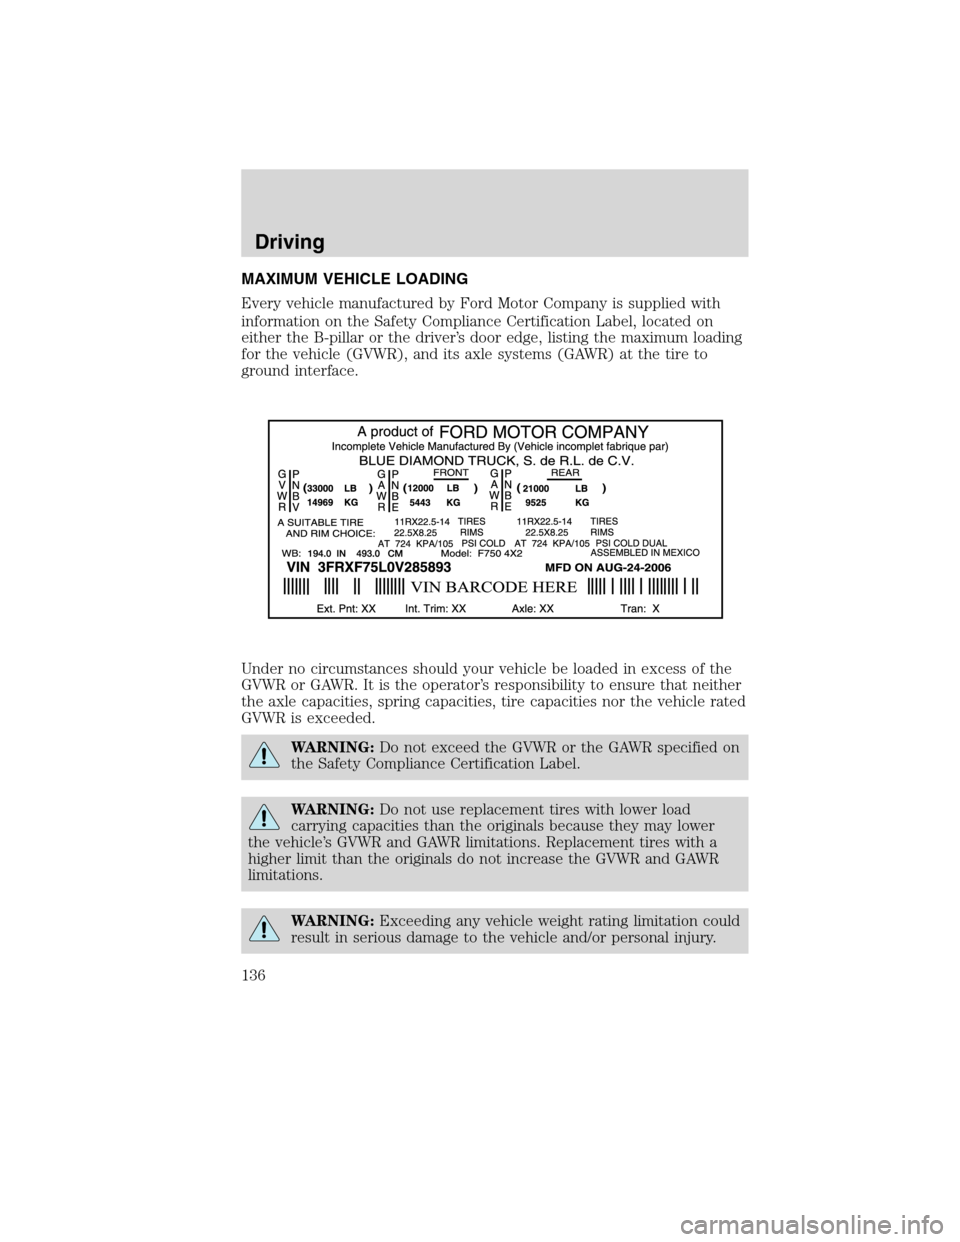
Every vehicle manufactured by Ford Motor Company is supplied with
information on the Safety Compliance Certification Label, located on
either the B-pillar or the driver’s door edge, listing the maximum loading
for the vehicle (GVWR), and its axle systems (GAWR) at the tire to
ground interface.
Under no circumstances should your vehicle be loaded in excess of the
GVWR or GAWR. It is the operator’s responsibility to ensure that neither
the axle capacities, spring capacities, tire capacities nor the vehicle rated
GVWR is exceeded.
WARNING:Do not exceed the GVWR or the GAWR specified on
the Safety Compliance Certification Label.
WARNING:Do not use replacement tires with lower load
carrying capacities than the originals because they may lower
the vehicle’s GVWR and GAWR limitations. Replacement tires with a
higher limit than the originals do not increase the GVWR and GAWR
limitations.
WARNING:Exceeding any vehicle weight rating limitation could
result in serious damage to the vehicle and/or personal injury.
Driving
136
2010 F-650/750(f67)
Supplement(supplement), 1st Printing
USA(fus)
Page 137 of 274

Unloaded or lightly loaded vehicles
The braking system has been designed to safely stop your vehicle when
fully loaded to its GVWR.
WARNING:When operating empty or lightly loaded, sudden or
hard braking may induce wheel lockup with loss of vehicle
control and the possibility of accident and serious injury, especially on
wet or slippery road surfaces.
TRAILER TOWING
Towing a trailer places an additional load on your vehicle’s engine,
transmission, axle, brakes, tires and suspension. Inspect these
components carefully prior to and after any towing operation.
Your vehicle’s load capacity is designated by weight, not by volume, so
you cannot necessarily use all available space when loading a vehicle.
2nd unit bodies are not included in maximum trailer weight ratings. The
weight of the additional “body” must be subtracted from the maximum
trailer weight.
Note:Do not exceed the GVWR or the GAWR specified on the
certification label.
WARNING:Towing trailers beyond the maximum recommended
gross trailer weight exceeds the limit of the vehicle and could
result in engine damage, transmission damage, structural damage, loss
of vehicle control, vehicle rollover and personal injury.
Model Maximum
GVWR - lb.
(kg)Maximum
GCWR - lb.
(kg)*
F-650 Regular/Super/Crew Cab 26000 (11793) 40000 (18143)
F-750 Regular/Super/Crew Cab 30000 (13608) 45000 (20412)
F-750 Regular/Super/Crew Cab 33000 (14969) 60000 (27216)
* Figures shown are the maximum available for each model. Actual
ratings may be less, depending on your transmission. Check with your
sales consultant for the exact rating on your vehicle.
Preparing to tow
Use the proper equipment for towing a trailer and make sure it is
properly attached to your vehicle. See your dealer or a reliable trailer
dealer if you require assistance.
Driving
137
2010 F-650/750(f67)
Supplement(supplement), 1st Printing
USA(fus)