2010 FORD F450 flat tire
[x] Cancel search: flat tirePage 300 of 408
the transmission vent tube is submerged may allow water into the
transmission and cause internal transmission damage.
Once through the water, always dry the brakes by moving your
vehicle slowly while applying light pressure on the brake pedal.
Wet brakes do not stop the vehicle as quickly as dry brakes.
SNOWPLOWING
Ford recommends that the Super Duty F-Series used for snow removal
include the Snow Plow Package Option.
Installing the snowplow
Weight limits and guidelines for selecting and installing the snowplow can
be found in the Ford Truck Body Builders Layout Book, Snowplow
section, found at www.fleet.ford.com/truckbbas. A typical installation
affects the following:
• Certification to government safety laws such as occupant protection
and airbag deployment, braking, and lighting. Look for an “Alterer’s
Label” on the vehicle from the snowplow installer certifying that the
installation meets all applicable Federal Motor Vehicle Safety
Standards (FMVSS).
• The Total Accessory Reserve Capacity (TARC) is shown on the lower
right side of the vehicle’s Safety Compliance Certification Label. This
applies to Ford-completed vehicles of 10,000 lb. (4,536 kg) GVWR or
less. This is the weight of permanently-attached auxiliary equipment,
such as snowplow frame-mounting hardware, that can be added to the
vehicle and satisfy Ford compliance certification to FMVSS. Exceeding
this weight may require the auxiliary equipment installer additional
safety certification responsibility. The Front Accessory Reserve
Capacity (FARC) is added for customer convenience.
• Rear ballast weight behind the rear axle may be required to prevent
exceeding the FGAWR, and provide front-to-rear weight balance for
proper braking and steering.
• Front wheel toe may require re-adjustment to prevent premature
uneven tire wear. Specifications are found in the Ford Workshop
Manual.
• Headlight aim may require re-adjustment.
• The tire air pressures recommended for general driving are found on
the vehicle’s Safety Certification Label. The maximum cold inflation
pressure for the tire and associated load rating is imprinted on the tireDriving
300
2010 F-250/350/450/550 (f23)
Owners Guide, 2nd Printing
USA (fus)
Page 303 of 408
ROADSIDE ASSISTANCE
Getting roadside assistance
To fully assist you should you have a vehicle concern, Ford Motor
Company offers a complimentary roadside assistance program. This
program is separate from the New Vehicle Limited Warranty. The service
is available:
• 24-hours, seven days a week
• for the coverage period listed on the Roadside Assistance Card
included in your Owner Guide portfolio.
Roadside assistance will cover:
• a flat tire change with a good spare (except vehicles that have been
supplied with a tire inflation kit)
• battery jump start
• lock-out assistance (key replacement cost is the customer’s
responsibility)
• fuel delivery – Independent Service Contractors, if not prohibited by
state, local or municipal law shall deliver up to 2.0 gallons (7.5L) of
gasoline or 5.0 gallons (18.9L) of diesel fuel to a disabled vehicle. Fuel
delivery service is limited to two no-charge occurrences within a
12-month period.
• winch out – available within 100 feet (30.5 meters) of a paved or
county maintained road, no recoveries.
• towing – Ford/Mercury/Lincoln eligible vehicle towed to an authorized
dealer within 35 miles (56 km) of the disablement location or to the
nearest authorized dealer. If a member requests to be towed to an
authorized dealer more than 35 miles (56 km) from the disablement
location, the member shall be responsible for any mileage costs in
excess of 35 miles (56 km).
Trailers shall be covered up to $200 if the disabled eligible vehicle
requires service at the nearest authorized dealer. If the trailer is disabled,
but the towing vehicle is operational, the trailer does not qualify for any
roadside services.
Canadian customers refer to your Customer Information Guide
for information on:
• coverage period
• exact fuel amounts Roadside Emergencies
303
2010 F-250/350/450/550 (f23)
Owners Guide, 2nd Printing
USA (fus)
Page 315 of 408

Fuse/Relay
Location Fuse Amp
Rating Protected Circuits
74 20A** Gasoline engines: Vehicle power
(VPWR): Heated exhaust gas oxygen
sensor, CMS, Mass air flow sensor,
Electronic vapor management valve,
CMCV, Variable cam timing, IMTV
Diesel engine: VPWR: Engine loads
75 5A** Back-up relay coil power
76 20A** Gasoline engines: VPWR: PCM
Diesel engine: VPWR: ECM
77 10A** ABS module logic
* Cartridge fuses ** Mini fuses
CHANGING A FLAT TIRE
If you get a flat tire while driving:
• do not brake heavily.
• gradually decrease the vehicle’s speed.
• hold the steering wheel firmly.
• slowly move to a safe place on the side of the road.
Your vehicle may be equipped with a conventional spare tire that is
different in one or more of the following: type, brand, size, speed rating
and tread design. If this is the case, this dissimilar spare tire is still rated
for your vehicle loads (GAWR and GVWR). Temporary spare tires are not
equipped with Tire Pressure Monitor System (TPMS) sensors if the
system is present.
WARNING: The use of tire sealant may damage your Tire
Pressure Monitoring System (if equipped) and should not be
used.
WARNING: If your vehicle is equipped with a Tire Pressure
Monitoring System, refer to Tire Pressure Monitoring System
(TPMS) in the Tires, Wheels and Loading chapter for more
information. If the tire pressure monitor sensor becomes damaged, it
will no longer function. Roadside Emergencies
315
2010 F-250/350/450/550 (f23)
Owners Guide, 2nd Printing
USA (fus)
Page 317 of 408

3. Full-size dissimilar spare without label on wheel
When driving with the full-size dissimilar spare tire/wheel, do not:
• Exceed 70 mph (113 km/h)
• Use more than one dissimilar spare tire/wheel at a time
• Use commercial car washing equipment
• Use snow chains on the end of the vehicle with the dissimilar spare
tire/wheel
The usage of a full-size dissimilar spare tire/wheel can lead to
impairment of the following:
• Handling, stability and braking performance
• Comfort and noise
• Ground clearance and parking at curbs
• Winter weather driving capability
• Wet weather driving capability
• All-Wheel driving capability (if applicable)
• Load leveling adjustment (if applicable)
When driving with the full-size dissimilar spare tire/wheel additional
caution should be given to:
• Towing a trailer
• Driving vehicles equipped with a camper body
• Driving vehicles with a load on the cargo rack
Drive cautiously when using a full-size dissimilar spare tire/wheel and
seek service as soon as possible.
Spare tire information
Note: If your vehicle is equipped the tire pressure monitoring system
(TPMS), the system indicator light will illuminate when the spare is in
use. To restore the full functionality of the TPMS system, all road wheels
equipped with the tire pressure monitoring sensors must be mounted on
the vehicle.
If your vehicle is equipped with TPMS, have a flat tire serviced by an
authorized dealer in order to prevent damage to the TPMS sensor; refer
to Tire Pressure Monitoring System (TPMS) in the Tires, Wheel and
Loading chapter. Replace the spare tire with the road tire as soon as
possible. Roadside Emergencies
317
2010 F-250/350/450/550 (f23)
Owners Guide, 2nd Printing
USA (fus)
Page 321 of 408
WARNING: Do not attempt to change a tire on the side of the
vehicle close to moving traffic. Pull far enough off the road to
avoid the danger of being hit when operating the jack or changing the
wheel.
Note: Passengers should not remain in the vehicle when the vehicle is
being jacked.
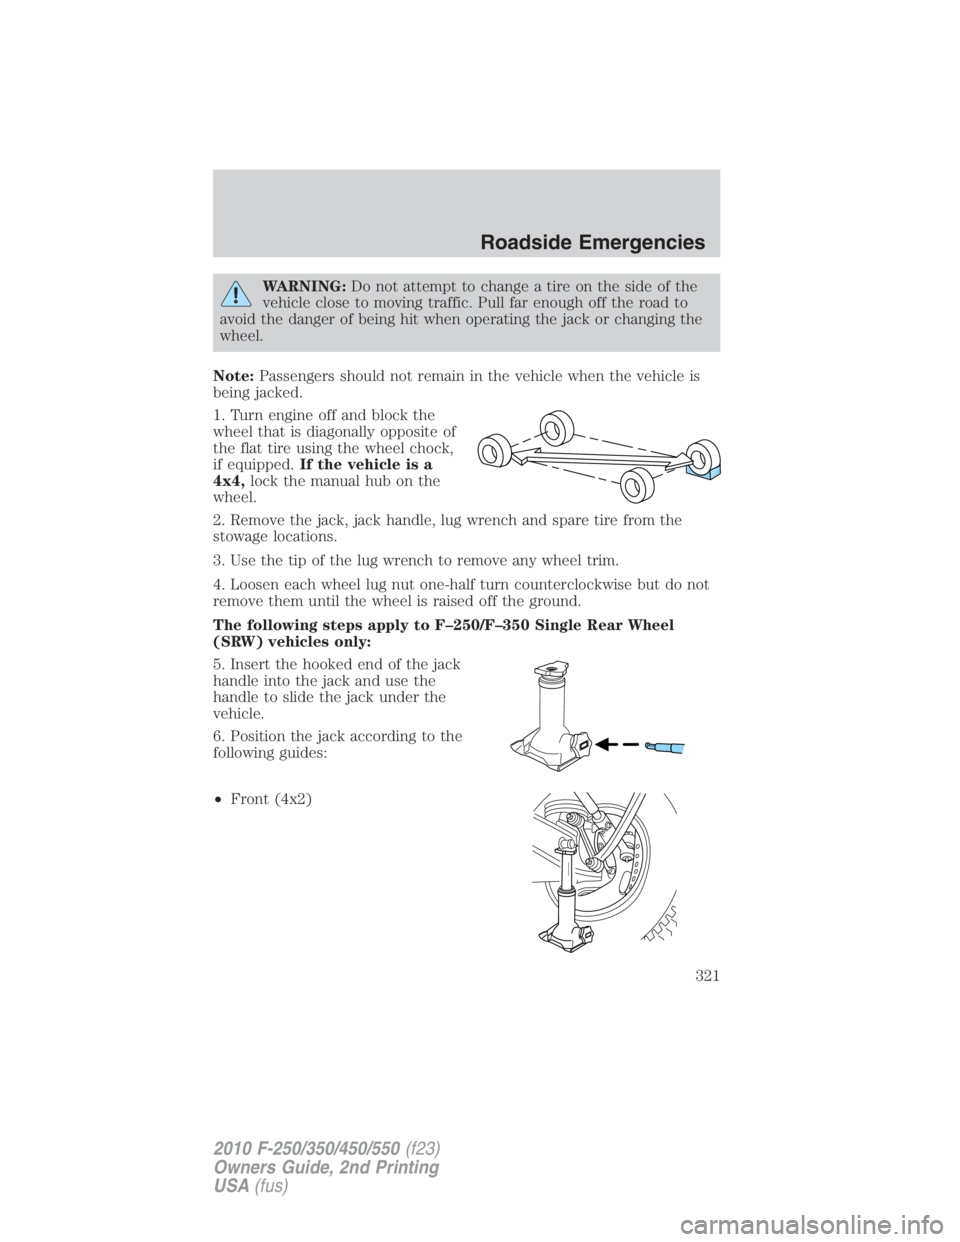
1. Turn engine off and block the
wheel that is diagonally opposite of
the flat tire using the wheel chock,
if equipped. If the vehicle is a
4x4, lock the manual hub on the
wheel.
2. Remove the jack, jack handle, lug wrench and spare tire from the
stowage locations.
3. Use the tip of the lug wrench to remove any wheel trim.
4. Loosen each wheel lug nut one-half turn counterclockwise but do not
remove them until the wheel is raised off the ground.
The following steps apply to F–250/F–350 Single Rear Wheel
(SRW) vehicles only:
5. Insert the hooked end of the jack
handle into the jack and use the
handle to slide the jack under the
vehicle.
6. Position the jack according to the
following guides:
• Front (4x2) Roadside Emergencies
321
2010 F-250/350/450/550 (f23)
Owners Guide, 2nd Printing
USA (fus)
Page 323 of 408
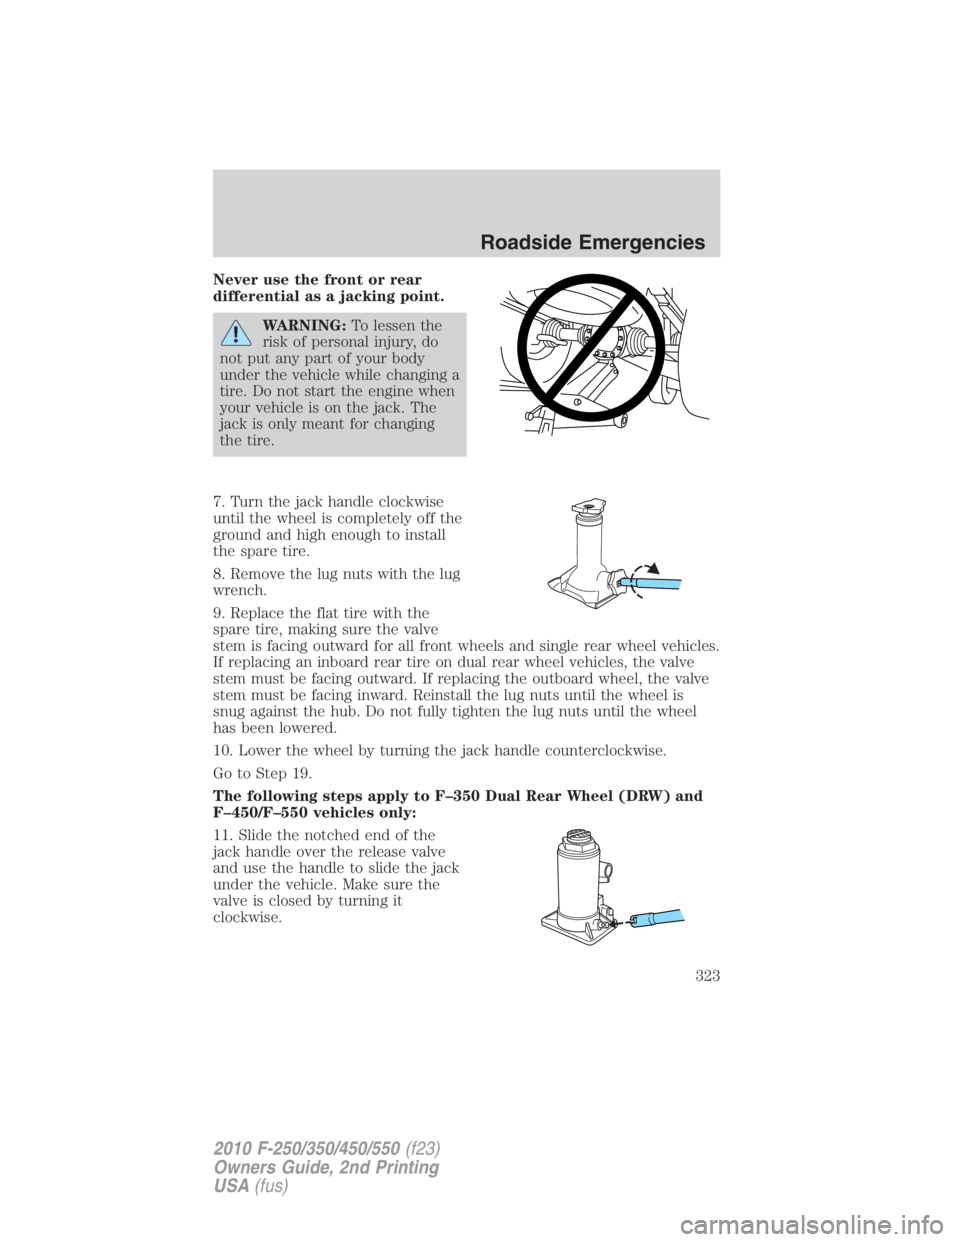
Never use the front or rear
differential as a jacking point.
WARNING: To lessen the
risk of personal injury, do
not put any part of your body
under the vehicle while changing a
tire. Do not start the engine when
your vehicle is on the jack. The
jack is only meant for changing
the tire.
7. Turn the jack handle clockwise
until the wheel is completely off the
ground and high enough to install
the spare tire.
8. Remove the lug nuts with the lug
wrench.
9. Replace the flat tire with the
spare tire, making sure the valve
stem is facing outward for all front wheels and single rear wheel vehicles.
If replacing an inboard rear tire on dual rear wheel vehicles, the valve
stem must be facing outward. If replacing the outboard wheel, the valve
stem must be facing inward. Reinstall the lug nuts until the wheel is
snug against the hub. Do not fully tighten the lug nuts until the wheel
has been lowered.
10. Lower the wheel by turning the jack handle counterclockwise.
Go to Step 19.
The following steps apply to F–350 Dual Rear Wheel (DRW) and
F–450/F–550 vehicles only:
11. Slide the notched end of the
jack handle over the release valve
and use the handle to slide the jack
under the vehicle. Make sure the
valve is closed by turning it
clockwise. Roadside Emergencies
323
2010 F-250/350/450/550 (f23)
Owners Guide, 2nd Printing
USA (fus)
Page 326 of 408
15. Remove the lug nuts with the lug wrench.
16. Replace the flat tire with the spare tire, making sure the valve stem
is facing outward on all front an inboard rear wheels. If replacing the
outboard wheel, the valve stem must be facing inward. Reinstall the lug
nuts until the wheel is snug against the hub. Do not fully tighten the lug
nuts until the wheel has been lowered.
17. Lower the wheel by slowly turning the release valve
counterclockwise. Opening the release valve slowly will provide a more
controlled rate of descent.
The following steps apply to all vehicles:
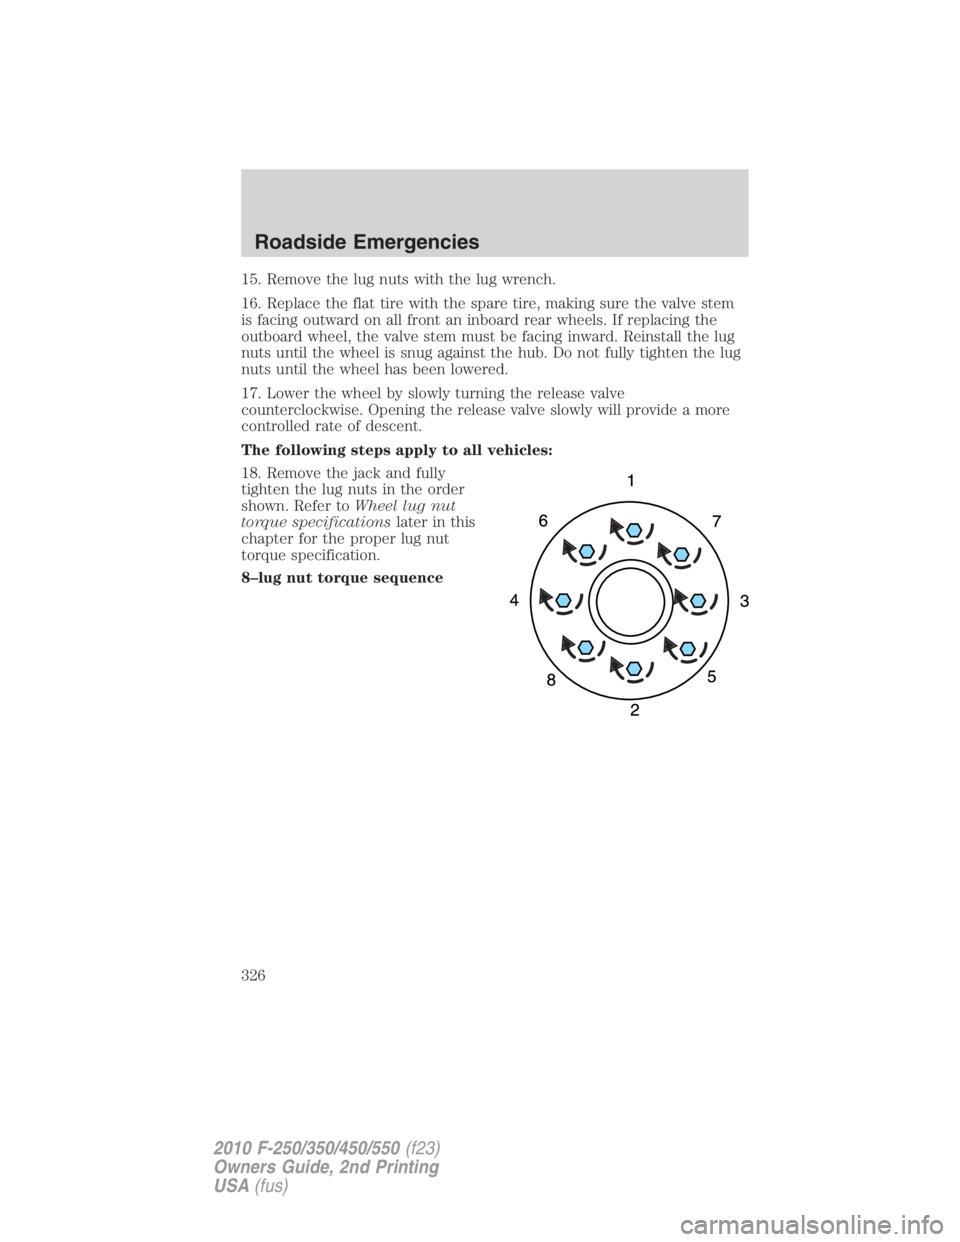
18. Remove the jack and fully
tighten the lug nuts in the order
shown. Refer to Wheel lug nut
torque specifications later in this
chapter for the proper lug nut
torque specification.
8–lug nut torque sequenceRoadside Emergencies
326
2010 F-250/350/450/550 (f23)
Owners Guide, 2nd Printing
USA (fus)
Page 327 of 408
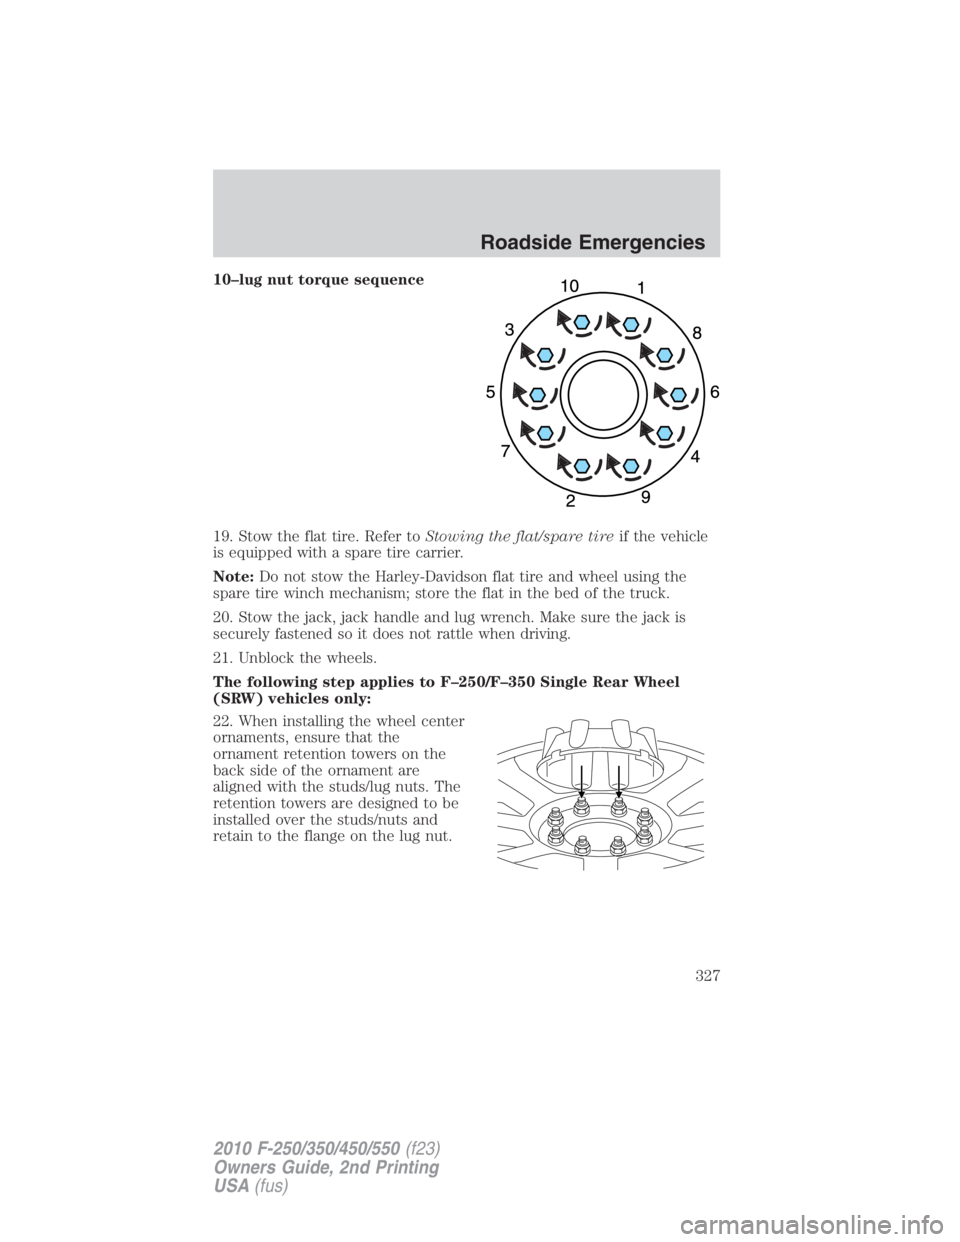
10–lug nut torque sequence
19. Stow the flat tire. Refer to Stowing the flat/spare tire if the vehicle
is equipped with a spare tire carrier.
Note: Do not stow the Harley-Davidson flat tire and wheel using the
spare tire winch mechanism; store the flat in the bed of the truck.
20. Stow the jack, jack handle and lug wrench. Make sure the jack is
securely fastened so it does not rattle when driving.
21. Unblock the wheels.
The following step applies to F–250/F–350 Single Rear Wheel
(SRW) vehicles only:
22. When installing the wheel center
ornaments, ensure that the
ornament retention towers on the
back side of the ornament are
aligned with the studs/lug nuts. The
retention towers are designed to be
installed over the studs/nuts and
retain to the flange on the lug nut. Roadside Emergencies
327
2010 F-250/350/450/550 (f23)
Owners Guide, 2nd Printing
USA (fus)