Page 10 of 344
These are some of the symbols you may see on your vehicle.
Vehicle Symbol Glossary
Safety Alert
See Owner’s Guide
Fasten Safety BeltAirbag - Front
Airbag - SideChild Seat Lower
Anchor
Child Seat Tether
AnchorBrake System
Anti-Lock Brake SystemParking Brake System
Brake Fluid -
Non-Petroleum BasedParking Aid System
Stability Control SystemSpeed Control
Master Lighting SwitchHazard Warning Flasher
Fog Lamps-FrontFuse Compartment
Fuel Pump ResetWindshield Wash/Wipe
Windshield
Defrost/DemistRear Window
Defrost/Demist
Introduction
10
2010 07+ Explorer Sport Trac(esp)
Owners Guide(own2002), 1st Printing
USA(fus)
Page 14 of 344

Brake system warning light:To
confirm the brake system warning
light is functional, it will
momentarily illuminate when the
ignition is turned to the on position
when the engine is not running, or in a position between on and start, or
by applying the parking brake when the ignition is turned to the on
position. If the brake system warning light does not illuminate at this
time, contact your authorized dealer as soon as possible. Illumination
after releasing the parking brake indicates low brake fluid level. Contact
your authorized dealer as soon as possible.
WARNING:Driving a vehicle with the brake system warning
light on is dangerous. A significant decrease in braking
performance may occur. It will take you longer to stop the vehicle.
Contact your authorized dealer as soon as possible. Driving extended
distances with the parking brake engaged can cause brake failure and
the risk of personal injury.
Anti-lock brake system:If the
ABS light stays illuminated or
continues to flash, a malfunction has
been detected. Contact your
authorized dealer as soon as
possible. Normal braking is still functional unless the brake warning light
also is illuminated.
Airbag readiness:If this light fails
to illuminate when the ignition is
turned to on, continues to flash or
remains on, contact your authorized
dealer as soon as possible. A chime will sound if there is a malfunction in
the indicator light.
Safety belt:Reminds you to fasten
your safety belt. A Belt-Minder�
chime will also sound to remind you
to fasten your safety belt. Refer to
theSeating and Safety Restraints
chapter to activate/deactivate the Belt-Minder�chime feature,
P!
BRAKE
ABS
Instrument Cluster
14
2010 07+ Explorer Sport Trac(esp)
Owners Guide(own2002), 1st Printing
USA(fus)
Page 17 of 344

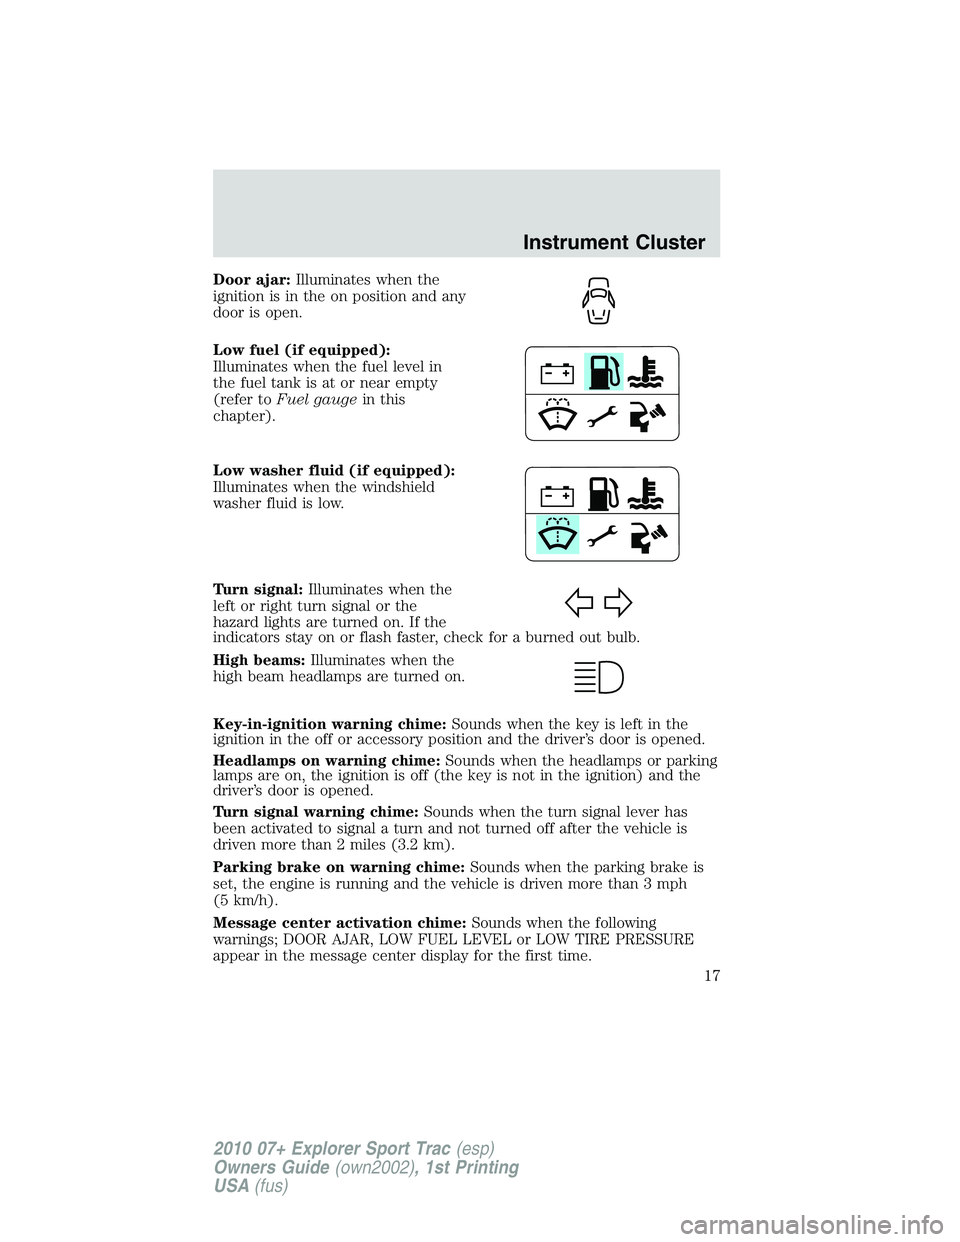
Door ajar:Illuminates when the
ignition is in the on position and any
door is open.
Low fuel (if equipped):
Illuminates when the fuel level in
the fuel tank is at or near empty
(refer toFuel gaugein this
chapter).
Low washer fluid (if equipped):
Illuminates when the windshield
washer fluid is low.
Turn signal:Illuminates when the
left or right turn signal or the
hazard lights are turned on. If the
indicators stay on or flash faster, check for a burned out bulb.
High beams:Illuminates when the
high beam headlamps are turned on.
Key-in-ignition warning chime:Sounds when the key is left in the
ignition in the off or accessory position and the driver’s door is opened.
Headlamps on warning chime:Sounds when the headlamps or parking
lamps are on, the ignition is off (the key is not in the ignition) and the
driver’s door is opened.
Turn signal warning chime:Sounds when the turn signal lever has
been activated to signal a turn and not turned off after the vehicle is
driven more than 2 miles (3.2 km).
Parking brake on warning chime:Sounds when the parking brake is
set, the engine is running and the vehicle is driven more than 3 mph
(5 km/h).
Message center activation chime:Sounds when the following
warnings; DOOR AJAR, LOW FUEL LEVEL or LOW TIRE PRESSURE
appear in the message center display for the first time.
Instrument Cluster
17
2010 07+ Explorer Sport Trac(esp)
Owners Guide(own2002), 1st Printing
USA(fus)
Page 76 of 344

Examples of acceptable condensation are:
•Presence of thin mist (no streaks, drip marks or droplets)
•Fine mist covers less than 50% of the lens
Examples of unacceptable moisture (usually caused by a lamp water
leak) are:
•Water puddle inside the lamp
•Large water droplets, drip marks or streaks present on the interior of
the lens
Take your vehicle to dealer for service if any of the above conditions of
unacceptable moisture are present.
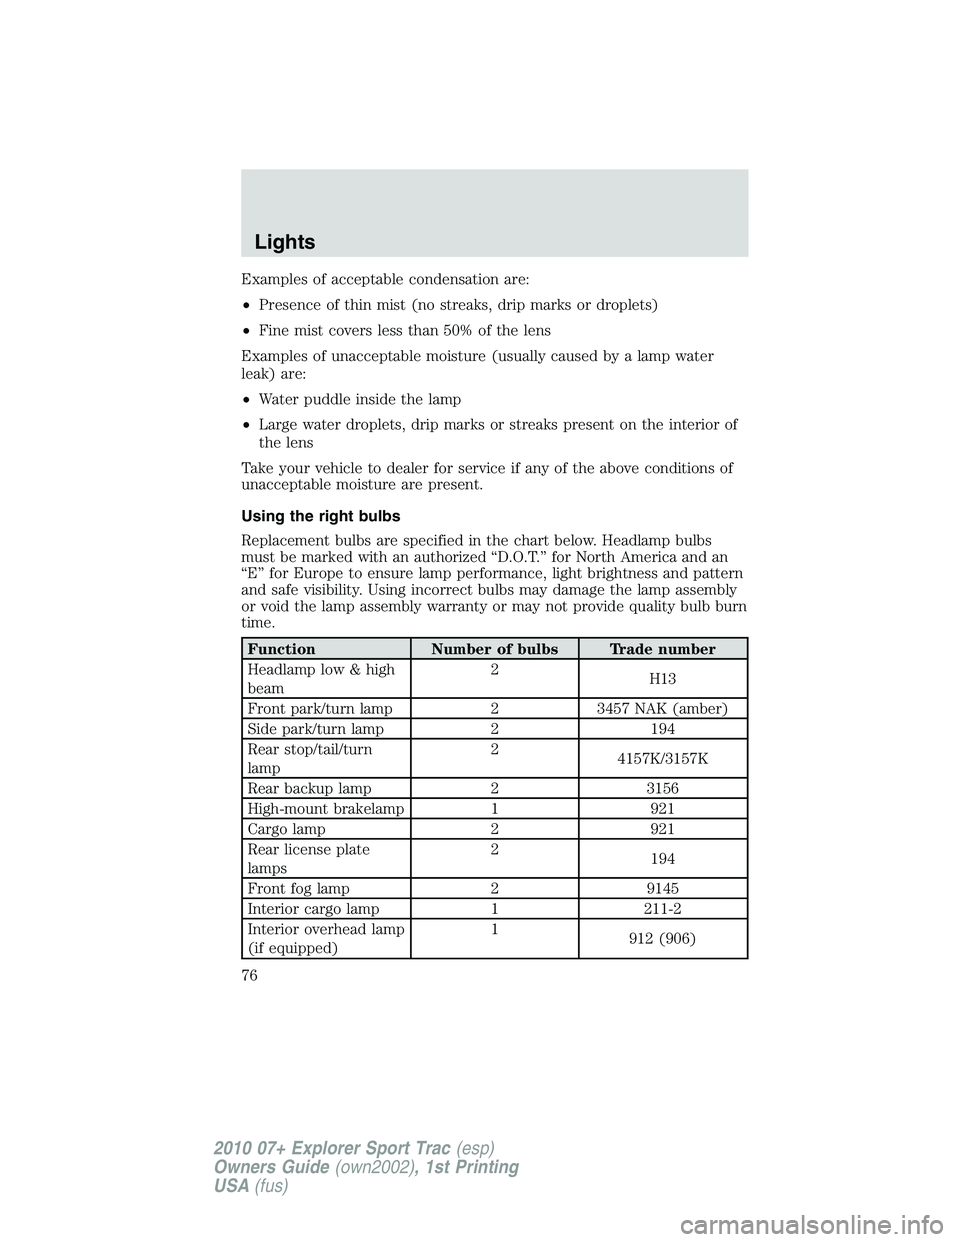
Using the right bulbs
Replacement bulbs are specified in the chart below. Headlamp bulbs
must be marked with an authorized “D.O.T.” for North America and an
“E” for Europe to ensure lamp performance, light brightness and pattern
and safe visibility. Using incorrect bulbs may damage the lamp assembly
or void the lamp assembly warranty or may not provide quality bulb burn
time.
Function Number of bulbs Trade number
Headlamp low & high
beam2
H13
Front park/turn lamp 2 3457 NAK (amber)
Side park/turn lamp 2 194
Rear stop/tail/turn
lamp2
4157K/3157K
Rear backup lamp 2 3156
High-mount brakelamp 1 921
Cargo lamp 2 921
Rear license plate
lamps2
194
Front fog lamp 2 9145
Interior cargo lamp 1 211-2
Interior overhead lamp
(if equipped)1
912 (906)
Lights
76
2010 07+ Explorer Sport Trac(esp)
Owners Guide(own2002), 1st Printing
USA(fus)
Page 79 of 344
Replacing tail/brake/turn/backup lamp bulbs
1. Turn the headlamp switch off and
open the tailgate.
2. Remove the two bolts from the
lamp assembly.
3. Remove the lamp assembly.
4. Rotate the bulb socket
counterclockwise and remove it
from the lamp assembly.
5. Pull the bulb straight out of the
socket.
Reverse steps to reinstall bulb(s).
Replacing fog lamp bulbs
1. Make sure the headlamp switch is
off.
2. Remove the bulb socket from the
fog lamp by turning it
counterclockwise.
3. Disconnect the electrical
connector.
Reverse steps to reinstall bulb(s).
Lights
79
2010 07+ Explorer Sport Trac(esp)
Owners Guide(own2002), 1st Printing
USA(fus)
Page 80 of 344
Replacing license plate lamp bulbs
The license plate bulbs are located
behind the rear bumper. To change
the license plate lamp bulbs:
1. Reach behind the rear bumper to
locate the bulb.
2. Twist the bulb socket
counterclockwise and carefully pull
to remove it from the lamp
assembly.
3. Pull out the old bulb from the
socket and push in the new bulb.
4. Install the bulb socket in lamp assembly by turning it clockwise.
Replacing high-mount brake and cargo lamp bulbs
Make sure the headlamp control is
off.
1. Remove the two screws and move
the lamp assembly away from the
vehicle to expose the bulb sockets.
2. Remove the bulb socket by
rotating counterclockwise and
pulling it out of the lamp assembly.
3. Pull the bulb straight out of the socket and push in the new bulb.
Install the new bulbs in reverse order.
Lights
80
2010 07+ Explorer Sport Trac(esp)
Owners Guide(own2002), 1st Printing
USA(fus)
Page 93 of 344
Setting speed control
The controls for using your speed
control are located on the steering
wheel for your convenience.
1. Press the ON control and release
it.
2. Accelerate to the desired speed.
3. Press the SET + control and
release it.
4. Take your foot off the accelerator
pedal.
5. The indicator light
on the
instrument cluster will turn on.
Note:
•Vehicle speed may vary momentarily when driving up and down a
steep hill.
•If the vehicle speed increases above the set speed on a downhill, you
may want to apply the brakes to reduce the speed.
•If the vehicle speed decreases more than 10 mph (16 km/h) below
your set speed on an uphill, your speed control will disengage.
Driver Controls
93
2010 07+ Explorer Sport Trac(esp)
Owners Guide(own2002), 1st Printing
USA(fus)
Page 146 of 344

The driver and front passenger Belt-Minder�features can be
deactivated/activated by performing the following procedure:
Before following the procedure, make sure that:
•The parking brake is set
•The gearshift is in P (Park)
•The ignition switch is in the off position
•The driver and front passenger safety belts are unbuckled
WARNING:While the design allows you to deactivate your
Belt-Minder�, this system is designed to improve your chances of
being safely belted and surviving an accident. We recommend you
leave the Belt-Minder�system activated for yourself and others who
may use the vehicle. To reduce the risk of injury, do not
deactivate/activate the Belt-Minder�feature while driving the vehicle.
1. Turn the ignition switch to the on position. DO NOT START THE
ENGINE.
2. Wait until the safety belt warning light turns off (Approximately one
minute).
•Step 3 must be completed within 50 seconds after the safety belt
warning light turns off.
3. For the seating position being disabled, buckle then unbuckle the
safety belt nine times at a moderate speed, ending in the unbuckled
state. Step 3 must be completed within 50 seconds after the safety belt
warning light turns off.
•After Step 3, the safety belt warning light will be turned on for three
seconds.
4. Within approximately seven seconds of the light turning off, buckle
then unbuckle the safety belt.
•This will disable the Belt-Minder�feature for that seating position if it
is currently enabled. As confirmation, the safety belt warning light will
flash four times per second for three seconds.
•This will enable the Belt-Minder�feature for that seating position if it
is currently disabled. As confirmation, the safety belt warning light will
flash four times per second for three seconds, followed by three
seconds with the light off, then followed by the safety belt warning
light flashing four times per second for three seconds again.
Seating and Safety Restraints
146
2010 07+ Explorer Sport Trac(esp)
Owners Guide(own2002), 1st Printing
USA(fus)