2010 FORD EXPLORER SPORT TRAC tow
[x] Cancel search: towPage 268 of 344
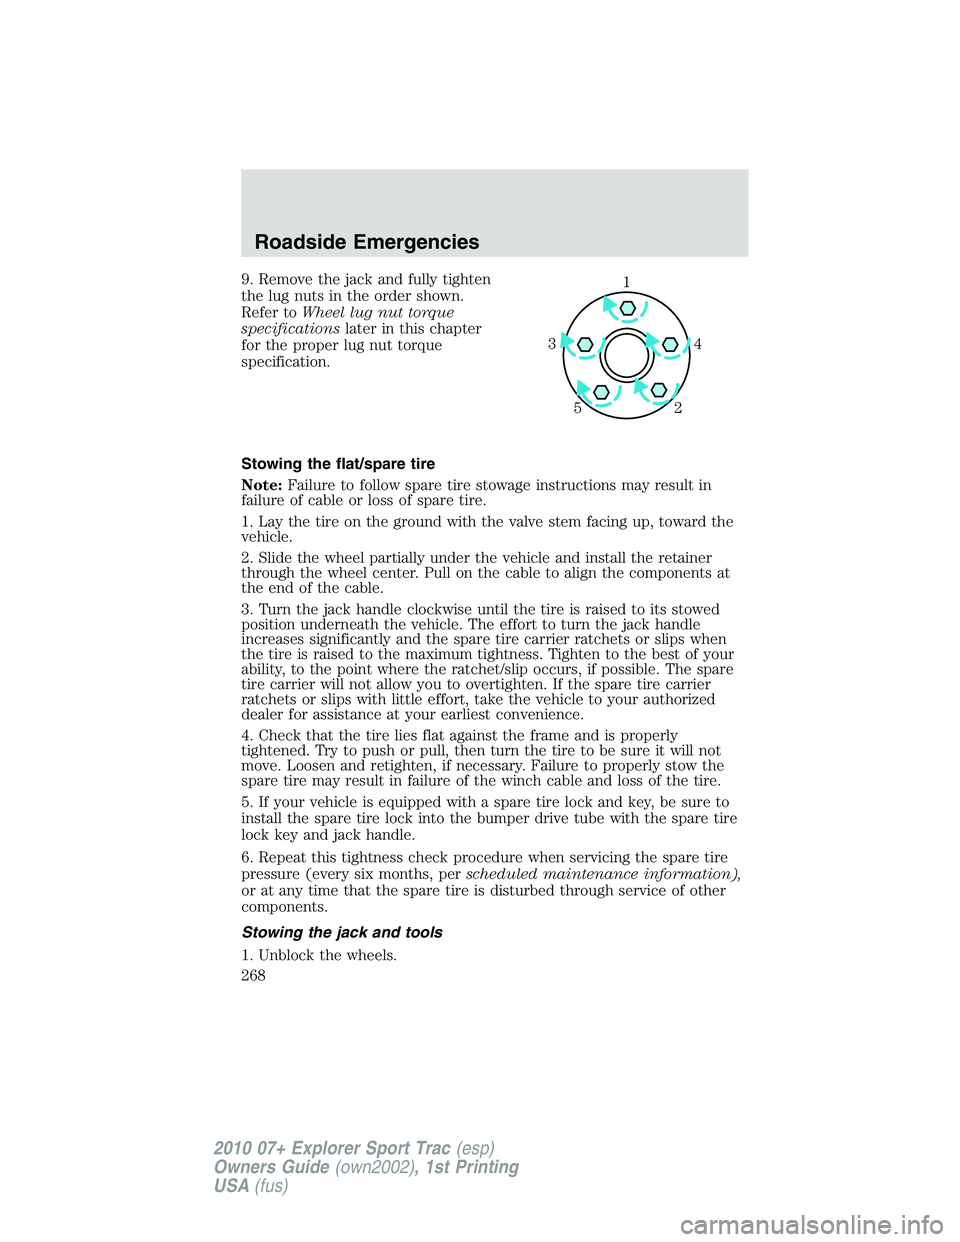
9. Remove the jack and fully tighten
the lug nuts in the order shown.
Refer toWheel lug nut torque
specificationslater in this chapter
for the proper lug nut torque
specification.
Stowing the flat/spare tire
Note:Failure to follow spare tire stowage instructions may result in
failure of cable or loss of spare tire.
1. Lay the tire on the ground with the valve stem facing up, toward the
vehicle.
2. Slide the wheel partially under the vehicle and install the retainer
through the wheel center. Pull on the cable to align the components at
the end of the cable.
3. Turn the jack handle clockwise until the tire is raised to its stowed
position underneath the vehicle. The effort to turn the jack handle
increases significantly and the spare tire carrier ratchets or slips when
the tire is raised to the maximum tightness. Tighten to the best of your
ability, to the point where the ratchet/slip occurs, if possible. The spare
tire carrier will not allow you to overtighten. If the spare tire carrier
ratchets or slips with little effort, take the vehicle to your authorized
dealer for assistance at your earliest convenience.
4. Check that the tire lies flat against the frame and is properly
tightened. Try to push or pull, then turn the tire to be sure it will not
move. Loosen and retighten, if necessary. Failure to properly stow the
spare tire may result in failure of the winch cable and loss of the tire.
5. If your vehicle is equipped with a spare tire lock and key, be sure to
install the spare tire lock into the bumper drive tube with the spare tire
lock key and jack handle.
6. Repeat this tightness check procedure when servicing the spare tire
pressure (every six months, perscheduled maintenance information),
or at any time that the spare tire is disturbed through service of other
components.
Stowing the jack and tools
1. Unblock the wheels.1
4 3
2 5
Roadside Emergencies
268
2010 07+ Explorer Sport Trac(esp)
Owners Guide(own2002), 1st Printing
USA(fus)
Page 269 of 344
2. Stow the wheel ornament (if removed) in a safe location in the vehicle
(such as the glove box or jack stowage compartment) so it will not
become damaged. Re-install the wheel ornament onto the wheel once the
tire is repaired or replaced.
3. Stow the jack and tools in their respective locations, making sure they
are fully secured so they do not rattle when you drive.
WHEEL LUG NUT TORQUE SPECIFICATIONS
Retighten the lug nuts to the specified torque within 100 miles (160 km)
after any wheel disturbance (rotation, flat tire, wheel removal, etc.).
Lug nut socket
size/Bolt sizeWheel lug nut torque*
lb.ft. N•m
Lug nut socket size:
3�4
inch (19 mm) hex
Bolt size:1�2x20100 135
* Torque specifications are for nut and bolt threads free of dirt and
rust. Use only Ford recommended replacement fasteners.
WARNING:When a wheel is installed, always remove any
corrosion, dirt or foreign materials present on the mounting
surfaces of the wheel or the surface of the wheel hub, brake drum or
brake disc that contacts the wheel. Ensure that any fasteners that
attach the rotor to the hub are secured so they do not interfere with
the mounting surfaces of the wheel. Installing wheels without correct
metal-to-metal contact at the wheel mounting surfaces can cause the
wheel nuts to loosen and the wheel to come off while the vehicle is in
motion, resulting in loss of control.
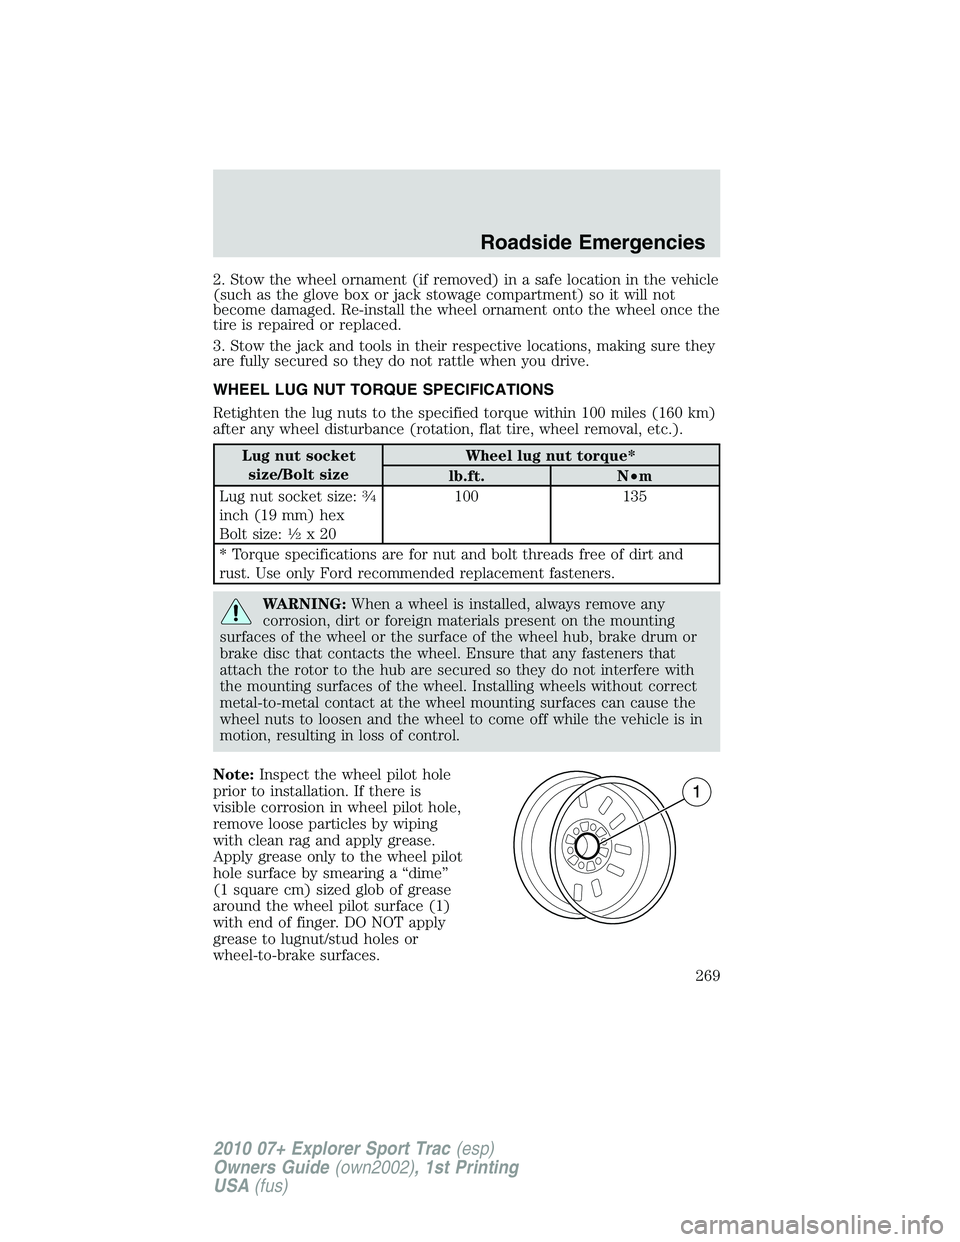
Note:Inspect the wheel pilot hole
prior to installation. If there is
visible corrosion in wheel pilot hole,
remove loose particles by wiping
with clean rag and apply grease.
Apply grease only to the wheel pilot
hole surface by smearing a “dime”
(1 square cm) sized glob of grease
around the wheel pilot surface (1)
with end of finger. DO NOT apply
grease to lugnut/stud holes or
wheel-to-brake surfaces.
Roadside Emergencies
269
2010 07+ Explorer Sport Trac(esp)
Owners Guide(own2002), 1st Printing
USA(fus)
Page 272 of 344
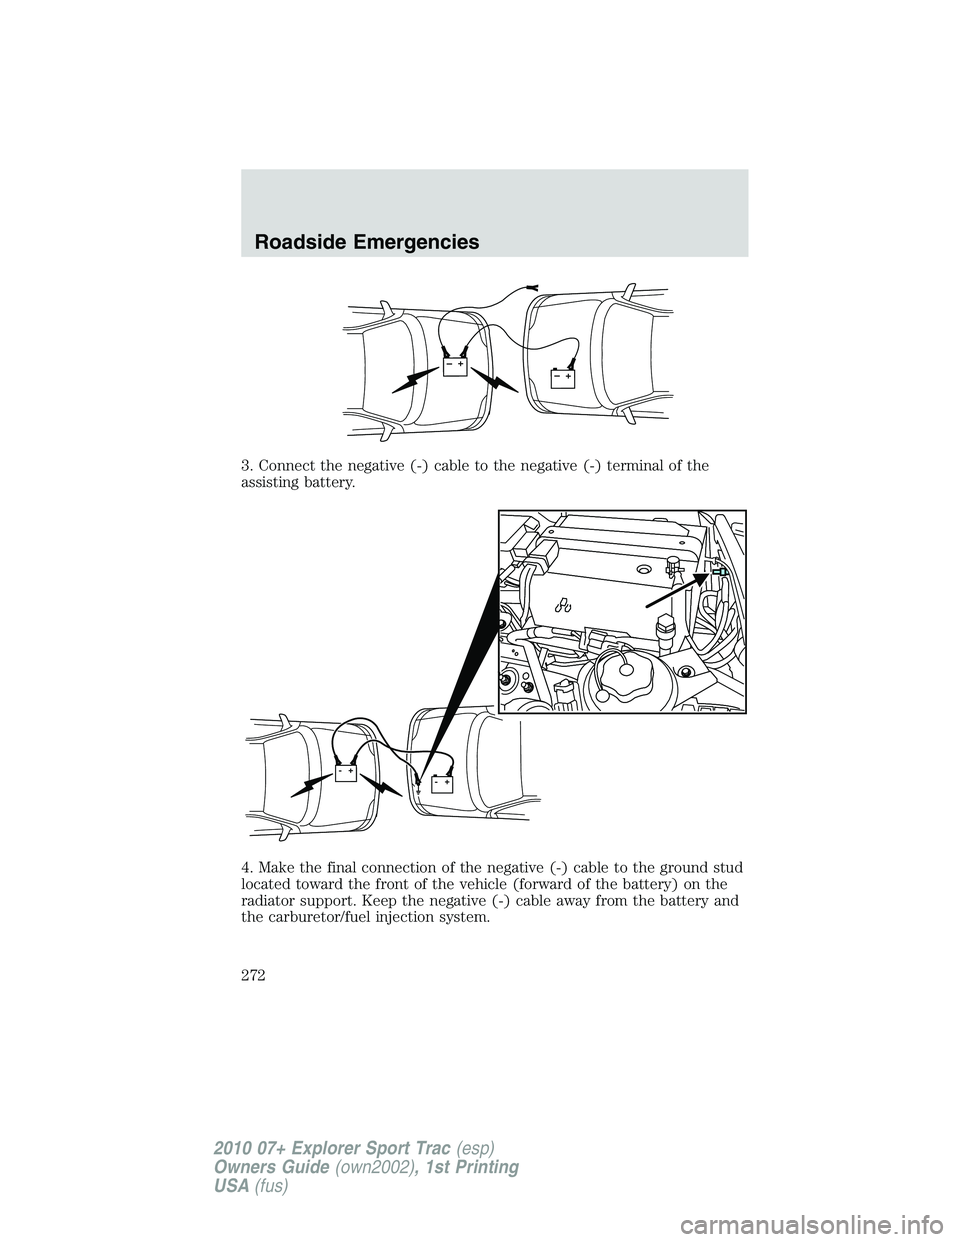
3. Connect the negative (-) cable to the negative (-) terminal of the
assisting battery.
4. Make the final connection of the negative (-) cable to the ground stud
located toward the front of the vehicle (forward of the battery) on the
radiator support. Keep the negative (-) cable away from the battery and
the carburetor/fuel injection system.
+–+–
++-
-
Roadside Emergencies
272
2010 07+ Explorer Sport Trac(esp)
Owners Guide(own2002), 1st Printing
USA(fus)
Page 275 of 344
WRECKER TOWING
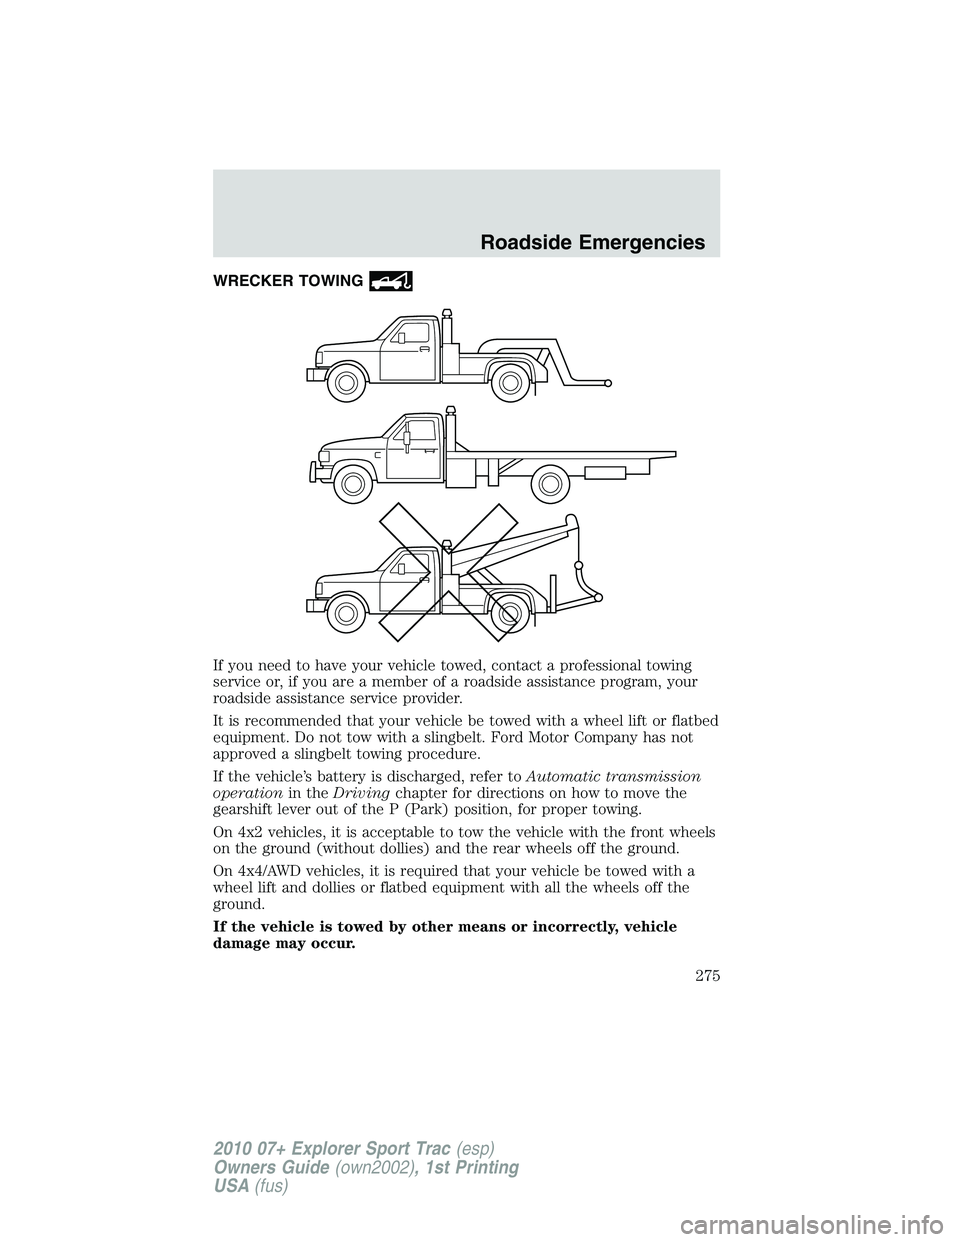
If you need to have your vehicle towed, contact a professional towing
service or, if you are a member of a roadside assistance program, your
roadside assistance service provider.
It is recommended that your vehicle be towed with a wheel lift or flatbed
equipment. Do not tow with a slingbelt. Ford Motor Company has not
approved a slingbelt towing procedure.
If the vehicle’s battery is discharged, refer toAutomatic transmission
operationin theDrivingchapter for directions on how to move the
gearshift lever out of the P (Park) position, for proper towing.
On 4x2 vehicles, it is acceptable to tow the vehicle with the front wheels
on the ground (without dollies) and the rear wheels off the ground.
On 4x4/AWD vehicles, it is required that your vehicle be towed with a
wheel lift and dollies or flatbed equipment with all the wheels off the
ground.
If the vehicle is towed by other means or incorrectly, vehicle
damage may occur.
Roadside Emergencies
275
2010 07+ Explorer Sport Trac(esp)
Owners Guide(own2002), 1st Printing
USA(fus)
Page 276 of 344
Ford Motor Company produces a towing manual for all authorized tow
truck operators. Have your tow truck operator refer to this manual for
proper hook-up and towing procedures for your vehicle.
Emergency towing
In case of a roadside emergency with a disabled vehicle (without access
to wheel dollies, car hauling trailer, or flatbed transport vehicle) your
vehicle (regardless of transmission powertrain configuration) can be flat
towed (all wheels on the ground) under the following conditions:
•Vehicle is facing forward so that it is being towed in a forward
direction.
•Place the transmission in N (Neutral). Refer toBrake shift interlock
in theDrivingchapter for specific instructions if you cannot move the
gear shift lever into N (Neutral).
•Maximum speed is not to exceed 35 mph (56 km/h).
•Maximum distance is 50 miles (80 km).
Roadside Emergencies
276
2010 07+ Explorer Sport Trac(esp)
Owners Guide(own2002), 1st Printing
USA(fus)
Page 284 of 344
WASHING THE EXTERIOR
Wash your vehicle regularly with cool or lukewarm water and a neutral
pH shampoo, such as Motorcraft Detail Wash (ZC-3-A), which is available
from your authorized dealer.
•Never use strong household detergents or soap, such as dish washing
or laundry liquid. These products can discolor and spot painted
surfaces.
•Never wash a vehicle that is “hot to the touch” or during exposure to
strong, direct sunlight.
•Always use a clean sponge or car wash mitt with plenty of water for
best results.
•Dry the vehicle with a chamois or soft terry cloth towel in order to
eliminate water spotting.
•It is especially important to wash the vehicle regularly during the
winter months, as dirt and road salt are difficult to remove and cause
damage to the vehicle.
•Immediately remove items such as gasoline, diesel fuel, bird droppings
and insect deposits because they can cause damage to the vehicle’s
paintwork and trim over time. Use Motorcraft Bug and Tar Remover
(ZC-42), which is available from your authorized dealer.
•Remove any exterior accessories, such as antennas, before entering a
car wash.
•Suntan lotions and insect repellents can damage any painted
surface; if these substances come in contact with your vehicle,
wash off as soon as possible.
•If your vehicle is equipped with running boards, do not use
rubber, plastic and vinyl protectant products on the running
board surface, as the area may become slippery.
Exterior chrome
•Wash the vehicle first, using cool or lukewarm water and a neutral pH
shampoo, such as Motorcraft Detail Wash (ZC-3-A).
•Use Motorcraft Custom Bright Metal Cleaner (ZC-15), available from
your authorized dealer. Apply the product as you would a wax to
clean bumpers and other chrome parts; allow the cleaner to dry for a
few minutes, then wipe off the haze with a clean, dry rag.
•Never use abrasive materials such as steel wool or plastic pads
as they can scratch the chrome surface.
Cleaning
284
2010 07+ Explorer Sport Trac(esp)
Owners Guide(own2002), 1st Printing
USA(fus)
Page 297 of 344
CHANGING THE WIPER BLADES
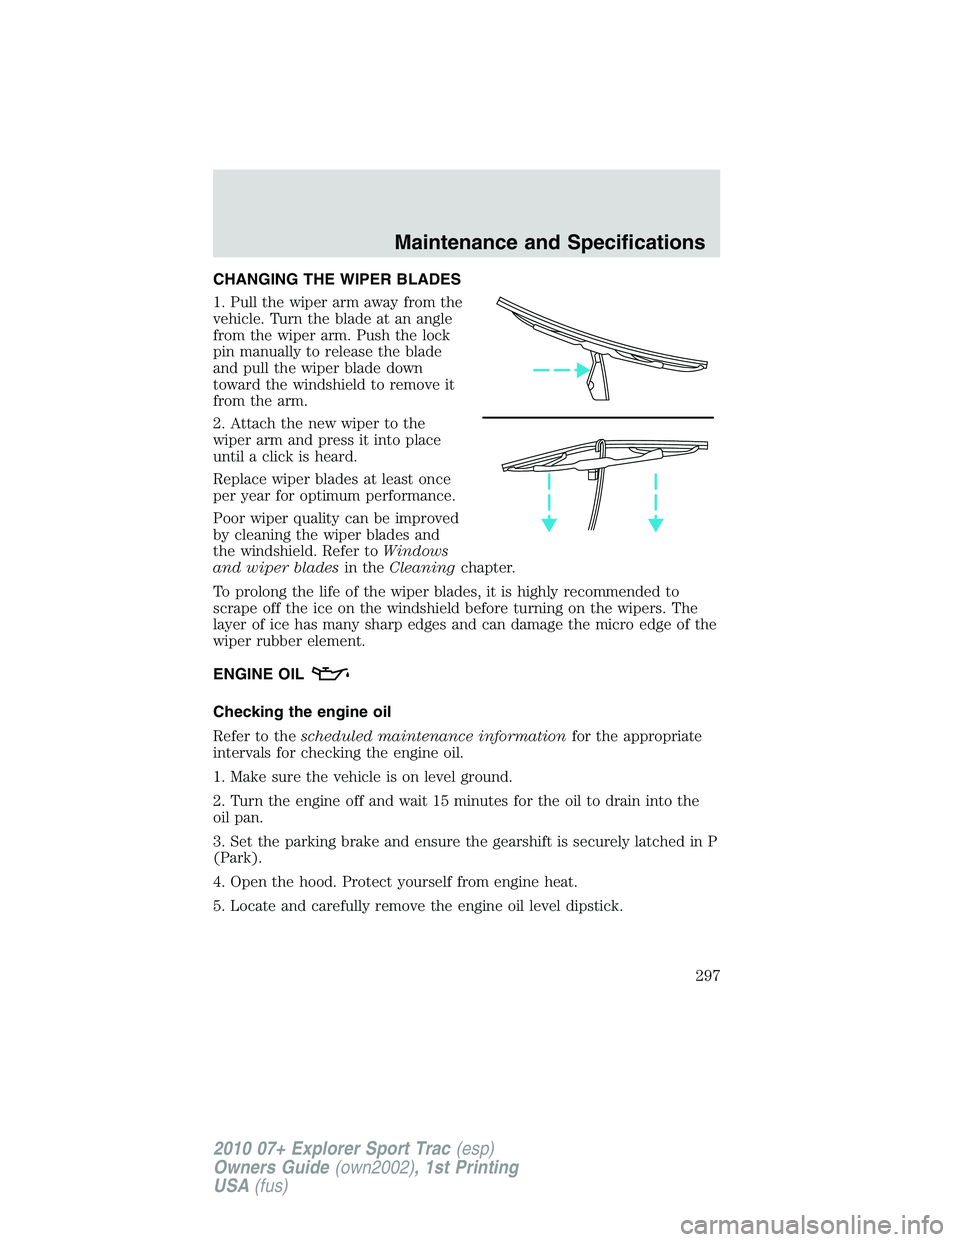
1. Pull the wiper arm away from the
vehicle. Turn the blade at an angle
from the wiper arm. Push the lock
pin manually to release the blade
and pull the wiper blade down
toward the windshield to remove it
from the arm.
2. Attach the new wiper to the
wiper arm and press it into place
until a click is heard.
Replace wiper blades at least once
per year for optimum performance.
Poor wiper quality can be improved
by cleaning the wiper blades and
the windshield. Refer toWindows
and wiper bladesin theCleaningchapter.
To prolong the life of the wiper blades, it is highly recommended to
scrape off the ice on the windshield before turning on the wipers. The
layer of ice has many sharp edges and can damage the micro edge of the
wiper rubber element.
ENGINE OIL
Checking the engine oil
Refer to thescheduled maintenance informationfor the appropriate
intervals for checking the engine oil.
1. Make sure the vehicle is on level ground.
2. Turn the engine off and wait 15 minutes for the oil to drain into the
oil pan.
3. Set the parking brake and ensure the gearshift is securely latched in P
(Park).
4. Open the hood. Protect yourself from engine heat.
5. Locate and carefully remove the engine oil level dipstick.
Maintenance and Specifications
297
2010 07+ Explorer Sport Trac(esp)
Owners Guide(own2002), 1st Printing
USA(fus)
Page 309 of 344
What you should know about fail-safe cooling
(4.6L V8 engine only)
If the engine coolant supply is depleted, this feature allows the vehicle to
be driven temporarily before incremental component damage is incurred.
The “fail-safe” distance depends on ambient temperatures, vehicle load
and terrain.
Fail-safe cooling and engine oil overheat mode (4.6L V8 only)
If the engine coolant and/or engine oil overheat, the vehicle’s fail-safe
modes will reduce engine power to limit engine damage, even with a
total loss of coolant. The vehicle’s range and/or speed will be reduced,
depending on vehicle load, terrain, and outside temperatures.
The instrument cluster provides warnings for each mode.
•Fail-Safe Cooling Mode:The
(Service engine
soon),
(Engine oil pressure), and(Engine coolant
temperature) indicators will be on.
Along with these warning indicators, the engine coolant temperature
gauge will read in the Hot (H) area.
If the engine coolant reaches even hotter temperatures, fail-safe
cooling mode limits engine power more and disables air conditioning.
The engine will switch to alternating cylinder operation to help cool
the engine. The engine will run rough in this mode.
If continued operation increases the engine coolant temperature to a
critical range, the engine will shut down. Steering and braking effort
will increase. Once engine coolant temperature cools, the engine can
be restarted.
•Engine Oil Overheat Mode:The
(Engine coolant temperature)
indicator will be on. The instrument cluster has no separate oil
temperature indicator.
Along with the
(Engine coolant temperature) indicator, the engine
coolant temperature gauge will read in the Hot (H) area.
Oil overheat can be triggered in severe driving conditions, such as
towing heavy loads over mountainous terrain in extreme hot
temperatures. As oil temperature increases, engine and vehicle speed
will be limited. The transmission will also shift differently.
When the engine oil has cooled, the vehicle will perform normally.
Maintenance and Specifications
309
2010 07+ Explorer Sport Trac(esp)
Owners Guide(own2002), 1st Printing
USA(fus)