Page 251 of 344

ROADSIDE ASSISTANCE
Getting roadside assistance
To fully assist you should you have a vehicle concern, Ford Motor
Company offers a complimentary roadside assistance program. This
program is separate from the New Vehicle Limited Warranty. The service
is available:
•24–hours, seven days a week
•for the coverage period listed on the Roadside Assistance Card
included in your Owner Guide portfolio.
Roadside assistance will cover:
•a flat tire change with a good spare (except vehicles that have been
supplied with a tire inflation kit)
•battery jump start
•lock-out assistance (key replacement cost is the customer’s
responsibility)
•fuel delivery – Independent Service Contractors, if not prohibited by
state, local or municipal law shall deliver up to 2.0 gallons (7.5L) of
gasoline or 5 gallons (18.9L) of diesel fuel to a disabled vehicle. Fuel
delivery service is limited to two no-charge occurrences within a
12-month period.
•winch out – available within 100 feet (30.5 meters) of a paved or
county maintained road, no recoveries.
•towing – Ford/Mercury/Lincoln eligible vehicle towed to an authorized
dealer within 35 miles (56.3 km) of the disablement location or to the
nearest authorized dealer. If a member requests to be towed to an
authorized dealer more than 35 miles (56.3 km) from the disablement
location, the member shall be responsible for any mileage costs in
excess of 35 miles (56.3 km).
Trailers shall be covered up to $200 if the disabled eligible vehicle
requires service at the nearest authorized dealer. If the trailer is disabled,
but the towing vehicle is operational, the trailer does not qualify for any
roadside services.
Canadian customers refer to your Customer Information Guide
for information on:
•coverage period
•exact fuel amounts
Roadside Emergencies
251
2010 07+ Explorer Sport Trac(esp)
Owners Guide(own2002), 1st Printing
USA(fus)
Page 256 of 344
Fuse/Relay
LocationFuse Amp
RatingProtected Circuits
5 5A Moon roof, Power down back
window, Door lock switch
illumination, Auto dimming rear
view mirror
6 20A Door unlock/lock
7 15A Trailer tow stop/turn lamps
8 15A Ignition switch power, Passive
anti-theft system (PATS), Cluster
9 2A 6-speed Transmission control
module/Powertrain control
module (Ignition RUN/START),
Fuel pump relay
10 5A Front wiper RUN/ACC relay in
power distribution box (PDB)
11 5A Radio start
12 5A Radio, Trailer tow battery charge
(relay in PDB)
13 15A Heated mirror
14 20A Horn
15 10A Reverse lamps
16 10A Trailer tow reverse lamps
17 10A Restraints control module,
Passenger occupancy
18 10A Roll Stability Control™ (RSC�)
switch, RSC�, 4x4 module, 4x4
switch, Heated seat switches,
Reverse park aid
19 — Not used
20 10A Climate control system, Brake
shift
21 — Not used
Roadside Emergencies
256
2010 07+ Explorer Sport Trac(esp)
Owners Guide(own2002), 1st Printing
USA(fus)
Page 258 of 344
The high-current fuses are coded as follows:
Fuse/Relay
LocationFuse Amp
RatingProtected Circuits
1 50A** Battery feed 2 (passenger
compartment fuse panel)
2 50A** Battery feed 3 (passenger
compartment fuse panel)
3 50A** Battery feed 1 (passenger
compartment fuse panel)
4 30A** Fuel pump, Fuel injectors
5 — Not used
6 40A** Anti-lock brake system (ABS) pump
7 40A** Powertrain control module (PCM)
8 — Not used
9 — Not used
10 20A** Power down back window
11 30A** Starter
12 — Not used
Roadside Emergencies
258
2010 07+ Explorer Sport Trac(esp)
Owners Guide(own2002), 1st Printing
USA(fus)
Page 264 of 344
Removing the jack and tools
1. Fold the passenger side rear seat
forward, then remove the jack.
2. Turn the jack screw eyelet (1)
counterclockwise to release
pressure.
3. Rotate the locking pin (2)
clockwise until loose then pull out
until it stops and remove the jack
and tool bag from the bracket
4. Remove the chock and jack tools
from the provided bag and rotate
the wrench socket out from the
handle.
Removing the spare tire
1. Assemble the jack handle to the
lug wrench by sliding the square
end of the jack handle through the
plastic grommet on the lug nut
wrench and into the square hole on
the other side.
Roadside Emergencies
264
2010 07+ Explorer Sport Trac(esp)
Owners Guide(own2002), 1st Printing
USA(fus)
Page 265 of 344

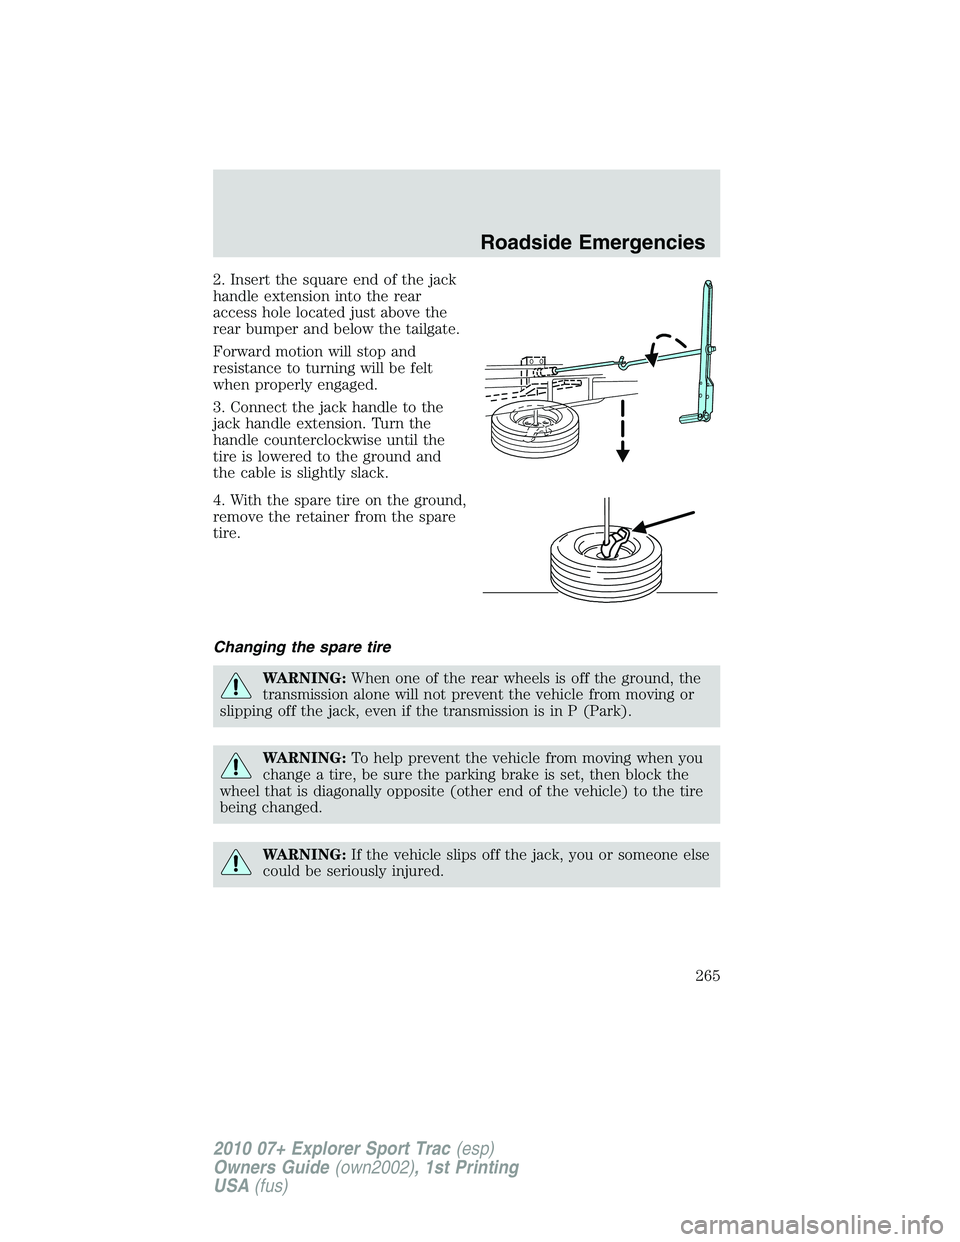
2. Insert the square end of the jack
handle extension into the rear
access hole located just above the
rear bumper and below the tailgate.
Forward motion will stop and
resistance to turning will be felt
when properly engaged.
3. Connect the jack handle to the
jack handle extension. Turn the
handle counterclockwise until the
tire is lowered to the ground and
the cable is slightly slack.
4. With the spare tire on the ground,
remove the retainer from the spare
tire.
Changing the spare tire
WARNING:When one of the rear wheels is off the ground, the
transmission alone will not prevent the vehicle from moving or
slipping off the jack, even if the transmission is in P (Park).
WARNING:To help prevent the vehicle from moving when you
change a tire, be sure the parking brake is set, then block the
wheel that is diagonally opposite (other end of the vehicle) to the tire
being changed.
WARNING:If the vehicle slips off the jack, you or someone else
could be seriously injured.
Roadside Emergencies
265
2010 07+ Explorer Sport Trac(esp)
Owners Guide(own2002), 1st Printing
USA(fus)
Page 266 of 344
WARNING:Do not attempt to change a tire on the side of the
vehicle close to moving traffic. Pull far enough off the road to
avoid the danger of being hit when operating the jack or changing the
wheel.
Note:Passengers should not remain in the vehicle when the vehicle is
being jacked.
1. Block the wheel that is diagonally
opposite of the flat tire using the
wheel chock provided with your
vehicle.
2. Use the tip of the lug wrench to
remove the beauty cap by twisting
the tip under the cap.
3. Loosen each wheel lug nut by half
a turn, but do not remove them
until the wheel is raised off the
ground.
4. Assemble the jack handle on the
lug nut wrench by sliding the square
end of the jack handle through the
plastic grommet on the lug nut
wrench and into the square hole on
the other side.
Roadside Emergencies
266
2010 07+ Explorer Sport Trac(esp)
Owners Guide(own2002), 1st Printing
USA(fus)
Page 267 of 344
5. Position the jack according to the
illustrated guides and turn the jack
handle clockwise until the tire is a
maximum of 1 inch (25 mm) off the
ground.
WARNING:To lessen the
risk of personal injury, do
not put any part of your body
under the vehicle while changing a
tire. Do not start the engine when
your vehicle is on the jack. The
jack is only meant for changing
the tire.
•Never use the front or rear differential as a jacking point.
6. Remove the lug nuts with the lug wrench.
7. Replace the flat tire with the spare tire, making sure the valve stem is
facing outward. Reinstall the lug nuts, cone side in, until the wheel is
snug against the hub. Do not fully tighten the lug nuts until the wheel
has been lowered.
8. Lower the wheel by turning the jack handle counterclockwise.
Roadside Emergencies
267
2010 07+ Explorer Sport Trac(esp)
Owners Guide(own2002), 1st Printing
USA(fus)
Page 268 of 344

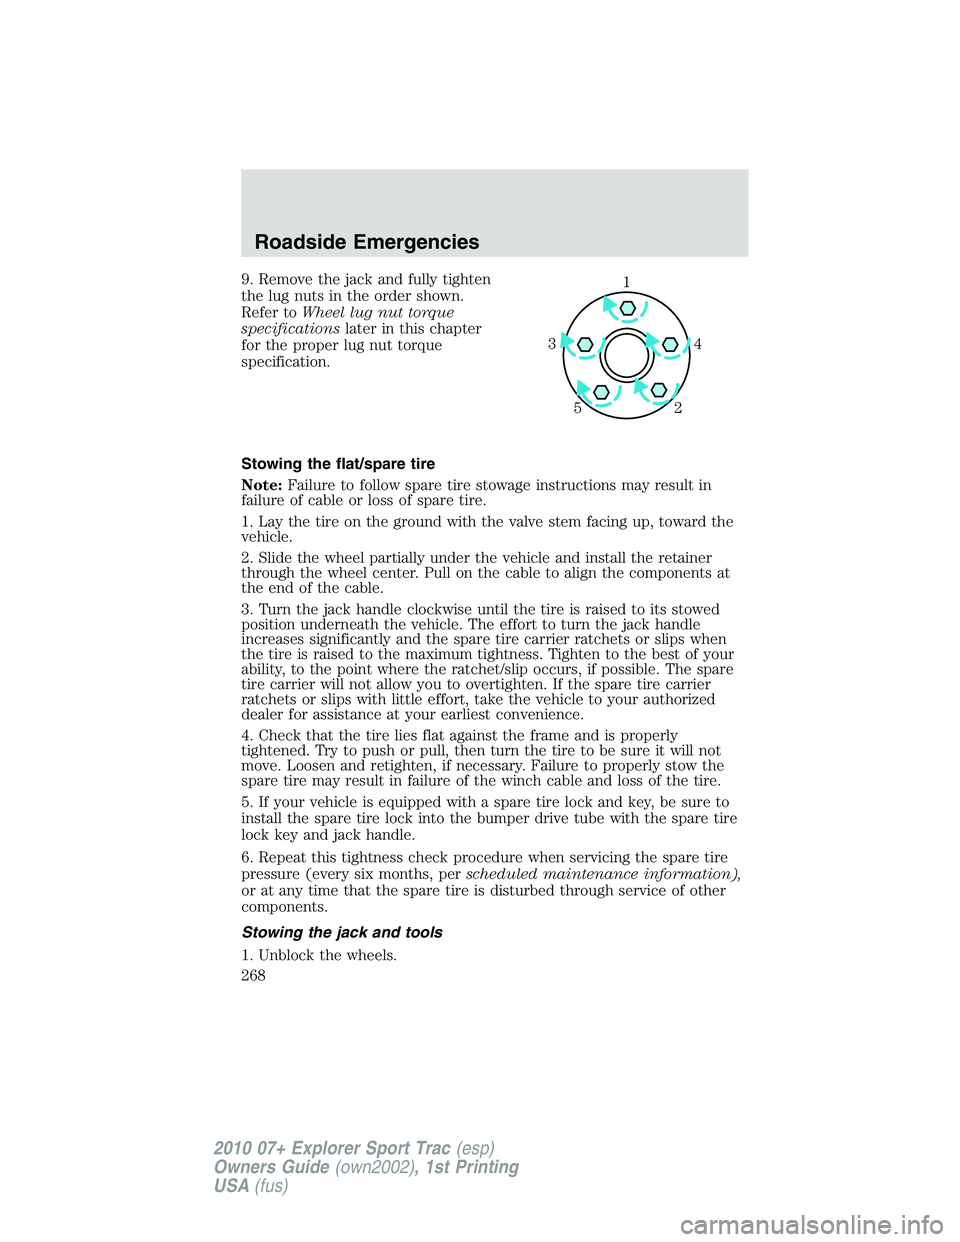
9. Remove the jack and fully tighten
the lug nuts in the order shown.
Refer toWheel lug nut torque
specificationslater in this chapter
for the proper lug nut torque
specification.
Stowing the flat/spare tire
Note:Failure to follow spare tire stowage instructions may result in
failure of cable or loss of spare tire.
1. Lay the tire on the ground with the valve stem facing up, toward the
vehicle.
2. Slide the wheel partially under the vehicle and install the retainer
through the wheel center. Pull on the cable to align the components at
the end of the cable.
3. Turn the jack handle clockwise until the tire is raised to its stowed
position underneath the vehicle. The effort to turn the jack handle
increases significantly and the spare tire carrier ratchets or slips when
the tire is raised to the maximum tightness. Tighten to the best of your
ability, to the point where the ratchet/slip occurs, if possible. The spare
tire carrier will not allow you to overtighten. If the spare tire carrier
ratchets or slips with little effort, take the vehicle to your authorized
dealer for assistance at your earliest convenience.
4. Check that the tire lies flat against the frame and is properly
tightened. Try to push or pull, then turn the tire to be sure it will not
move. Loosen and retighten, if necessary. Failure to properly stow the
spare tire may result in failure of the winch cable and loss of the tire.
5. If your vehicle is equipped with a spare tire lock and key, be sure to
install the spare tire lock into the bumper drive tube with the spare tire
lock key and jack handle.
6. Repeat this tightness check procedure when servicing the spare tire
pressure (every six months, perscheduled maintenance information),
or at any time that the spare tire is disturbed through service of other
components.
Stowing the jack and tools
1. Unblock the wheels.1
4 3
2 5
Roadside Emergencies
268
2010 07+ Explorer Sport Trac(esp)
Owners Guide(own2002), 1st Printing
USA(fus)