Page 178 of 420

•Visual warnings are displayed followed by a chime when a preselected
vehicle speed of 45, 55 or 65 mph (75, 90, or 105 km/h) is exceeded
•The maximum volume of the audio system is limited to 45%. MYKEY
VOLUME LIMITED will be displayed in the radio or (if equipped)
navigation screen when attempting to exceed the limited volume
•The AdvanceTrac�system cannot be turned off. When this optional
setting is on, the MyKey™ user will not be able to deactivate the
system.Note:It may be beneficial to deactivate the AdvanceTrac�
system if the vehicle is stuck in snow, mud, or sand.
Create a MyKey™
To program MyKey™ on one of the keys programmed to the vehicle,
insert it into the ignition. Turn the ignition on. Use the message center
buttons to do the following:
1. Press SETUP until PRESS RESET TO CREATE MYKEY is displayed.
2. Press and release the RESET button. HOLD RESET TO CONFIRM
MYKEY will be displayed.
3. Press and hold the RESET button for two seconds until MARK THIS
AS RESTRICTED is displayed.
4. Wait until KEY RESTRICTED AT NEXT START is displayed.
MyKey™ is successfully programmed. Make sure you label it so you can
distinguish it from the Admin keys.Note:To program the optional
settings go to step 2 in theProgramming MyKey™ optional settings
section.
Note:The MyKey™ can be cleared within the same key cycle that it was
created, otherwise a standard key (Administrator key) is required to
disable the MyKey™ programming. To clear all MyKeys™ go to step 2 in
theDisable MyKey™section.
Programming MyKey™ Optional Settings
Turn the ignition on using an Admin key. To program the optional
settings, use the message center buttons to do the following:
1. Press SETUP until RESET FOR MYKEY SETUP is displayed.
2. Press and release the RESET button to display MyKey™ setup menus.
The first menu shown is:
MYKEY MAX MPH <80 MPH> OFF
Locks and Security
178
2010 Expedition(exd)
Owners Guide(own2002), 1st Printing
USA(fus)
Page 203 of 420
Third row power folding seat (if equipped)
Note: Be sure that the head
restraints are folded down before
powering the 3rd row seat down.
The control buttons are located on
the right-hand rear quarter trim
panel (accessible from the liftgate
area).
Push the bottom portion of the
control button to lower the desired
seatback.
Push the top of the control button
to return the seatback to its original
position.
Seating and Safety Restraints
203
2010 Expedition(exd)
Owners Guide(own2002), 1st Printing
USA(fus)
Page 211 of 420

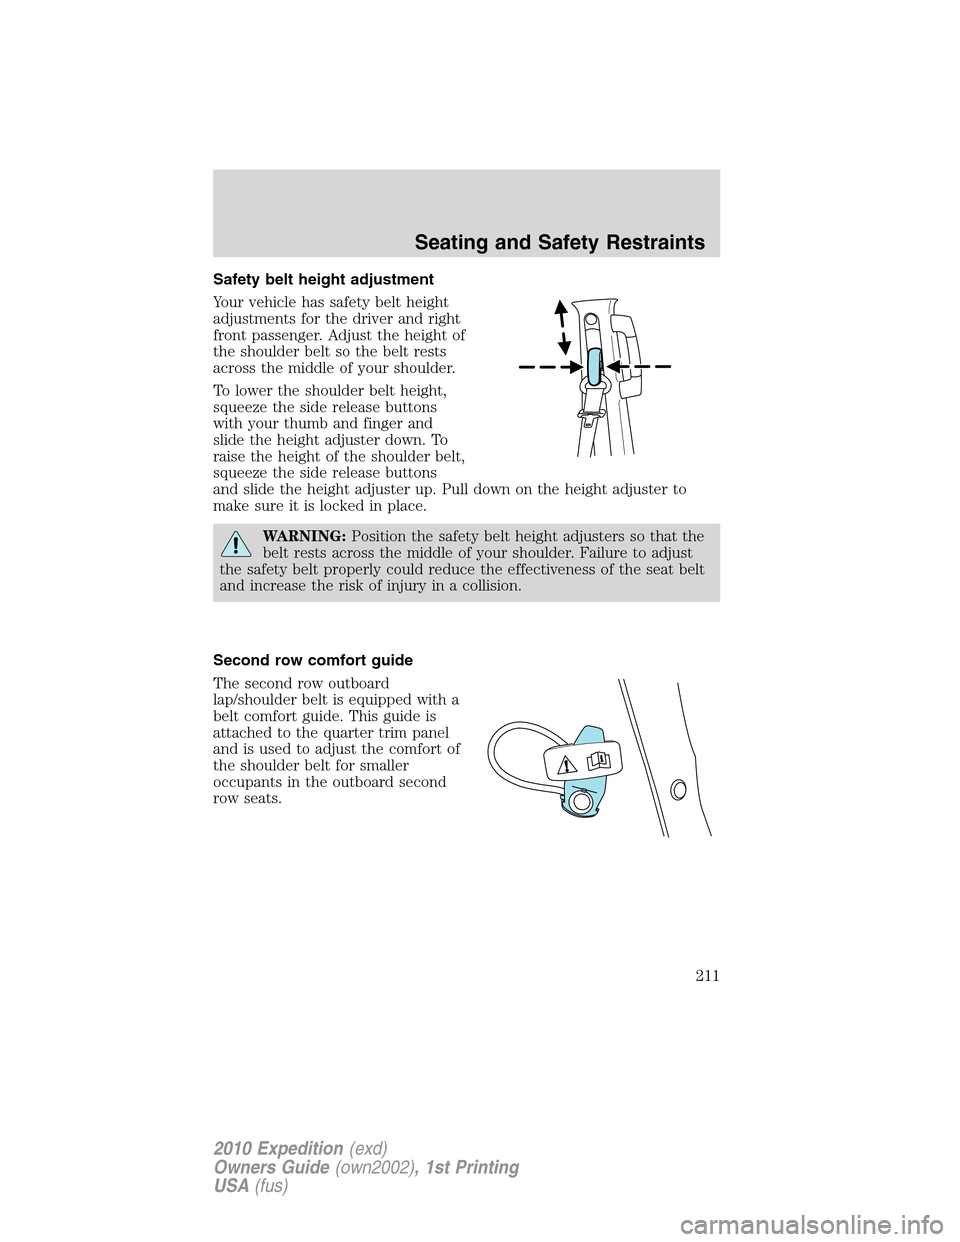
Safety belt height adjustment
Your vehicle has safety belt height
adjustments for the driver and right
front passenger. Adjust the height of
the shoulder belt so the belt rests
across the middle of your shoulder.
To lower the shoulder belt height,
squeeze the side release buttons
with your thumb and finger and
slide the height adjuster down. To
raise the height of the shoulder belt,
squeeze the side release buttons
and slide the height adjuster up. Pull down on the height adjuster to
make sure it is locked in place.
WARNING:Position the safety belt height adjusters so that the
belt rests across the middle of your shoulder. Failure to adjust
the safety belt properly could reduce the effectiveness of the seat belt
and increase the risk of injury in a collision.
Second row comfort guide
The second row outboard
lap/shoulder belt is equipped with a
belt comfort guide. This guide is
attached to the quarter trim panel
and is used to adjust the comfort of
the shoulder belt for smaller
occupants in the outboard second
row seats.
Seating and Safety Restraints
211
2010 Expedition(exd)
Owners Guide(own2002), 1st Printing
USA(fus)
Page 236 of 420
Your vehicle has LATCH lower anchors for child seat installation at the
seating positions marked with the child seat symbol.
The LATCH anchors are located at
the rear section of the rear seat
between the cushion and seatback,
below the locator symbols on the
seat back. Follow the child seat
manufacturer’s instructions to
properly install a child seat with
LATCH attachments.
The locator symbols are on round plastic buttons on the center seat and
on rectangular tags on the outboard seats.
Follow the instructions on attaching child safety seats with tether straps.
Refer toAttaching child safety seats with tether strapslater in this
chapter.
Attach LATCH lower attachments of the child seat only to the anchors
shown.
Seating and Safety Restraints
236
2010 Expedition(exd)
Owners Guide(own2002), 1st Printing
USA(fus)
Page:
< prev 1-8 9-16 17-24