Page 115 of 184

114
The spare wheel is specific
for your car. Do not use it on
cars of different models. Do not use
spare wheels of different models on
your car. The wheel bolts are specif-
ic for your car. Do not use them on
cares of different models. Do not use
bolts of different models on your car.
WARNING
Repair and refit the standard
wheel as soon as possible.
Do not apply grease to the bolt
threading before assembly: the bolts
could come loose unexpectedly.
WARNING
The jack may only be used to
replace wheels on the car
which it equips or other cars of the
same model.
Never use the jack for
other purposes, such as lifting other
car models. Never use the jack to car-
ry out repairs under the car. Incorrect
positioning of the jack may cause the
car to fall. Do not use the jack
for
loads higher than those shown on the
label.
WARNING
Incorrect wheel cup assem-
bly may cause it to come off
when the car is travelling. Never tam-
per with the inflation valve. Never in-
troduce tools of any kind between rim
and tyre. Check tyre and spare wheel
pressure regularly referring to the
val-
ues shown in the “Technical Specifi-
cations” chapter.
WARNING
Important notes:
�the jack weighs 1.76 kg;
�the jack requires no adjustment;
�the jack cannot be repaired: replace
with an original spare part if damaged;
�no tool other than its handle may be fit-
ted on the jack.
CORRECT USE
OF THE CAR
DASHBOARD
AND CONTROLS
SAFETY
DEVICES
CAR
MAINTENANCE
TECHNICAL
SPECIFICATIONS
INDEX
WARNING
LIGHTS AND
MESSAGES IN AN
EMERGENCY
LINEA Owner HAND BOOK RHD.pdf 114LINEA Owner HAND BOOK RHD.pdf 1148/21/09 2:16:16 PM8/21/09 2:16:16 PM
Page 117 of 184
116
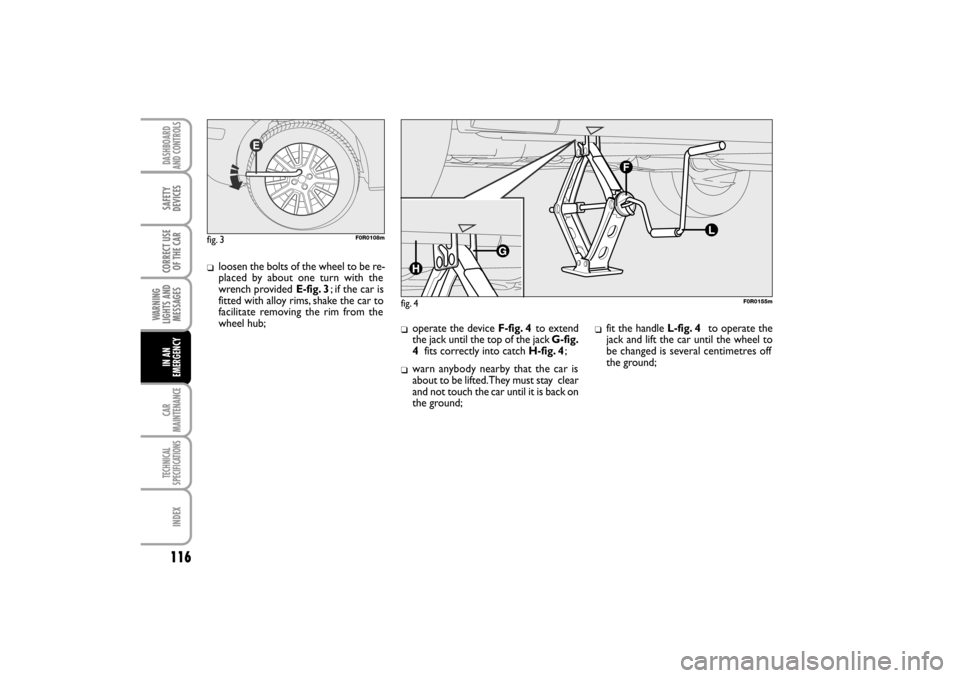
�loosen the bolts of the wheel to be re-
placed by about one turn with the
wrench provided E-fig. 3; if the car is
fitted with alloy rims, shake the car to
facilitate removing the rim from the
wheel hub;
�
�operate the device F-fig. 4to extend
the jack until the top of the jack G-fig.
4fits correctly into catch H-fig. 4;
warn anybody nearby that the car is
about to be lifted. They must stay
clear
and not touch the car until it is back on
the ground;
�fit the handle L-fig. 4to operate the
jack and lift the car until the wheel to
be changed is several centimetres off
the ground;
fig. 3F0R0108m
fig. 4F0R0155m
CORRECT USE
OF THE CAR
DASHBOARD
AND CONTROLS
SAFETY
DEVICES
CAR
MAINTENANCE
TECHNICAL
SPECIFICATIONS
INDEX
WARNING
LIGHTS AND
MESSAGES IN AN
EMERGENCY
LINEA Owner HAND BOOK RHD.pdf 116LINEA Owner HAND BOOK RHD.pdf 1168/21/09 2:16:18 PM8/21/09 2:16:18 PM
Page 118 of 184

117
�for versions with wheel cap, remove the
wheel cap after loosening the 3 fastening
bolts and finally loosen the fourth bolt
L-fig. 5and extract the wheel;
�make sure the contact surfaces be-
tween spare wheel and hub are clean
so that the fastening bolts will not come
loose;
�fit the spare wheel by inserting the first
bolt for two threads into the hole clos-
est to the inflation valve;
�fit the wheel cap making the crescent
hole coincide with the bolt you have fit-
ted using the wrench;
�tighten the fastening bolts;
�turn the jack handle L-fig. 4to lower
the car and remove the jack;
�
�use the wrench provided to fasten the
bolts completely in a criss-cross fashion
as shown in fig. 6;
if replacing a wheel with alloy rim, stove
it temporarily into the spare
wheel
compartment with the cosmetic side
facing upwards.REFITTING THE
STANDARD WHEEL
Following the procedure described previ-
ously, raise the car and remove the
spare
wheel.
fig. 5F0R0156mfig. 6F0R0157m
CORRECT USE
OF THE CAR
MAINTENANCE
TECHNICAL
SPECIFICATIONS
INDEX
DASHBOARD
AND CONTROLS
SAFETY
DEVICES WARNING
LIGHTS AND
MESSAGES IN AN
EMERGENCY
CAR
LINEA Owner HAND BOOK RHD.pdf 117LINEA Owner HAND BOOK RHD.pdf 1178/21/09 2:16:18 PM8/21/09 2:16:18 PM
Page 119 of 184

118
Versions with steel rims
Proceed as follows:
�make sure the contact surfaces be-
tween spare wheel and hub are clean
so
that the fastening bolts will not come
loose;
�fit the standard wheel by inserting the
first bolt for two threads into the hole
closest to the inflation valve;
�fit the wheel cap making the lunette
hole coincide with the bolt you have fit-
ted then, fit the other 3 bolts;
�using the wrench provided, tighten the
fastening bolts;
�lower the car and remove the jack;
�using the wrench provided, fully tight-
en the bolts in the sequence shown
previously in the figure.Versions with alloy rims
Proceed as follows:
�insert the wheel on the hub and using
the wrench provided tighten the bolts;
�lower the car and remove the jack;
�using the wrench provided, fully tight-
en the bolts in the sequence shown in
the figure.When you have finished
�fit the jack partia lly open in its box C-
fig.2 forcing it lightly to prevent it from
vibrating when traelling;
�put the tools back into their places
in the container;
�stow the container C-fig.2 complete
with tools;
�stow the spare wheel in the space pro-
vided in the boot;
�
�tight the fastener A-fig.2;
reposition the mat in the boot.CORRECT USE
OF THE CAR
DASHBOARD
AND CONTROLS
SAFETY
DEVICES
CAR
MAINTENANCE
TECHNICAL
SPECIFICATIONS
INDEX
WARNING
LIGHTS AND
MESSAGES IN AN
EMERGENCY
LINEA Owner HAND BOOK RHD.pdf 118LINEA Owner HAND BOOK RHD.pdf 1188/21/09 2:16:19 PM8/21/09 2:16:19 PM