Page 25 of 80
Clock Setting
• Turn the ignition switch to the ON/RUN or ACC position.
• Using the point of a ballpoint pen or similar object, press either the H (HOUR) or M(MINUTE) button on the radio. The display will show the time.
• Press the “H” button to set hours or the “M” button to set minutes. The time setting
will increase each time you press a button.
Station Presets
• Press the SET button once and SET 1 will show in the display. Then select the button (1–5).
• A second station may be added to each pushbutton. Press the SET button twice and SET 2 will show in the display, then select button (1–5).
23
ELECTRONICS
Page 26 of 80
NON-TOUCH-SCREEN RADIO
Navigation Radio – RB1
• The radio sales code is located on the upper left side of radio faceplate.
Radio Mode
• Press the AM/FM button to toggle between AM and FM modes.
Seek Up/Down
• Press to seek through radio stations in AM or FM bands and to seek through tracks inCD mode.
Tune Up/Down
• In AM or FM modes, press to increase or decrease the radio frequency. In CD modepress to fast forward or fast rewind a track.
Clock Setting
• To manually set the clock, use a ballpoint pen or similar object. When pressing eitherthe hour (H) or minute (M) button the Setup screen appears.
• To adjust the hours, press the “H” (hour) button.
• To adjust the minutes, press the “M” (minute) button.
• Turn the Selector knob to highlight DONE and press ENTER or wait 5 seconds.
ELECTRONICS
24
Page 27 of 80

Daylight Savings
• Use a ball point pen or similar object to press the "H" (hour) or "M" (Minute) button toaccess the clock setup screen.
• Press ENTER to select Clock Setup.
• Rotate the Selector knob to highlight Daylight Savings and press ENTER.
• Rotate the Selector knob to highlight St andard or Daylight Savings and press ENTER.
• Turn the Selector knob to highlight DONE and press ENTER or wait 5 seconds.
Changing Time Zone
• Use a ball point pen or similar object to press the "H" (hour) or "M" (Minute) button to access the clock setup screen.
• Press ENTER to select Clock Setup.
• Rotate the Selector knob to highlight Time Zone and press ENTER.
• Rotate the Selector knob to highlight the desired Time Zone and press ENTER.
• Turn the Selector knob to highlight DONE and press ENTER or wait 5 seconds.
Store Radio Presets
• Find the station to store by either pressing the seek up/down button, the tune up/down button, or by t ouching the SCAN button.
• Turn the Selector knob to highlight SET and press ENTER. SET 1 appears on the display.
• Then select button (1–5).
• You may add a second station to each pushb utton by repeating the above procedure
with this exception: After highlighting SET, press ENTER twice. SET 2 appears on the
display, then select button (1–5).
Navigation
Navigation Radio – RB1 Only
• Your navigation system receives GPS signals from up to 8 satellites to display the position and direction of your vehicle.
• Map and database information is supplied through a DVD-ROM and vehicle sensors enable the system to display the present vehicle position even in locations where GPS
may be blocked.
• The DVD-ROM disc must be inserted into the radio before accessing the Navigation mode.
NOTE: Many features of this radio are speed dependent. For your own safety, some of
the programmable options will be grayed out and unavailable while the vehicle is in
motion. Pull over at a safe location to complete your task.
New Destination
• Press the NAV button to access the NAV Main Menu.
• Using the Selector knob, highlight Destination to program a destination, press ENTER, then select one of the 8 ways to input a destination.
25
ELECTRONICS
Page 28 of 80

Program Destination by Street Address
• Press the NAV button to access the NAV Main Menu.
• Select/highlight Destination from the Main Menu screen and press ENTER.
• Select/highlight Street Address from the Find Destination by screen and press ENTER.
• Select/highlight Street Name from the Find Address screen and press ENTER.
NOTE: City, State and Province can be also be changed in the Find Address screen.
• The Input Street Name screen appears. Use the Selector knob to spell out the street
name. Select/highlight each letter and press ENTER.
• Select/highlight Street List and press ENTER to continue. The Select Street Name screen appears. Select/highlight the c orrect street and press ENTER.
• The Input Address screen appears. Us e the Selector knob to input the address
number. When finished, select/highlight Done and press ENTER.
• Lastly, the Confirm Destination screen appe ars, showing the address of the selected
destination. If it is correct, select/highlight OK and press ENTER. The system will
calculate a route to that destination.
Address Book
• Press the NAV button, use the Selector knob to highlight Destination and press ENTER.
• Select/highlight one of the eight choices to input a destination and press ENTER.
• Enter the address information following the screen prompts.
• Once a destination has been entered, select/highlight Options from the Confirm Destination screen and press ENTER.
• Select/Highlight Save in Address Book and press ENTER.
• The Input Name screen appears. Use the Select Encoder to spell out the name you
would like to see in the Address Book.
• Select/highlight Done when finished and press ENTER.
• The Input Phone Number screen appears. Use the Select Encoder to input the phone
number of the address. When the number is complete, or if you do not know the
phone number, select/highlight Save and press ENTER.
• The name, address and phone number are now stored in the address book. The Confirm Destination screen will reappear showing the saved information.
Map
• Press the NAV button and select/highlight Map and press ENTER.
• The Map screen will appear showing your current location.
Adjusting Navigation Volume
• The navigation volume can be adjusted during a voice command by using the radioPower/Volume control knob.
• To repeat a voice command select the voice icon on the Map or Arrow guidance.
ELECTRONICS
26
Page 29 of 80
POWER OUTLET
• One 12 Volt power outlet for this vehicle is located to the rightof the Transmission
Gear Selector.
• Another 12 Volt power outlet for this vehicle is located inside the center console.
NOTE: Do not exceed the maximum power of 160 Watts (13 Amps) at 12 Volts. If the 160
Watt (13 Amp) power rating is exceeded the fuse protecting the system will need to be
replaced.
27
ELECTRONICS
Page 30 of 80
OVERVIEW
• The Viper ACR is the literal fusion of Street and Racing Technology. It takes the aweinspiring performance capabilities of the Dodge Viper SRT10 to the next level.
• The Viper ACR is not certified as a race car and it is not equipped with a racing safety cage, racing restraints or other racing safety equipment.
• Throughout this manual there are notes of WARNING and CAUTION. Review each of them before driving this car.
WARNING!
It is recommended that all customers comple te a high-performance driving school
prior to operating this vehicle. Speeds at the handling limits of this car are much
higher than with other sports cars. Competitive driving and track outings can cause
serious injury or death.
• Drive safely.
PERFORMANCE/ACR
28
Page 31 of 80
AERODYNAMICS
• The Viper ACR aerodynamics are capable of high levels of downforce which willnoticeably affect the grip and handling of the vehicle at speeds as low as 50 mph.
• Regularly inspect all of the aerodynamic components and attachments for damage or wear.
29
PERFORMANCE/ACR
Page 32 of 80

Front Splitter
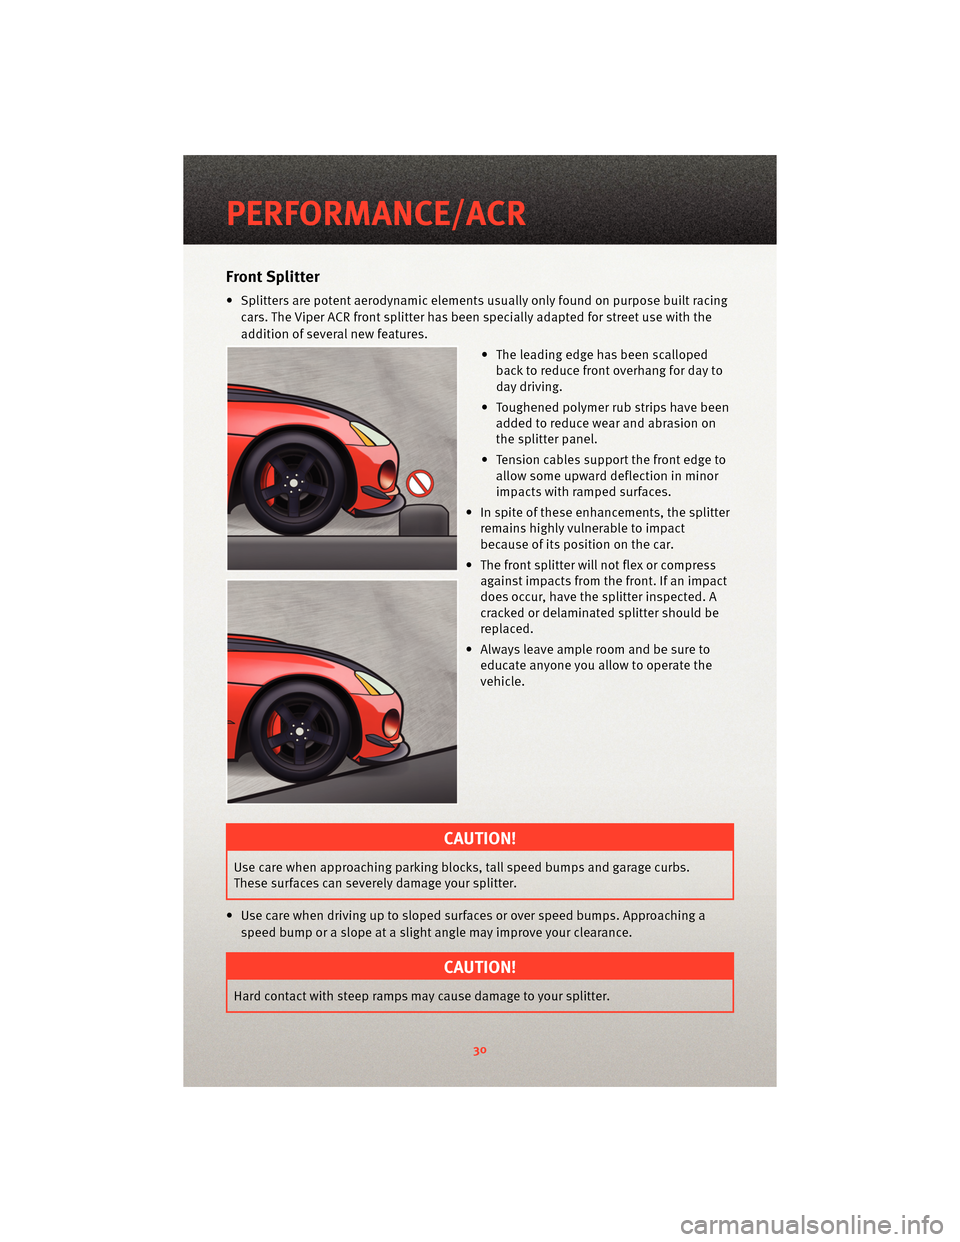
• Splitters are potent aerodynamic elements usually only found on purpose built racing
cars. The Viper ACR front splitter has been specially adapted for street use with the
addition of several new features.
• The leading edge has been scallopedback to reduce front overhang for day to
day driving.
• Toughened polymer rub strips have been added to reduce wea r and abrasion on
the splitter panel.
• Tension cables support the front edge to allow some upward deflection in minor
impacts with ramped surfaces.
• In spite of these enhancements, the splitter remains highly vulnerable to impact
because of its position on the car.
• The front splitter will not flex or compress against impacts from the front. If an impact
does occur, have the splitter inspected. A
cracked or delaminated splitter should be
replaced.
• Always leave ample room and be sure to educate anyone you allow to operate the
vehicle.
CAUTION!
Use care when approaching parking bloc ks, tall speed bumps and garage curbs.
These surfaces can severely damage your splitter.
• Use care when driving up to sloped surfaces or over speed bumps. Approaching a speed bump or a slope at a slight angle may improve your clearance.
CAUTION!
Hard contact with steep ramps may cause damage to your splitter.
PERFORMANCE/ACR
30