2010 DODGE JOURNEY Change
[x] Cancel search: ChangePage 4 of 88

WELCOME FROM CHRYSLER GROUP LLC
Congratulations on selecting your new Chrysler Group LLC vehicle. Be assured that it
represents precision workman ship, distinctive styling, and high quality - all essentials
that are traditional to our vehicles.
This guide illustrates and describes the operation of features and equipment that are
either standard or optional on this vehicle. This guide may also include a description of
features and equipment that are no longer available or were not ordered on this vehicle.
Please disregard any features and equipment described in this guide that are not
available on this vehicle. Chrysler Group LLC reserves the right to make changes in
design and specifications and/or make additions to or improvements to its products
without imposing any obligation upon itself to install them on products previously
manufactured.
For complete owner information, refer to the DVD in the owner’s kit provided at the time
of new vehicle purchase. For your convenience, the information contained on the DVD
may also be printed and saved for future reference.
Chrysler Group LLC is committed to protecting our environment and natural resources. By
converting from paper to electronic delivery f or the majority of the user information for
your vehicle, together we greatly reduce the demand for tree-based products and lessen
the stress on our environment.
Vehicles Sold In Canada
With respect to any Vehicles Sold in Canada, the name Chrysler Group LLC shall be
deemed to be deleted and the name Chrysler C anada Inc. used in substitution therefore.
Driving And Alcohol
Drunken driving is one of the most frequent causes of accidents.
Your driving ability can be seriously impaired with blood alcohol levels far below the
legal minimum. If you are drinking, don’t drive. Ride with a designated non-drinking
driver, call a cab, a friend, or use public transportation.
WARNING!
Driving after drinking can lead to an accident. Your perceptions are less sharp, your
reflexes are slower, and your judgment is impaired when you have been drinking.
Never drink and then drive.
INTRODUCTION/WELCOME
2
Page 9 of 88

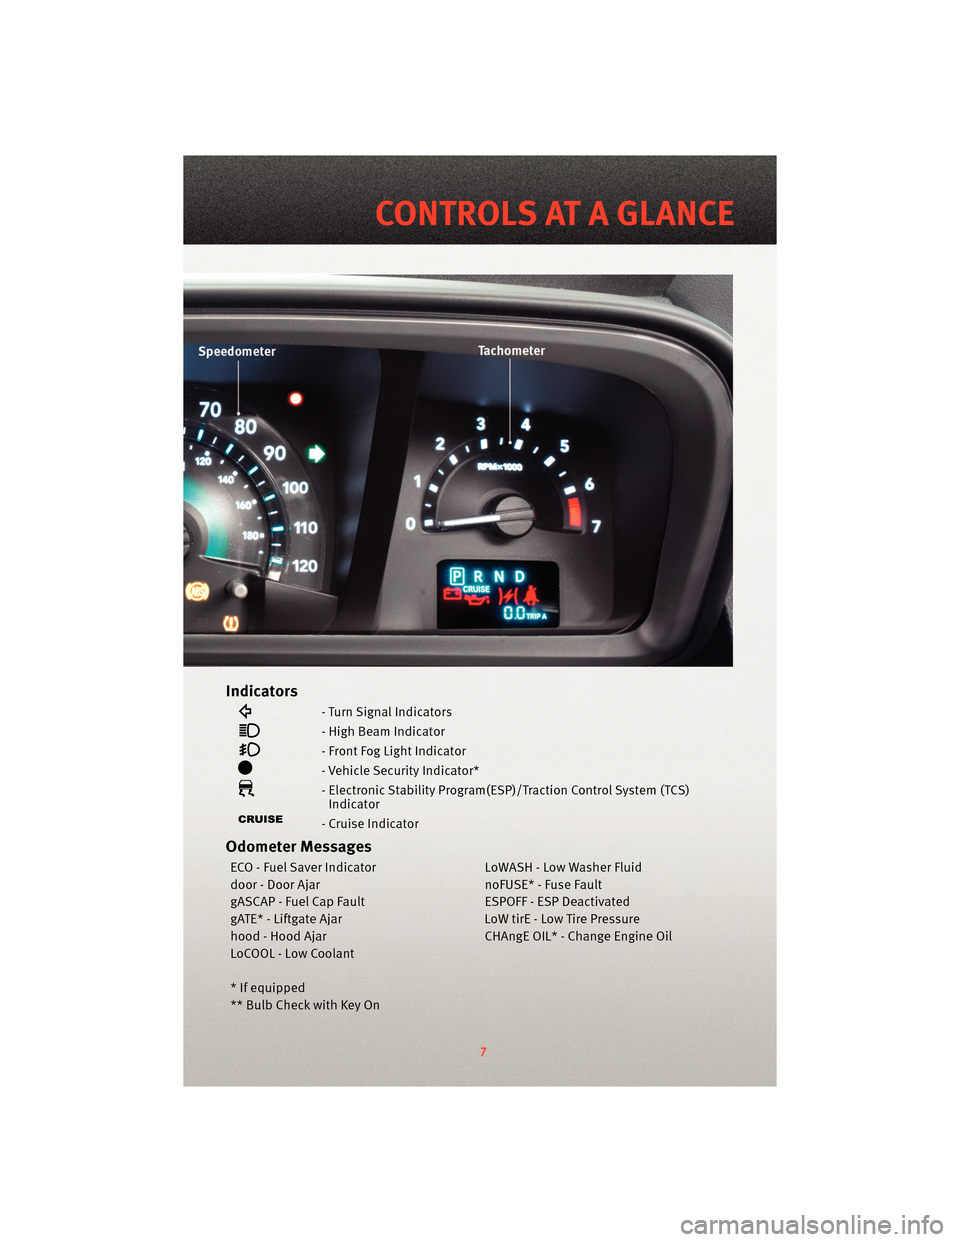
Indicators
- Turn Signal Indicators
- High Beam Indicator
- Front Fog Light Indicator
- Vehicle Security Indicator*
- Electronic Stability Program(ESP)/Traction Control System (TCS)Indicator
- Cruise Indicator
Odometer Messages
ECO - Fuel Saver Indicator LoWASH - Low Washer Fluid
door - Door Ajar noFUSE* - Fuse Fault
gASCAP - Fuel Cap Fault ESPOFF - ESP Deactivated
gATE* - Liftgate Ajar LoW tirE - Low Tire Pressure
hood - Hood Ajar CHAngE OIL* - Change Engine Oil
LoCOOL - Low Coolant
* If equipped
** Bulb Check with Key On
7
CONTROLS AT A GLANCE
Page 22 of 88

WARNING!
Do not adjust the steering wheel while driving. The tilt/telescoping adjustment must
be locked while driving. Adjusting the steering wheel while driving or driving without
the tilt/telescoping adjustment locked could cause the driver to lose control of the
vehicle. Failure to follow this warning may result in serious injury or death.
PROGRAMMABLE FEATURES
Electronic Vehicle Information Center (EVIC) – If Equipped
• The EVIC can be used to program the following Personal Settings. Press and release the MENU button
until Personal Settings displays, then press the SCROLL
button
to scroll through the settings. Press the FUNCTION SELECT buttonto
change the setting.
• Language • Headlamps With Wipers
• Auto UNLK On Exit • ILLUMIN Approach
• RKE Unlock • Key-Off Power Delay
• Sound Horn With Lock • NAV Turn By Turn
• Flash Lamp Lock • Display ECO Message
• Headlamp Off Delay • Display Units of Measure In
Key Fob Programmable Features
• The following features may also be programmed by using the Key Fob transmitter or the ignition switch and driver's door lock switch.
NOTE: Pressing the LOCK button while you are inside the vehicle will activate the
Vehicle Security Alarm. Opening a door with the Vehicle Security Alarm activated will
cause the alarm to sound. Press the UNLOCK button to deactivate the Vehicle Security
Alarm.
Unlock On First Press
• To unlock either the driver's side, or all doors, on the first press of the UNLOCK button:
• Press and hold the LOCK button for at least 4 seconds, but no longer than10 seconds. Then, press and hold the UNLOCK button while still holding the LOCK
button.
• Release both buttons at the same time.
GETTING STARTED
20
Page 24 of 88

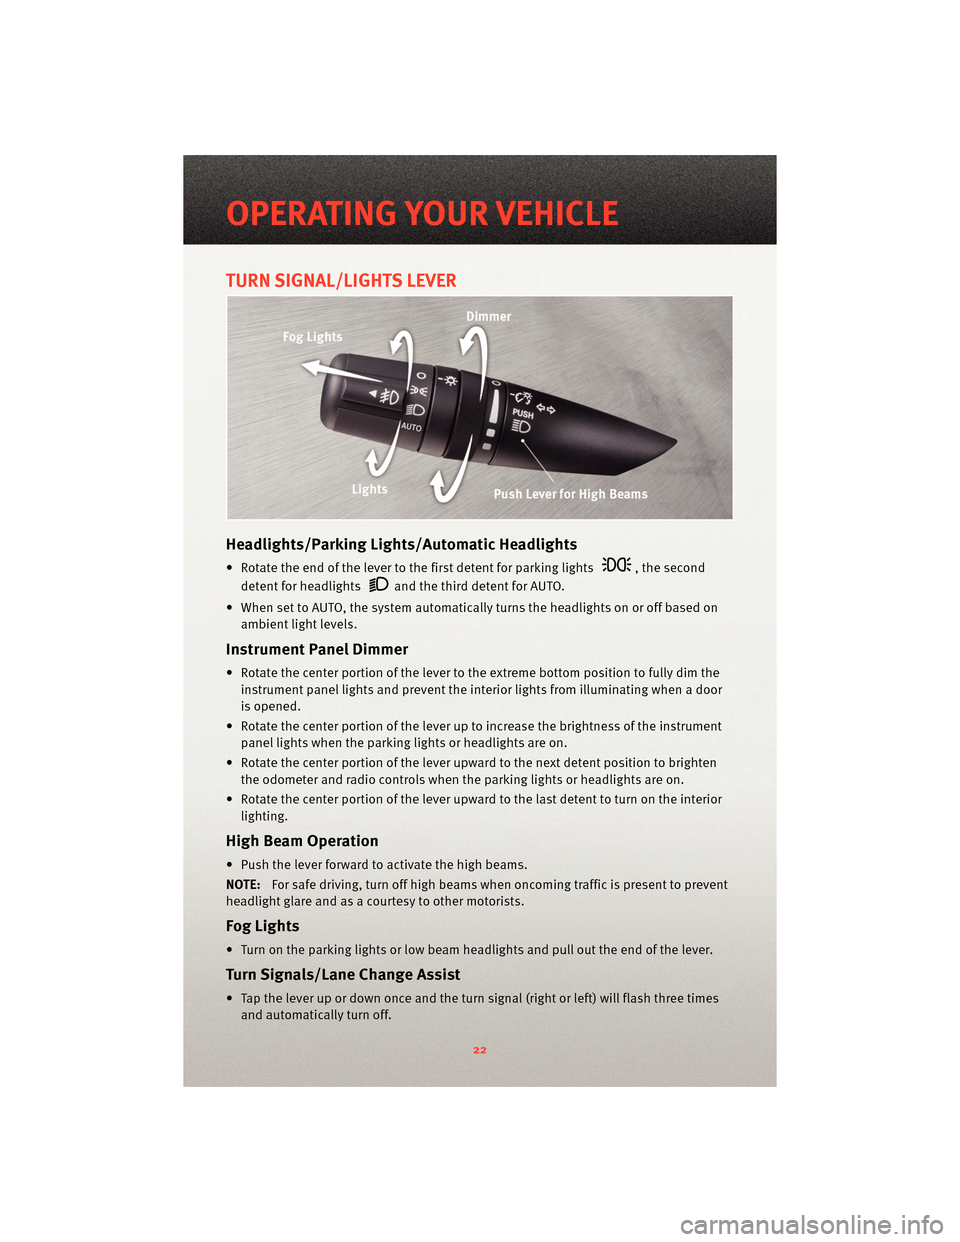
TURN SIGNAL/LIGHTS LEVER
Headlights/Parking Lights/Automatic Headlights
• Rotate the end of the lever to the first detent for parking lights, the second
detent for headlights
and the third detent for AUTO.
• When set to AUTO, the system automatically turns the headlights on or off based on ambient light levels.
Instrument Panel Dimmer
• Rotate the center portion of the lever t o the extreme bottom position to fully dim the
instrument panel lights and prevent the int erior lights from illuminating when a door
is opened.
• Rotate the center portion of the lever up to increase the brightness of the instrument panel lights when the parking lights or headlights are on.
• Rotate the center portion of the lever u pward to the next detent position to brighten
the odometer and radio controls when the parking lights or headlights are on.
• Rotate the center portion of the lever upward to the last detent to turn on the interior lighting.
High Beam Operation
• Push the lever forward to activate the high beams.
NOTE: For safe driving, turn off high beams when oncoming traffic is present to prevent
headlight glare and as a courtesy to other motorists.
Fog Lights
• Turn on the parking lights or low beam headlights and pull out the end of the lever.
Turn Signal s/Lane Change Assist
• Tap the lever up or down once and the turn signal (right or left) will flash three times
and automatically turn off.
OPERATING YOUR VEHICLE
22
Page 35 of 88

Auxiliary Mode
• The auxiliary (AUX) jack allows a portable device, such as an MP3 player or a cassetteplayer, to be plugged into the radio and uti lize the vehicle’s audio system to amplify
the source and play through the vehicle speakers.
• Pressing the AUX button will change the mode to auxiliary device if the AUX jack is connected.
• The control of the external device cannot be provided by the radio; use the device controls instead.
Clock Setting
• Press and hold the TIME button until the hours blink; turn the TUNE/SCROLL controlknob to set the hours.
• Press the TUNE/SCROLL control knob until the minutes begin to blink; turn the TUNE/SCROLL control knob to set the minutes.
• Press the TUNE/SCROLL control knob to save the time change.
• To exit, press any button/knob or wait five seconds.
Station Presets
• Press the SET/RND button once and SET 1 will show in the display. Then select the button (1–6).
• A second station may be added to each push button. Press the SET/RND button twice and SET 2 will show in the display, then select button (1–6).
How To Load Multiple CDs/DVDs
REQ Radio Only
• Press the LOAD button and then press the button with the corresponding number
(1–6) where the CD is being loaded. The radio will display PLEASE WAIT and prompt
when to INSERT DISC.
• After the radio displays INSERT DISC, insert the CD into the player. The radio display will show LOADING DISC when the disc is loading and “READING DISC” when the radio
is reading the disc.
• Press the eject button and then the cor responding number (1–6) to eject the desired
disc.
33
ELECTRONICS
Page 37 of 88

Clock Setting
• Turn the radio on, then press the Time button to access the Time Settings screen.
• Turn the CENTER CONTROL knob until USER TIME is highlighted, then press theJOYSTICK to select the USER TIME option.
• To adjust the hours, turn the CENTER CONTROL knob to highlight SET HOURS, then press the JOYSTICK to select the setting.
• Turn the CENTER CONTROL knob to adjust the hours, then press the JOYSTICK to save the setting.
• To adjust the minutes turn the CENTER CONTROL knob to highlight SET MINUTES, then press the JOYSTICK to select the setting.
• Turn the CENTER CONTROL knob to adjust the minutes, then press the JOYSTICK to save the setting.
Store Radio Presets
• Press the RADIO button to select the de sired AM, FM or SAT radio band.
• Find the station to store by either pressing the SEEK UP/DOWN buttons, or touch the SCAN button or rotate the TUNE knob to change the currently playing station.
• Once the station is found, press the SET button followed by a preset button (1–6). To store the current station in one of the presets 7–12, press the SET button twice
followed by a preset button (1–6).
Hard-Disc Drive Operation
Copy Complete Audio Disc To Hard-Drive
• Insert and select a disc, then press the MENU button.
• Select COPY DISC, then press the JOYSTICK to start the copy process.
Copying from USB
• Insert a USB device, then select IMPORT MUSIC.
• Check-mark the desired music, titles, folders or Select All.
• Highlight IMPORT SELECTED MUSIC, then press the JOYSTICK to start the copy process.
Copy pictures to the Hard-Drive
• Press the MENU button, then select the MY FILES function.
• Select MY PICTURES, then highlight ADD PICTURE and press the JOYSTICK.
• Select FROM DISC or FROM USB, then insert either a Disc or a USB devise.
• Select IMPORT PICTURES and press the JOYSTICK, then select the desired picture andpress the JOYSTICK to begin the copy process.
• Select YES to confirm your selection.
35
ELECTRONICS
Page 38 of 88

Navigation
• Navigation radios require digital data from a navigation database. The data in thenavigation database is licensed from Navigation Technologies®. Not all roads are
digitized.
• For software updates, visithttp://www.chrysler.com/en/owner s/mygig/ website, visit
http://www.navteq.com website, or contact your authorized dealer for the latest
available software.
NOTE: Many features of this radio are speed dependent. For your own safety, it is not
possible to use the predictive speller to enter a name (e.g., street name) while the
vehicle is in motion. Pull over at a safe location to complete your task.
• The Navigation system receives GPS signals from satellites to display the position of your vehicle.
New Destination
• Press the NAV button to access the navigation menu, then select DESTINATION ENTRY.
• Select NEW DESTINATION, then rotate the CENTER CONTROL knob and press theJOYSTICK to select to the destination of your choice.
Program/Storing Home Address
• Press the NAV hard-key to access the Navigation MAIN MENU.
• Rotate the CENTER CONTROL knob to highlight GUIDE ME HOME, then press theJOYSTICK to select.
• Rotate the CENTER CONTROL knob to highlight YES (only if home address has never been set) in the next screen and press the JOYSTICK to access the ENTER HOME
ADDRESS menu.
• Select STREET ADDRESS and press the JOYSTICK to confirm.
• Select INPUT STREET NAME and press the JOYSTICK to confirm, then enter your street name into the predictive speller.
• Select CONTINUE and enter your address into the predictive speller; then select
CONTINUE again.
• Select OK to save your home address.
• Change the Country or State or Province as required by highlighting and selecting the appropriate folder on the scr een and pressing LIST or entering the information into the
predictive speller, then press the JOYSTICK to confirm your selection.
ELECTRONICS
36
Page 39 of 88

Change Stored Home Address
• Press the MENU button, then select MY FILES.
• Select MY ADDRESS BOOK, then select the HOME folder.
• In the HOME folder select EDIT HOME to change and/or clear address.
• Select STREET ADDRESS and press the JOYSTICK to confirm.
• Select INPUT STREET NAME and press the JOYSTICK to confirm, then enter your streetname into the predictive speller.
• Select CONTINUE and enter your address into the predictive speller; then select
CONTINUE again.
• Select OK to save your home address.
Guide Me Home
• Press the NAV button to access the Navigation Main Menu.
• Rotate the CENTER CONTROL knob to highlight GUIDE ME HOME, then press the JOYSTICK to select and to route you back to your home destination from your current
location.
Map
• Press the NAV button to access the navigation MAIN MENU.
• Press the NAV button again to toggle between the navigation MAIN MENU and the navigation MAP.
37
ELECTRONICS